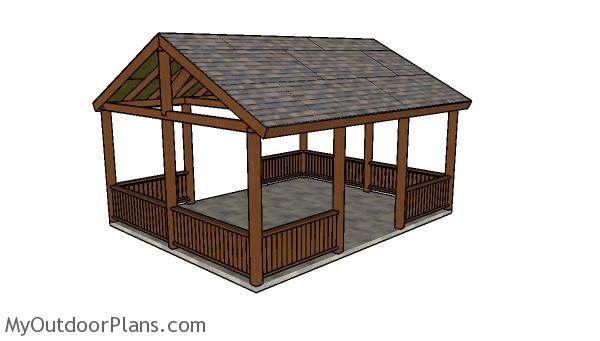
This step by step diy woodworking project is about how to build picnic shelter railings. This is PART 3 of the picnic shelter project, where I show you how to build the railings. Moreover, we recommend you to adjust the height and the design of the balusters as to fit the rest of the constructions on your property. Countersink the head of the screws and fill the holes with wood putty.
We strongly recommend you to build the components for the railings of the octagonal gazebo from quality materials, such as redwood, cedar or pine. Make sure you take accurate measurements and use a sharp saw to cut the components, otherwise they won’t lock together properly. See all my Premium Plans HERE.
Projects made from these plans
Building gazebo railing

Building-a-16×20-pavilion
Cut & Shopping Lists
- G – 2 pieces of 2×6 lumber – 87 3/4″ long, 2 pieces of 2×2 lumber – 87 3/4″ long, 19 pieces of 1×4 lumber – 28″ long 4xRAILS
- G – 2 pieces of 2×6 lumber – 72 3/4″ long, 2 pieces of 2×2 lumber – 72 3/4″ long, 16 pieces of 1×4 lumber – 28″ long 4xRAILS
- 36 pieces of 1×4 lumber – 10′
- 16 pieces of 2×6 lumber – 8′
- 16 pieces of 2×2 lumber – 8′
- 2 1/2″ screws
- 1 5/8″ screws
Tools
![]() Hammer, Tape measure, Framing square, Level
Hammer, Tape measure, Framing square, Level
![]() Miter saw, Drill machinery, Screwdriver, Sander
Miter saw, Drill machinery, Screwdriver, Sander
![]() Post hole digger, Concrete mixer
Post hole digger, Concrete mixer
Time
Related
- Part 1: 16×20 Picnic Shelter Plans
- Part 2: 16×20 Picnic Shelter Roof Plans
- Part 3: 16×20 Picnic Shelter Railings
How to Build Gazebo Railings

Building-the-railings—16×18-pavilion
Use 2×6 lumber for the top and bottom rails. Use 2×2 lumber for the cleats and 1×4 lumber for the slats. Use a wood block to create even gaps between the slats. Drill pilot holes through the cleats and insert 2 1/2″ screws to lock them to the rails.

Building-the-rails
Use 1 5/8″ screws to secure the 1×4 slats to the cleats

Fitting the railings
Drill pocket holes at both ends of the 2×6 rails and insert 2 1/2″ screws to lock them to the posts. Use a spirit level to make sure the railings are horizontal.

16×20 Pavilion Plans
Last but not least, you have to take care of the final touches. Check if the components are locked together tightly and if the screws are at the same level with the wooden surface.
Top Tip: Fill the holes with wood putty and sand the surface with medium-grit sandpaper, along the wood grain. Cover the wooden components with paint, in order to protect them from decay and to enhance the look of the gazebo.
This woodworking project was about how to build picnic shelter railings. If you want to see more outdoor plans, we recommend you to check out the rest of our step by step projects. LIKE us on Facebook to be the first that gets our latest updates and submit pictures with your DIY projects.


