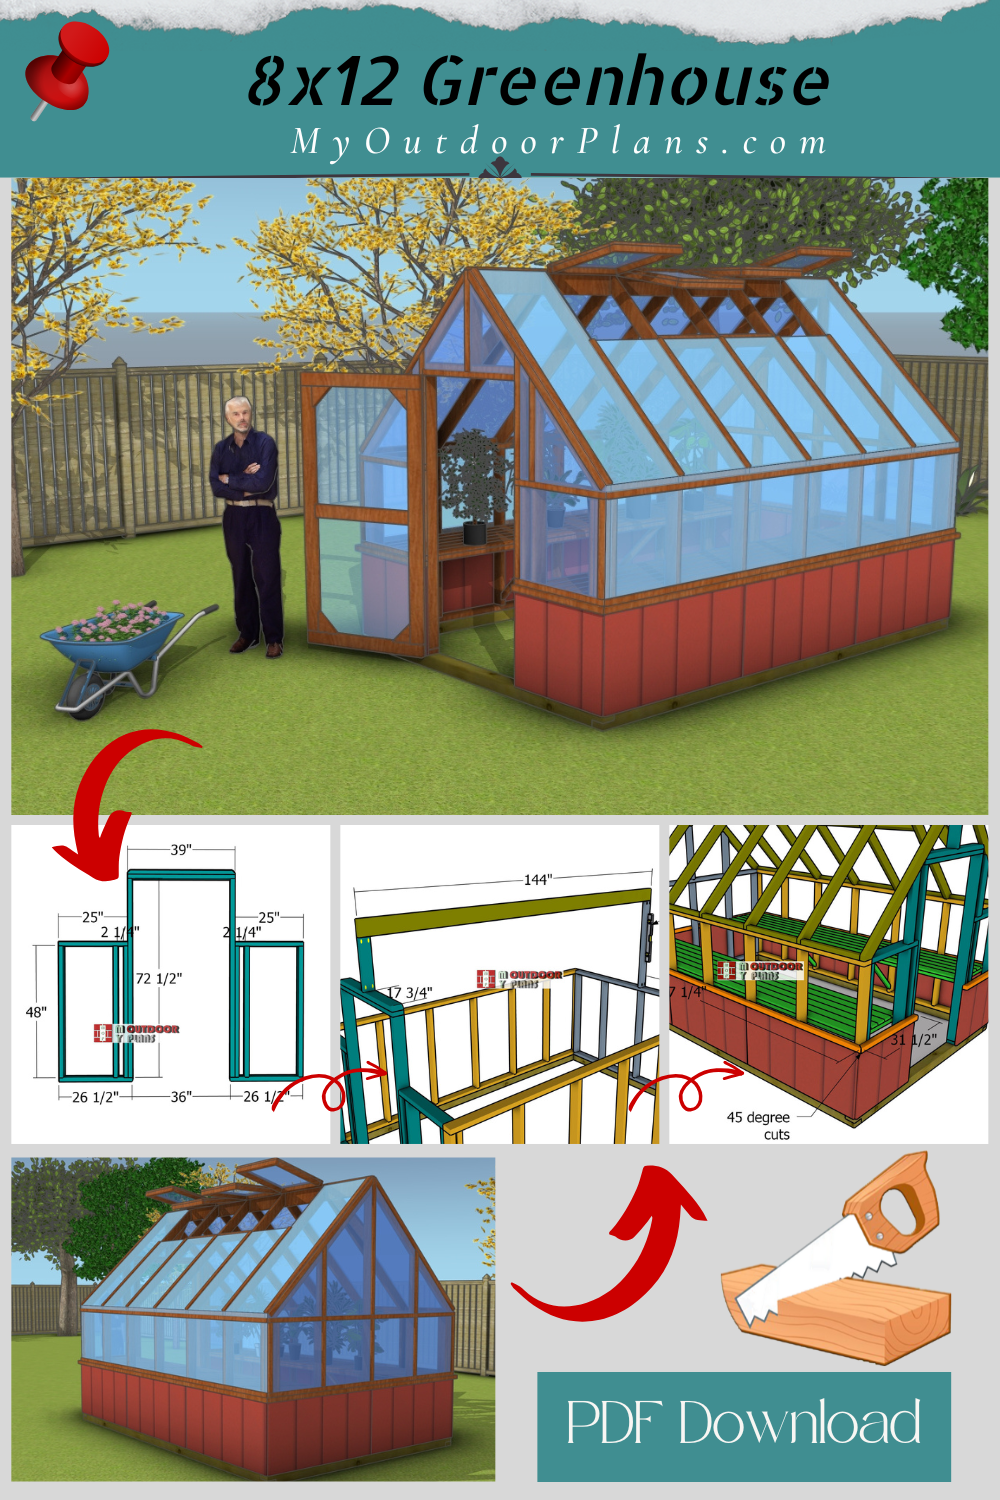
Building your own greenhouse is a rewarding project that brings both functionality and beauty to your backyard. These DIY 8×12 gable greenhouse plans feature a classic gable roof, a convenient front door, and four vents for optimal airflow, perfect for creating a controlled environment for your plants. Designed with durability and simplicity in mind, this greenhouse is built on a sturdy 2×4 frame with easy-to-follow steps that make it achievable for DIY enthusiasts. Whether you’re starting seeds, extending your growing season, or cultivating exotic plants, this greenhouse is a versatile addition to any garden.
The estimated time to complete this 8×12 greenhouse as a DIY project is approximately 7 workdays if working 8-hour days. The total cost for materials is estimated to be around $1,500, depending on local prices and any tools or materials you may already have on hand. This project is a manageable yet rewarding challenge for DIY enthusiasts, offering a chance to hone your skills while creating a functional and beautiful structure. With thoughtful planning and step-by-step execution, building this greenhouse is not only achievable but also an investment in your gardening passion. Plus, the satisfaction of creating your own controlled growing space makes the effort truly worthwhile! Take a look over the rest of my woodworking plans, if you want to get more building inspiration.
When buying the lumber, you should select the planks with great care, making sure they are straight and without any visible flaws (cracks, knots, twists, decay). Investing in cedar or other weather resistant lumber is a good idea, as it will pay off on the long run. Use a spirit level to plumb and align the components, before inserting the galvanized screws, otherwise the project won’t have a symmetrical look. If you have all the materials and tools required for the project, you could get the job done in about a day.
Projects made from these plans
DIY 8×12 Greenhouse Plans – PDF Download Plans
Building-a-8×12-greenhouse
Cut and Shopping Lists
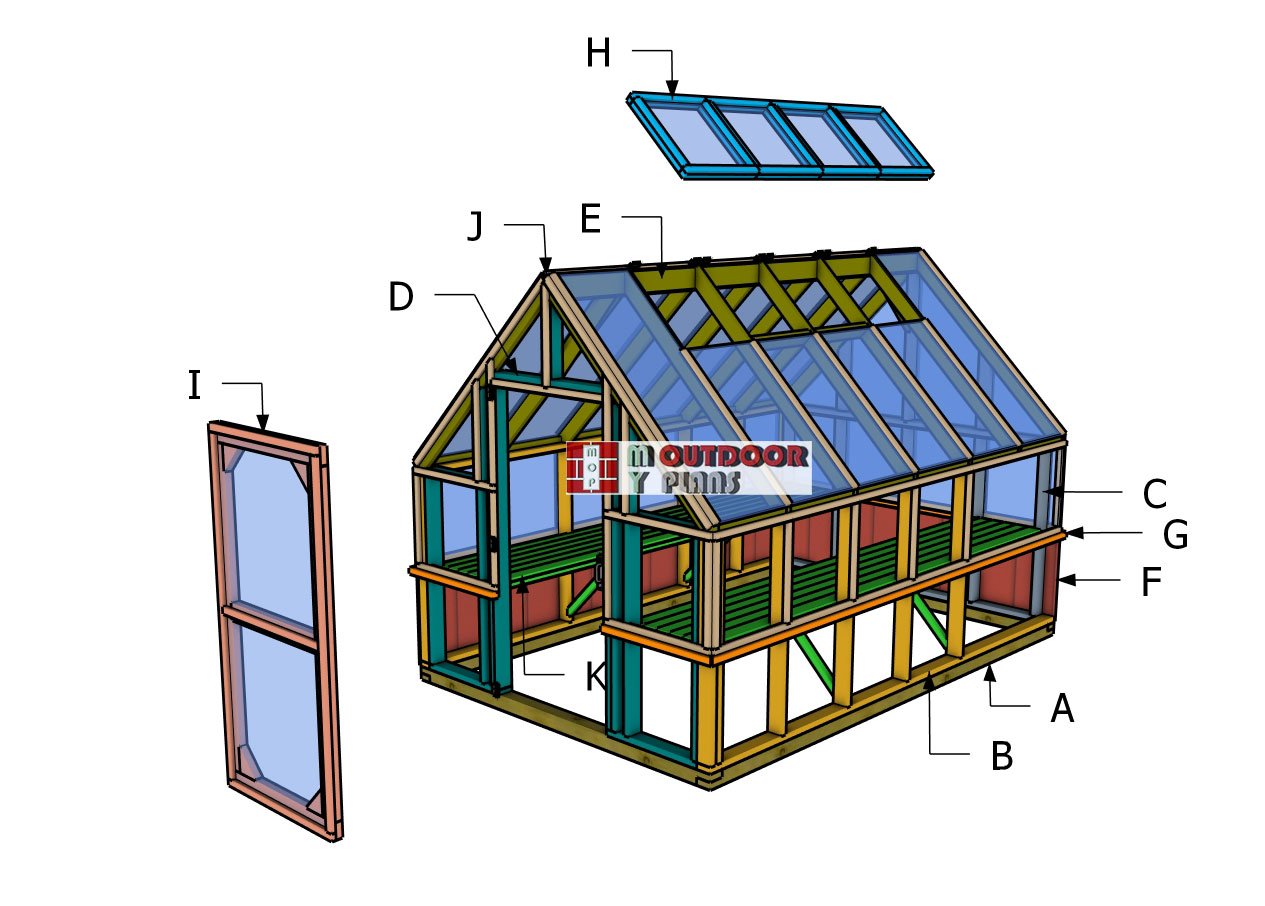
A – SKIDS – 2 pieces of 4×4 lumber – 8 ft, 2 pieces – 12 ft
B – 2xSIDE WALL – 2 pieces of 2×4 lumber – 12 ft, 7 pieces – 48”
C – BACK WALL – 2 pieces of 2×4 lumber – 89”, 5 pieces – 48”, 2 pieces – 22 1/4″
D – FRONT WALL – 2 pieces of 2×4 lumber – 26 1/2”, 2 pieces – 25″, 2 pieces – 39″, 2 pieces – 72 1/2″, 6 pieces – 48″, 2 pieces – 22 1/4″
E – RIDGE BEAM – 1 piece of 2×6 lumber – 12 ft, 1 piece of 2×4 lumber – 17 1/4″, 1 piece – 43 1/4″, 2 pieces – 24″
E – RAFTERS – 14 pieces of 2×4 lumber – 67 3/4″, 4 pieces of 2×2 lumber – 21 3/4″, 8 pieces – 22 1/2″
F – SIDING – 8 pieces of 5/8″ T1-11 siding – 4’x2′, 2 pieces – 30″x24″
G – SIDING TRIMS – 2 pieces of 2×2 lumber – 147 1/4″, 2 pieces – 31 1/2″, 1 piece – 99″
- 4×4 PT lumber 8 ft – 2 pieces
- 4×4 PT lumber 12 ft – 2 pieces
- 2×4 lumber 8 ft – 16 pieces
- 2×4 lumber 10 ft – 7 pieces
- 2×4 lumber 12 ft – 11 pieces
- 2×6 lumber 12 ft – 1 piece
Tools
![]() Hammer, Tape measure, Framing square, Level
Hammer, Tape measure, Framing square, Level
![]() Miter saw, Drill machinery, Screwdriver, Sander
Miter saw, Drill machinery, Screwdriver, Sander
![]() Safety Gloves, Safety Glasses, Pocket hole jig
Safety Gloves, Safety Glasses, Pocket hole jig
Time
Related
- PART 1: 8×12 Greenhouse Plans
- PART 2: 8×12 Greenhouse Plans – Part II
- 8×10 Lean to Greenhouse Plans
- 10×16 Gable Greenhouse Plans
DIY greenhouse plans!
It’s that easy to build a modern greenhouse!
Step 1: Building the base
Laying out the shed location
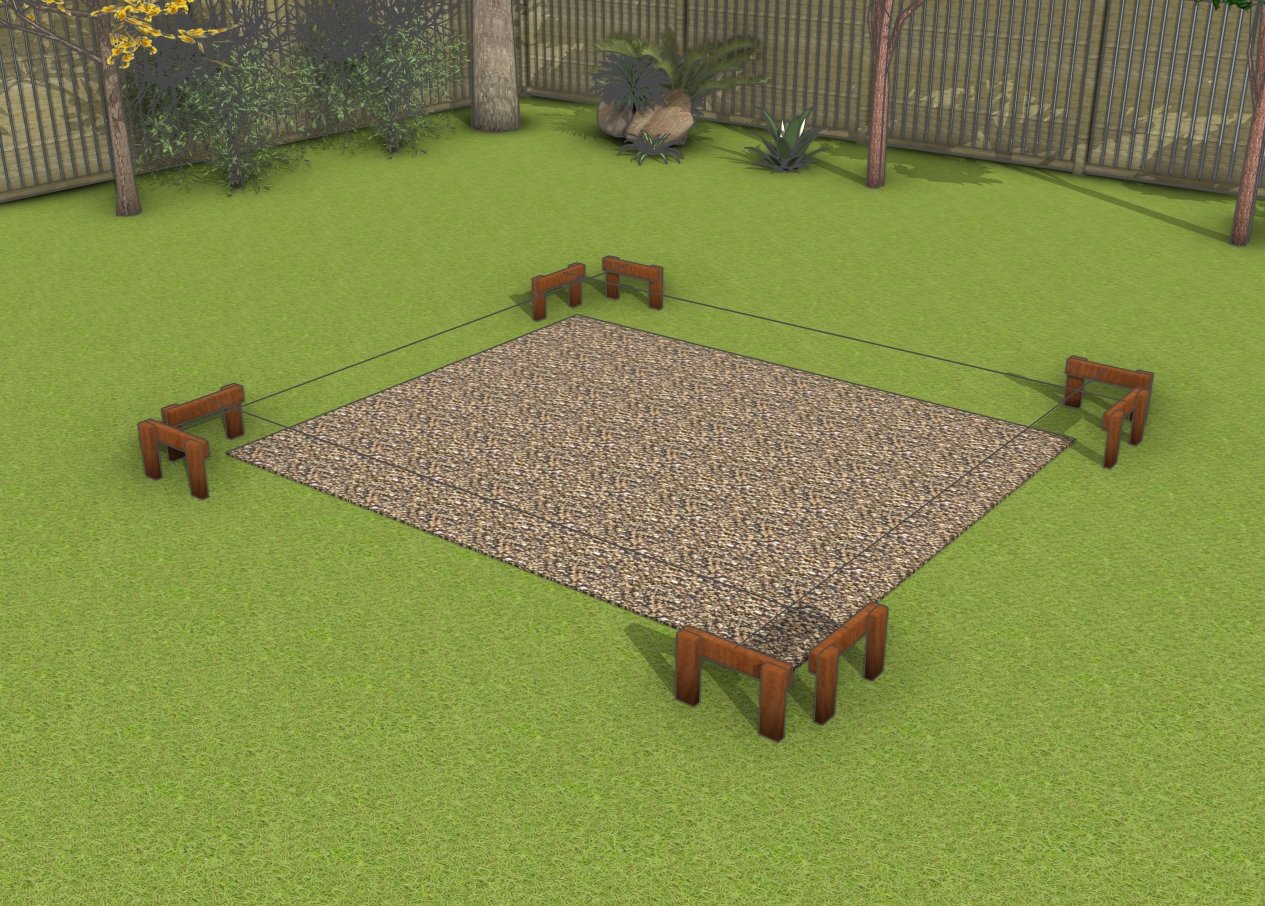
Choosing the right location for your greenhouse is crucial for its success, as most plants thrive with abundant direct sunlight. Opt for a spot with maximum exposure to the south, ideally where it can receive at least 6-8 hours of sunlight daily. Avoid areas with tall trees or structures that might cast shadows during peak sunlight hours.
Once you’ve selected the location, thoroughly level the surface to ensure a stable foundation. A properly leveled base prevents structural issues, improves drainage, and makes assembly easier, setting the stage for a productive and long-lasting greenhouse.
Skids
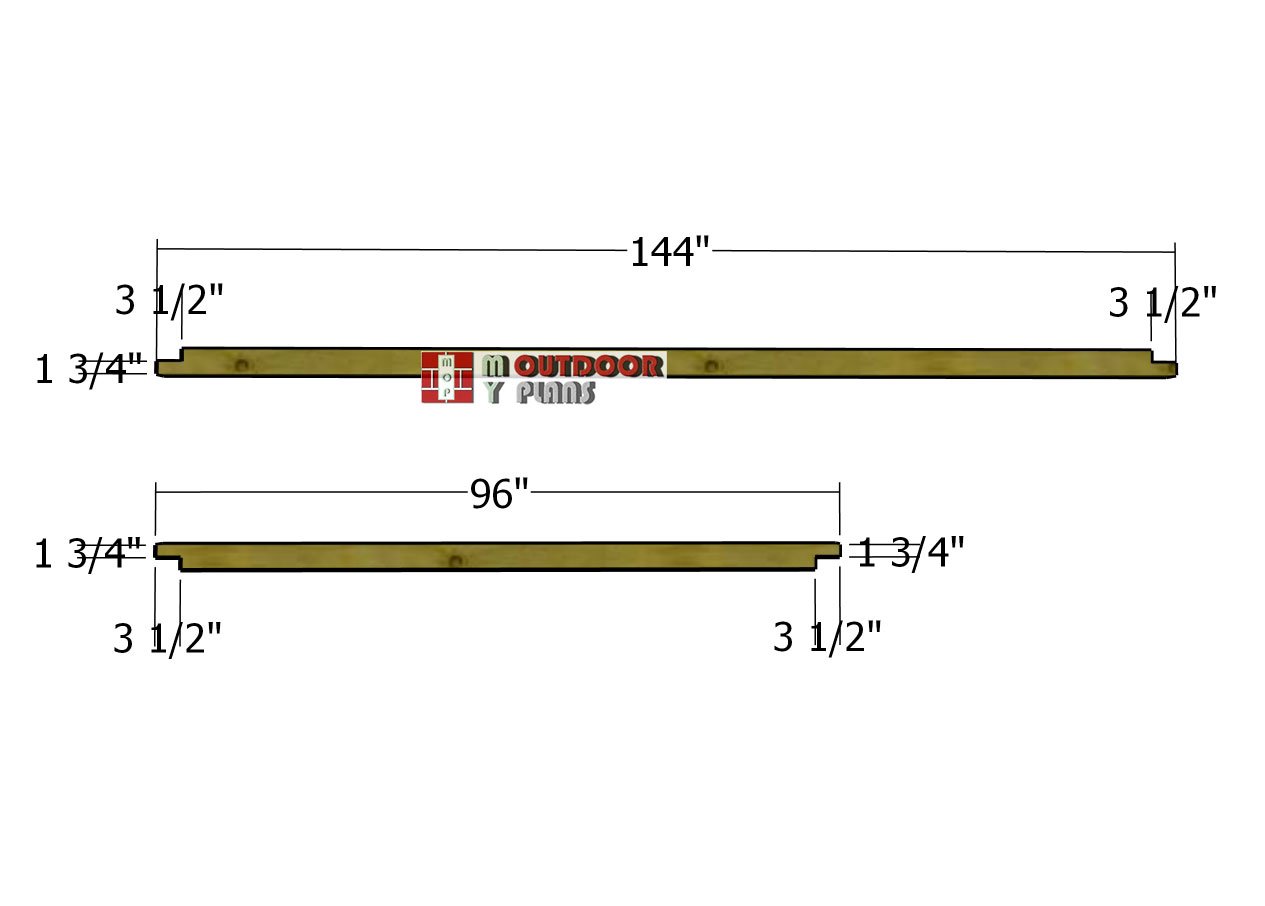
For the skids, opt for 4×4 pressure-treated beams as they’re built to withstand moisture, ensuring your structure’s durability. To create notches at both ends of the beams, set your circular saw blade depth to 1 3/4″.
Make multiple parallel cuts within the marked area, then use a chisel to remove the excess wood. Once cleared, smooth the recess with the chisel for a clean and precise finish. This method ensures a strong and accurate fit for the foundation of your project.
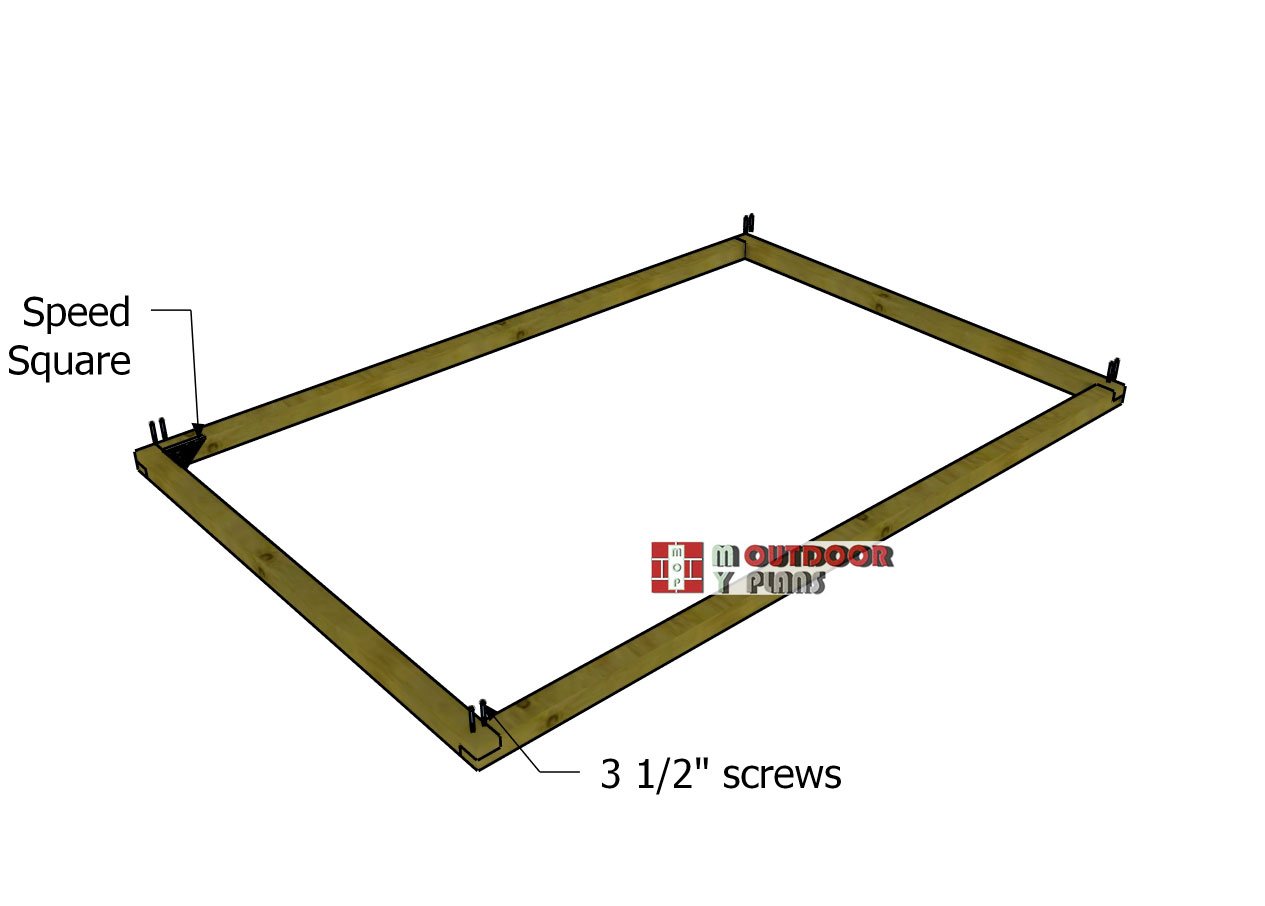
Assembling-the-skids
Lay the beams in place, aligning the corners carefully for a solid foundation. Drill pilot holes at the joints and fasten them with 3 1/2″ screws to lock everything securely. Check that the corners are square by using a speed square and ensuring the diagonals are equal—accuracy here is key for a stable structure.
For added stability in windy areas, fit 2×3 stakes along the side skids and drive them into the ground until they’re flush with the beams. Secure the stakes to the skids using 2 1/2″ screws. This simple anchoring method effectively stabilizes the greenhouse, but be sure to adjust the depth of the skids based on the wind conditions in your area. Alternatively, consider using a greenhouse anchoring kit for even more secure options tailored to your specific needs.
Step 2: Building the wall frames
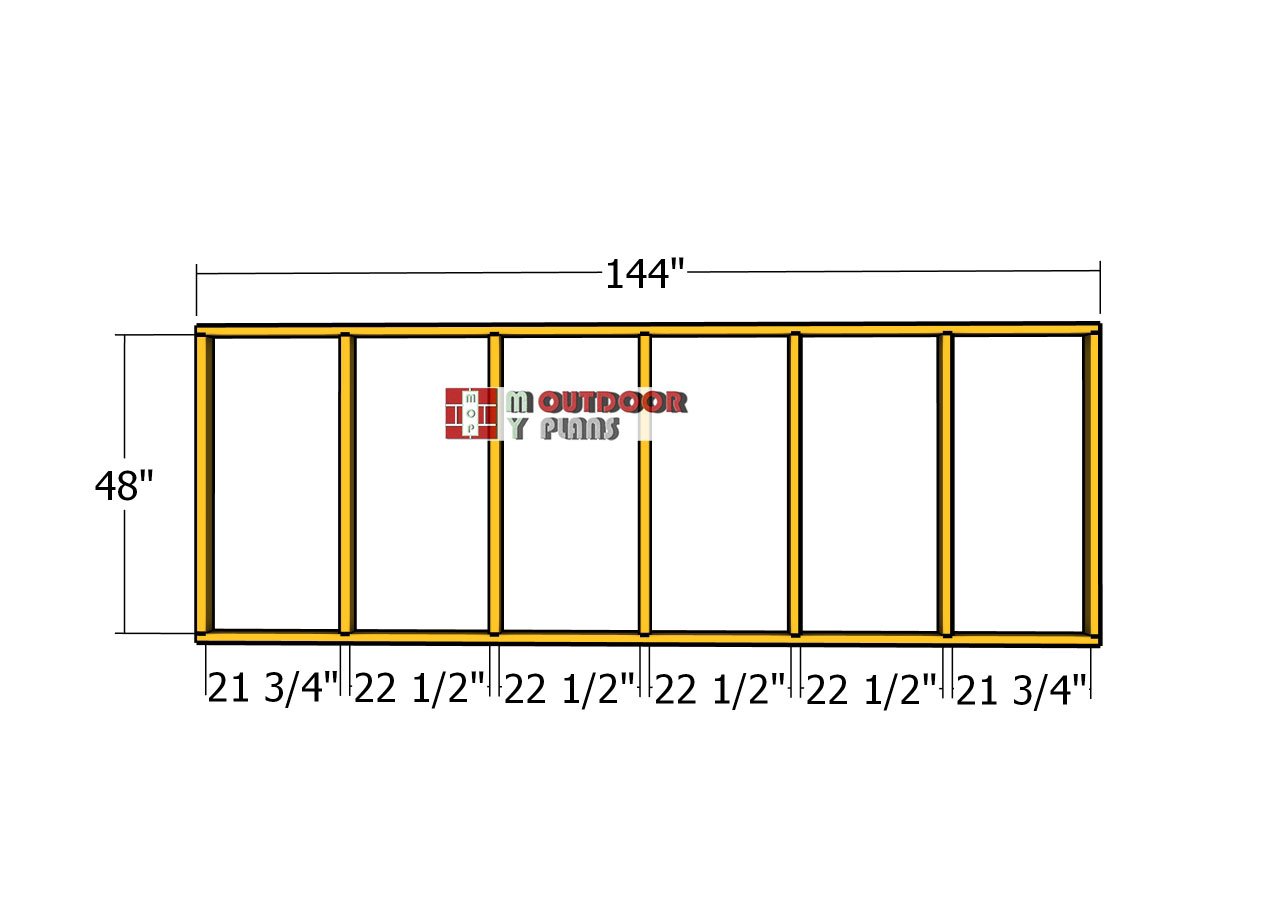
Side wall frame
Frame the side walls using 2×4 lumber for strength and durability. Drill pilot holes through the top and bottom plates, then secure the studs using 3 1/2″ screws. Position the studs 24 inches on center, aligning their edges carefully for a precise fit. Use a speed square to ensure the corners are perfectly square, as this will guarantee a sturdy and well-aligned structure for your greenhouse. Attention to detail here will pay off in the long run!
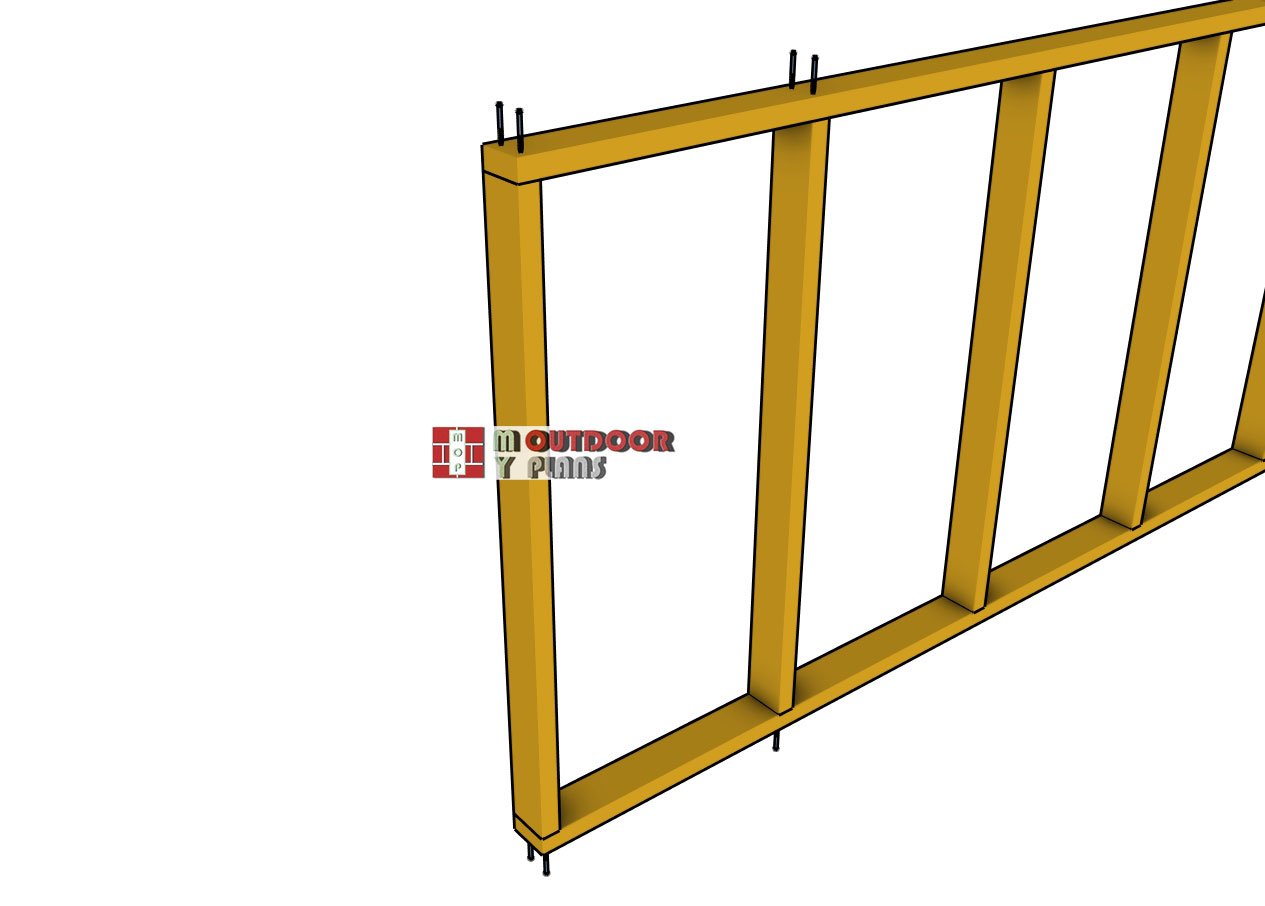
Detail—wall-frame
A crucial detail when assembling the wall frames is how you insert the screws. Always drill pilot holes before driving in the screws, this simple step prevents the wood from splitting and ensures a cleaner, stronger connection. It’s a small effort that makes a big difference in the durability and precision of your greenhouse structure.
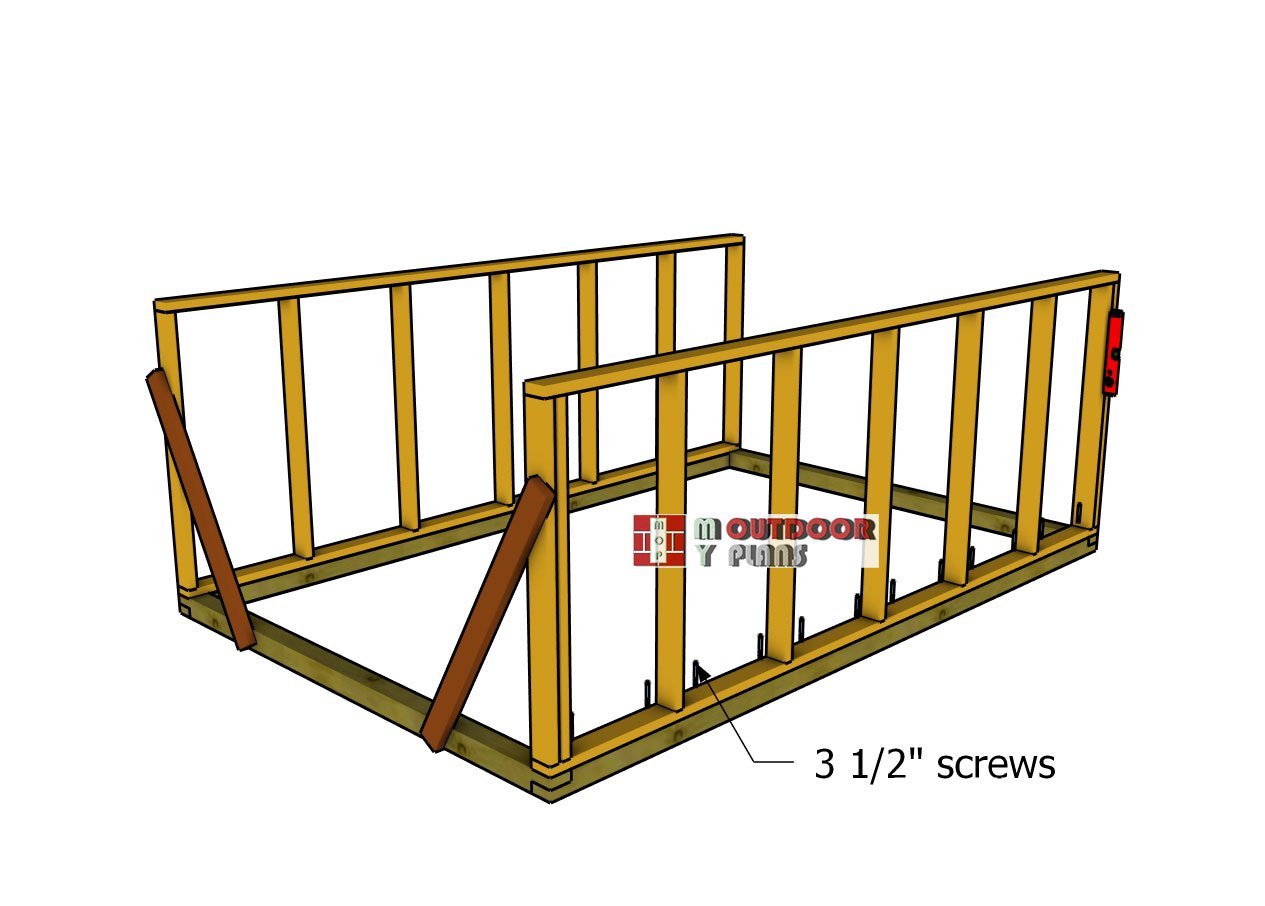
Fitting-the-side-walls
Attach the side walls to the skids, ensuring the edges are perfectly flush for a seamless fit. Use a spirit level to plumb the wall frames, making sure they are perfectly vertical. Temporarily secure the walls in place with braces to hold them steady during installation. Drill pilot holes through the bottom plates and drive 3 1/2″ screws into the skids to firmly anchor the walls. Taking the time to align and level everything now ensures a strong, stable structure for your greenhouse.
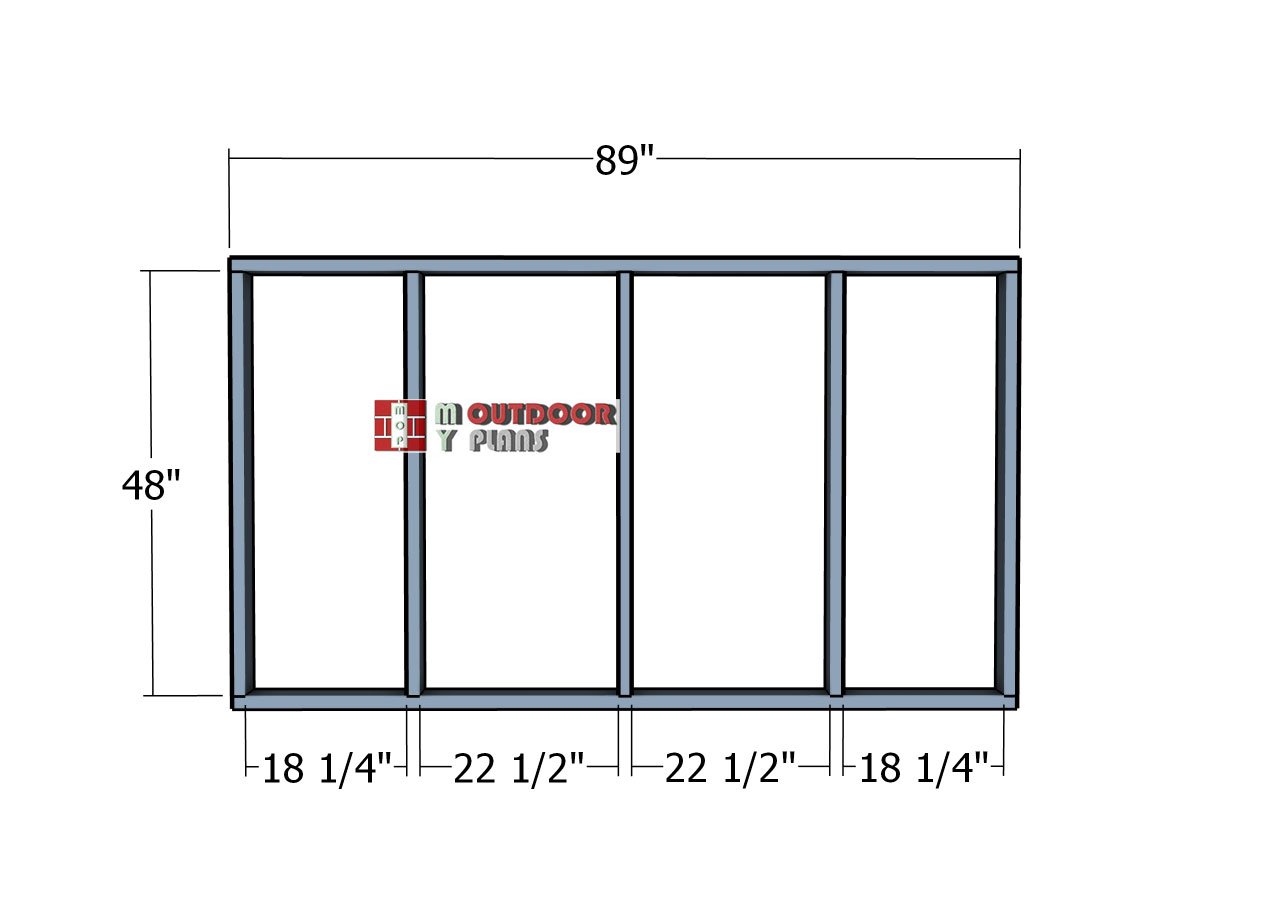
Back-wall-frame
Next, move on to assembling the back wall. Use 2×4 lumber for the frame and secure the pieces together with 3 1/2″ screws. As with the other walls, drill pilot holes before driving in the screws to prevent splitting and ensure strong connections.
Take your time to align the edges carefully and check that the corners are square for a precise and sturdy frame. This step sets the foundation for a well-built and reliable back wall for your greenhouse.
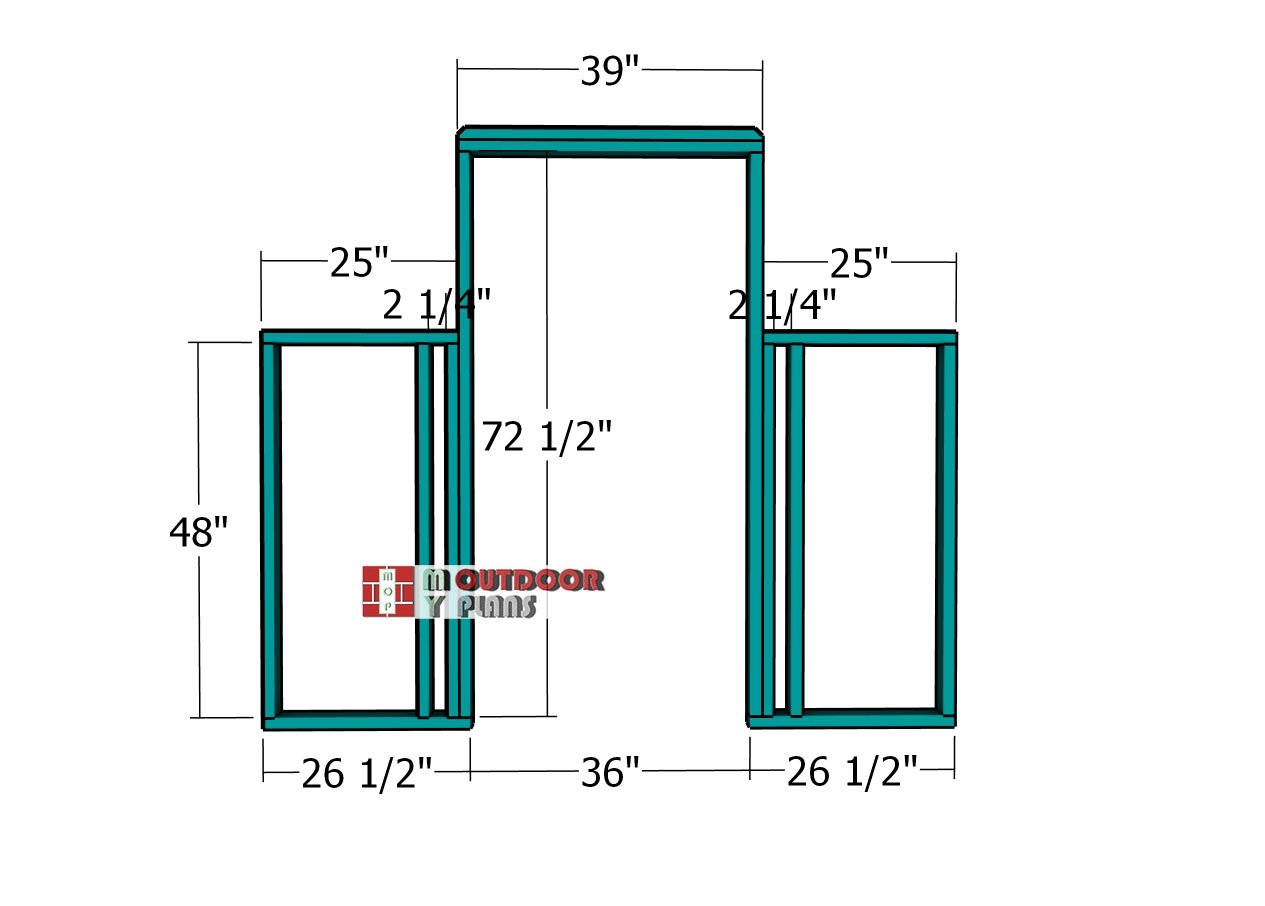
How-to-build-a-front-wall-frame
Assemble the front wall of your 8×12 gable greenhouse using 2×4 lumber for a sturdy frame. Drill pilot holes to prevent splitting, then secure the studs to the top and bottom plates with 3 1/2″ screws.
Use two screws per joint to create strong, reliable connections. Take care to align all edges precisely and ensure the corners are square for a professional finish that will provide a solid foundation for the rest of the structure.
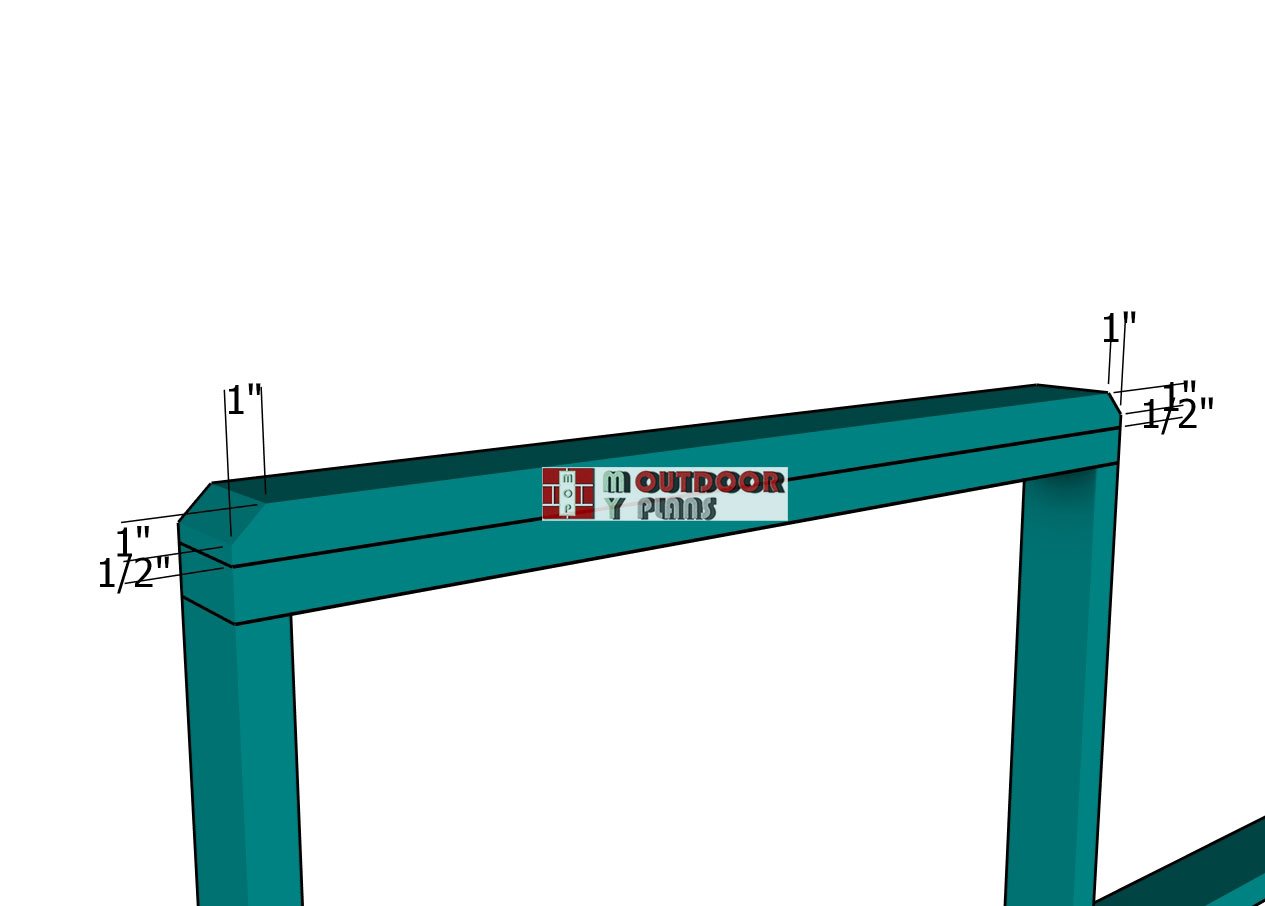
Top-double-board
Pay attention to the double header for the door opening, a key element for added strength and stability. Use a saw to cut 45-degree angles at both ends of the double plate for a precise fit. Apply outdoor glue along the joints to enhance the connection, ensuring a tight and secure bond.
Secure the header into place with 2 1/2″ screws, spaced every 8 inches along the length. This combination of screws and glue creates a rock-solid structure that will stand up to the demands of your greenhouse.
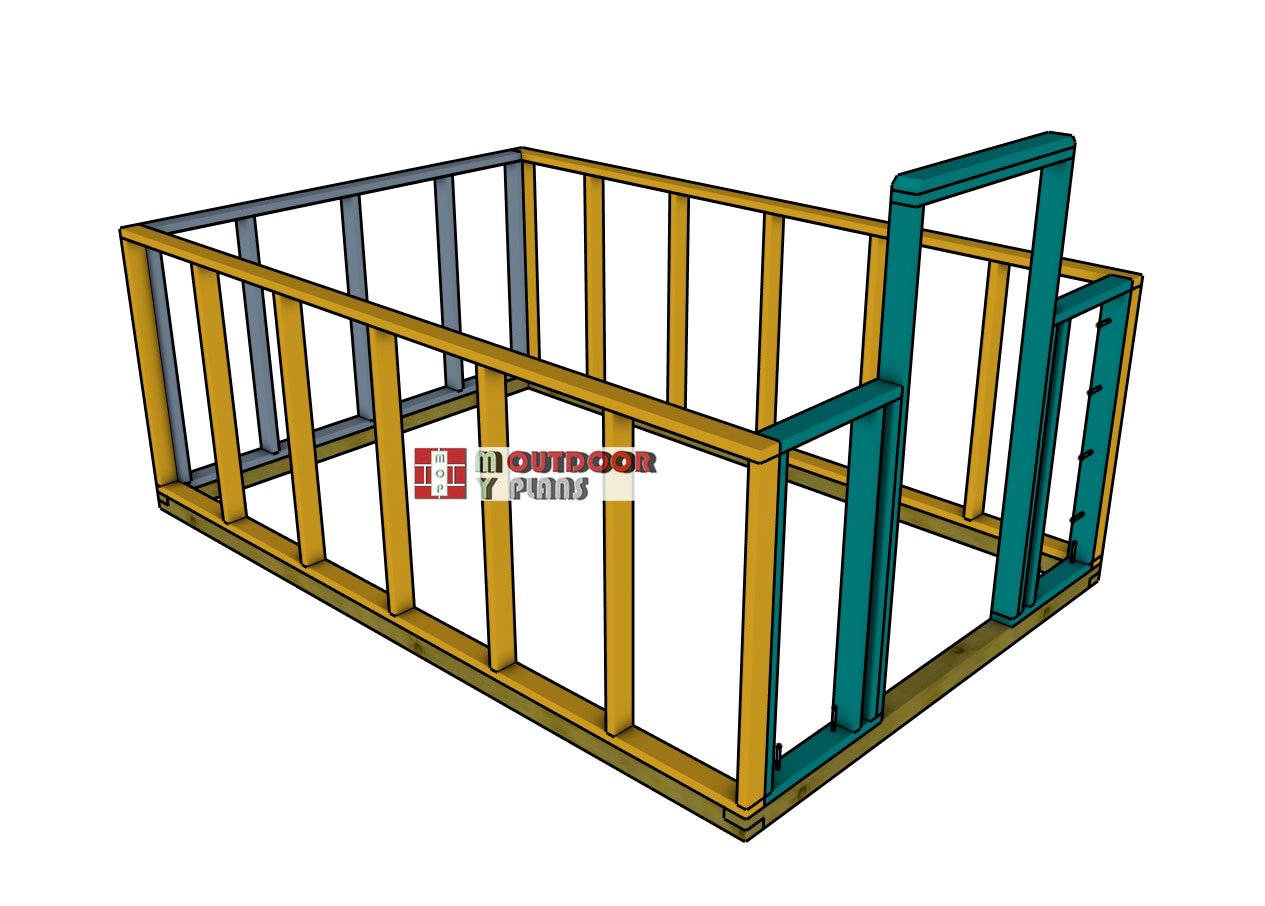
Assembling-the-frame-of-the-greenhouse
Lift the front and back wall frames onto the base of the greenhouse and use a spirit level to plumb them, ensuring they are perfectly vertical. Drill pilot holes through the base plates and secure the frames to the base with 3 1/2″ screws for a firm connection.
Next, drill pilot holes and drive 3 1/2″ screws into the adjacent walls to lock them tightly together. Double-check that the corners are square and the edges are flush for a seamless and sturdy assembly. Proper alignment here ensures a solid foundation for the rest of your greenhouse build.
Step 3: Building the greenhouse roof
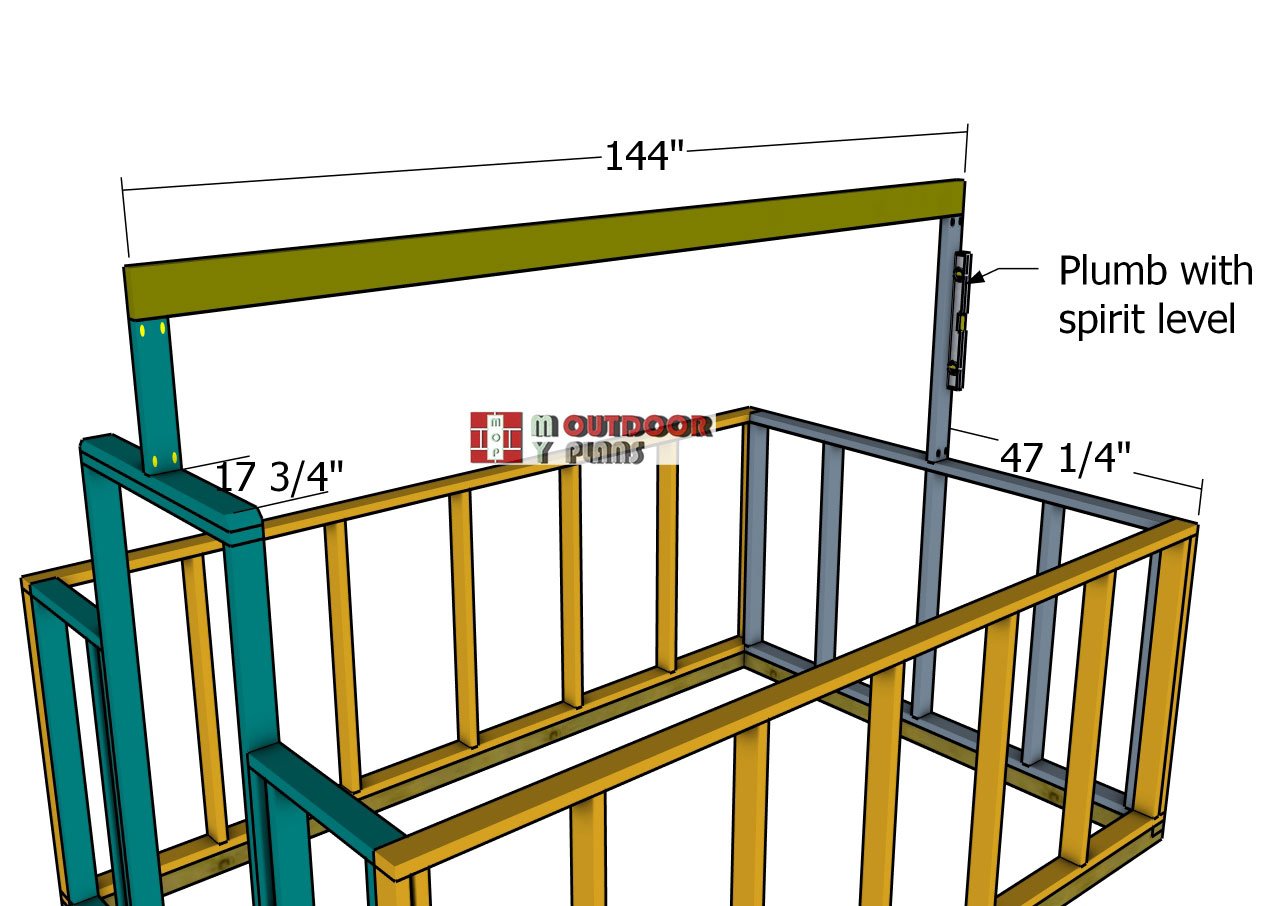
Fitting-the-ridge-beam
Install the 2×4 ridge beam supports at the center of the front and back walls, ensuring they are plumb using a spirit level. Secure the supports firmly with 1 1/2″ structural screws and A88 strong tie connectors for a reliable connection. Once the supports are in place, attach the ridge beam using L ties and 1 1/2″ structural screws.
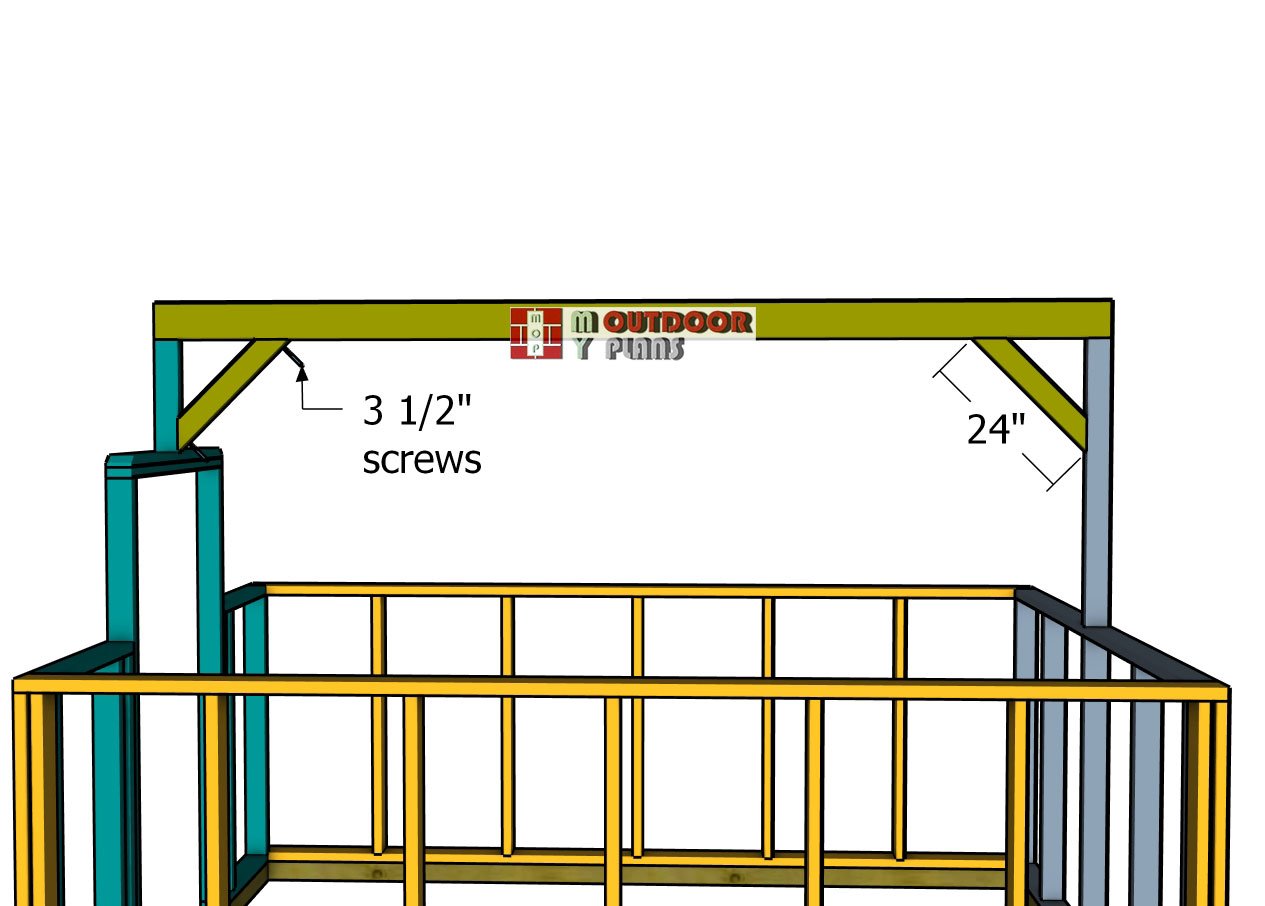
Braces-for-ridge-beam
Cut the diagonal braces to size with 45-degree angles at both ends for a precise fit. Position them on the roof structure, ensuring they are snug and align perfectly with the frame.
Drill pilot holes at each joint to prevent the wood from splitting, then secure the braces with two 3 1/2″ screws per joint. These braces add critical stability to the roof, reinforcing the overall structure of your greenhouse.
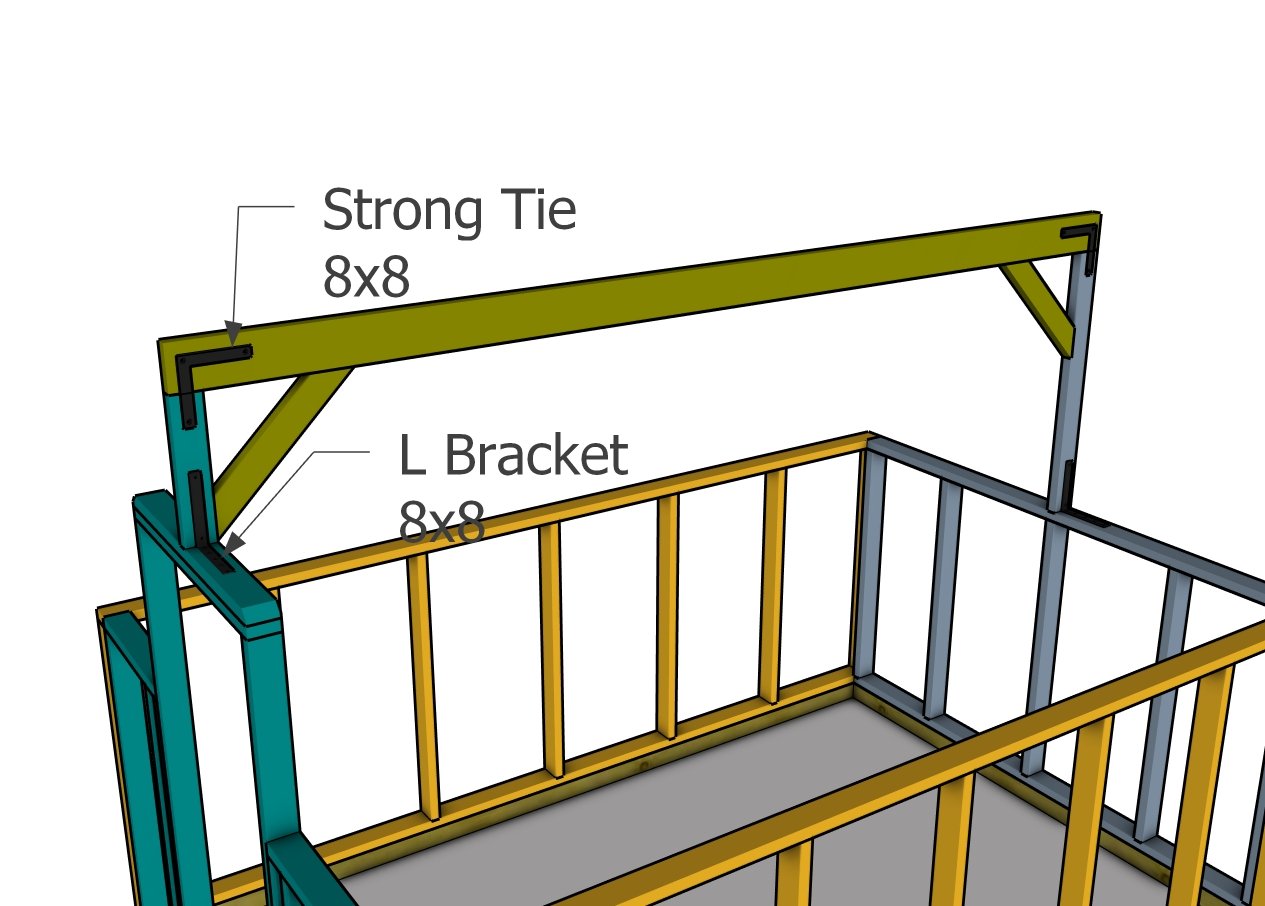
Hardware for ridge beam
Take a close look at the detail diagram for the proper installation of the hardware pieces. Position the ties on both sides of the joints to distribute the load evenly and reinforce the connections.
Secure the ties with the recommended screws, following the spacing shown in the diagram. This step ensures a durable and sturdy structure, providing long-lasting support for your greenhouse.
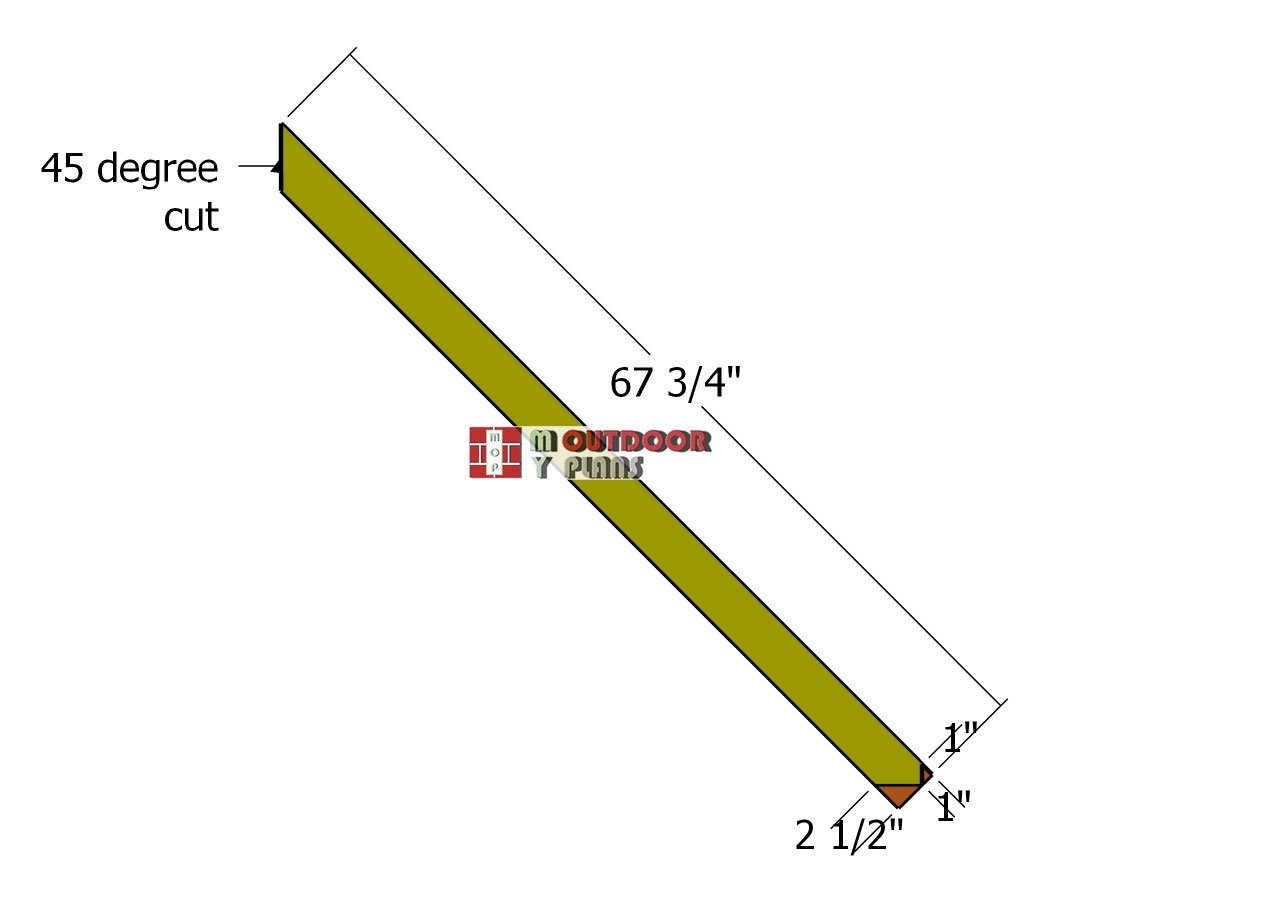
Rafters
Construct the rafters using 2×4 lumber for a strong and reliable roof structure. Begin by making 45-degree cuts on one end of each rafter using a miter saw for precision.
On the opposite ends, mark the cut lines according to your measurements and complete the cuts with a saw. Once all cuts are made, smooth the edges with sandpaper to remove splinters and ensure a clean, professional finish.
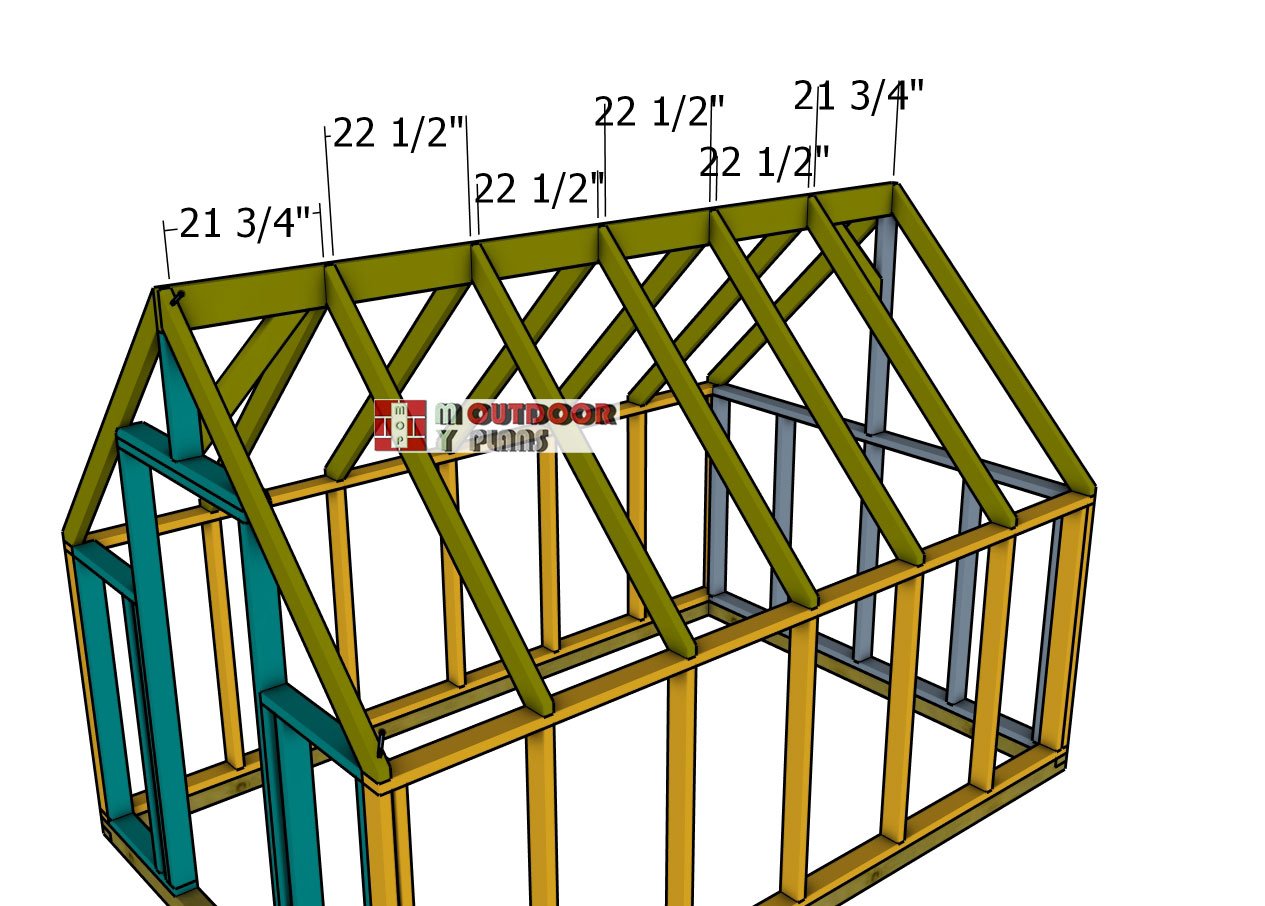
Attaching-the-rafters
Attach the rafters to the top of the greenhouse, spacing them 24 inches on center (OC) for consistent support and alignment. Drill pilot holes at each connection point to prevent the wood from splitting, then secure the rafters with 3 1/2″ screws. Ensure the rafters are evenly spaced and properly aligned for a strong and stable roof structure that will support your greenhouse effectively.
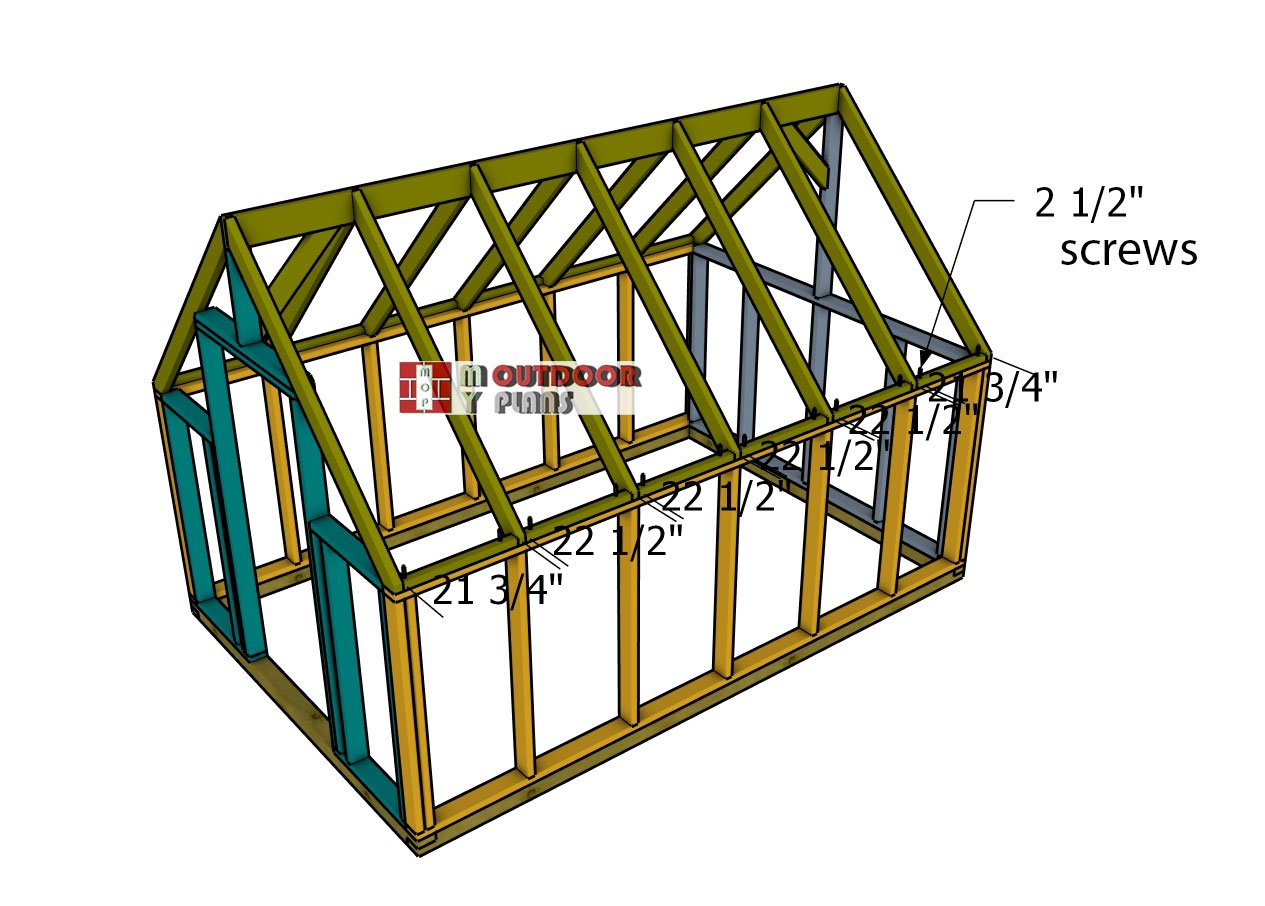
Rafter-blockings
Install the 2×2 blockings between the rafters to enhance stability and prevent lateral movement. Position the blockings snugly between each pair of rafters and drill pilot holes to avoid splitting.
Secure each blocking with at least two 2 1/2″ screws, driving them into the rafters and the greenhouse frame for a tight, durable connection. This step reinforces the roof structure, ensuring long-term strength and reliability.
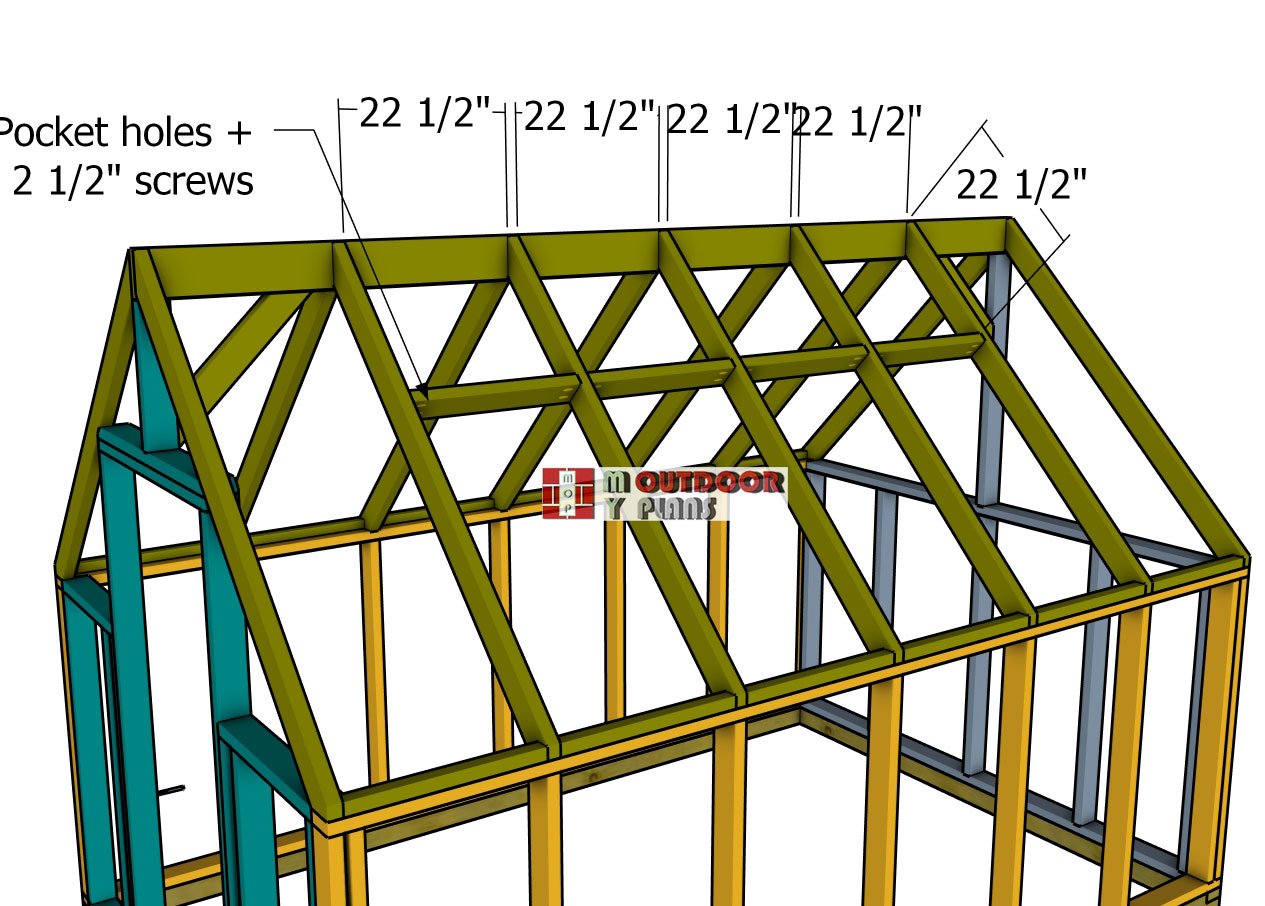
Vent–supports
Attach the 2×4 lumber for the vent supports. Drill pocket holes at both ends of the supports and lock them to the rafters, as well. Adjust the location of the supports according to the size of the vents.
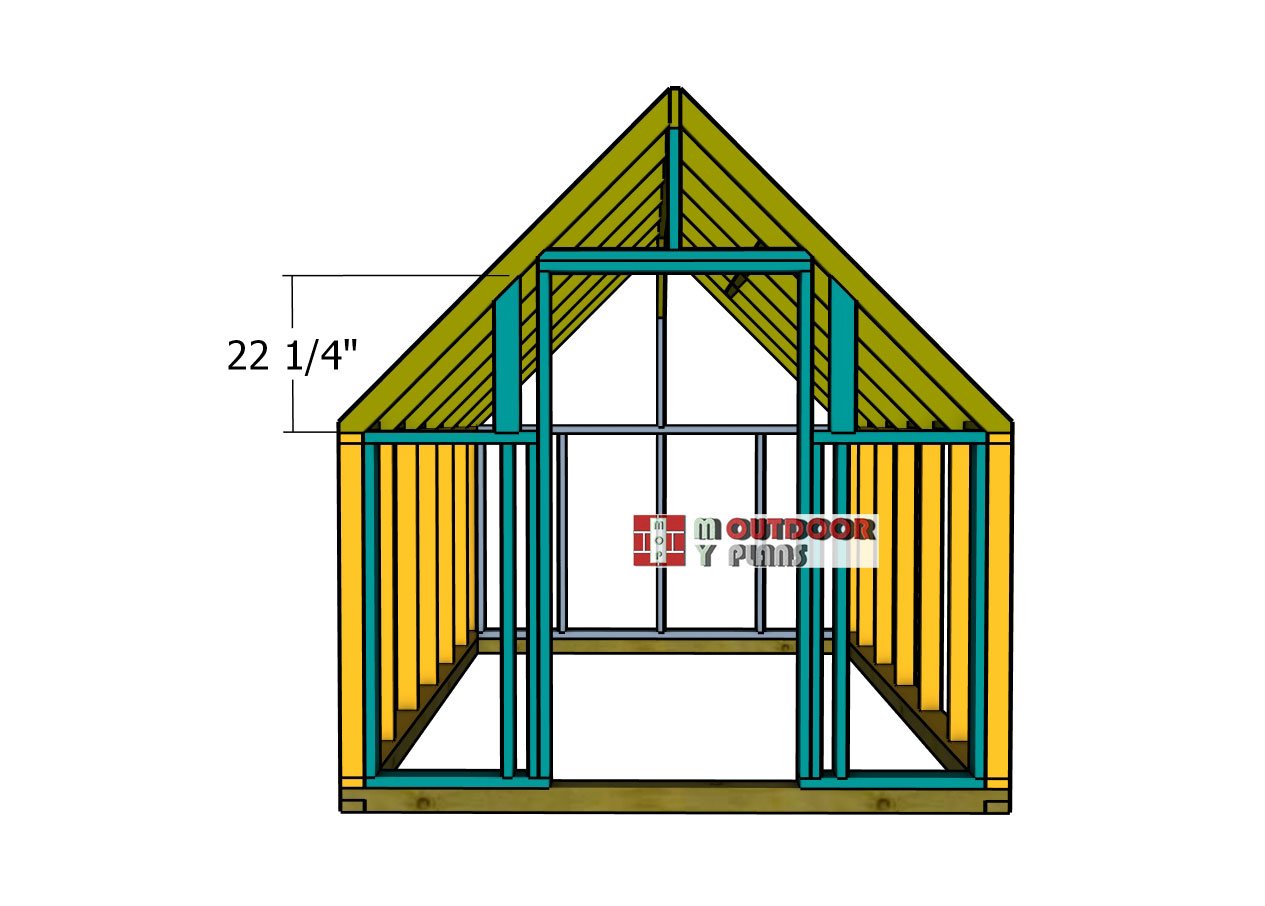
Front-wall-supports
Construct the gable end supports using 2×4 boards for added strength and stability. Cut one end of each support at a 45-degree angle using a miter saw for a precise fit.
Attach the supports to the framing using pocket holes and secure them with 2 1/2″ screws. This method creates a strong, clean connection, ensuring the gable ends are well-supported and integrated into the overall structure of the greenhouse.
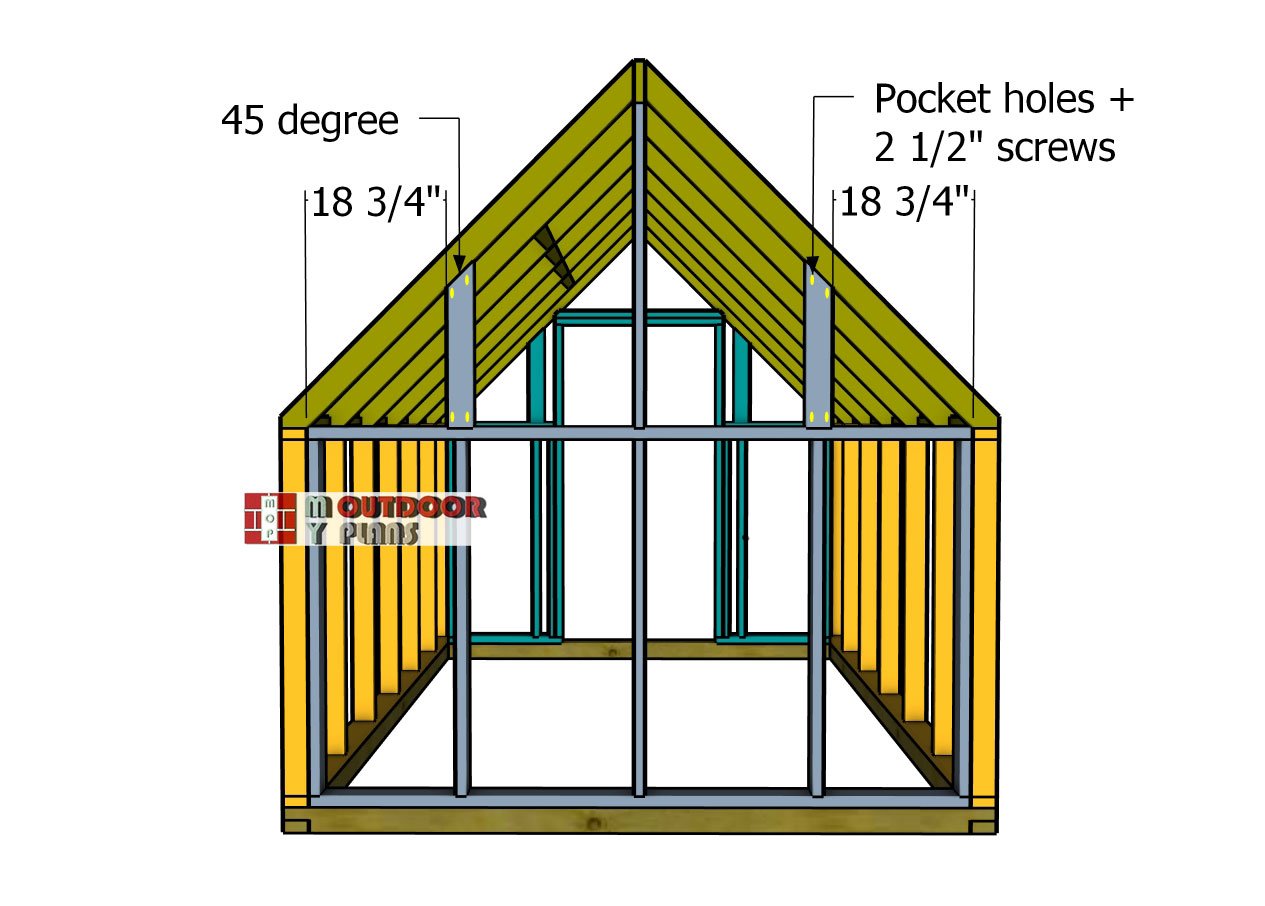
Back-wall-supports
Attach the 2×4 supports to the back end of the greenhouse as well, mirroring the process used for the front. Ensure the supports are properly aligned and secured to the framing with pocket holes and 2 1/2″ screws. This step reinforces the entire structure, providing balanced support and stability for the greenhouse’s roof and walls.
Step 4: Fitting the siding panels
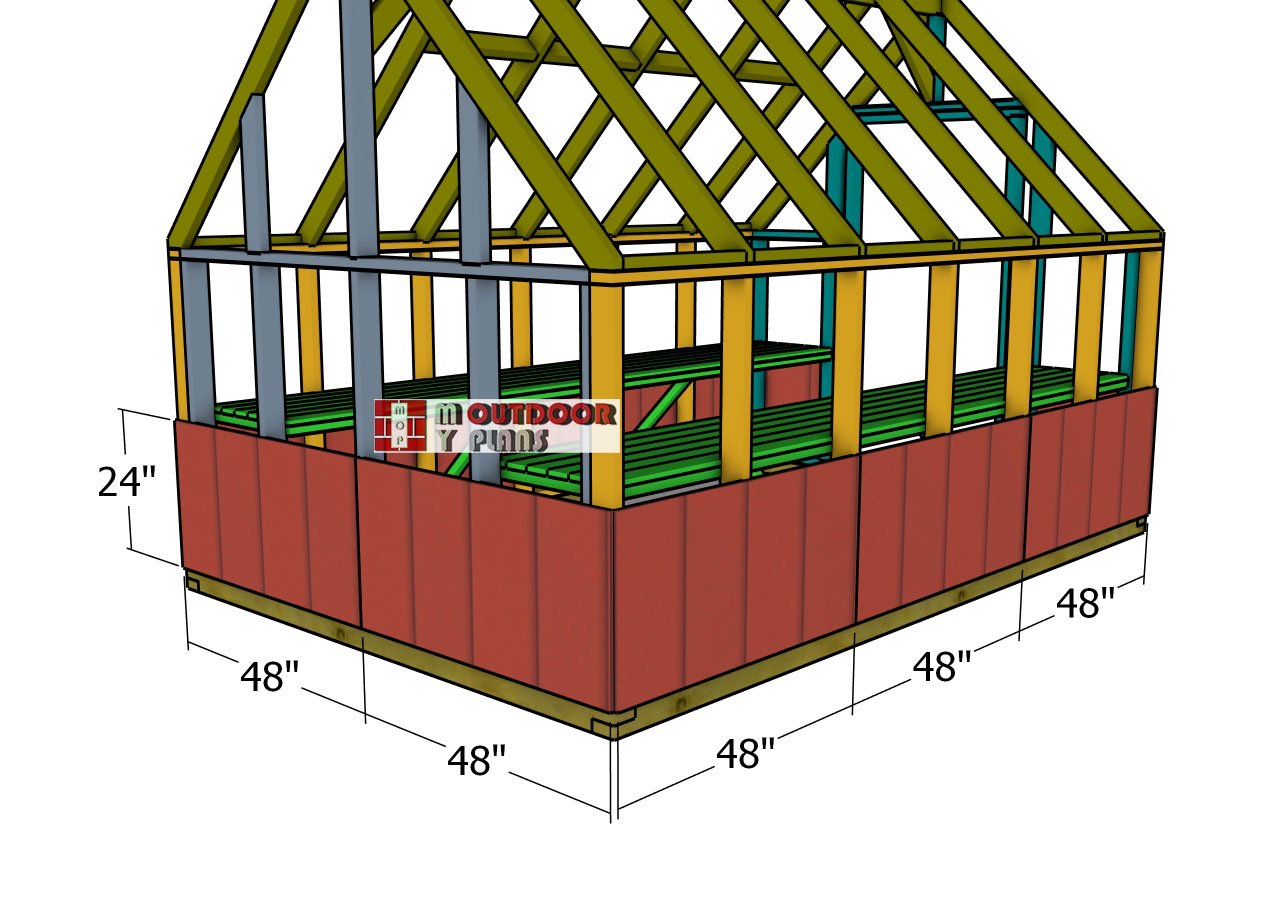
Attaching-the-siding-sheets
This step is optional, but it comes with lots of advantages. Therefore, add T1-11 siding panels to the base of the greenhouse. Cut the panel height to 24″ and then secure them into place with 8d nails, every 8″ along the framing. Align the edges flush and leave no gaps between the panels.
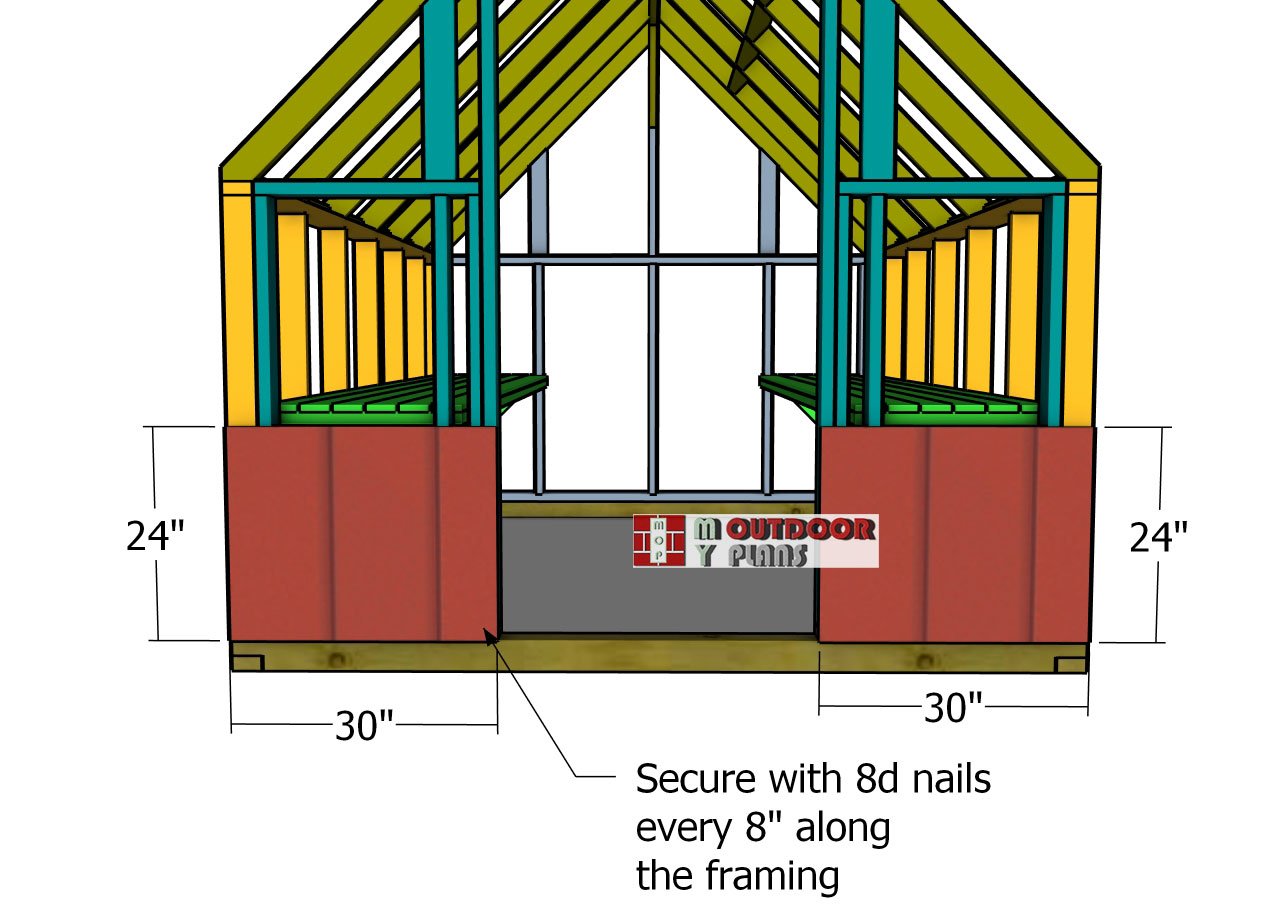
Front-siding-sheets
Repeat the process for the front of the greenhouse.
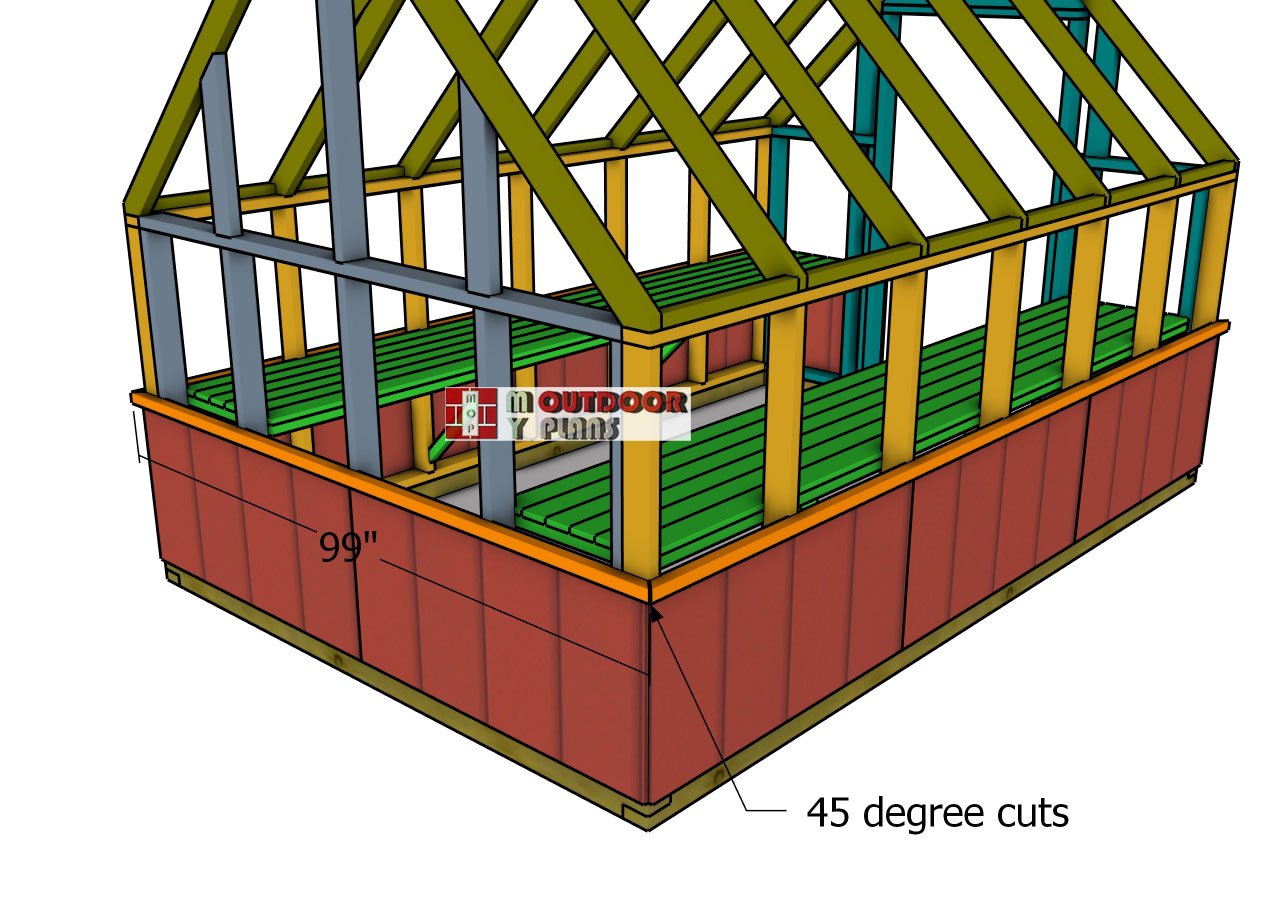
Siding-trims-back
Use 2×2 lumber for the siding trims. Make 45 degree cuts to both ends of the shown trims and attach them on top of the siding panels. Leave no gaps between the trims and secure them to the wall frames with 3 1/2″ screws.
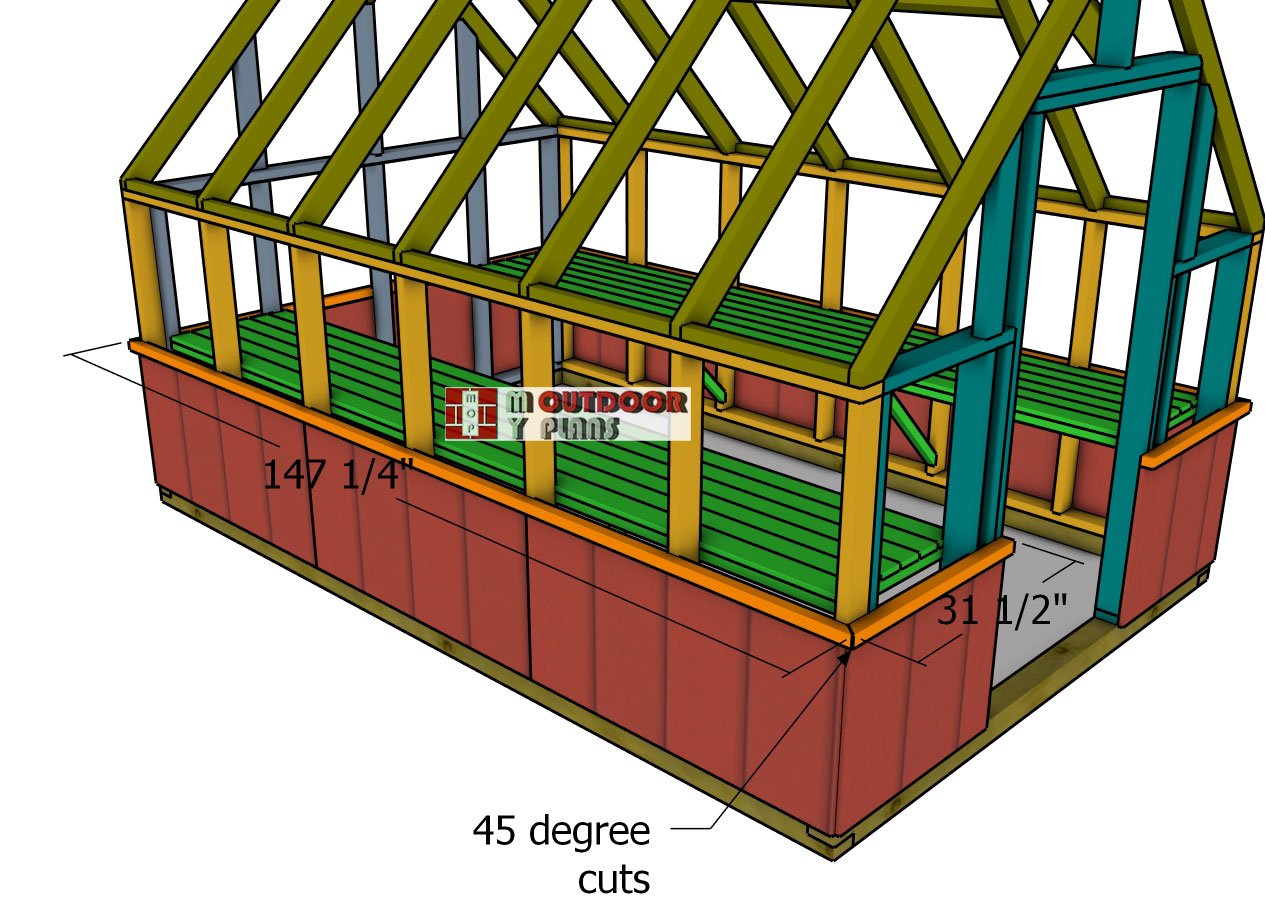
Side-siding-trims
Attach the trims to the front of the greenhouse, as well.
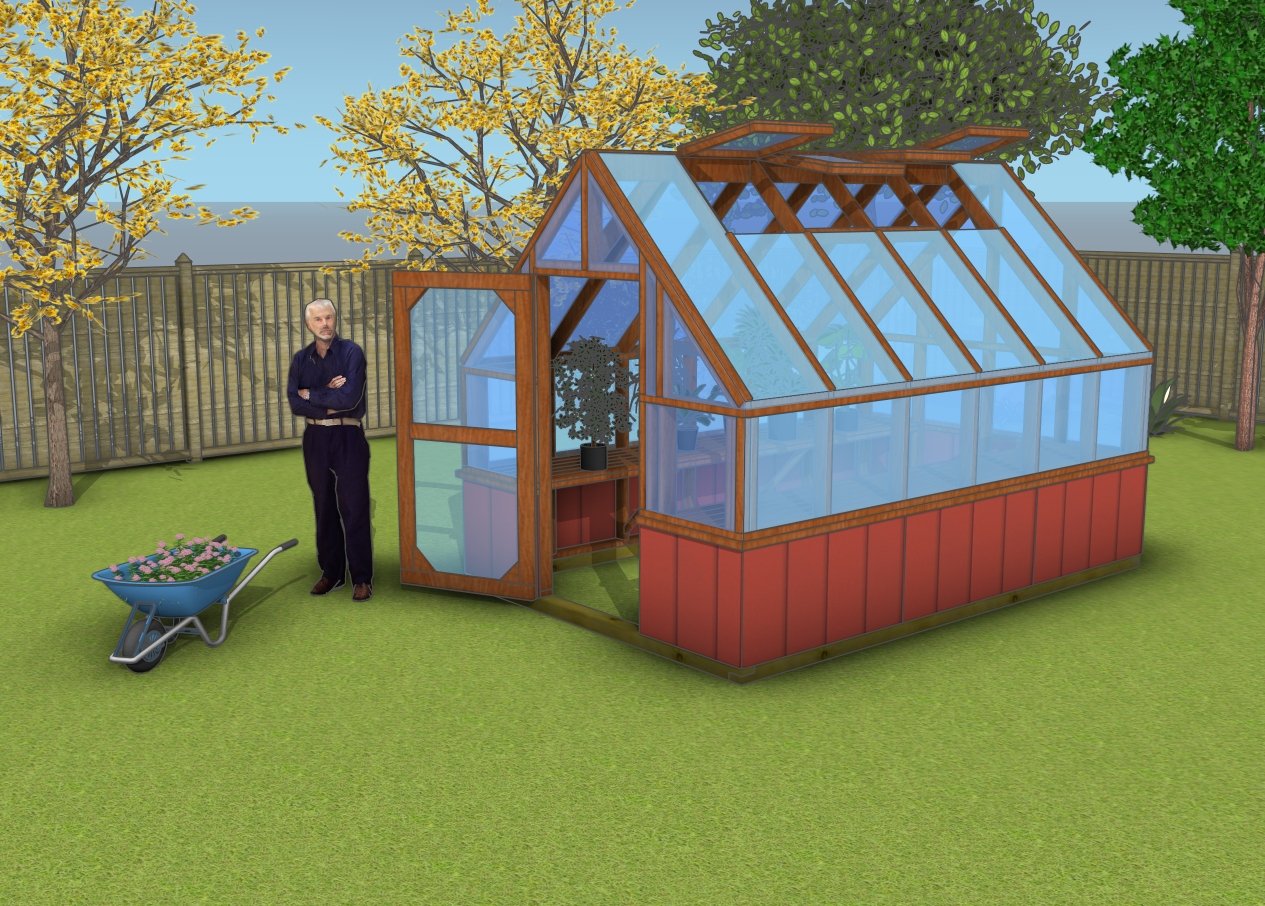
How to build a 8×12 greenhouse
Automated vent openers are a great upgrade to maintain consistent airflow without manual effort. For colder climates, you can install insulation panels or a small heater to extend your growing season. Add gutters to the roof for rainwater collection, providing a sustainable water source for your plants. These thoughtful add-ons not only boost efficiency but also make your greenhouse a more versatile and enjoyable space.
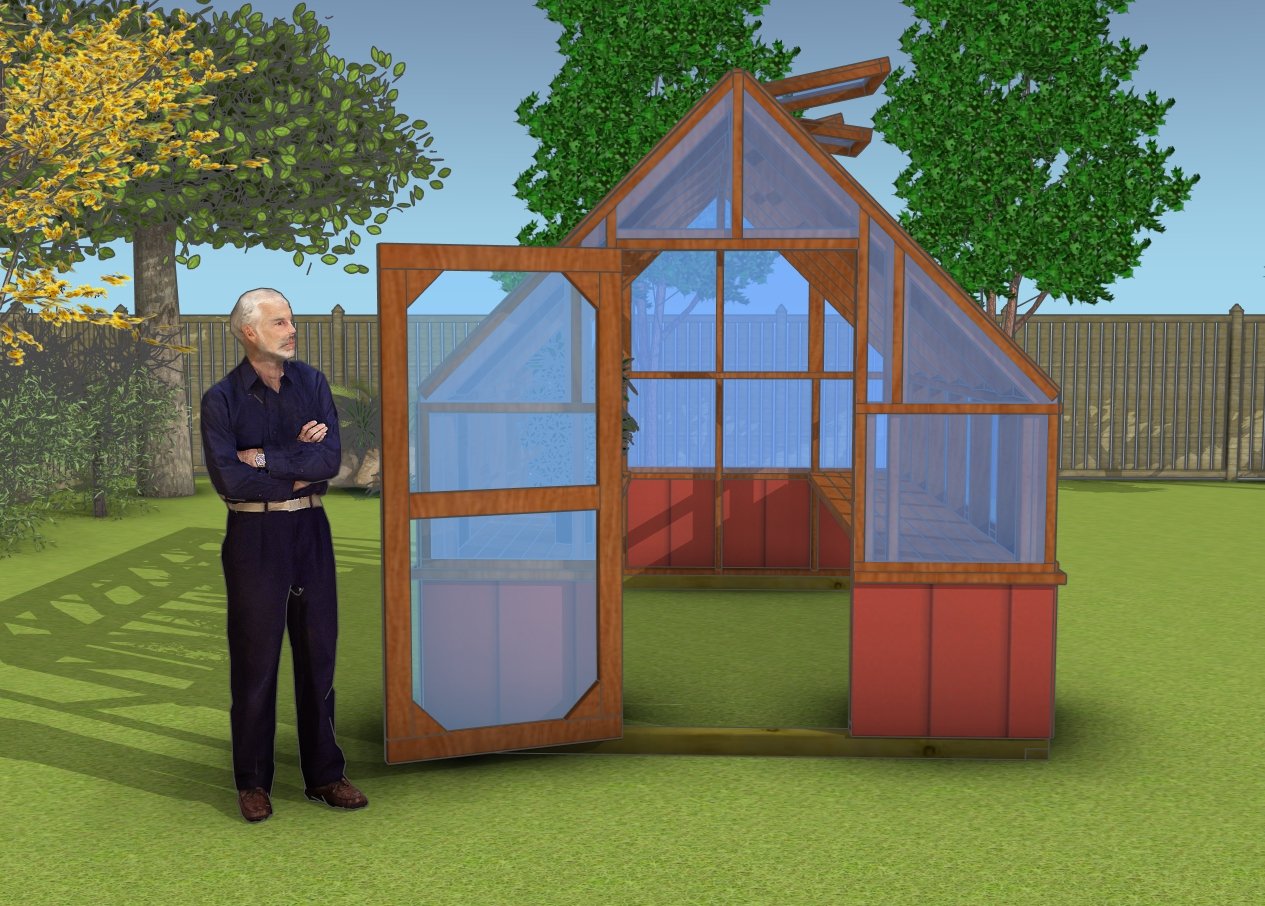
8×12 greenhouse plans – front view
In PART 2 of the article, I will show you how to build the door, the vents and install the trims that hold the greenhouse plastic into place.
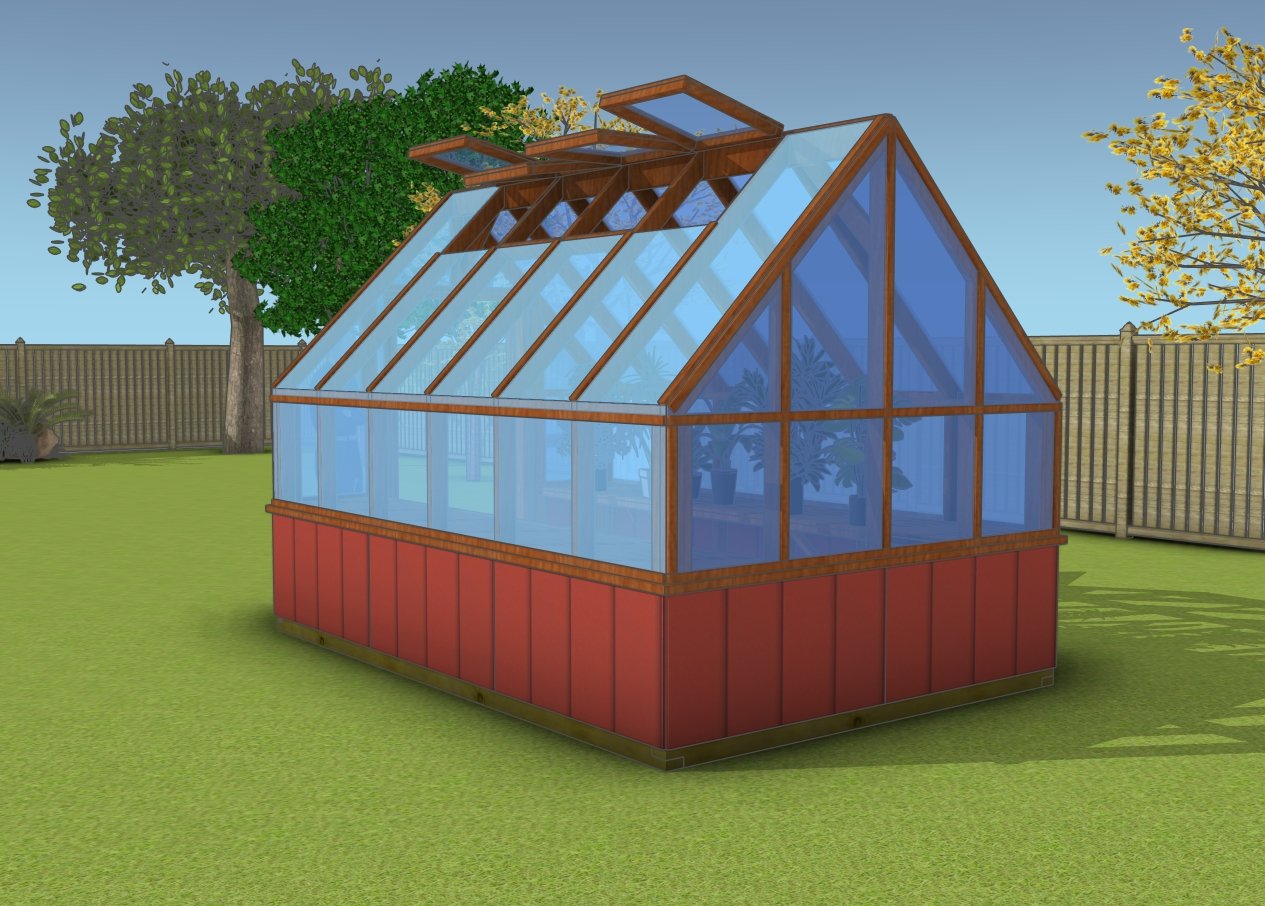
8×12 greenhouse plans – back view
If you want to get the Premium plans with all the extras: cut layout diagrams (shows how to cut the parts from the shopping list), PDF file, no ads, plans for the work benches, just press the GET PREMIUM PLANS button bellow. If you want to get the free plans, just read the blog FAQs.
This woodworking project was about 8×12 greenhouse plans. If you want to see more outdoor plans, check out the rest of our step by step projects and follow the instructions to obtain a professional result.


