This step by step woodworking project is about wooden table plans. Building a nice table out of wood is a simple project, so you can get the job done by yourself in just a few hours, if you have gathered all the materials and tools required for the job. For this project we recommend you to buy cedar, as it has a nice texture and it is very resistant to wood decay. Make sure the slats and the posts are in good condition, before buying them from your local store.
In order to get a nice appearance, we recommend you to countersink the head of the screws, using the appropriate bit. In addition, you should always pre-drill the components, before inserting the screws, to prevent the wood from splitting. Moreover, add glue to enhance the bond of the joints, but make sure you remove the excess with a dry cloth, before it hardens. Always check if the parts are aligned, otherwise the end result might not raise to your expectations. See all my Premium Plans HERE.
Projects made from these plans
Cut & Shopping Lists
- A – 4 pieces of 4×4 lumber – 26” long LEGS
- B – 2 pieces of 4×4 lumber – 11” long, 1 pieces of 4×4 lumber – 38” long STRETCHER
- C – 2 pieces of 2×2 lumber – 48” long, 4 pieces of 2×2 lumber – 25” long TABLETOP FRAME
- D – 8 pieces of 1×4 lumber – 48” long TABLETOP
- E – 2 pieces of 1×3 lumber – 48” long, 2 pieces of 1×3 lumber – 29 1/2” long TRIMS
Tools
![]() Hammer, Tape measure, Framing square
Hammer, Tape measure, Framing square
![]() Miter saw, Drill machinery, Screwdriver, Sander
Miter saw, Drill machinery, Screwdriver, Sander
Time
Wood table plans free
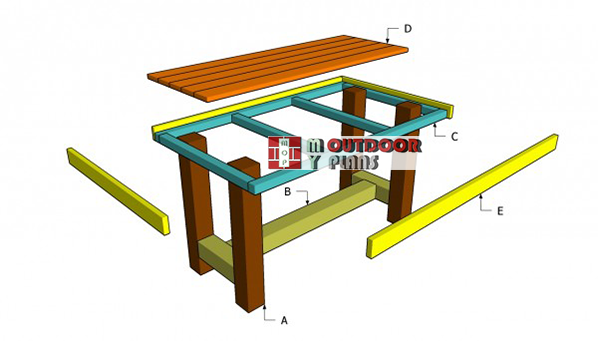
Wooden-table-building-plans
Building a table for you deck, patio or garden is a straight-forward process, so you can get the job done by yourself, if you use the right plans and tools. A wooden table would complement perfectly an outdoor location and it would add character to your backyard.
Top Tip: As you can see in the image, the plans are for a robust wooden table, so you can install a large outdoor umbrella, even in bad weather. Make sure all the components are well-aligned, before driving in the lag screws.
Wooden table plans
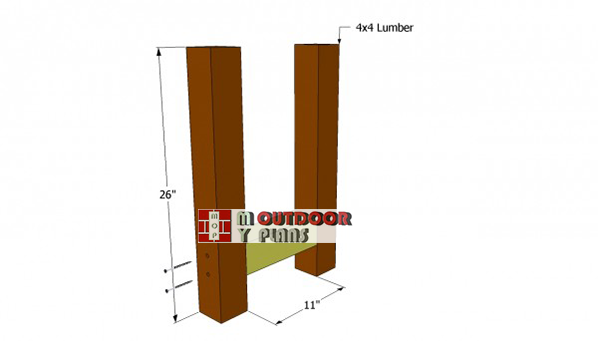
Building-the-frame-of-the-table
The first step of the project is to build the sides of the table frame, as in the plans. As you can easily notice in the image, you need to build the legs of the table, as well as the braces out of 4×4 lumber. Align the components at both ends, before drilling the pilot holes and inserting the 6” lag screws.
Top Tip: Countersink the head of the bolts, before inserting them, as to get a nice appearance. Make sure all the edges are flush.
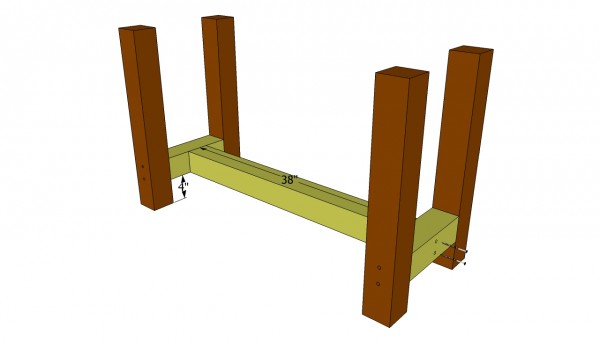
Installing the stretcher
After building the sides of the table, you need to join them together by installing the stretcher. As you can see in the plans, you need to plumb the legs, center the stretcher and insert the 6” lag screws. Use a spirit level to check if the stretcher is perfectly horizontal.
The 4×4 stretcher will make the frame of the table rigid and you will be able to install a large umbrella in any kind of weather.
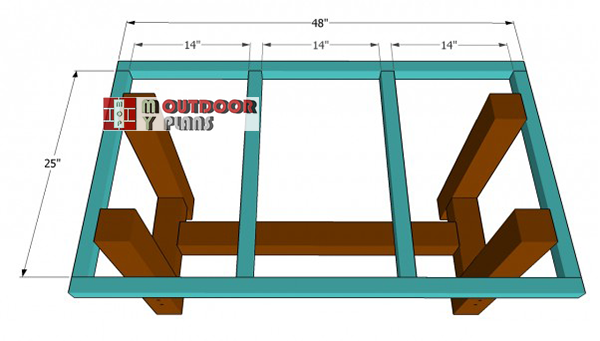
Installing-the-frame-of-the-table
Before attaching the tabletop slats into place, build a small frame out of 2x2s. In order to get the job done quickly and to obtain an accurate result, we recommend you to assemble the components on a sturdy surface. Drill pilot holes trough the perimeter components and drive in 3” wood screws.
Check the corners of the frame for squareness, before attaching it to the legs of the table. Work with attention, to get an accurate result.

Attaching the tabletop slats
Next, attach the slats and to secure them into place with 2” screws. The best techniques is to drive in several screws trough the slats into the frame, at both ends. Afterwards, turn the table upside-down and drive in the screws trough the frame into the wooden boards.
Top Tip: Place the slats and align them at both ends, before inserting the screws. Do not leave any gaps between the boards and apply glue to the edges, to enhance the bond of the joints.
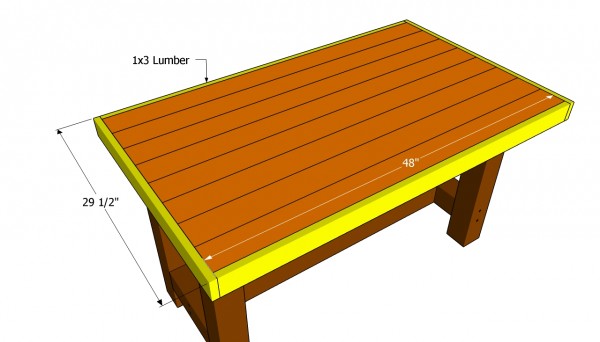
Attaching the trims
After installing the main components of the table, you need to attach the trims, as to hide the edges of the tabletop. Align the trims before securing them into place with finish nails and wood glue. Work with great care and attention, if you want to get a professional result.
Top Tip: Sand the visible edges with a sand-block or make them round with a router and a 1/4” drill bit, as to enhance the look of the table.
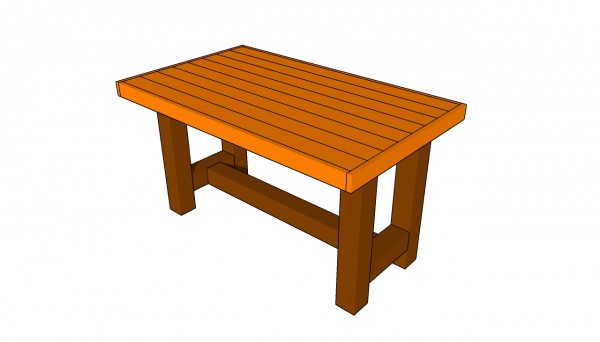
Wooden table plans
Last but not least, you should take care of the finishing touches. Fill the head of the screws with a good wood filler and let it dry out for several hours. Next, sand the wooden surfaces with 120-git sandpaper, along the wood grain.
Top Tip: Clean the residues with a dry cloth, before staining the table to the desired color. Apply the stain in a properly ventilated location and make sure you wear a respiratory mask.
This woodworking project was about wooden table plans. If you want to see more outdoor plans, check out the rest of our step by step projects and follow the instructions to obtain a professional result.
