This step by step woodworking project is about planter bench plans. If you like to spend time in your garden, but a simple outdoor bench is a little too common for your tastes, you should consider building a nice wooden bench with two planters attached on both sides. After selecting the right plans for your needs, you should buy quality materials for the job, such as cedar, redwood or pine slats. Make sure the wooden components are perfectly straight and in good condition, before starting your project. This bench will enhance the look of any deck, patio or backyard lawn. More outdoor furniture plans HERE.
In order to obtain a professional result, you have to pay attention to several aspects. Therefore, align the components at both hands before inserting the wood screws. In addition, drill pilot holes in the components, to prevent the wood from splitting. Moreover, don’t forget to countersink the head of the screws, before inserting the wooden screws. Last but not least, add a good wood glue to the edges of the components, in order to enhance the bond of the joints. Premium Plans for this project available in the Shop.
Projects made from these plans
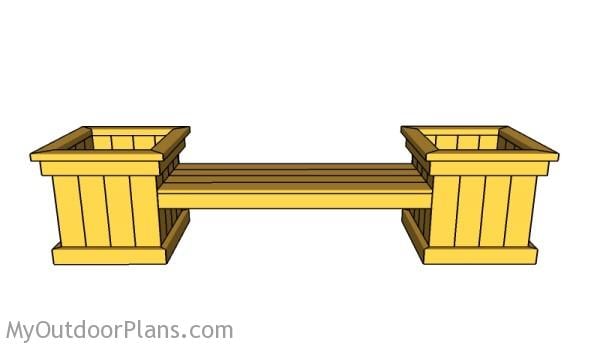
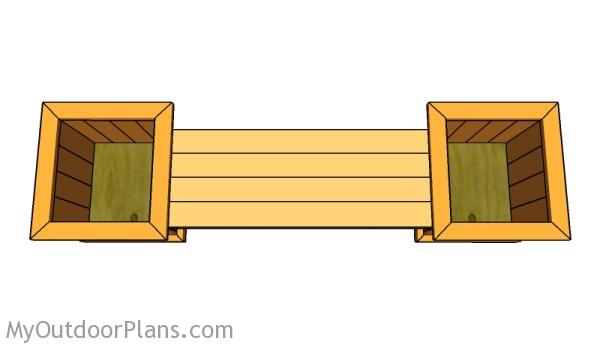
It’s that simple to build a planter bench!
Cut List
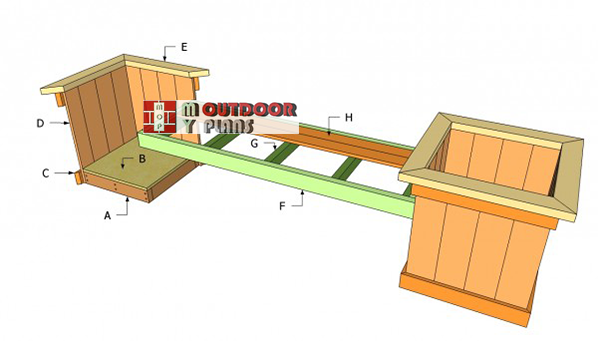
- A – 6 pieces of 2×4 lumber 17 1/2” long, 4 pieces of 2×4 lumber 20 1/2” long JOISTS
- B – 2 piece of 3/4” plywood 20 1/2 x 20 1/2” FLOORING
- C – 16 pieces of 1×4 lumber 23 1/2” long TRIMS
- D – 32 pieces of 1×6 lumber 25” long SIDE SLATS
- E – 8 pieces of 2×4 lumber 27 1/2” long TOP TRIMS
- F – 2 pieces of 2×4 lumber 63” long, 2 pieces of 2×4 lumber 17 1/2” long BENCH FRAME
- G – 5 pieces of 1×2 lumber 17 1/2” long SUPPORTS
- H – 5 pieces of 1×4 lumber 60” long BENCH SLATS
Shopping List
- 9 pieces of 2×4 lumber – 8′
- 1 piece of 3/4″ plywood – 2’x4′
- 8 pieces of 1×4 lumber – 8′
- 11 pieces of 1×6 lumber – 8′
- 1 piece of 1×2 lumber – 8′
- 100 pieces of 1 1/4″ screws
- 100 pieces of 2 1/2″ screws
- glue, stain
Tools
![]() Hammer, Tape measure, Framing square
Hammer, Tape measure, Framing square
![]() Miter saw, Drill machinery, Screwdriver, Sander
Miter saw, Drill machinery, Screwdriver, Sander
Time
![]() One day
One day
Bench with planters plans
Outdoor-bench-with-planter—diy-project
A planter bench is a great addition for decks and small gardens, as they add character and enhance the look of any backyard. There are many designs and shapes you could choose from, starting with a simple bench adjacent to a large planter, up to more complex constructions, such as a wooden bench attached to two planters.
To Tip: You should adjust the size of the bench planter to your needs, but use the same carpentry techniques to get the job done. Work with good judgement, making sure all the components are aligned, before driving in the screws.
Planter bench plans
Planter-floor-plans
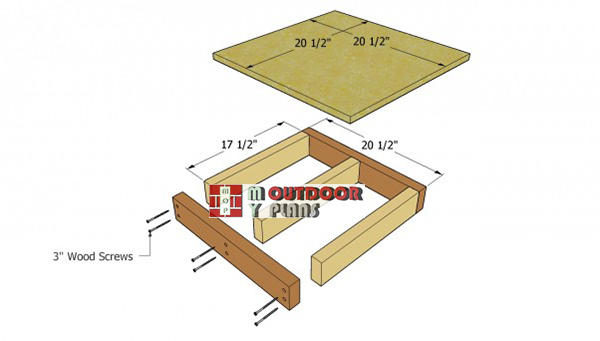
The first step of the project is to build the floor of the two large planters. Therefore, join together several 2×4 joists, as you see in the image. Work with great care, making sure the corners are square and the joists perfectly aligned one with another.
Drill pilot holes trough the rim joists, before inserting the 2 1/2″ or 3” screws. Attach the 3/4” plywood to the frame, using 2” nails. The edges of the plywood should be flush with the frame. In addition, drill 5/8″ drainage holes through the plywood, so it doesn’t retain all the water inside the planters.
You can also add some 1×4 pieces under the frame to create a small clearance space between the ground and the frame. The gaps will protect the frame from moisture and enhance the durability of the project.
Installing-the-wall-slats-to-planters
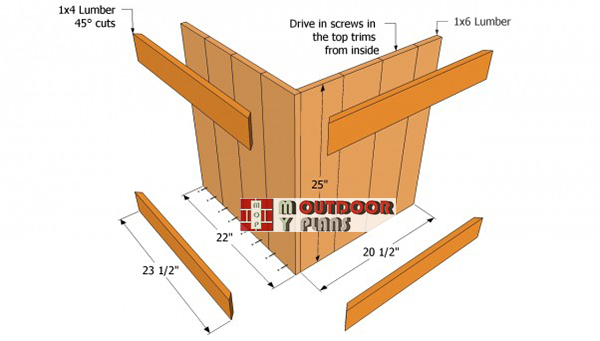
Continue the project by installing the side slats of the planter, using our free plans. Attach the 1×6 tongue and groove slats (regular slats work as well) to the frame, using 1 1/4” wood screws. Use a spirit level to make sure the walls are perfectly plumb, otherwise the planter won’t be symmetrical.
Top Tip: Attach the bottom trims and lock it into place with finishing nails. Drive 1 1/4” screws from the inside of the planter, to secure the top trims. Cut the end of the trims at 45º, using a miter saw.
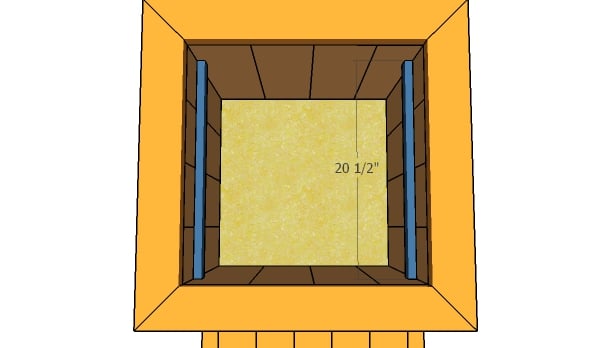
Side for the planter
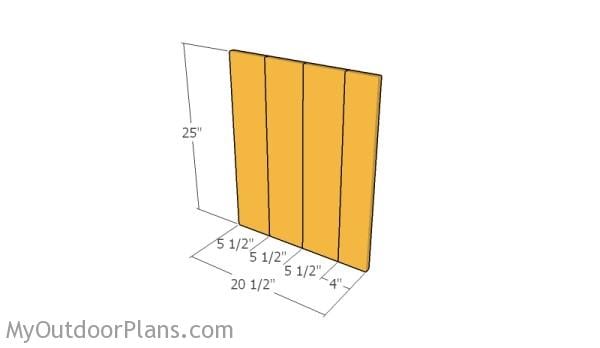
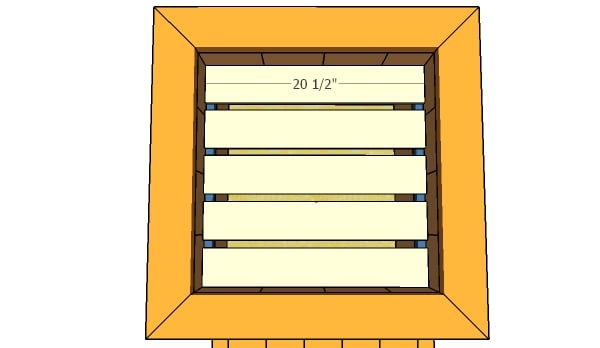
As you can notice in the diagram, you need to adjust the width of one slat to 4″, so that the side panels are 20 1/2″ wide. The easiest way to rip the slat lengthwise is with a table saw. Alternatively, you can use a circular saw.

Installing the top trims
In order to get the job done with the planters, you should build the top trims and install them into place with 2 1/2” finish nails. In order to add personality to the planter bench, we recommend you to build the trims from 2×4 lumber. Use a miter saw to cut both ends of the trims at 45º.
Lock the trims together with pocket screws, before centering them on top of the planters. Last but not least, insert the 2 1/2” finish nails in the slats.
Assembling the planter bench
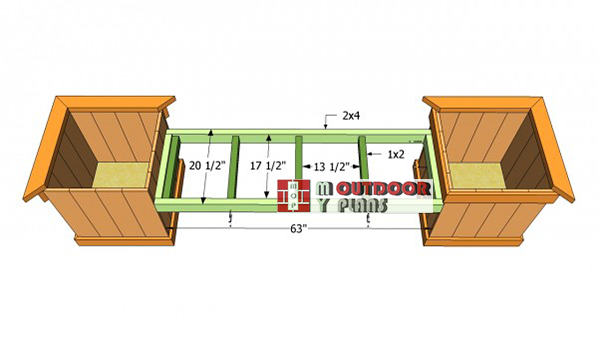
Building-the-bench-frame
Place the two planters on a sturdy surface, leaving about 60” between them. Make sure the large planters are aligned properly, before building the wooden bench between them. Use 2×4 lumber to build the frame of the wooden bench, as in the plans.
Top Tip: Reinforce the frame by fitting the 1×2 supports. Drill pilot holes trough the frame and drive in 3” screws into the supports. Level the frame of the bench with a 3′ hand level. Place the seat supports 3/4″ under the top edge of the 2×4 frame.

Reinforcing the bench
Fit 2×2 supports under the frame, if you really want to enhance the rigidity of the frame. Drill pilot holes and insert 2″ galvanized screws or 2 1/2″ carriage bolts. Use a spirit level to plumb the supports before securing them with screws to the planters, otherwise the seat won’t be perfectly horizontal.

Installing the bench slats
Drill pilot holes trough the sides of the frame, as well as trough the planter and insert 2 1/2” carriage bolts. Make the whole construction more rigid, by drilling pilot holes and inserting 2” screws..
Cut the 1×4 slats at 60” and fit them into place. Smooth the cut edges with a sander before locking them into place. Drill pilot holes trough the slats, countersink them and insert the 2” screws, or drive the screws trough the supports in the slats.
How to build a garden bench
As you can see you can learn how to build this garden bench in just one weekend, if you follow my step by step plans and instructions. This outdoor bench is extremely sturdy and if you invest in weather resistant lumber, such as cedar or redwood, it will be the attraction point of your backyard for many years in a row.
DIY Outdoor Bench
The secret for a neat result is to select perfectly straight slats and to take accurate measurements before making the cuts. In addition, you need to make sure the edges are perfectly flush before inserting the screws and nails.
Fitting the cleats
One last tip I give is related to the planter boxes. You don’t have to fit large containers to the planters, as you have an easier alternative to fill them with lively flowers. You can 1×2 fit cleats to the interior of the planters and then create a false bottom just a few inches from the top. Adjust the height at which you place the cleats to suit your needs.
Fitting the slats
Fit the 1×4 slats to the cleats, as shown in the diagram. In this manner you can place small pots with flowers and make them visible.

Planter bench plans
Last but not least, you should take care of the finishing touches. Therefore, fill the head of the screws with a good wood putty and let it dry out properly for several hours. Sand the wooden surface with 120-grit sandpaper and remove the residues with a vacuum.
Top Tip: Apply several coats of wood stain to protect the wood from rot and to enhance its rustic appearance. If this design is not what you are looking for, I suggest you to take a look over my other projects. Check out my simple planter bench plans and my rustic planter bench project. Premium Plans for this project available in the Shop.
If you want to get PREMIUM PLANS for this project, in a PDF format, please press GET PDF PLANS button bellow. Thank you for the support.

This woodworking project was about planter bench plans. If you want to see more outdoor plans, check out the rest of our step by step projects and follow the instructions to obtain a professional result.
EXPLORE MORE IDEAS FOR:
 |
 |
 |
 |
39 comments
My 9 year old son and I built this in a weekend, because I needed to get him away from screens. I am by no means a skilled craftsman, but the directions were great and easy to follow. We did use a strap to square up our box, due to warpped wood. The best part is it looks great on my deck, my wife loves it, and I may have started a new passion with my son. We will be looking for similar projects to keep us busy all summer.
Thanks
Congratulations for your first project and for finding a new passion! I would be thrilled to see how your planter bench looks like so feel free to send a few images. I am looking forward to seeing your next projects!
Your top trim measurement pieces are incorrect. You have 45″ and it should be 55″, so you can get two piece of 27.5″.
Thank you for pointing that out. It was a typing error. It should have been 27 1/2″ in first place, as it says 8 pieces.
how much would this cost i need an estimate
According to the people who build this bench – around 100 $. I hope this helps.
Whats the best way to make sure the walls are plumb on the platform? Can someone provide specific ways to do this w the spririt level and only one person?
You can also use a corner square. Another method would be to assemble the panels by attaching the braces to the slats and them joint the four sides together.
Great project but man I wasted so much wood precutting to your specs. I would recommend to anyone do do your own dimensions and just follow the structure/build.
Regardless appreciate you putting this up
If you are all about saving money and minimize waste, you could make the slats for the planters 24″. In this way you can make 4 pieces from an 8′ long slat. Thanks for the feedback and I’m glad that you managed to build the bench planter. It would be interested to see how it turned out. Cheers!
Are the 1×6 slats supposed to be tongue and groove board? Or pressure treated 1×6 lumber?
Not necessarily. If I were to recommend you a material, I would personally choose cedar.
Thank goodness! I’ve already cut the pieces out of the standard 1×6! Got confused when the directions say tongue in groove, but that wasn’t noted in the materials list. Hopefully I can get it to work! Thanks for the plans and the help.
I’m sure you ll do a great job with the project. Let me know how it comes out.
You can also build this out of pallets (they are free) at a cost of nails and your time check out my planter box and dresser I made out of pallets on here under Brags
The link to your project, for anyone that wants to take a look: http://myoutdoorplans.com/brags/diy-pallet-planter/
I pre-cut all the wood. What a waste!! the measurements are WRONG. Im an experienced wood worker, and usually use ANNA-WHITE. What a joke.
There is nothing wrong with the measurements, as anyone can see that in the BRAGS submitted by other DIY-ers. If you don’t have the patience to read the article and follow the diagrams, it is very disrespectful to make such comments. If you asked for assistance I would gladly help you assemble it.
The joke here is calling yourself an experienced wood worker then saying you use ANA White
Hello
I’m really confused under the materials. What is the difference between the top half pf the materials divided by the line to the top. Are they the same or an addition to what is listed on the top?
The top half (the one with A,B,C,D) is the list with the components that you need to cut. The bottom list is about the components added up into a list with the materials you need to buy.
So the bottom one is the master list?
Yes, the materials list. And the top is the cut list.
I have some leftover TimberTech composite boards and was thinking of using them for the slats…but would they be strong enough to support the bench? Maybe another 2×4 on the inside of the planter that the bench can bolt to? Appreciate any thoughts!
How thick are they?
They are .94″ x 5.36″…
1×6 lumber is 3/4″x5 1/2″ so they should work with a few minor adjustments
This is the first wood working project I have ever planned on doing, so I have a few questions.
1- I plan on leaving these benches outside. If I used ceder wood it would not have to be treated so it could withstand the elements, correct?
2- I’ve determined from the comments the second part of the materials is the master list. Perhaps I am missing it in the instructions, but which pieces are cut to make the top part of the list?
1. Yes
2. The top part of the list is the Cut List (the actual components of the bench), the bottom part of the list is the materials list (what you need to buy for this bench)
wonderful free download site.. waaaaaw thaaaaanks
Hi all
Looking for guidance. I would love to build this over rthe weekend. However my patio is not that large and it will require me to position the planter boxes/bench on the ground. I want to make sure it is level and will support me. How do I go about making it level and is there a way I can provide extra support. I am a big man and want to make sure it holds me. Lol
To check if it’s level, you can use a straight piece of lumber and a spirit level. You can provide extra support by attaching 2×4 legs under the middle of the bench.
I’m not sure what this means: Moreover, don’t forget to countersink the head of the screws, before inserting the wooden screws.
What’s a wooden screw and where is it being inserted into a countersunk screw? 🙂
No. You need to use a countersink bit when pre-drilling the holes for the metal screws.
Sprayed the inside of the planter boxes with the spray rubber they’ve been advertising on TV. Waterproofed it to the point where I can now fill it with dirt, and plant right in it.
That is a great idea. I would love to see your project!
hey quick question. i was looking at the materials on this one and i saw the A B C D E F G H list of materials but what is the list below that one? is that the shopping list version of that list? i was confused because how can 8 feet of 2×4 be enough for all the 2×4 you mentioned in the A B C D E F G H list? which list should i shop using?
A B C is cut list. The other list is Shopping list
Do you have a planter bench instructional that has a back to the bench?