This step by step diy article is about picnic table bench plans. Building a picnic table and bench is easy, especially if the right plans are used. From our experience, we recommend you to check the alternatives with great attention, before selecting the plans, as there are many designs and plans to choose from. Gather all the materials and tools required for the project, before starting the job.
There are several aspects that you should take into account when building a table and picnic benches. First of all, you need to use quality materials, otherwise you won’t be able to enjoy the furniture on the long term. From our experience, we recommend you to choose weather-resistant lumber, such as pine, cedar or redwood. Always pre-drill the lumber before driving the galvanized screws and add glue to enhance the bond of the components. See all my Premium Plans HERE.
Projects made from these plans
Cut & Shopping Lists
- A – 6 pieces of 2×6 lumber – 72″ long SLATS
- B – 4 pieces of 2×4 lumber – 42 1/2″ long LEGS
- C – 2 pieces of 2×4 lumber – 34 1/2″ long SUPPORTS
- D – 2 pieces of 1×4 lumber – 26 3/4″ long BRACES
- E – 6 pieces of 2×4 lumber – 72″ long SLATS
- F – 8 pieces of 2×4 lumber – 20″ long LEGS
- G – 4 pieces of 2×4 lumber – 11″ long SUPPORTS
- H – 4 pieces of 2×4 lumber – 17 1/2″ long BRACES
Tools
![]() Hammer, Tape measure, Framing square
Hammer, Tape measure, Framing square
![]() Miter saw, Drill machinery, Screwdriver, Sander
Miter saw, Drill machinery, Screwdriver, Sander
Time
Related
Building Picnic Table Bench
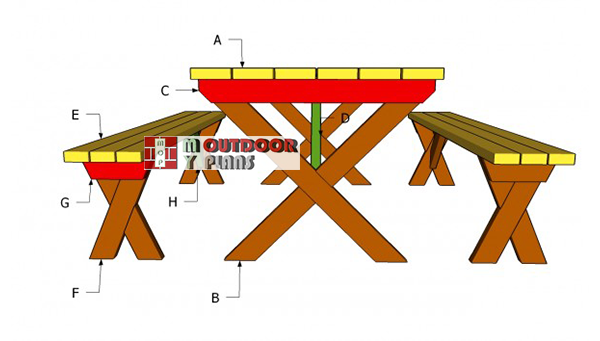
Building-a-x-picnic-table
Building a picnic table and benches is not a complex woodworking project, but there are a few things you should pay attention to. Always take accurate measurements and plumb the components, if you want to get a professional result. In addition, the seat and the counter-top should be horizontal.
Picnic Table Bench Plans
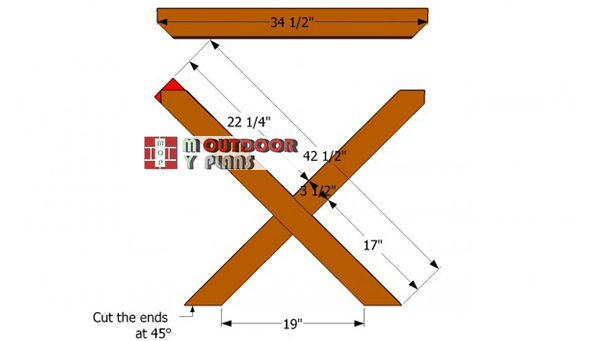
Building-the-x-shaped-legs
The first step of the project is to build the legs of the table. As you can see in the plans, you need to build the x-shaped legs from 2×4 lumber. Cut the ends of the legs at 45º using a circular saw. In addition, you need to cut out 3/4″ deep notches in the legs, as to overlap easily.
Make several parallel cuts inside the marked area and clean the recess with a chisel. Smooth the surface with medium-grit sandpaper.
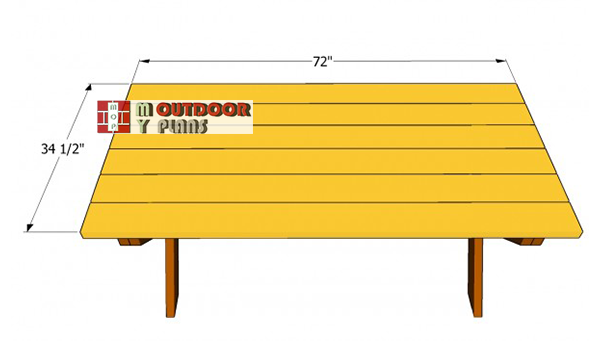
Installing-the-tabletop
Lock the legs together with a 2×4 support. As you can see in the image, you need to cut the ends of the supports at angle and to smooth the cut edges. Attach the supports to the top of the X-shaped legs and lock them into place with 2 1/2″ galvanized screws.
Plumb the sides of the table, before attaching the top slats. Cut the 2×6 slats at the right size and lock them to the supports with 2 1/2″ wood screws.
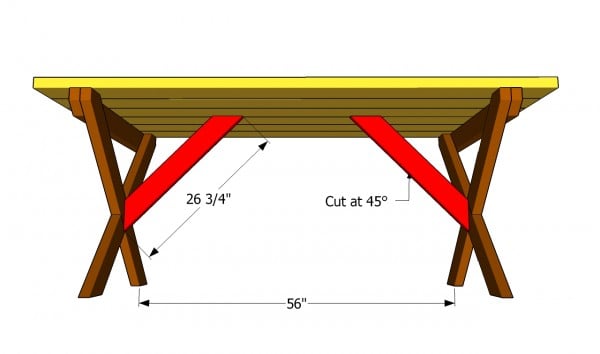
Fitting the table braces
In addition, it is essential to countersink the head of the screws, if you want to get a professional result. Drill pilot holes trough the lumber, to prevent the wood from splitting.
Top Tip: On the other hand, you need to reinforce the frame of the table by installing the braces. Cut the braces at 45º and fit them into place with galvanized screws. Make sure the sides of the table are plumb.
Picnic Bench Plans
Building-the-bench-legs
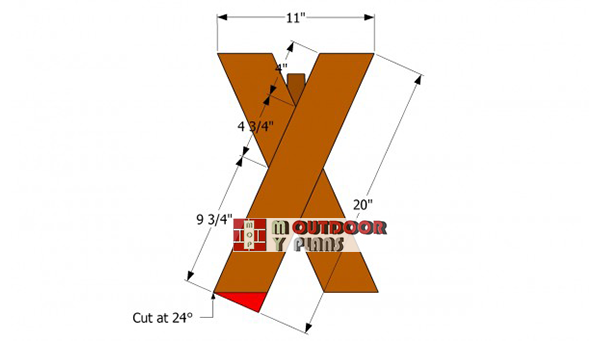
Continue the woodworking project and build the two benches. As you can see in the image, you need to cut the ends of the slats at 24º. In addition, you need to cut 3/4″ notches inside the legs, otherwise they won’t overlap properly.
Clean the recess with a chisel and smooth the surface with medium-grit sandpaper. Add waterproof glue and lock the X-shaped legs together with a 2 1/2″ galvanized screws.
Fitting the supports
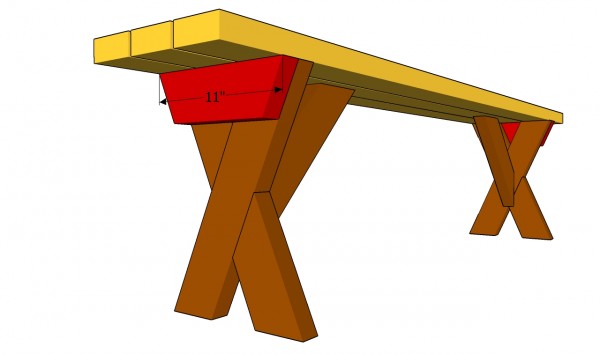
In order to support the seat slats, we recommend you to attach 2×4 lumber to the exterior of the X-shaped lumber. Cut the ends of the supports at angle and attach them to the legs.
Drill pilot holes trough the supports to prevent the wood from splitting. If you want to get a professional result, we recommend you to add waterproof glue to the joint. In this manner, you will create strong bonds between the components.
Building the bench slats
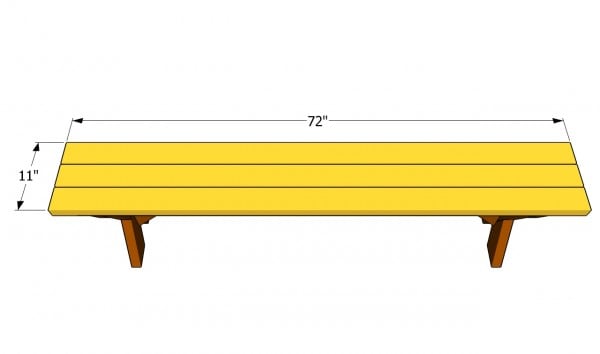
Attach the 2×4 slats to the supports, after plumbing the sides with a spirit level. If you want to get a professional result, we recommend you to drill pilot hole trough the slats, before inserting the galvanized screws.
Top Tip: The slats should overhang the frame for about 5″. In addition, we recommend you to place the slats equally spaced, leaving between them about 1/4″.
Fitting the braces
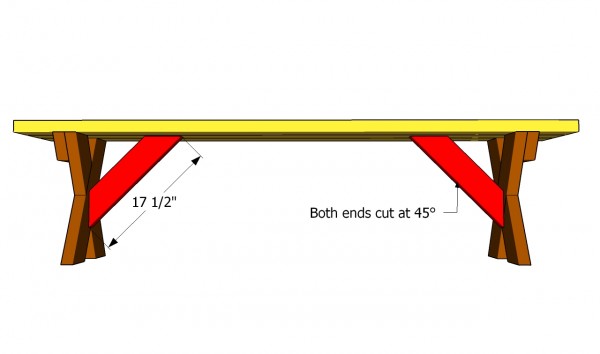
One of the last steps of the project is to reinforce the frame with 2×4 braces. Cut the ends of the braces at 45º, if you want to get a professional result. Fit the braces into place, drill pilot holes and lock them to the components with galvanized screws.
It is essential to plumb the sides of the table and to check if the slats are horizontal, before attaching the wooden braces. If you follow these guidelines, you will get a professional result.
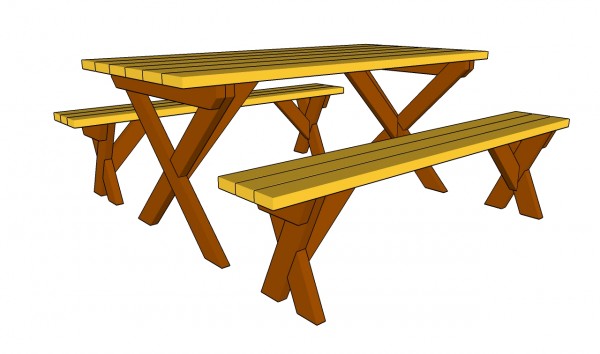
Picnic table bench plans
Last but not least, you should take care of the finishing touches. Therefore, fill the holes with wood putty and let the compound to dry out for several hours. Smooth the surface with medium-grit sandpaper along the wood grain.
Top Tip: Apply several coats of stain or paint to enhance the look of the outdoor storage box and to protect the components from decay. Check out the rest of the project, to how how to build the deck stair rails.
This project was about picnic table bench plans. If you want to see more outdoor plans, we recommend you to check out the rest of the projects. Don’t forget to share our projects with your friends, by using the social media widgets.

9 comments
when screwing screws are they screwed in top down or from underneath ? Thank You
The screws should be inserted through the slats into the supports. Drill pilot holes and countersink the heads. Fill the holes with wood putty. Finish with 120-150 grit sandpaper.
Thank you for this great plan…just what my husband and I were looking for. We would like to make one a little long and beefier. Do you know how much longer we could make this without adding a third support? I’m thinking 7′ long would be a great length. Thank you Julian!
You can make it 7′ wide without adding the middle supports.
Hi there, thanks for the plans! I’m in the middle of building this. Just a quick point, in the materials list it calls for a 1 x 4 for the table leg support, but in the instructions it says 2 x 4. Other than that this has been a really great project thanks!
Do you have the CAD models per chance?
I do, but I don’t share them.
Can ipe planks be used in this application or does additional bracing have to be added to allow support for people sitting on the thinner material. I have some spare 1×4 ipe I was going to use for the tops of the table and benches.
No, it doesn’t work with 1x4s