This step by step woodworking project is about outdoor storage bench plans free. This is a nice weekend project, as it’s a great opportunity to work with wood and to build something beautiful with your own hands. There are many designs and plans you could choose from, but in this article we show you how to build a simple bench using just 1×6 boards and the appropriate screws. If you plan to place the bench in your backyard, you need to buy weather-resistant lumber, such as cedar, redwood or pine. Make sure all the slats are in a good condition and perfectly straight.
Align the components at both hand before locking them together with screws. Don’t forget to drill pilot holes in the wood, to prevent it from splitting. In addition, countersink the head of the screws, before inserting the wooden screws. Afterwards, apply a good wood filler in the holes, let it dry out properly and sand the surface thoroughly, before applying the final coats of stain. See all my Premium Plans HERE.
Projects made from these plans
Cut & Shopping Lists
- A – 4 pieces of 1×6 lumber 15” long FRONT LEGS
- B – 4 pieces of 1×6 lumber 46 1/2” long END SLATS
- C – 4 pieces of 1×6 lumber 35” long BACK LEGS
- D – 4 pieces of 1×6 lumber 19 3/4” long SIDE SLATS
- E – 2 pieces of 2×2 lumber 45” long CLEATS
- F – 10 pieces of 1×6 lumber 19 3/4” long FLOORING
- G– 4 pieces of 1×6 lumber 48” long, 2 pieces of 1×4 lumber 15” long SEAT
- H – 2 pieces of 1×6 lumber 46 1/2” long BACK SUPPORT
Tools
![]() Hammer, Tape measure, Framing square
Hammer, Tape measure, Framing square
![]() Miter saw, Drill machinery, Screwdriver, Sander
Miter saw, Drill machinery, Screwdriver, Sander
Time
Wood Storage Bench Plans
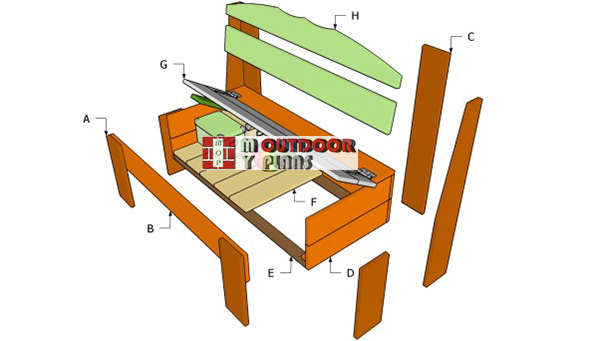
Building-an-outdoor-storage-bench
An outdoor storage bench is very useful, as it offers a significant space to deposit items you don’t use on a regular basis. In addition, if you use the right woodworking techniques and choose a nice design, the wooden bench would be the perfect place to relax during the summer days.
Top Tip: Buy lumber designed for outdoor use, which is weather-resistant, such as treated cedar. Round the exposed edges using a router and a 1/4” bit, to give your bench a proper look.
It’s that easy to build an outdoor bench – Video!
Outdoor Storage Bench Plans
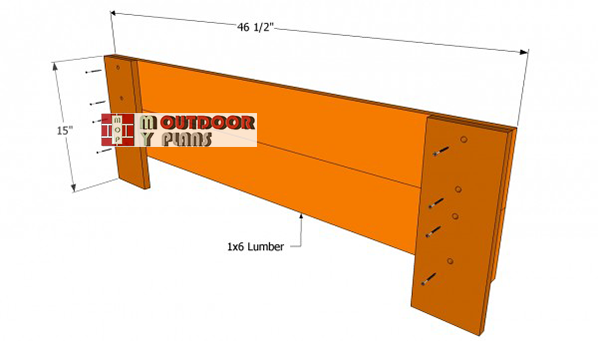
Bench-frame-plans
Build the front and the back ends of the wooden bench. Therefore, you should select straight 1×6 boards and cut them to the right size, using a mire saw with a sharp blade. Afterwards, build the legs of the bench using the same materials.
Place the components on a level surface and align them properly, making sure the corners are perfectly square. Drill pilot holes and countersink the head of the 1 1/4” wood screws.
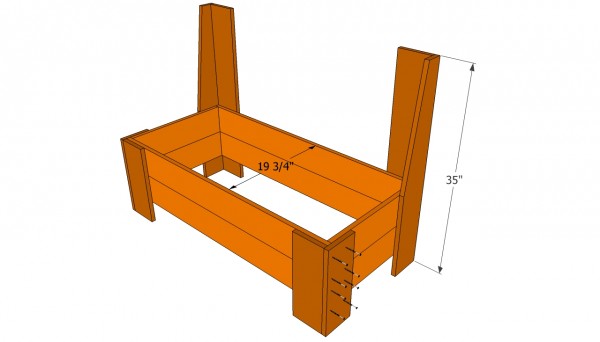
Building the base of the bench
Build the both sides of the bench, in the same manner described above and lock the frame together. As you can notice in the free plans, the back legs are angled, in order to enhance the look of the storage bench.
Top Tip: Use a spirit level to make sure the frame is perfectly horizontal and the sides plumb, before inserting the wood screws. Lock the adjacent legs together, by driving in 1 1/2” wood screws.
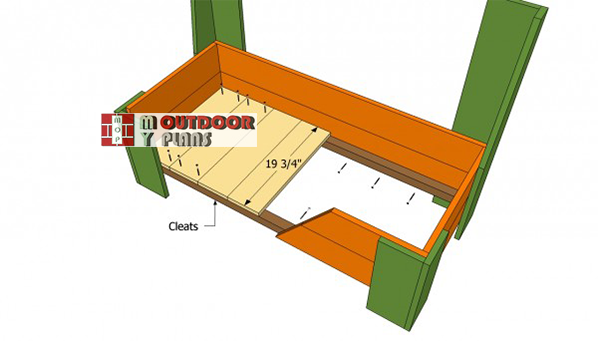
Storage-bench-floor-plans
The next step of the woodworking project is to build the floor of the outdoor bench. Therefore, attach 2×2 cleats on both sides of the interior faces and lock them into position with 2” screws. You could also use 1×1 cleats, if you going to store lightweight items inside the bench.
Top Tip: Cut the 1×6 boards at 19 3/4” and install them into place with screws. Leave small gaps between the slats, to allow water drain properly.
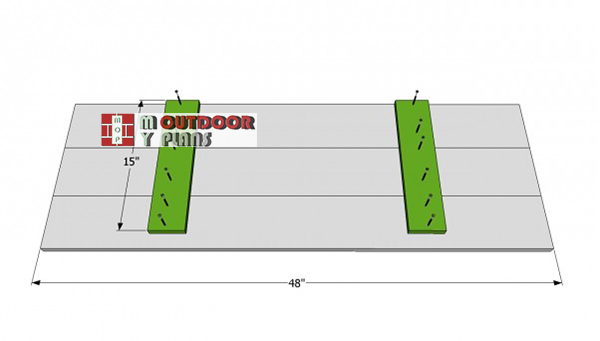
Building-the-bench-seat
Continue the project and build the seat of the bench. Cut the slats at the right size, using the material list, and secure them together with two wooden battens and 1 1/2” screws. Before driving in the screws, we recommend you to align the slats properly, making sure the diagonals of the lid are equal.
Top Tip: Apply wood glue on the edges of the slats, before locking them together, to enhance the bond and to wake the joints waterproof.
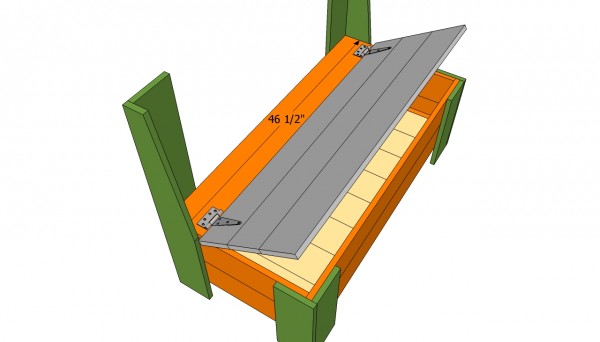
Attaching the bench seat
Before attaching the lid, you need to fit the stationary slat between the back legs and to lock it to the frame with several 1 1/2” wood screws. Next, place the seat with the battens downward-oriented and make sure it is aligned properly.
Install two hinges at both ends of the seat, as in the image. Alternatively, you could install a continuous hinge between the joint of the lid with the stationary slat.
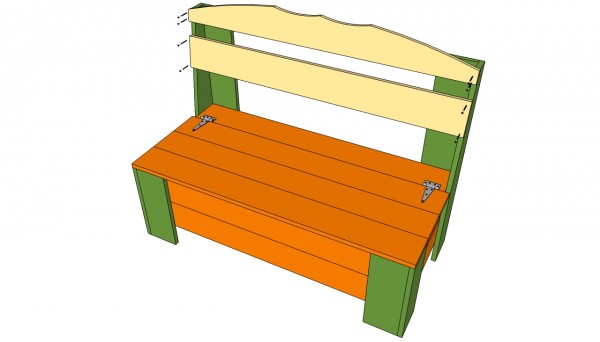
Attacking the back support
Next, build the a couple of decorative slats and attach them to the back legs, using 1 1/2” wood screws. Don’t forget to countersink the head of the screws, if you want to obtain a professional look. Mark the curved line on the 1×6 boards using a pencil and make the cuts with a jigsaw.
Top Tip: Smooth the cut edges using a sand-block or a router and a 1/4” bit. Work with great care and attention, making sure you double-check all the measurements.
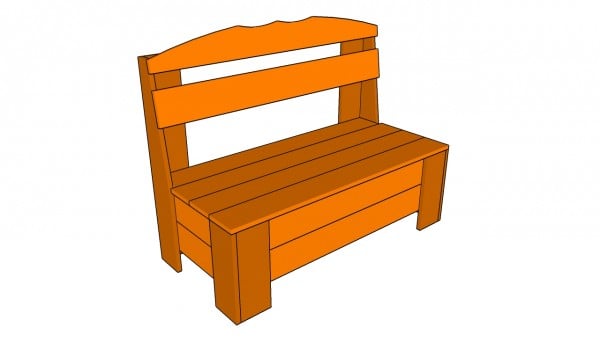
Free outdoor storage bench plans
Check if the seat is horizontal, if the sides are plumb and if the lid works properly. As we have already said, you need to leave small gaps between the flooring slats, to allow the water drain properly.
Smooth all the exposed edges of the bench, using a sand-block, otherwise you might easily injure in the sharp edges. If you want to build the bench for your kids, multiply all the dimensions with 2/3 and use the same carpentry techniques.

Outdoor storage bench plans
The last step of the project is to take care of the finishing touches. Therefore, fill the head of the screws with a good wood putty and let it dry out properly. Next, sand the wooden surface with 120-grit sandpaper, making sure there is a smooth transition between the patches and the rest of the wood.
Top Tip: Apply several coats of wood stain to protect the wood from rot and to enhance its rustic appearance.
This woodworking project is about outdoor storage bench plans. If you want to see more outdoor plans, check out the rest of our step by step projects and follow the instructions to obtain a professional result.

2 comments
Can I print off there plans
You can print all the plans. Please read the FAQs for more details: http://myoutdoorplans.com/faq/