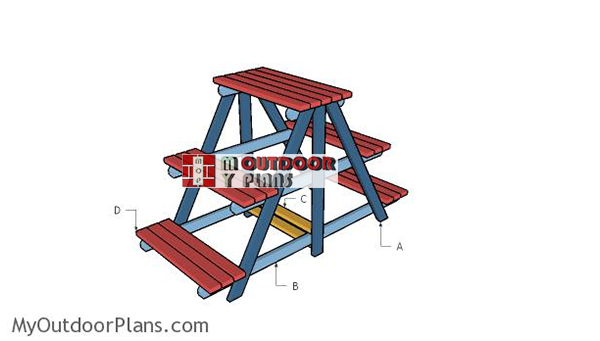
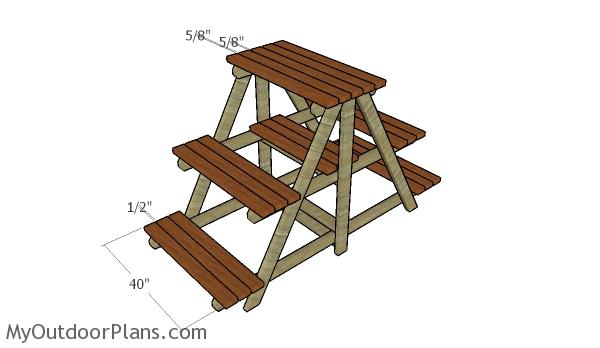
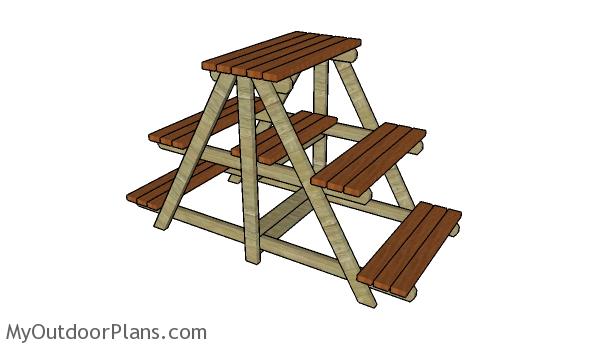
This step by step diy project is about large plant stand plans. I designed this tiered plant stand so you can save space and showcase your flowers. Exposing the flower pots to sunlight might be difficult, especially if you have many plants. Invest in cedar or other weather-resistant lumber, as the components will be exposed to the elements. Take a look over the rest of my woodworking plans, if you want to get more building inspiration.
When buying the lumber, you should select the planks with great care, making sure they are straight and without any visible flaws (cracks, knots, twists, decay). Investing in cedar or other weather resistant lumber is a good idea, as it will pay off on the long run. Use a spirit level to plumb and align the components, before inserting the galvanized screws, otherwise the project won’t have a symmetrical look. If you have all the materials and tools required for the project, you could get the job done in about a day. See all my Premium Plans HERE.
Projects made from these plans
Large plant stand plans
Building-a-large-plant-stand
Cut & Shopping Lists
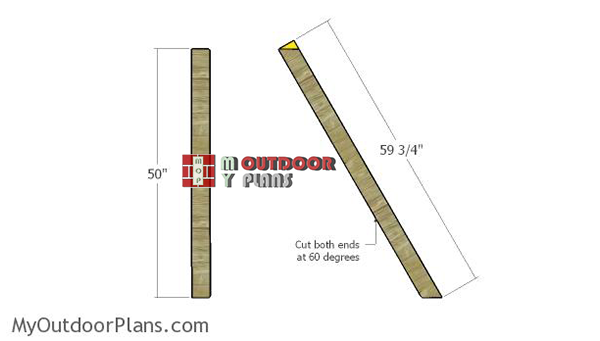
- A – 4 pieces of 2×4 lumber – 59 3/4″ long, 2 pieces – 50″ long LEGS
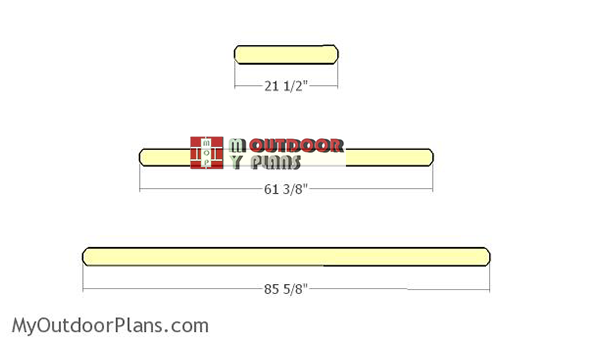
- B – 2 pieces of 2×4 lumber – 85 5/8″ long, 2 pieces – 61 3/8″ long, 2 pieces – 21 1/2″ long SUPPORTS
- C – 6 pieces of 2×4 lumber – 33″ long SUPPORTS
- D – 17 pieces of 2×4 lumber – 40″ long SHELVES
- 11 pieces of 2×4 lumber – 8′
- 9 piece of 2×4 lumber – 6′
- 2 1/2″ screws
- wood glue, stain/paint, wood filler
Tools
![]() Hammer, Tape measure, Framing square, Level
Hammer, Tape measure, Framing square, Level
![]() Miter saw, Drill machinery, Screwdriver, Sander
Miter saw, Drill machinery, Screwdriver, Sander
Time
![]() One day
One day
Related
Building an A-frame plant stand
Building-the-legs—plant-stand
The first step of the project is to build the legs for the A-frame plant stand. Cut the components from 2×4 lumber, as shown in the diagram. Smooth the edges with sandpaper. Set the miter at 30 degrees to make the angled cuts. After you make the cuts, the legs will be 60 degree at both ends.
Building-the-supports-for-plant-stand
Next, build the supports for the shelves. Make decorative cuts to both ends of the supports, as shown in the diagram. Smooth the edges with sandpaper and remove the residues with a damp cloth.
Assembling-the-sides-for-the-stand
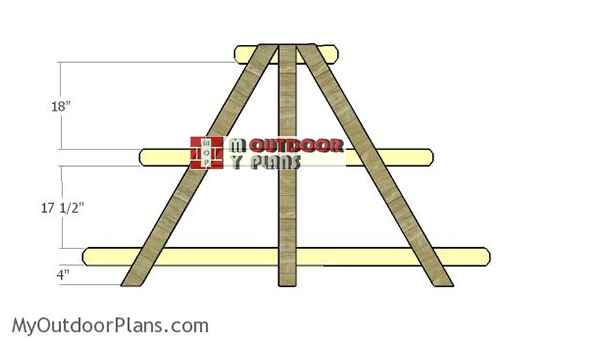
Lay the supports and the legs on a level surface. Align everything as shown in the diagram. Drill pilot holes through the legs and insert 2 1/2″ screws into the supports. Add waterproof glue to the joints to enhance the rigidity of the structure. Repeat the process for the opposite side of the A-frame plant stand.
Fitting the middle supports
The next step of the project is to fit the 2×4 supports to join the sides of the plant stand together. Drill pilot holes and insert 2 1/2″ screws to lock everything together tightly. Make sure the corners are square and leave no gaps between the components.
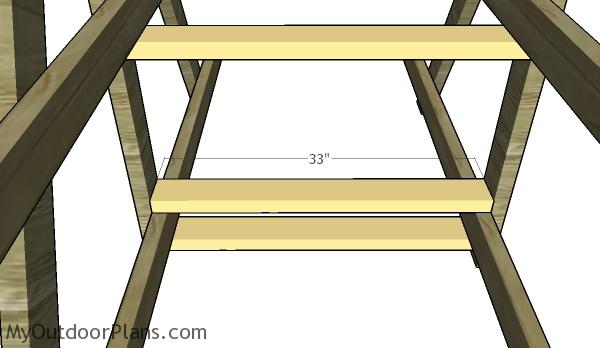
Middle shelf
Fit 2×4 slats to the A-frame so you can create the middle shelf. Drill pilot holes at both ends of the slats and insert 2 1/2″ screws into braces.
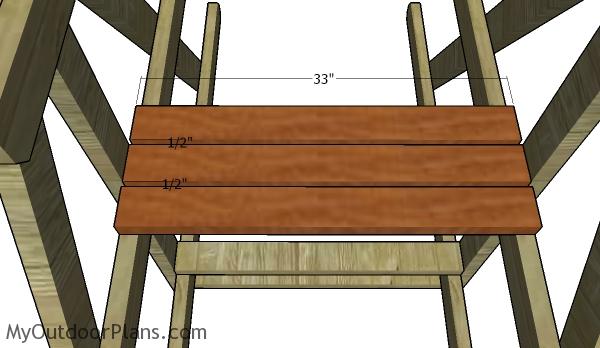
Fitting the shelves
Fit the 2×4 slats to the frame of the plant stand, so you can create the shelves. Center the slats to the braces, drill pilot holes and insert 2 1/2″ screws to lock them into place.
Plant stand plans
Last but not least, you need to take care of the finishing touches. Smooth the edges and fill the holes with wood putty. Afterwards, smooth the surface with 120-220 grit sandpaper. Apply a few coats of outdoor paint and then seal everything with spar varnish.
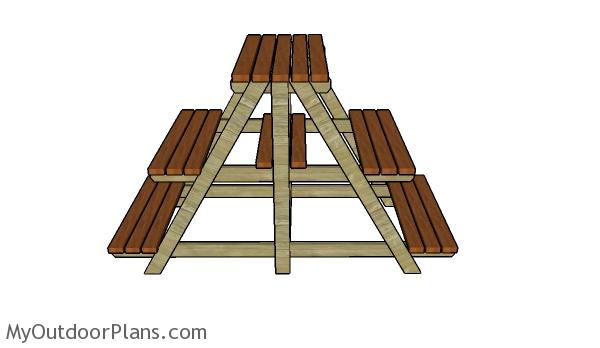
A-frame plant stand plans
This large A-frame plant stand is a wonderful addition to any backyard, as it will hold all your flower pots in a stylish manner. Therefore, you can save space and create a conversation piece. Check out the rest of the my free woodworking plans HERE. If you build this, I would love to see your project.
This woodworking project was about free large tiered plant stand free. If you want to see more outdoor plans, check out the rest of our step by step projects and follow the instructions to obtain a professional result.
EXPLORE MORE IDEAS FOR:
 |
 |
 |
 |
2 comments
I printed the large plant stand plans and I’m not good with angles! First step says to cut both ends 60 degrees! As I know there is no 6o degree angle on a mitre saw! So my question is what does that 6o degrees convert to on a mitre saw? I know to most silly question but I’m teaching myself some carpentry skills! I know all the degree cuts needs converted to the mitre saw so I would love your input on how to do this in the simplest of terms for me to learn how to do this! Thx for reading and look forward to your help! P.s. this is the most amazing diy site on the net! Again thx for reading my silly !
Set the miter at 30 degrees to make the angled cuts. After you make the cuts, the legs will be 60 degree at both ends.