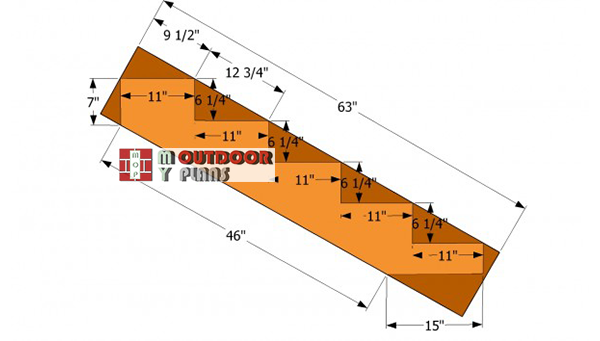
This step by step diy project is about deck stairs plans. Building deck stairs can be done in several ways, therefore you should choose the option that fits your needs. From our experience, we can say that building stairs for an elevated deck is a complex project, as it requires lots of preparation and calculus. It is essential to use accurate proportions, such as 11″ for the for treads or 6 1/4″ for the rise.
Make sure you use 2×12 beams to build the stringers. In addition, if the stairs are wider than 36″, you need to install a middle stringer, to support the weight of the structure properly. When speaking about building the stringers, you have three options: notched stringers, solid stringers or housed stringers with a middle carriage. All of these options have their own pros and cons, but in this article we show you the most complex choice: the notched stringers.
Projects made from these plans
Cut & Shopping Lists
- A – gravel, sand and cement, welded wire LANDING
- B – 3 pieces of 2×12 lumber – 63″ long STRINGERS
- C – 2 pieces of 2×4 lumber – 21 3/4″ long CLEATS
- D – 10 pieces of 2×6 lumber – 48″ long DECKING
Tools
![]() Hammer, Tape measure, Framing square
Hammer, Tape measure, Framing square
![]() Miter saw, Drill machinery, Screwdriver, Sander
Miter saw, Drill machinery, Screwdriver, Sander
Time
Related
- Part 1: Outdoor Deck Plans
- Part 2: Deck Framing Plans
- Part 3: Deck Stairs Plans
- Part 4: Deck Railing Plans
- Part 5: Deck Stair Railing Plans
Building deck stairs
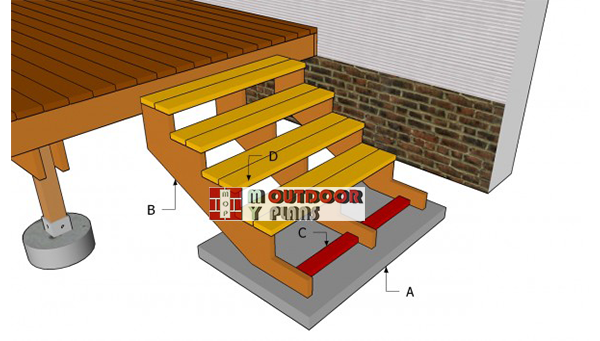
Building-deck-stairs
Top Tip: Building deck rails can be done in several ways, so you should study the alternatives and choose the most convenient option for your needs. The most difficult part of the project is to cut the stringers, but you have always the option of installing metal brackets to support the treads.
Deck Stairs Plans
Marking-the-cut-lines
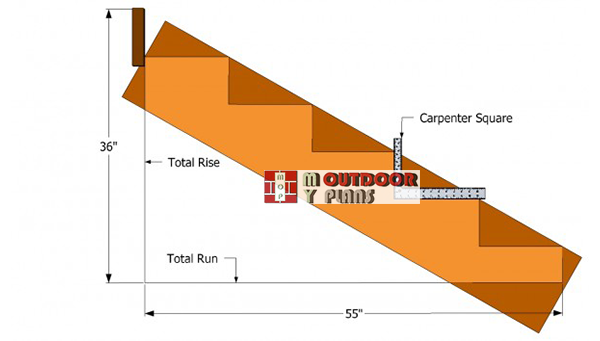
The first step of the project is to mark the cut lines of the 2×12 beams. You can also use full beams and support the treads with metal brackets, but for this project the cut stretcher make more sense. Start with measuring the rise of the stairs (the distance from the ground to the decking).
Use a carpentry square to mark the lines on the beams. The treads should be around 10-11″ and the rise between 6 1/4″ and 8″.
Building-the-stringers-for-deck
After marking the cut lines on the wooden beams, you should get the job done with a circular saw. Make sure the proportions are accurate, otherwise the stringers won’t fit into place properly. Plan everything with attention or buy precut stringers.
Top Tip: Don’t forget to smooth the edges of the stringers with medium-grit sandpaper. Make three stringers in the same manner described above, for 48″ wide stairs.
Building the landing pad
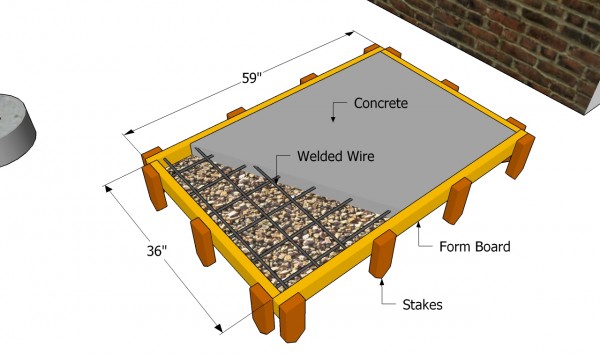
Afterwards, you should fit the stringers into place and mark the place where they meet the ground. It is essential to pour a concrete landing pad, as to secure the stringers into place tightly.
Dig about 6″ in the ground and install a basic form. Compact a layer of 3″ of gravel, place a piece of welded wire and pour a 3″ layer of concrete. Level the surface thoroughly, moving a straight edge along the form.
Attaching the stringers to the framing
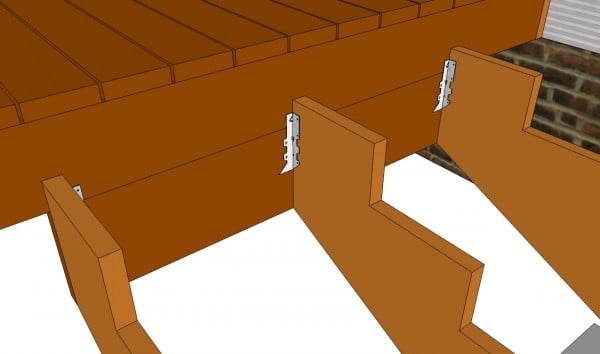
Align the stringers at both ends and secure them to the joists of the deck. As you can see in the image, the easiest way to get the job done is to use corner brackets. Use nails to secure the joists into place, after plumbing them with a spirit level.
Top Tip: Make sure you place the stringers equally spaced, if you want to provide a proper support to the stairs. If necessary, place a piece of 2×6 lumber under the joists, as to increase the support surface.
Attaching the stringers to the base
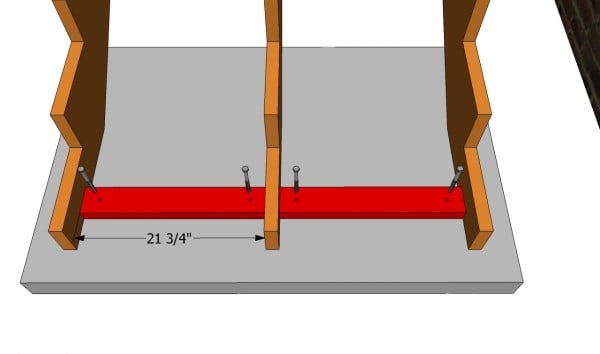
Continue the woodworking project by securing the other end of the stringers to the concrete landing pad. In order to get the job done, you have several options: brackets, cleats or anchor bolts.
From our experience, using 2×4 cleats is a good choice, as it provided a good support to the structure. Secure the cleats to the stringers with 3 1/2″ wood screws. Drill pilot holes, insert dowels and drive in lag screws.
Installing-the-decking-stairs
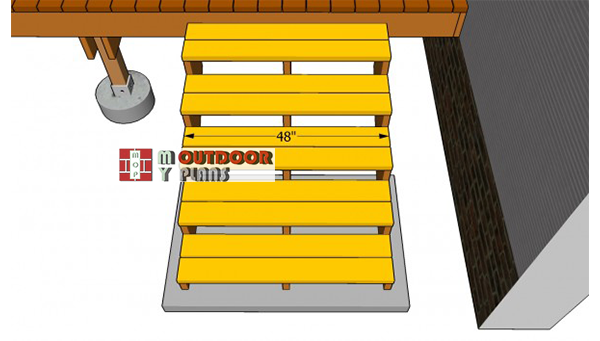
One of the last steps of the project is to install the treads. As you can easily notice in the image, you need to use 2×6 lumber. Place the decking boards on top of the stringers, drill pilot holes and insert 2 1/2″ galvanized screws into the framing.
Top Tip: Make sure you leave 1/2″ between the decking boards. In this manner, the water could drain properly and will not damage the components. Don’t forget to countersink the head of the screws, in order to get a nice appearance.
Deck stairs plans
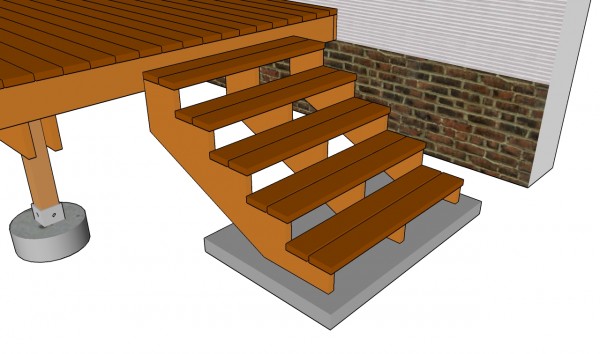
Last but not least, you should take care of the finishing touches. Therefore, fill the holes with wood putty and let the compound to dry out for several hours. Smooth the surface with medium-grit sandpaper along the wood grain.
Top Tip: Apply several coats of stain or paint to enhance the look of the deck stairs and to protect the components from decay. Check out the rest of the project, to how how to build the deck stair rails.
This project was about deck stairs plans. If you want to see more outdoor plans, we recommend you to check out the rest of the projects. Don’t forget to share our projects with your friends, by using the social media widgets.
