This step by step diy project is about simple carport plans. I have designed these plans so you can built a single car carport in less than one week. Although it is a sturdy structure, this carport is really easy to build, as I have spent a lot of time designing it as simple as possible. Make sure you set the location and start the building process, only after reading the local building codes and getting the permit if necessary. Take a look over the rest of my woodworking plans, if you want to get more building inspiration.
When buying the lumber, you should select the planks with great care, making sure they are straight and without any visible flaws (cracks, knots, twists, decay). Investing in cedar or other weather resistant lumber is a good idea, as it will pay off on the long run. Use a spirit level to plumb and align the components, before inserting the galvanized screws, otherwise the project won’t have a symmetrical look. If you have all the materials and tools required for the project, you could get the job done in about a day.
Projects made from these plans
It’s that simple to build a carport!
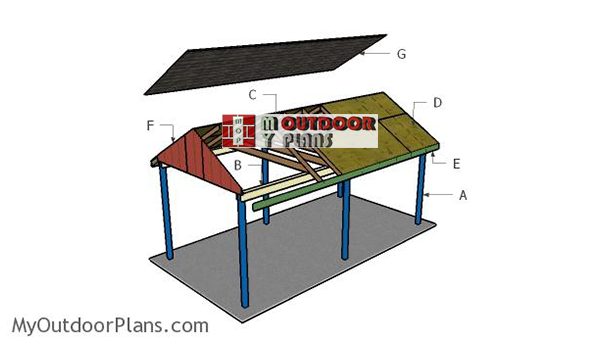
Simple Carport Plans
Building-a-simple-carport
Cut & Shopping Lists
- A – 6 pieces of 4×4 lumber – 132″ long POSTS
- B – 4 pieces of 2×6 lumber – 240″ long SUPPORTS
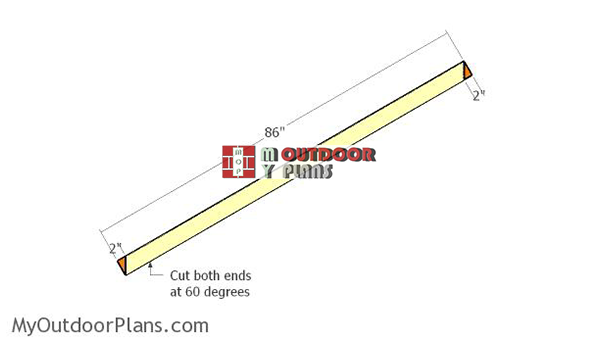
- C – 1 piece of 2×6 lumber – 120″ long, 2 pieces of 2×4 lumber – 86″ long 11xTRUSS
- C – 1 piece of 1/2″ plywood – 8″x27 3/4″ long, 2 pieces – 14 3/8″x18″ long 11xGUSSETS
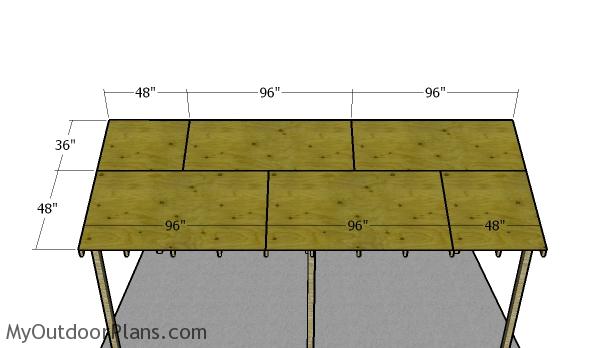
- D – 4 pieces of 3/4″ plywood – 48″x96″ long, 2 pieces – 48″x48″ long, 4 pieces – 36″x96″ long, 2 pieces – 36″x48″ long ROOF
- E – 2 pieces of 1×6 lumber – 240″ long TRIMS
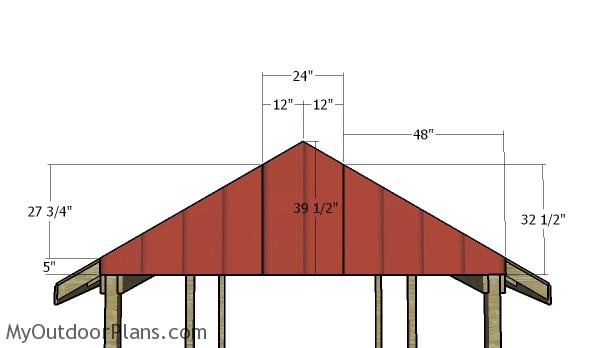
- F – 4 pieces of 5/8″ siding – 32 1/2″x48″ long, 2 pieces – 24″x39 1/2″ long GABLE ENDS
- G – 300 sq ft of tar paper, 300 sq ft of asphalt shingles ROOFING
- 6 pieces of 4×4 lumber – 12′
- 4 piece of of 2×6 lumber – 20′
- 22 pieces of 2×4 lumber – 8′
- 11 pieces of 2×6 lumber – 10′
- 1 piece of 1×6 lumber – 20′
- 3 pieces of 5/8″ siding – 4’x8′
- 10 pieces of 3/4″ plywood – 4’x8′
- 2 pieces of 1/2″ plywood – 4’x8′
- tube form, post anchor
- 12 pieces 7″ carriage bolts
- 500 pieces of 2 1/2″ screws
- rafter ties
- 300 sq fr of tar paper, asphalt shingles
- 2″ brad nails
- wood glue, stain/paint
- wood filler
Tools
![]() Hammer, Tape measure, Framing square, Level
Hammer, Tape measure, Framing square, Level
![]() Miter saw, Drill machinery, Screwdriver, Sander
Miter saw, Drill machinery, Screwdriver, Sander
![]() Concrete mixer, Post hole digger
Concrete mixer, Post hole digger
Time
![]() One weekend
One weekend
Related
How to build a single car carport

Laying-out-the-posts
The first step of the woodworking project is to lay out the carport in a professional manner. Build batter boards and use string to layout everything in a professional manner. Apply the 3-4-5 rule to every corner and make sure the diagonal are equal, otherwise the corners won’t be square.
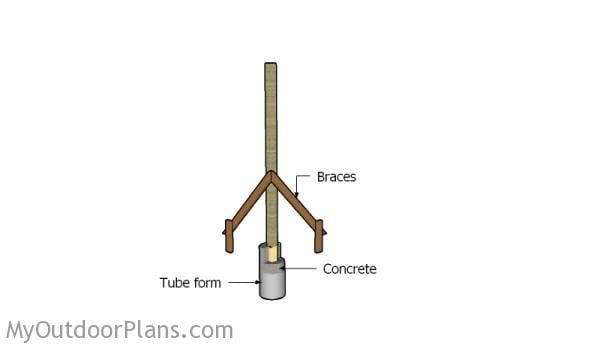
Setting the posts in concrete
You can set the posts in concrete (about 3′ deep – make sure you read the local building codes for accurate information) or you can pour footing and use posts anchors. If you live in an area affected by hurricanes, it would be better to set the posts in concrete.
Use a post hole digger to make 15″ holes in diameter and 3′ deep. Pour a 2″ layer of concrete on the bottom of the holes so you level them. Fit the tube forms and then the 4×4 posts. Use a spirit level to make sure the posts are plumb and then secure them temporarily into place with braces. Fill the tubes with concrete and let it dry out as shown on the bags.
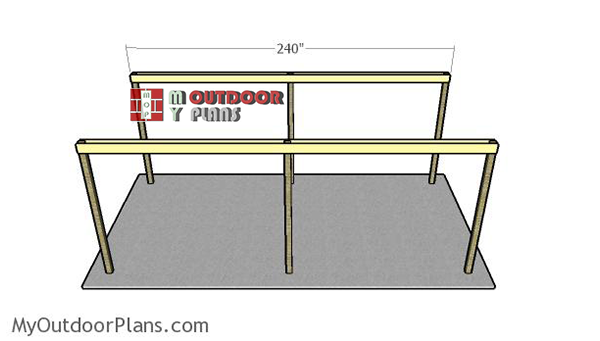
Fitting-the-support-beams
Attach 2×6 beams to the top of the posts and clamp them into place, after making sure they are horizontal. Drill pilot holes through the beams and through the posts and insert 7″ two carriage bolts to lock them tightly into place.
Build-the-regular-rafters
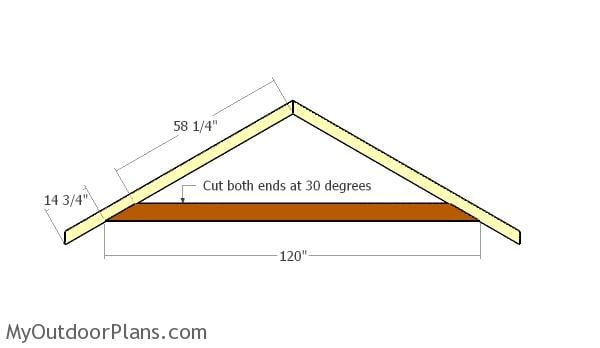
Build the regular rafters from 2×4 lumber. As you can see in the plans, you need to make 60 degree cuts to both ends of the common rafters. Smooth the edges with sandpaper.
Building the bottom rafters
Use 2×6 lumber for the bottom rafters. Make 60 degree cuts to both ends of the beams using a miter saw.
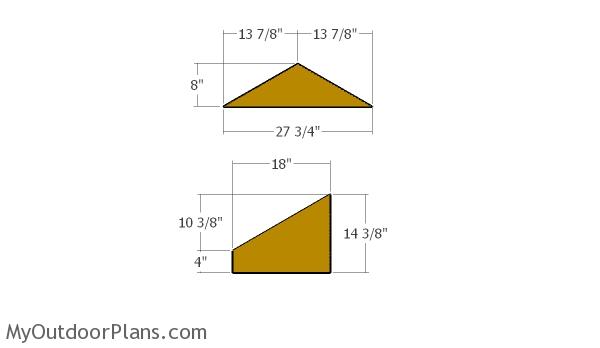
Building the gussets
In order to assemble the trusses in a professional manner, I recommend you to build gussets from 1/2″ plywood. Mark the cut lines on the plywood sheets and get the job done with a saw. Smooth the edges with sandpaper and remove the residues before fitting them into place.
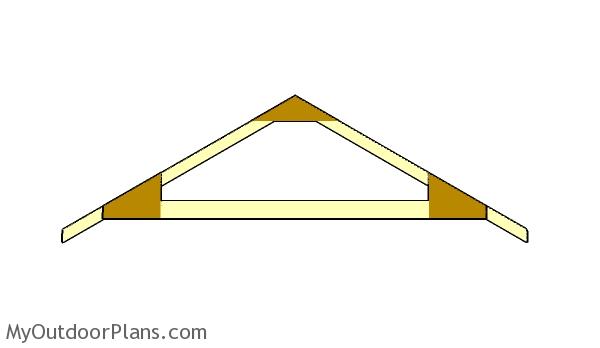
Fitting the gussets
Lay the rafters on a level surface, making sure all the components are properly aligned. Check if there are any any gaps between the rafters before attaching the gussets into place. Align the edges and use 1 1/4″ screws to lock the gussets into place.
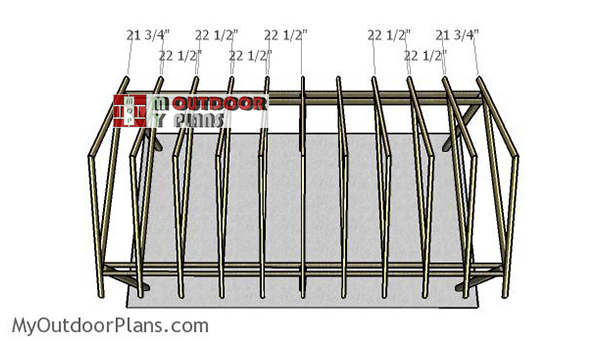
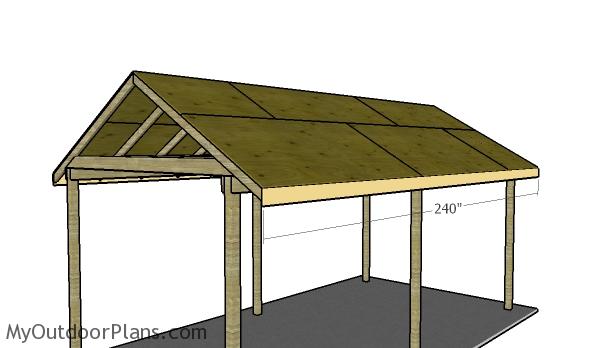
Fitting-the-trusses
Fit the trusses to the top of the single car carport, making sure you place them every 24″ on center. Use a spirit level to plumb the trusses and lock them to the support beams with rafter ties. In addition, toenail the bottom rafters to the support beams, for extra rigidity.
Fitting the roofing sheets
Attach 3/4″ plywood sheets to the top of the carport. Start with the bottom left section of the carport and go up to the top. Leave no gaps between the sheets and secure them into place with 2″ screws or nails.
Fitting the side trims
Fit 1×6 trims to the sides of the carport, so you cover the ends of the rafters. Use 2″ brad nails to secure the trims into place. Align the edges with attention for a professional result.
Fitting the gable ends
Build gable ends for the carport, for an exquisite look. Build the panel from 5/8″ siding. Mark the cut lines on the sheets and get the job done with a saw. Attach the panels to the structure and lock them into place with 2″ brad nails.

Fitting the roofing
Install the roofing felt, starting from the bottom left of the roof. Secure the paper to the roofing, using a stapler. Make sure the tar paper overlaps at least 2”. Don’t forget to cover the top ridge with a 14” strip of paper .
Start the first course of shingles with a full tab, the second with 2 1/2 tabs, the third with 2 tabs, the forth with 1 1/2 tabs, the fifth with 1 tab, the sixth with half tab and the seventh with a 3 tabs.
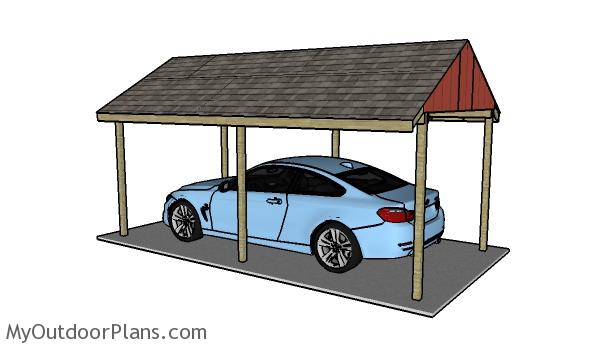
Small carport plans
Once you have assembled the small carport, you should take of the finishing touches. Make sure you double check all the joints and smooth the edges with sandpaper. Fill the holes with wood putty and even out the surfaces with 120-220 sandpaper. Apply a few coats of stain to enhance the look of the project and to protect the wood from decay.
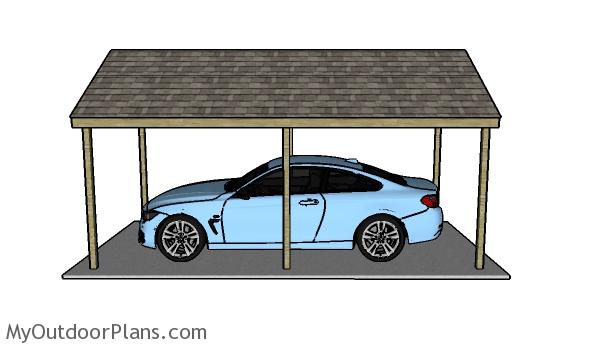
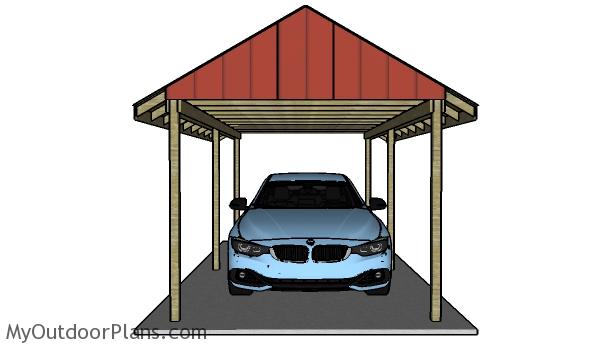
Single car carport plans
The gable roof carport can blend in with any yard design, so you don’t have to worry about this. Even if the carport doesn’t have front and back overhangs, it will protect your car from the elements. You should also take a look over the rest of the carport designs I feature on my blog, as there are more alternatives to choose from.
Simple carport plans
This is a super simple project anyone should be able to build in a few days without much effort. If you have a handy friend, I don’t see why you shouldn’t be able to assemble everything in one weekend. Remember that you need to adjust the size of the components so they suit your particular own needs and you have to check the local building codes before starting the building process.
This woodworking project was about single carport plans free. If you want to see more outdoor plans, check out the rest of our step by step projects and follow the instructions to obtain a professional result.
EXPLORE MORE IDEAS FOR:
 |
 |
 |
 |
4 comments
I was looking at the Simple Carport plan and it says 6 4×4 lumber at 132″ and then below in the list says 6 4×4 at 12′ which is 144″. Which is it?
If you go by the suggestion of the post hole being 3′ deep and the 4×4 lumber being 132″ then that would leave 8′ above ground for the posts. Is this correct? It doesn’t really show in the plan the actual height of the posts above ground.
Yes, that is correct. The top section is the cut list, the bottom section is the materials list. You cannot buy 11′ long lumber, so that’s why it is listed 6 pieces at 12′.
Hello,
Do you have a set of plans for this for a two car wide carport cover?
What is the horizontal distance from the outside of the post to the outside edge of the roof.