This step by step woodworking project about carport plans free. If you want to protect your car from bad weather, choose proper carport building plans for your needs and budget. In this project, we show you a simple and cheap way of protecting your car, while building a nice free-standing construction in your backyard. Always choose quality and weather-resistant lumber, if you want to build a durable carport.
Let’s talk about the cost of building a single car lean-to carport. You’re looking at around $700 to $1000 for all the materials, depending on the quality of wood and roofing you choose. Of course, prices can vary based on your location, but this estimate should give you a solid ballpark to plan your budget.
There are several things that you need to know before starting the actual construction of the single carport. You need to know if there are any legal requirement you have to comply with, before choosing the right plans for your needs. Pay a visit to the local building department, if you want to find more information about the matter. In addition, don’t forget that you should check out the rest of the carport plans. See all my Premium Plans HERE.
Projects made from these plans
Cut & Shopping Lists
- A – 6 pieces of tube forms, concrete FOOTING
- B – 3 pieces of 4×4 lumber 120” long, 3 posts of 4×4 lumber 140″ POSTS
- C – 2 pieces of 2×6 lumber 240” long SUPPORT BEAMS
- D – 8 pieces of 4×4 lumber 25 3/4” long, cut at 45º at both ends BRACES
- E – 12 pieces of 2×4 lumber 122 1/2” long RAFTERS
- F – 8 pieces of 3/4” tongue and groove plywood 4×8′ ROOFING
- G – 250 sq ft of tar paper TAR PAPER
- H – 250 sq ft of asphalt shingles ASPHALT SHINGLES
- I – 2 pieces of 1×6 lumber – 125 3/4″ long TRIMS
- 3 pieces of 4×4 lumber – 10′
- 3 pieces of 4×4 lumber – 12′
- 3 pieces of 4×4 lumber – 4′
- 2 pieces of 2×6 lumber – 20′
- 12 pieces of 2×4 lumber – 12′
- 8 pieces of 3/4″ plywood – 4’x8′
- 250 sq ft of tar paper
- 250 ft of asphalt shingles
- 3 tube form
- 6 pieces of post anchor
- 500 pieces of 2 1/2″ screws
- 500 pieces of 1 1/4″ screws
- wood glue, stain/paint
Tools
![]() Hammer, Tape measure, Framing square, Level
Hammer, Tape measure, Framing square, Level
![]() Miter saw, Drill machinery, Screwdriver, Sander
Miter saw, Drill machinery, Screwdriver, Sander
![]() Post hole digger, Concrete mixer
Post hole digger, Concrete mixer
Time
Carport building plans
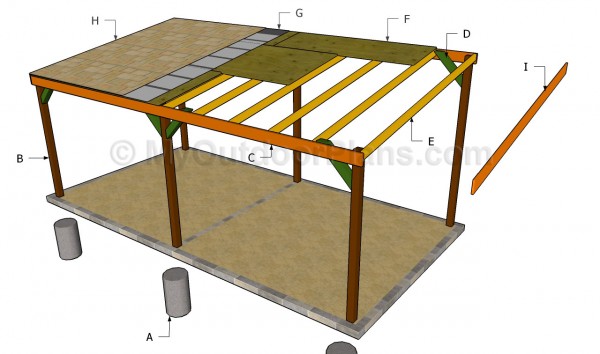
Carport building plans
Top Tip: Building a simple carport for one car is simple and cheap woodworking project, that can be done by any person with basic woodworking skills. As you will find out in this project, you need to adjust the size of the carport to your needs.
Carport plans free
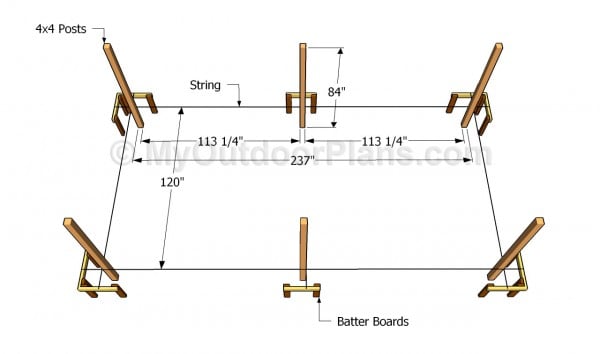
Layout the carport
The first step of the project is to layout the single carport. As you can notice in the image, you need to use batter boards and string. After fitting them into place, we recommend you to check if the corners are right angled, by applying the 3-4-5 rule to each corner.
Top Tip: In addition, adjust the position of the string until the diagonals are equal. Dig 2-3′ deep holes.
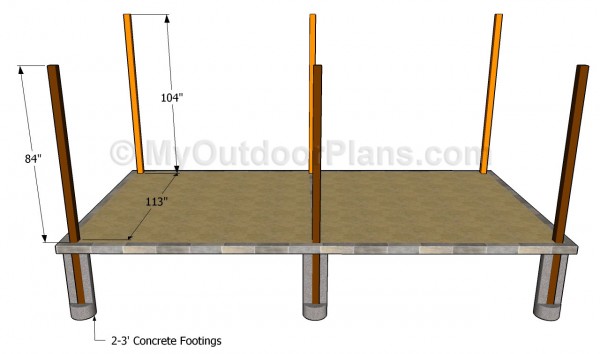
Setting the posts into concrete
There are several options when fitting the posts of the carport. As you can see in the image, the best option is to dig 2-3 deep holes (at least 6″ under the frost line) and set the posts into concrete. Alternatively, you can pour footings and use post anchors.
Top Tip: We recommend you to plumb the posts with a spirit level and to secure them temporarily with 2×4 braces, before filling the tube forms with concrete. Let the concrete to dry out for several days.

Attaching the support beams
The next step of the woodworking project is to attach the 2×6 support beams to the posts. As you can see in the carport plans free, you should attach the beams to the posts with several C-clamps, after leveling them.
Drill pilot holes trough the components and lock the beams to the posts with several 5 1/2″ carriage bolts. Use washers and make sure you don’t over-tighten the nuts.
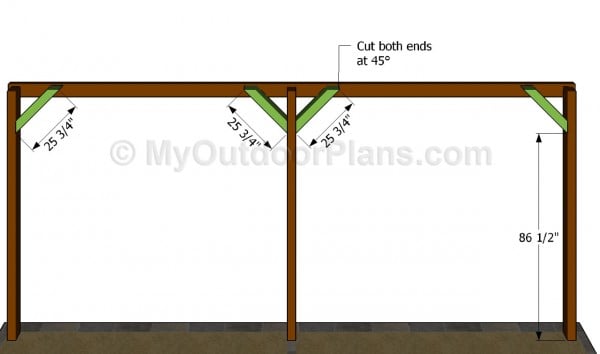
Fitting the braces
Although this step is not compulsory, we strongly recommend you to attach 4×4 braces to the posts, as in the image. Cut the ends of the braces at 45º and lock them to the posts and beams with 3 1/2″ galvanized screws.
Always drill pilot holes before inserting the galvanized screws, to prevent the wood from splitting. In addition, add waterproof glue to enhance the rigidity of the joints.
Building the rafters
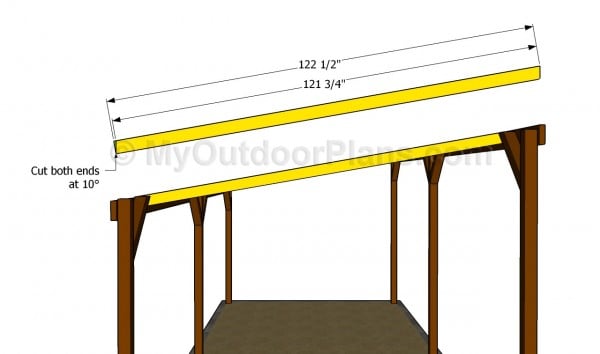
Attaching the rafters into place is a straight forward process, but you need first to cut their ends as in the plans. Use 2×4 lumber to build the rafters and cut their ends at about 10º.
Top Tip: If you want to get a professional result, we recommend you to take accurate measurements and to cut the ends of the rafters at about 10º, using a miter saw. Work with attention and plan everything from the very beginning.
Fitting the rafters
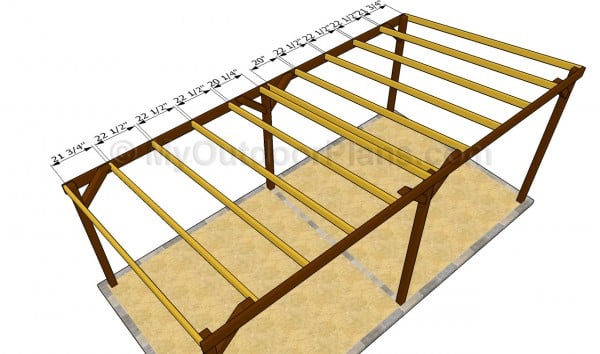
You need to place the rafters equally spaced, every 24″ on center. As you can notice in the plans, we recommend you to fit the rafters between the beams. Drill pilot holes trough the 2×6 beams and insert 3 1/2″ galvanized screws into the rafters.
We strongly recommend you to ask a friend to help you when building the roof of the carport, as one person needs to hold the rafters into place, while the other one inserts the screws.
Attaching the roofing sheets
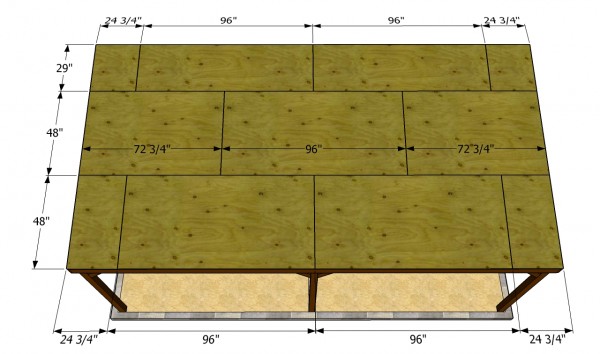
Attach 3/4″ plywood sheets on top of the rafters, starting with the bottom part of the roof. It is essential to adjust the size of the tongue and groove sheets using a good circular saw, before securing them into place.
Align the sheet at both ends and insert 1 1/4″ screws into the rafters, every 6-8″. Make sure the sheets cover the support beams and there are no gaps between the plywood sheets.
Installing the roofing
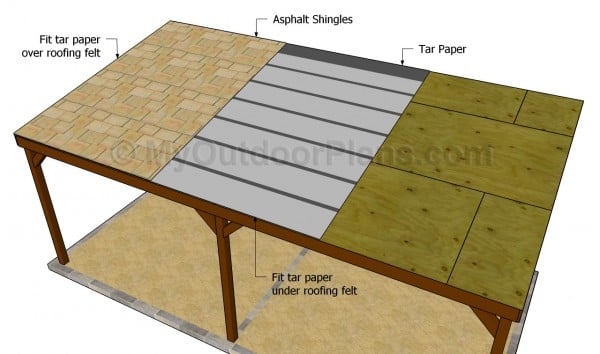
Install the roofing felt, starting from the bottom left of the roof. Secure the paper to the roofing, using a stapler. Make sure the tar paper overlaps at least 2”. Don’t forget to cover the top ridge with a 14” strip of paper .
Start the first course of shingles with a full tab, the second with 2 1/2 tabs, the third with 2 tabs, the forth with 1 1/2 tabs, the fifth with 1 tab, the sixth with half tab and the seventh with a 3 tabs.
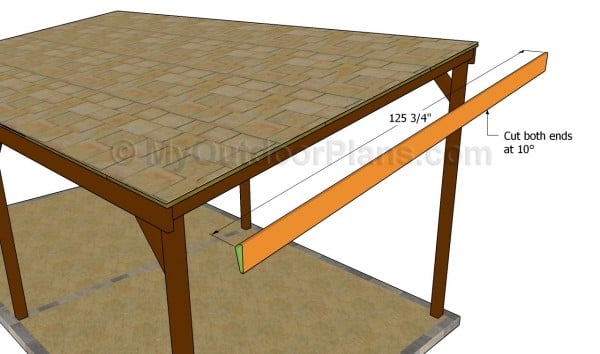
Attaching the trims
If you really want to enhance the look of the carport, we recommend you to attach 1×6 trims to the front and back faces of the carport. As you can easily notice in the image, we recommend you to cut the ends of of the trims at 10º and lock it to the rim rafters with 1 1/4″ finishing nails.
Align the trims at both ends before inserting the finishing nails, if you want to get a carport with a nice appearance.
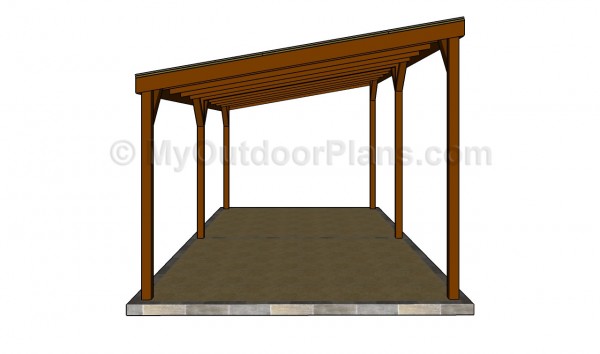
Carport Plans Free
Last but not least, you should take care of the finishing touches. Fill the gaps with wood putty and let the compound dry out for several hours, before sanding the surface with 120-grit sandpaper. Clean the surface with a cloth and apply several coats of wood stain, to protect the wood from rot.
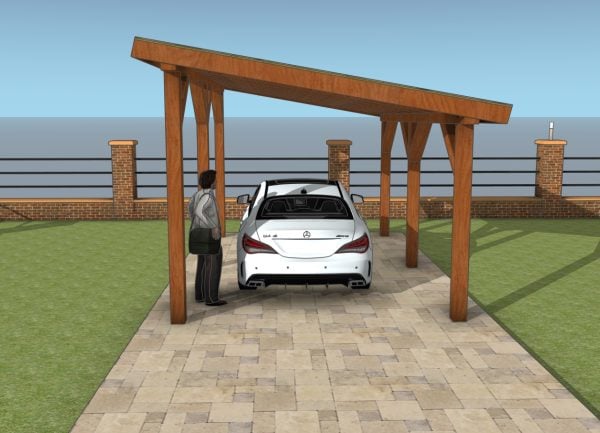
Lean to carport plans
A single car lean-to carport is a brilliant project with loads of benefits. It provides essential protection for your vehicle from the elements, saving you time on cleaning and maintenance. Plus, it’s a straightforward build that gives you the chance to sharpen your DIY skills and add value to your home.
Top Tip: You could fit lattice panels between the posts, if you want to protect your car from bad weather. In addition, the panels would add character to your construction.
This woodworking project was about carport plans free. If you want to see more outdoor plans, we recommend you to check out the rest of our step by step projects.
EXPLORE MORE IDEAS FOR:
 |
 |
 |
 |

28 comments
Love the plan. I live in the mountains in Colorado. What pitch should I make the roof to be safe. Don’t want too much weight up there.
Usually, when you live in a snowy area the roof pitch should be over 1″ per foot, so approximately 9.5 degrees. This carport has a roof slope of 10 degrees. Just to be safe, you could make it over 15 degrees. Good luck and keep me updated with the progress!
Most areas of Colorado require a minimum 4-12 pitch. In other words…for every 12 inches horizontal, the roof must be elevated a minimum of 4 inches. This is due to potential snow loads. Don’t forget the minimum 3/4″ plywood for the roof prior to snow barrier and shingles. You won’t regret this step.
How do I get plans sent to my email? Thank you. Laurel
You should use the green floating icon on the left side of the screen (only on desktop). By pressing the green printer icon you can save a PDF version of the plans or print them.
i have a cement pad all ready can i just use steel bases to put on with instead of digging through cement? also i am in colorado…will this way hold up to winds…ty!
Theoretically, it should work, but the best thing to do is talk to a local builder/engineer that knows more about the intensity of the winds and such. In addition, I am sure the local building codes provide lots of information on what you can and can’t do.
Is it safe to sheet the 3 of the walls on this so that only the drive in opening is left open. I drive know if it would cause this to be unstable with winds. The address i an putting this would be somewhat protected within a fenced back yard with a fence on one side and a shed behind it, but winds would still get to it. My area is not overly windy. But several times a year we can have steady 20 to 30mph with winds gusting up to 50-60mph.
Thanks
I think it should work, if you frame the walls properly, so the sheets have some back supports. In addition, you should reinforce the roof and the rest of the joints to be prepared. Make sure you take the measurements and check if you can open the car doors properly with the walls in place. In addition, you should take a look over my single car garage plans at: http://myoutdoorplans.com/carport/free-garage-plans/
Hello, is there anyway to use this plan but make the car port 20 feet wide by 40 feet long?
I don’t have plans for that. The only way to do that is adjust the plans on your own.
Hi, Do you think it would be okay to substitute a tin roof (not an expensive metal house roof) instead of shingled to keep expenses down? I’m actually using this design to put an outdoor tiki bar under whenever it rains, snows. I live in southeastern Massachusetts so we do get snow.
I don’t see why it wouldn’t work. However, read the local codes before starting the project,
No place to get the plans (pdf) ???? No printer icon anywhere on this page.
Left of the screen. The first floating button. If it doesn’t show, you might need to disable your adblocker.
Thank you
Amateur construction person here but can follow plans very well…was wondering if you have a plan for a 30×30 carport with a single sloped roof? I realize with that length I need to be careful to distribute weight accordingly if I were to modify the above plans…I am open to suggestions. Thank you
The closest I have is this plan: http://myoutdoorplans.com/carport/2-car-carport-plans/ But I don’t have a 30×30 lean to carport plan
Thank you…structurally could I add another 10 ft section onto the existing plans following the same process for setting post and support beams?
Thank you for sharing your plans—this is my inspiration for designing and building an RV carport, but with a solar roof. I am not a structural engineer, but I have drawn CAD plans for a home builder. I don’t see any fore-aft bracing, so I’d be concerned this structure could blow over. Has this design passed building inspection and been used successfully, and in what region? This looks like it would work in a warmer climate, but I live in New England, and we have to deal with snow loads. Do you have a design that would support that kind of roof loading? Is it as simple as using heavier dimensional lumber in place of the 2×4 rafters? How much do the beams, posts, and footings need to also be increased? This info would help me get a design and cost estimate before having plans approved by an engineer. Thanks!
You should check my heavy duty design: http://myoutdoorplans.com/carport/12×24-do-it-yourself-lean-to-carport-plans/
Do you have an RV-type carport with a flat roof that would support a deck?
No, I don’t have plans for that.
Thank you,
Do you have a plan for 18 ft. x 18.5 ft. lean flat carport. (roll roof)
No
My wife and I are the homeowners with a 24’x36′ concrete slab in our back yard. We would like to build a free standing lean-to or open Carport on it. The goal is to create a shaded area for enjoying the backyard.
Points or information about the slab:
– slab was poured 4+ years ago
– 12″x12″ continous footer with rebar
– 4″ inner area thickness
– visquene used under all concrete
– used concrete with fiber in it
We want to see what the cost would be for the plans to build this as a DYI project. We want to make sure that it will not blow over during the next hurricane. We live in the Town & County area of Tampa, Florida.
Any information, insight or advice would be greatly appreciated.
Thank you.
Hello,
This carport is exactly what the town I’m building in requires, Do you have a version that I’d be able to submit to plan check? Even if I have to pay for it. Just not sure if they would accept this version.
Thank you!
No, sorry