This step by step diy project is about 24×24 double detached garage plans. I have designed this basic 2 car garage with a gable roof, so you can build a sturdy structure with a gable roof, in your yard. This garage feature two 9′ garage doors to the front, one 3′ side door and one 4’x4′ window. Plan everything from the very beginning and build a strong foundation for the garage, in order to build a durable garage. Read the local building codes and adjust my plans to comply with the legal requirements
It is essential to choose the right materials before starting the construction and the assembly of the garage. As you will see in the project, you need to choose durable lumber with a nice appearance, such as pine, cedar or redwood. Make sure the components are in a good visual condition and choose professional tools when adjusting their size. Take accurate measurements and join the components with glue and screws. See all my Premium Plans HERE.
Projects made from these plans
24×24 Double Garage Plans – Free PDF Download

Building-a-2-car-24×24-carport
Cut & Shopping Lists
- A – 1 piece of 2×4 lumber – 10 1/4″ long, 1 piece – 12″ long, 1 piece – 144″ long, 5 pieces – 115 1/2″ long, 9 pieces – 11 3/4″ long, 2 pieces of 2×10 lumber – 114″ long 2xFRONT WALL
- B – 2 pieces of 2×4 lumber – 140 1/2″ long, 10 pieces – 115 1/2″ long 2xBACK WALL
- C – 2 pieces of 2×4 lumber – 144″ long, 11 pieces – 115 1/2″ long 2xSIDE WALL
- D – 1 piece of 2×4 lumber – 144″ long, 1 piece – 47 1/4″ long, 1 piece – 59 1/4″ long, 10 pieces – 115 1/2″ long, 5 pieces – 30″ long, 2 pieces – 80″ long, 2 pieces of 2×6 lumber – 40 1/2″ long SIDE WALL
- D – 2 pieces of 2×4 lumber – 144″ long, 10 pieces – 10 1/2″ long, 5 pieces – 30″ long, 5 pieces – 26 1/2″ long, 2 pieces – 48″ long, 4 pieces – 51″ long SIDE WALL
- E – 2 pieces of 2×4 lumber – 120″ long, 2 pieces – 144″ long, 4 pieces – 72″ long, 2 pieces – 80 1/2″ long DOUBLE PLATES
- E – 26 pieces of 2×4 lumber – 168″ long, 2 pieces – 35″ long, 2 pieces – 72 5/8″ long, 2 pieces of 2×6 lumber – 144″ long, 2 pieces – 192″ long, 2 pieces – 96″ long TRUSS
- F – 26 pieces of 1/2″ plywood – 48″x96″ long, 6 pieces – 24″x96″ long, 4 pieces – 21″x48″ long, 2 pieces – 24″x48″ long, 4 pieces – 20″x47 3/4″ long WALLS
- 15 pieces of 2×4 lumber – 12′
- 120 pieces of 2×4 lumber – 10′
- 3 pieces of 2×6 lumber – 10′
- 4 pieces of 2×10 lumber – 10′
- 26 pieces of 2×4 lumber – 14′
- 26 pieces of 2×6 lumber – 12′
- 32 pieces of 1/2″ plywood – 4’x8′
- anchor bolt
- 3 1/2″ screws
- 8d nails, 16d nails
- truss plate, truss plate
- rafter ties
Tools
![]() Hammer, Tape measure, Framing square, Level
Hammer, Tape measure, Framing square, Level
![]() Miter saw, Drill machinery, Screwdriver, Sander
Miter saw, Drill machinery, Screwdriver, Sander
Time
![]() One day
One day
Related
- Part 1: 16×24 Detached Garage Plans
- Part 2: 16×24 Detached Gable Garage Roof Plans
24×24 Double Garage Plans
Building a 24×24 2 car detached garage
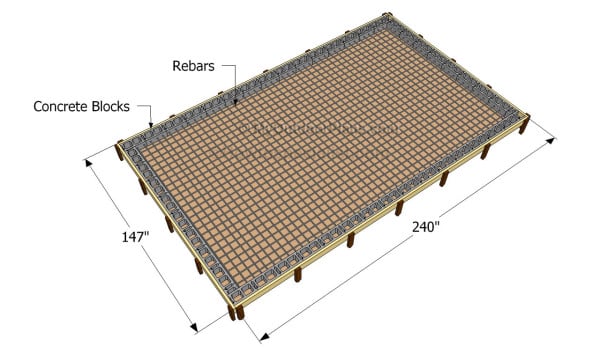
Building the concrete slab
A detached garage doesn’t require deep footings as in the case of attached constructions. However, read the local codes so you determine the appropriate depth of the perimetral footings. Use batter boards to lay out the footing and then gig the trenches. Fit the rebars and pour the footings along with the elevation wall. Last but not least, pour the concrete floor.
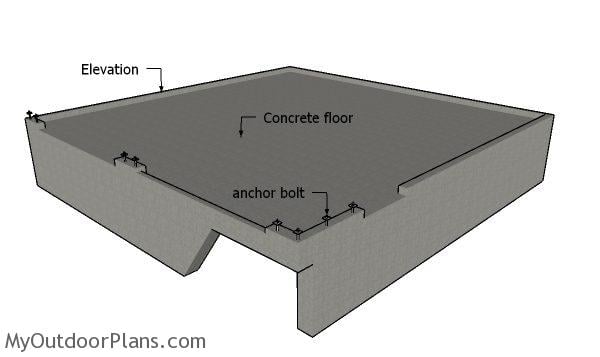
Garage Foundation
As you can notice in the plans, the footings should have a small elevation as compared to the concrete floor. Notice that the elevations are flush with the floor at the door openings. Notice the anchors that go on the elevations, every 4′ or so. You will secure the walls to the footings using these bolts.
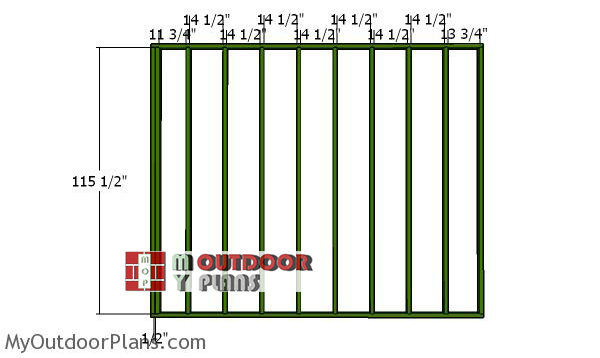
Side-wall-frame
The first step of the one car garage is to build the two sections for the plain side wall. Cut the components from 2×4 lumber at the right dimensions, as shown in the plans. Drill pilot holes through the plates and insert 3 1/2″ screws or 16d nails into the studs. Place the studs equally spaced, every 16″ on center. Make sure the edges are flush and check if the corners are square. As you can see in the plans, the walls for the garage will be 10′ high.
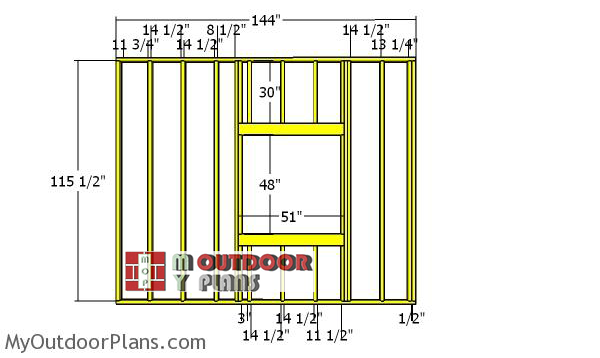
Side-wall-frame-with-window
Next, build the first section of the opposite side wall. As you can see in the plans, you should frame a 48″x48″ window opening to the wall frame. This window will let the light inside the garage. You can adjust the size of the window to suit your needs, or add even more openings. Notice the double 2×6 headers (fit 1/2″ plywood between the 2×6 boards).
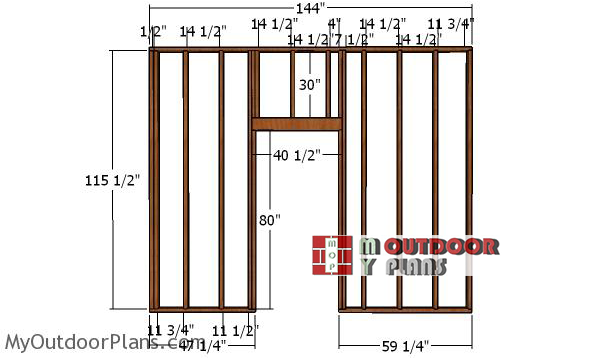
Side-wall-with-door-frame
Next, frame the other section for the side wall. Frame a door opening so you can have easy access in and out the garage. I have framed the door opening at 37 1/2″x80″ so you can fit a standard 36″x80″ door. However, make sure you adjust the opening to suit your needs, using the same techniques described above. Notice the double header.
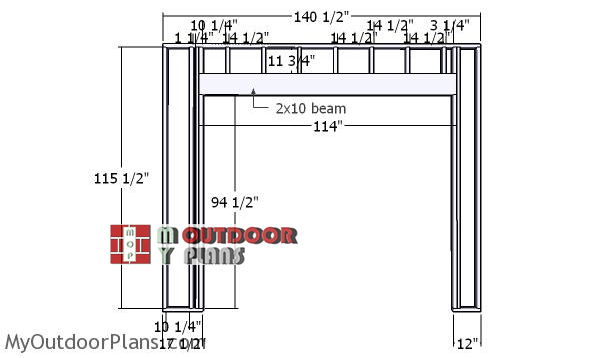
Front-wall-frame-2-car-garage
Next, you have to frame the front wall of the detached garage. The front wall is made of 2 identical sections. It is essential to make a build a sturdy wall frame and to adjust the size of the opening according to the door you are going to fit. Build the double header from 2×10 lumber, as to add extra-support to the construction. Make sure the corners are right-angled before inserting the screws. These particular plans are designed for a 9′ garage door. However, my advise would be to read the instructions on the garage door before framing the wall and make the appropriate modifications to fit into place.
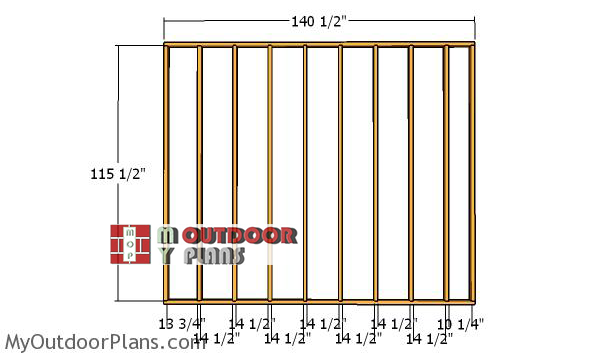
Back-wall-frame
Building the back wall for the garage is a straight forward process, as there are no openings or other complex cuts to be made. Make sure you place the studs equally spaced, every 16″ on center. Follow the instructions described in the diagram to get a professional result. You need to build two frames for the back wall.
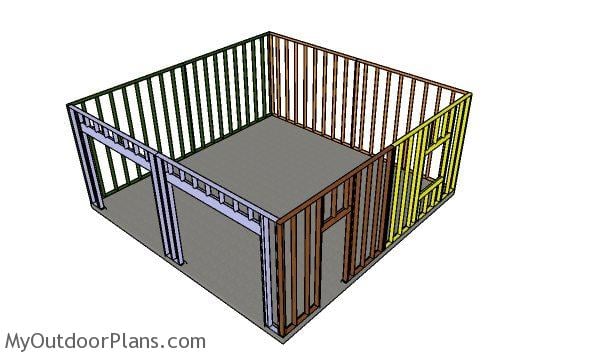
Assembling the frame of the garage
After building the front, back and side walls of the garage, we recommend you to assemble the structure. Lift the walls and lay them to the concrete elevations, as described in the diagram. Make sure the corners are square and use temporarily braces to lock them together. Drill pilot holes through the plates and fit them to the anchors. In addition, lock the adjacent walls together by inserting 3 1/2″ screws. Leave no gaps between the frames and use a spirit level to plumb the walls, for a professional result.
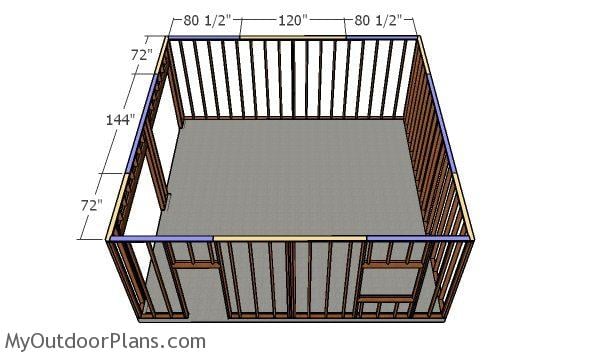
Fitting the double plates
Fit the double plates to the top of the garage wall framing. Use the pattern shown in the plans so you can add strength to the structure. Align the edges with attention, drill pilot holes and insert 3 1/2″ screws to lock them into place tightly.
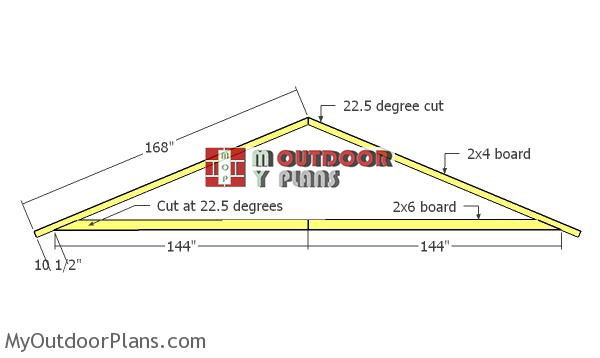
Building-the-24-truss
Next, build the trusses for the double garage. As you can see in the diagram, you need to use 2×4 lumber for the rafters and 2×6 lumber for the bottom chords. Use a miter saw to make the angle cuts to the rafters. Lay the rafters on a level surface and leave no gaps between the components. Place the rafters against a straight edge.
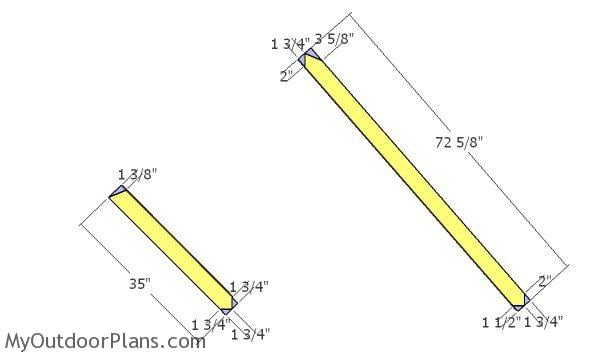
Building the W truss supports
Use 2×4 lumber for the W shaped truss supports. Use a miter saw to make the angle cuts to both ends of the supports.
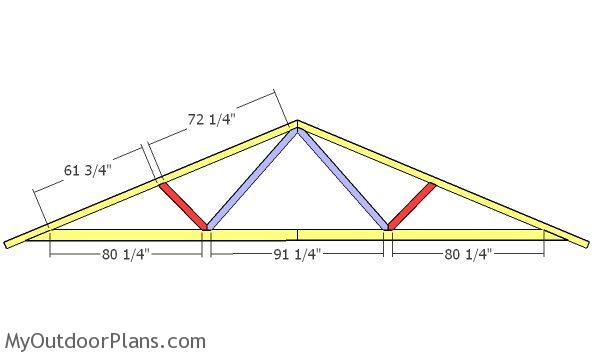
Fitting the W supports to the trusses
Fit the supports to the trusses as shown on the diagram. Use metal plates over the joints to assemble everything together tightly. Notice the joint between the two boards of the bottom chord. Make sure that complies with your local chords.
Personally, I strongly recommend you to buy engineered trusses and you will probably get them for the same price as building them yourself. In addition, you will save labor time and they will be properly built and designed for your local conditions.
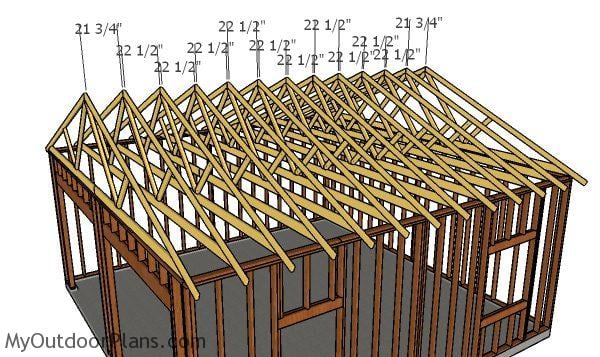
Fitting the trusses
Fit the trusses to the top of the garage frame, every 24″ on center. Plumb the trusses with a spirit level and then lock them to the top plates with rafter ties.

Fitting the truss supports
Fit 2×4 supports to the bottom chords to enhance the rigidity of the structure. Drill pilot holes and insert 3 1/2″ screws or 16d nails.
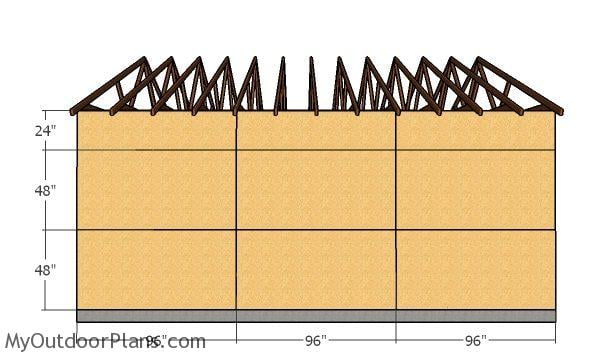
Side wall sheets – 24×24 Garage Plans
The next step of the garage is to attach the 1/2″ plywood sheets to the side wall. Align the edges flush, leave no gaps between the sheets and insert 8d nails, every 8″ along the framing.
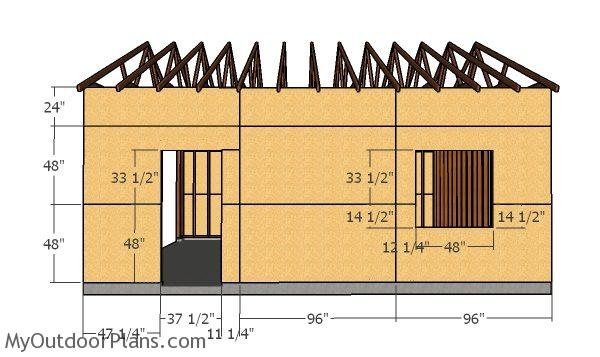
Side wall with window sheets – Double Car Garage Plans
Fit the plywood sheets to the opposite side wall. Use a saw to make the cuts around the window and door openings.
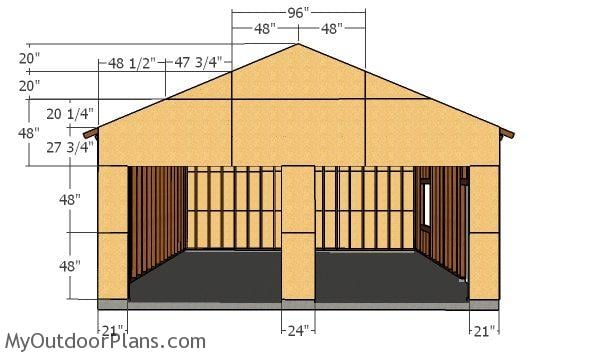
Front wall sheets – 24×24 Garage Plans
Fit the plywood sheets to the front of the of the shed. Make the cuts around the garage door openings.
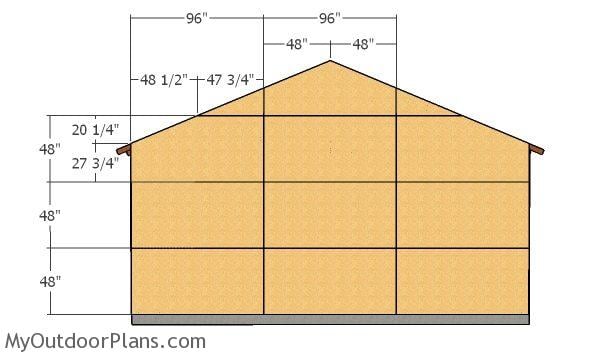
Back wall sheets – 2 car Garage Plans
Attach the 1/2″ plywood sheets to the back of the garage. Align the edges flush and insert 8d nails, every 8″ along the framing. Make the cuts to the gable ends.
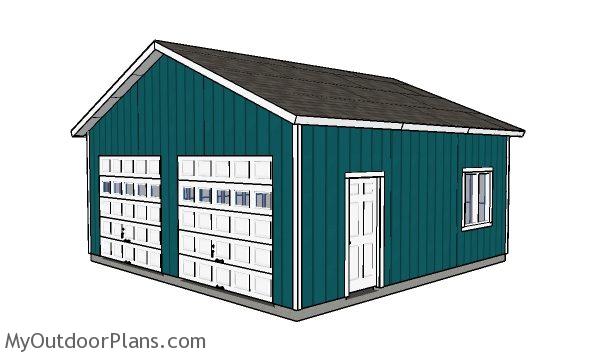
24×24 Garage Plans
Make sure you take a look over PART 2 of the garage project, where I show you how to finish the roof construction. If you have some framing experience and a few friends to help, you can assemble the structure of this garage in a few days.
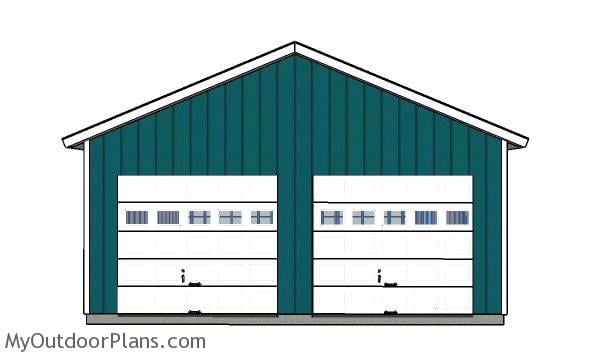
2 Car Garage Plans
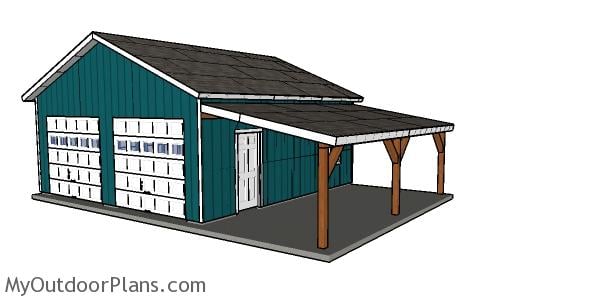
How to build an attached carport
After you take a look over PART 2 of the project, I recommend you to take a look over the attached carport plans, if you want to shelter an addition car, atv or motorcycles. This also works as a covered patio, and it is ideal if you want to create some shade while woodworking outside the workshop.
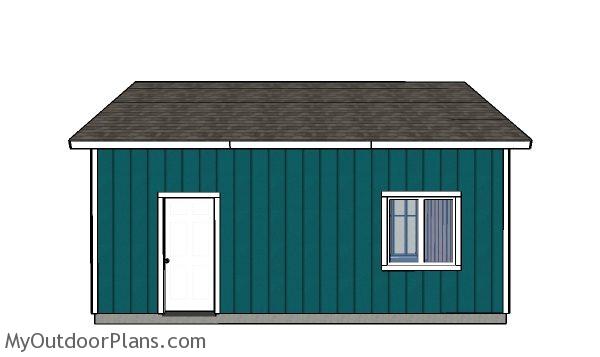
Double Garage Plans – Side View
Top Tip: Use pressure treated lumber for the bottom plates, as they will be exposed to moisture. If you want to get PREMIUM PLANS for this project, in a PDF format, please press GET PDF PLANS button bellow. Thank you for the support.
This woodworking project was about free 24×24 double car garage plans. If you want to see more outdoor plans, we recommend you to check out the rest of our step by step projects. LIKE us on Facebook to be the first that gets our latest plans. Send us pictures with your plans.


6 comments
Still looking for that free PDF download for the 24×24 garage.
Please read the FAQs: http://myoutdoorplans.com/faq/
Do you have any plans for a 24×24 double garage like the one above, but with 8ft walls instead of 10ft?
No, but that’s a simple modification you can make.
Great plans. If I wanted to use a single 16′ garage door, what would you use for the header?
any plans for a 24×30?