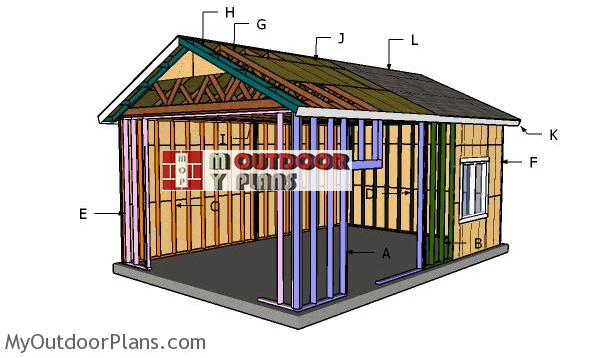
This step by step diy project is about 16×24 detached garage plans. This garage is built with 2×4 studs and it features a gable roof, a 10′ front door, a side 3′ door and a 4’x4′ window. Plan everything from the very beginning and build a strong foundation for the garage, in order to build a durable garage. This simple garage will protect your car from the elements, but it is also an amazing space for a small workshop. Read the local building codes and adjust my plans to comply with the legal requirements
It is essential to choose the right materials before starting the construction and the assembly of the garage. As you will see in the project, you need to choose durable lumber with a nice appearance, such as pine, cedar or redwood. Make sure the components are in a good visual condition and choose professional tools when adjusting their size. Take accurate measurements and join the components with glue and screws. See all my Premium Plans HERE.
Projects made from these plans
16×24 Detached Garage Plans
Building-a-16×24-detached-garage
Cut & Shopping Lists
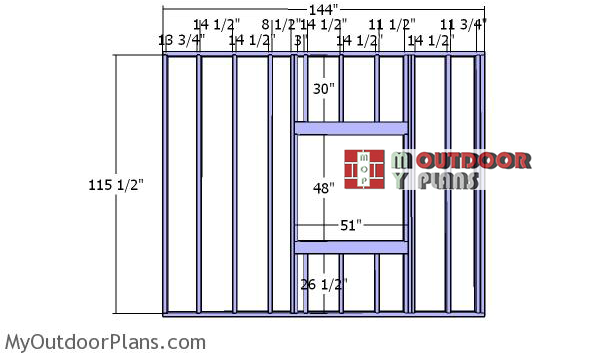
- A – 1 piece of 2×4 lumber – 144″ long, 1 piece – 47 1/4″ long, 1 piece – 59 1/4″ long, 10 pieces – 115 1/2″ long, 5 pieces – 30″ long, 2 pieces – 80″ long, 2 pieces of 2×6 lumber – 40 1/2″ long SIDE WALL A
- B – 2 pieces of 2×4 lumber – 144″ long, 10 pieces – 10 1/2″ long, 5 pieces – 30″ long, 5 pieces – 26 1/2″ long, 2 pieces – 48″ long, 4 pieces – 51″ long SIDE WALL B
- C – 2 pieces of 2×4 lumber – 144″ long, 11 pieces – 115 1/2″ long 2xSIDE WALL C
- D – 2 pieces of 2×4 lumber – 185″ long, 13 pieces – 115 1/2″ long BACK WALL
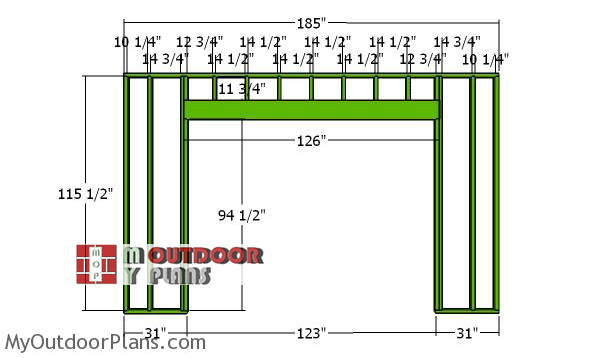
- E – 2 pieces of 2×4 lumber – 31″ long, 1 piece – 185″ long, 6 pieces – 115 1/2″ long, 2 pieces – 94 1/2″ long, 9 pieces – 11 3/4″ long, 2 pieces of 2×10 lumber – 126″ long FRONT WALL
- E – 2 pieces of 2×4 lumber – 192″ long, 2 pieces – 120″ long, 4 pieces – 80 1/2″ long DOUBLE PLATES
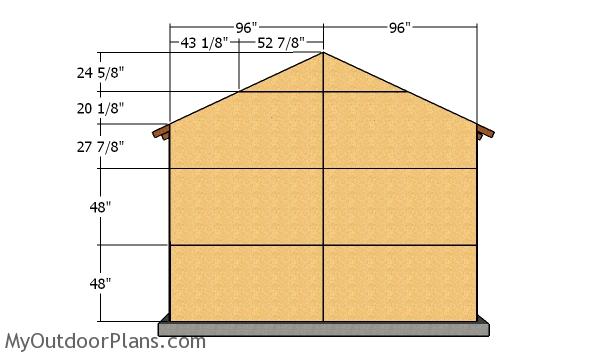
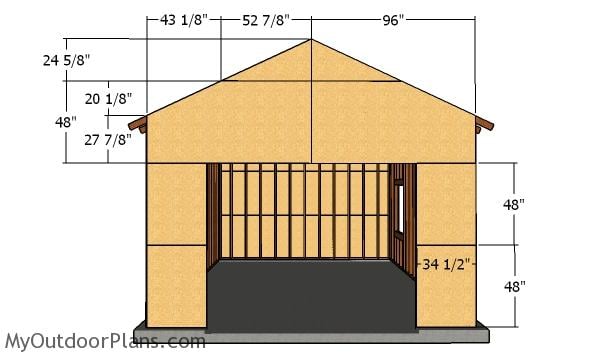
- F – 20 pieces of 1/2″ plywood – 48″x96″ long, 6 pieces – 24″x96″ long, 4 pieces – 24 5/8″x52 7/8″ long, 4 pieces – 34 1/2″x48″ long EXTERIOR WALLS
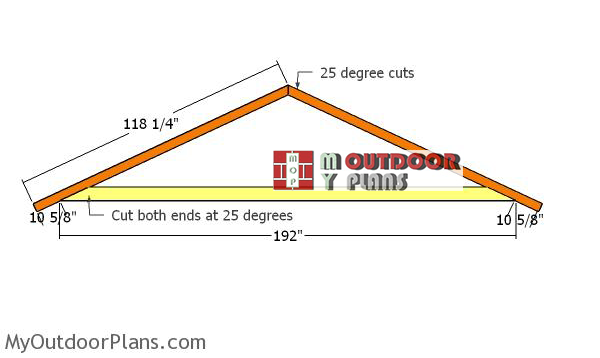
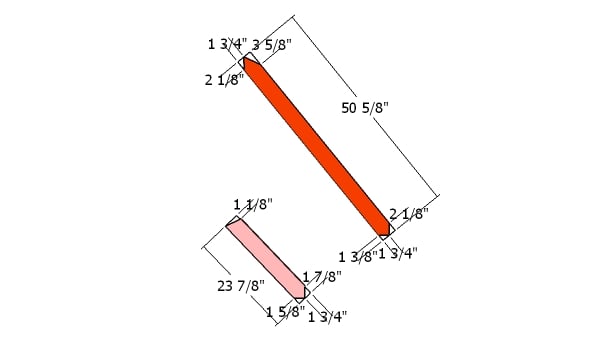
- G – 2 pieces of 2×4 lumber – 118 1/4″ long, 2 pieces – 50 5/8″ long, 2 pieces – 23 7/8″ long, 1 piece of 2×6 lumber – 192″ long 13xTRUSS
- G – 2 pieces of 2×4 lumber – 192″ long, 2 pieces – 96″ long ROOF SUPPORTS
- 7 pieces of 2×4 lumber – 12′
- 7 pieces of 2×4 lumber – 16′
- 66 pieces of 2×4 lumber – 10′
- 3 pieces of 2×6 lumber – 10′
- 2 pieces of 2×10 lumber – 12′
- 13 pieces of 2×6 lumber – 16′
- 34 pieces of 2×4 lumber – 8′
- 27 pieces of 1/2″ plywood – 4’x8′
- anchor bolt
- 3 1/2″ screws
- 8d nails, 16d nails
- truss plate, truss plate
- rafter ties
Tools
![]() Hammer, Tape measure, Framing square, Level
Hammer, Tape measure, Framing square, Level
![]() Miter saw, Drill machinery, Screwdriver, Sander
Miter saw, Drill machinery, Screwdriver, Sander
Time
![]() One day
One day
Related
- Part 1: 16×24 Detached Garage Plans
- Part 2: 16×24 Detached Gable Garage Roof Plans
It’s that simple to build your own garage – Video!
Building a 16×24 detached garage
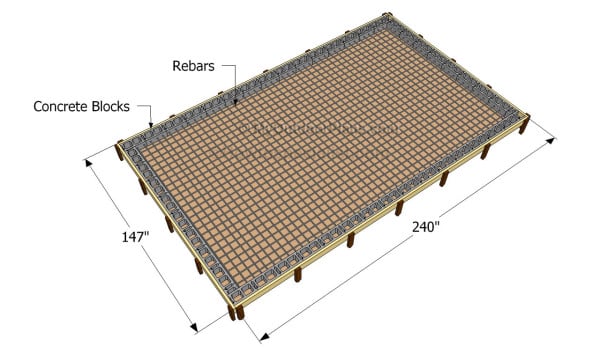
Building the concrete slab
A detached garage doesn’t require deep footings as in the case of attached constructions. However, read the local codes so you determine the appropriate depth of the perimetral footings. Use batter boards and string to layout the location of the footings and use rebars to reinforce them. Use boards to make the sturdy form before pouring the concrete footings.

Foundation
As you can notice in the plans, the footings should have a small elevation as compared to the concrete floor. Notice that the elevations are flush with the floor at the door openings. Notice the anchors that go on the elevations, every 4′ or so. You will secure the walls to the footings using these bolts.

Plain-side-wall-frame
The first step of the one car garage is to build the two sections for the plain wall. As you can see in the diagram, you need to cut the components from 2×4 lumber at the right dimensions, as shown in the plans. Drill pilot holes through the plates and insert 3 1/2″ screws or 16d nails into the studs. Place the studs equally spaced, every 16″ on center. Make sure the edges are flush and check if the corners are square. As you can see in the plans, the walls for the garage will be 10′ high.
Side-wall-with-window-frame
Next, build the first section of the opposite wall. As you can see in the plans, you should frame a 48″x48″ window opening to the wall frame. This window will let the light inside the garage. You can adjust the size of the window to suit your needs. Notice the double 2×6 headers (fit 1/2″ plywood between the 2×6 boards).
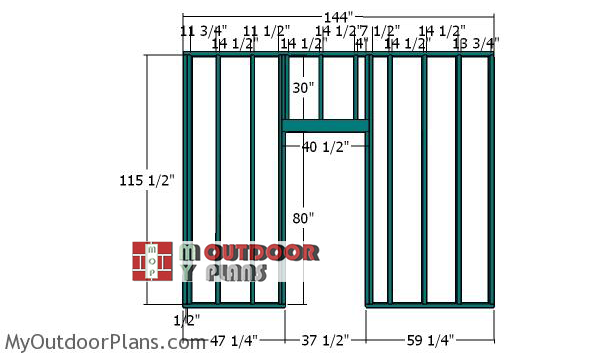
Side-wall-with-door-frame
Next, frame the other section for the side wall. Frame a door opening so you can have easy access in and out the garage. I have framed the door opening at 37 1/2″80″ so you can fit a standard 36″x80″ door. However, make sure you adjust the opening to suit your needs, using the same techniques described above. Notice the double header.
Building-the-front-garage-wall
Next, you have to frame the front wall of the detached garage. It is essential to make a build a sturdy wall frame and to adjust the size of the opening according to the door you are going to fit. As you can see in the diagram, build the double header from 2×10 lumber, as to add extra-support to the construction. Make sure the corners are right-angled before inserting the screws. These particular plans are designed for a 10′ garage door. However, my advise would be to read the instructions on the garage door before framing the wall and make the appropriate modifications to fit into place.

Building-the-back-wall-frame—garage
Building the back wall for the garage is a straight forward process, as there are no openings or other complex cuts to be made. Make sure you place the studs equally spaced, every 16″ on center. Follow the instructions described in the diagram to get a professional result.

Assembling the 16×24 detached garage frame
After building the front and the back wall of the garage, we recommend you to assemble the structure. Lift the walls and lay them to the concrete elevations, as described in the diagram. Make sure the corners are square and use temporarily braces to lock them together.
Drill pilot holes through the plates and fit them to the anchors. In addition, lock the adjacent walls together by inserting 3 1/2″ screws. Leave no gaps between them to get a professional result.
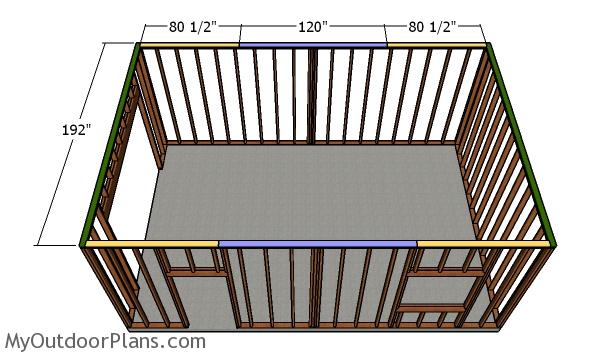
Fitting the double plates
Fit the double plates to the top of the garage wall framing. Use the pattern shown in the plans so you can add strength to the structure. Align the edges with attention, drill pilot holes and insert 3 1/2″ screws to lock them into place tightly.
Building-the-trusses
Next, build the trusses for the one car garage. As you can see in the diagram, you need to use 2×4 lumber for the rafters and 2×6 lumber for the bottom chords. Use a miter saw to make the angle cuts to the rafters. Lay the rafters on a level surface and leave no gaps between the components. Place the rafters against a straight edge.
Truss supports
Use 2×4 lumber for the truss supports. Use a miter saw to make the angle cuts to both ends of the supports.
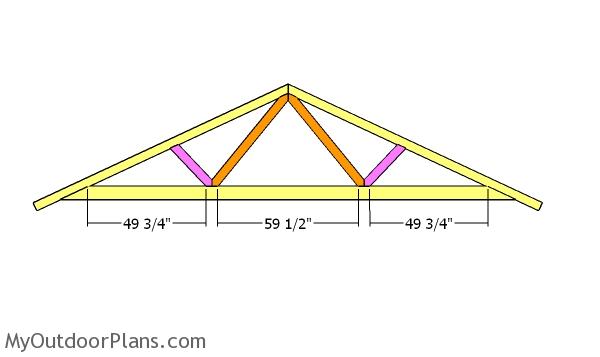
Fitting the W truss supports
Fit the W shaped supports to the trusses as shown on the diagram. Use metal plates over the joints to assemble everything together tightly.
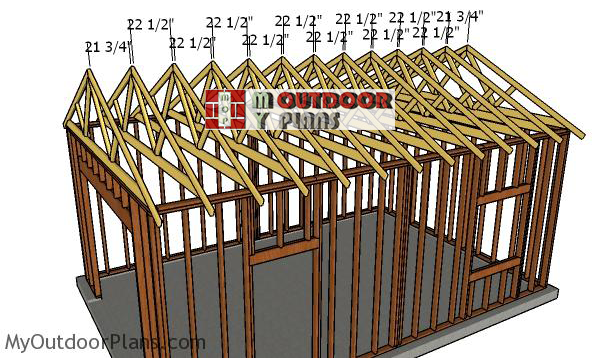
Fitting-the-trusses-one-car-garage
Fit the trusses to the top of the garage frame, every 24″ on center. Plumb the trusses with a spirit level and then lock them to the top plates with rafter ties.

Fitting the truss supports
Fit 2×4 supports to the bottom chords to enhance the rigidity of the structure. Drill pilot holes and insert 3 1/2″ screws or 16d nails.
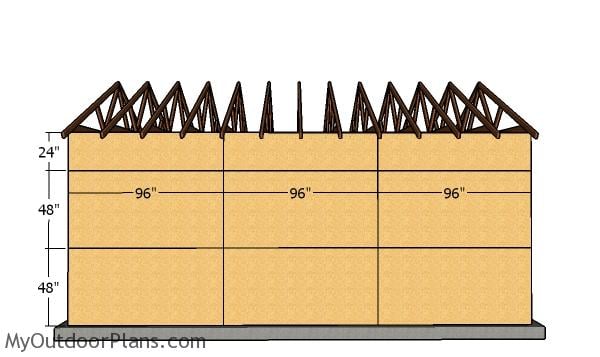
Side wall panels – 16×14 Garage Plans
The next step of the garage is to attach the 1/2″ plywood sheets to the side wall. Align the edges flush, leave no gaps between the sheets and insert 8d nails, every 8″ along the framing.
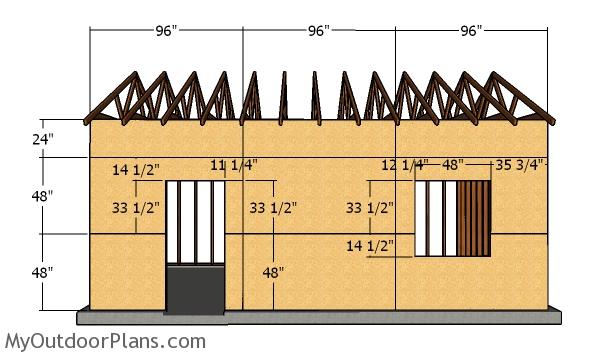
Side wall with window – 16×24 Detached Garage Plans
Fit the plywood sheets to the opposite side wall. Use a saw to make the cuts around the window and door openings.
Back wall sheets – One car garage plans
Attach the 1/2″ plywood sheets to the back of the garage. Align the edges flush and insert 8d nails, every 8″ along the framing. Make the cuts to the gable ends.
Fitting the front wall sheets – 16×24 Detached Garage
Fit the plywood sheets to the front of the of the shed. Make the cuts around the garage door opening.

16×24 One Car Garage Plans
Make sure you take a look over PART 2 of the garage project, where I show you how to finish the roof construction. Building this one car garage is complex, but with a little effort you can get the job done.

16×24 Detached Garage Plans
Top Tip: Use pressure treated lumber for the bottom plates, as they will be exposed to moisture. If you want to get PREMIUM PLANS for this project, in a PDF format, please press GET PDF PLANS button bellow. Thank you for the support.

This woodworking project was about free 16×24 one car garage plans. If you want to see more outdoor plans, we recommend you to check out the rest of our step by step projects. LIKE us on Facebook to be the first that gets our latest plans. Send us pictures with your plans.

EXPLORE MORE IDEAS FOR:
 |
 |
 |
 |
8 comments
This plan is called 16×24 detached garage; however, the foundation/slab measurements in the first picture say 147″ x 240″… I don’t need a calculator to know that slab is not big enough to equate to a 16’x24′ structure.
That’s something generic. The point of that diagram is to illustrate the structure of the slab.
I can’t find the button to download the plan. I have even closed a handful of the ads
J’ai procéder à l’achat d’un plan de garage 16×24 en PDF et je ne suis pas en mesure de recevoir ou d’ouvrir le plan
Funny how you found the 1 star rating button though. Funny how you can’t even have the decency to comment in english on an english website. It’s a lot easier to show low character than ask for guidance.
And for the other readers, you can’t even RATE a plan without downloading the plans. So yeah… all plans get automatically sent to the email you checkout with. I resent him the email, just in case, he has there the link to the PDF plans.
Gpod detail Could I get a download copy Txs
Sure, read the FAQs to download the plans for free, or you can buy a single PDF file by clicking the GET PDF PLANS button, at the end of the article.
Hey thank you idk about all these others but you really helped me out I appreciate it