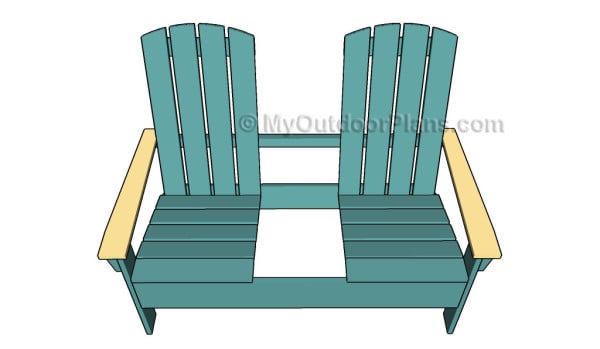
This step by step woodworking project is about double adirondack chair plans. This article features detailed instructions for building nice double adirondack chairs with table, ideal for any backyard. The best part of this project is that you can build the bench in less than a weekend using common tools and materials. We have designed the adirondack bench to keep the expenditures under control and to involve the least amount of work possible. Premium Plans available for this project in the Shop.
When buying the lumber, you should select the planks with great care, making sure they are straight and without any visible flaws (cracks, knots, twists, decay). Investing in cedar or other weather resistant lumber is a good idea, as it will pay off on the long run. Use a spirit level to plumb and align the components, before inserting the galvanized screws, otherwise the table won’t have a symmetrical look. If you have all the materials and tools required for the project, you could get the job done in about a day. See all my Premium Plans HERE.
Projects made from these plans
Double Adirondack Chair Plans

Building-a-double-adirondak-bench-with-table
Cut & Shopping Lists
- A – 2 pieces of 1×4 lumber – 20 3/4″ long FRONT LEGS
- B – 2 pieces of 1×8 lumber – 33″ long BACK LEGS
- C – 1 piece of 1×8 lumber – 46 1/2″ long, 2 pieces of 1×4 lumber – 19 3/4″ long, 1 piece of 1×6 lumber – 45″ long, 1 piece of 2×2 lumber – 48″ long SUPPORTS
- D – 4 pieces of 1×4 lumber – 29 1/4″ long, 1 piece – 16″ long 2xBACKREST
- E – 2 pieces of 1×4 lumber – 23 1/4″ long, 1 piece of 1×2 lumber – 3 1/2″ long SUPPORTS
- F – 2 pieces of 1×4 lumber – 24 1/2″ long ARMRESTS
- G – 3 pieces of 1×4 lumber – 13″ long TABLE SUPPORTS
- H – 4 pieces of 1×4 lumber – 24 1/2″ long TABLE
- I – 10 pieces of 1×4 lumber – 16 3/4″ long SEAT SLATS
- 9 pieces of 1×4 lumber – 8′
- 1 piece of 1×8 lumber – 10′
- 1 piece of 1×6 lumber – 6′
- 1 piece of 2×2 lumber – 4′
- 2 1/2″ screws, 1 1/4″ screws
- glue, stain
Tools
![]() Hammer, Tape measure, Framing square, Level
Hammer, Tape measure, Framing square, Level
![]() Miter saw, Drill machinery, Screwdriver, Sander
Miter saw, Drill machinery, Screwdriver, Sander
Time
![]() One day
One day
Adirondack chairs with table plans
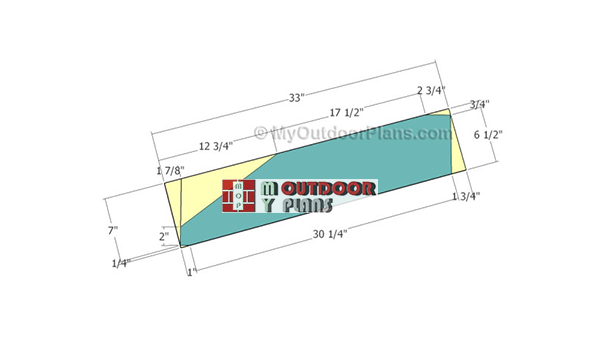
Building-the-back-legs-for-bench
The first step of the project is to build the back legs out of 1×8 lumber. Mark the cut lines on the slats, as shown in the diagram. Use a circular saw to make the cuts and smooth the edges with 120-grit sandpaper.

Fitting-the-front-legs
Attach the 1×4 front legs to the back legs. Use the information from the diagram to lock the components together tightly. Drill pilot holes and insert 1 1/4″ screws through the back legs into the front legs. Make sure the front legs are plumb before inserting the screws.
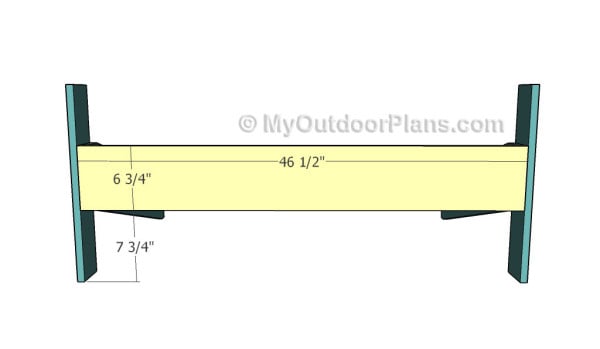
Fitting the front support
Fit the front support to the structure. Use 1×8 lumber to build the front component, making sure you adjust the width to 6 3/4″. Drill pilot holes and insert 1 1/4″ screws into the back legs. Make sure the corners are square before inserting the galvanized screws.
Attaching the back support
Fit the back support to the frame of the adirondack chair. Drill pocket holes at both ends and secure the 1×6 slat to the back legs using 1 1/4″ screws. Make sure the corners are square and leave no gaps between the components.
Building the seat supports
Continue the woodworking project by building the supports for the seat. As you can easily see in the plans, you need to make a few cuts to 1×4 slats. Smooth the edges with 120 grit sandpaper.
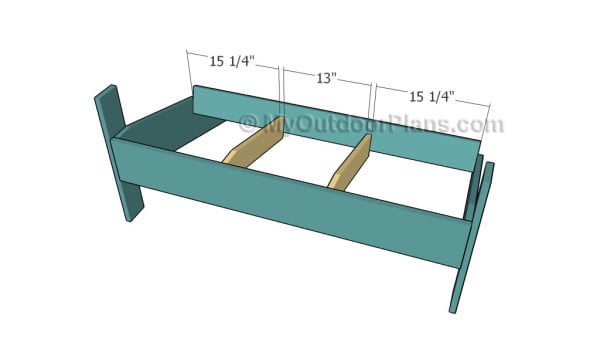
Fitting the seat supports
Fit the seat supports to the frame, as shown in the diagram. Drill pocket holes at both ends of the supports and secure them to the frame using 1 1/4″ screws. Make sure the corners are square. alternatively, you could drill pilot holes through the frame and insert 1 1/4″ screws into the seat supports.
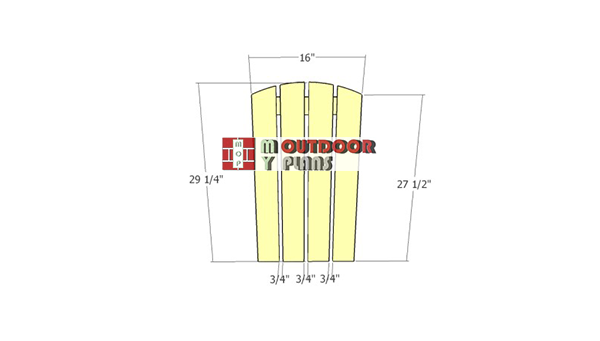
Building-the-backrest
Build the backrest out of 1×4 slats. Round the top of the backrest using a jigsaw. Use a 1×4 support to lock the slats together with 1 1/4″ screws. Make sure you place a 3/4″ plywood piece between the slats to create even gaps between the components. Smooth the edges with 120-grit sandpaper.
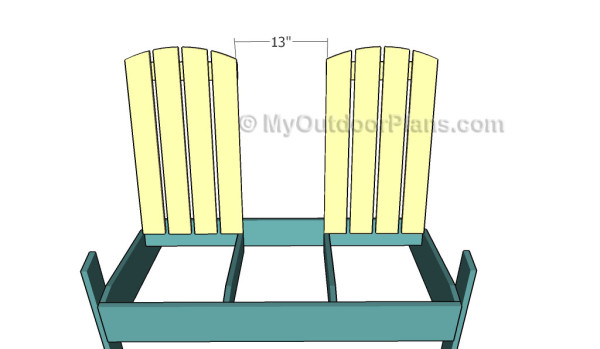
Fitting the backrests
Fit the backrests to the back of the adirondack bench. Drill pilot holes and insert 1 1/4″ screws into the 1×6 support.
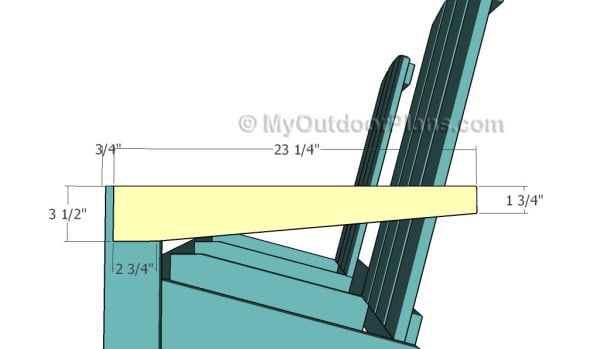
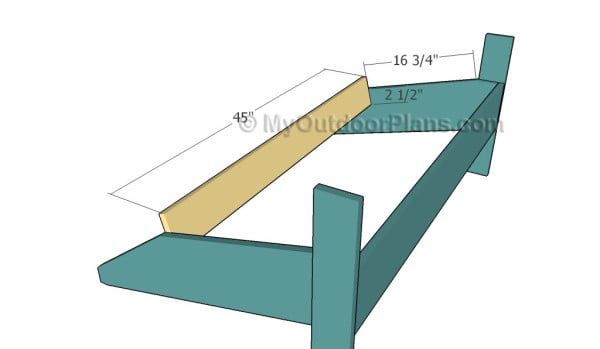
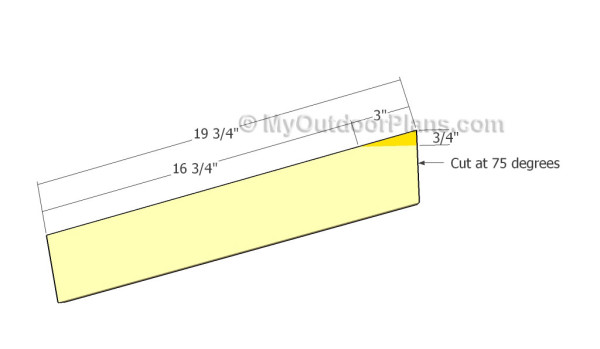
Fitting the armrests supports
Next, you need to build the armrests supports for the double adirondack chairs. Fit the supports to the bench, as shown in the diagram. Use 1 1/4″ screws to lock the supports to the front legs.
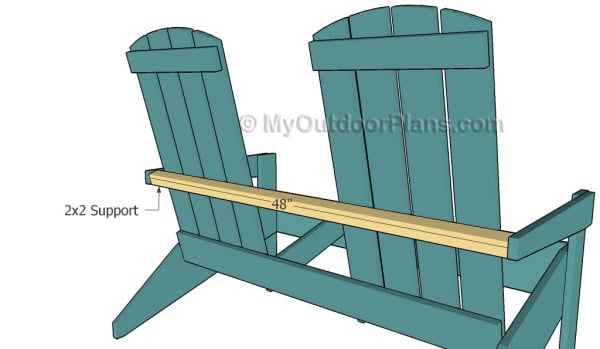
Fitting the back support
Build the middle back support out of 2×2 lumber. Fit the support between the armrests supports and lock it into place by inserting 1 1/4″ screws.
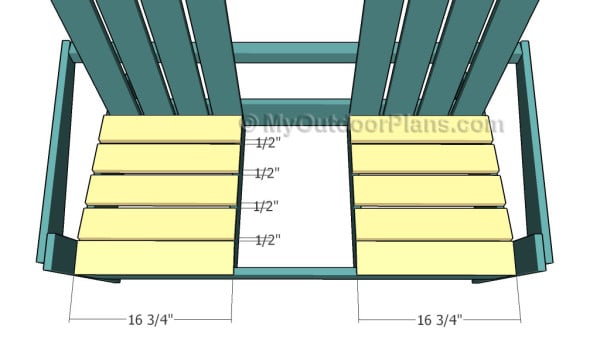
Fitting the seat slats
Fit the 1×4 slats to the seat frame, as shown in the diagram. Place the slats equally-spaced and lock them into place using 1 1/4″ screws.
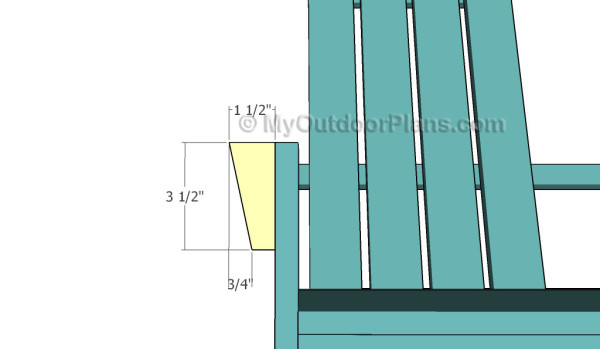
Building the armrests details
Build the corner details out of 1/2″ lumber. Fit the details to the chairs, as shown in the diagram, by using 1 1/4″ screws.
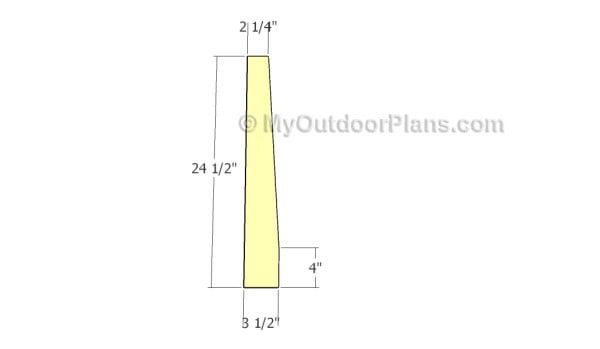
Building the armrests
Build the armrests out of 1×4 lumber. Make a few decorative cuts to the components, if you want to get a professional result. Smooth the cut edges with fine-grit sandpaper.
Fitting the armrests
Fit the armrests to the supports, as shown in the diagram. Drill pilot holes and insert 1 1/4″ screws to lock them into place. Leave no gaps between the components.
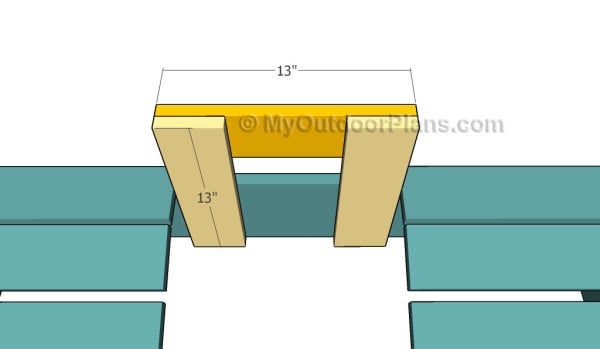
Attaching the table supports
Build the supports for the table out of 1×4 lumber. Cut the slats at the right dimensions and secure them to the frame using 1 1/4″ screws. Check if the corners are square and leave no gaps between the components.
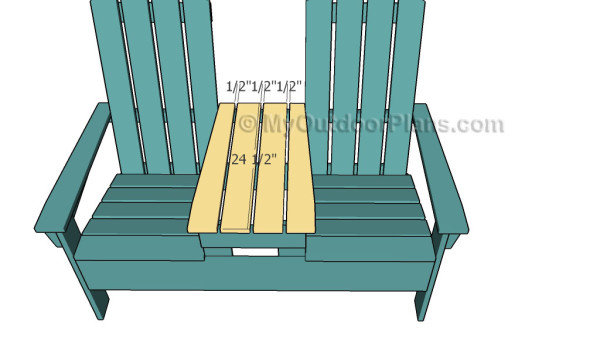
Fitting the table slats
Next, attach the 1×4 slats to the table supports. Drill pilot holes through the slats and insert 1 1/4″ screws to lock them to the supports. Place a piece of 1/2″ plywood between the slats to create consistent gaps.
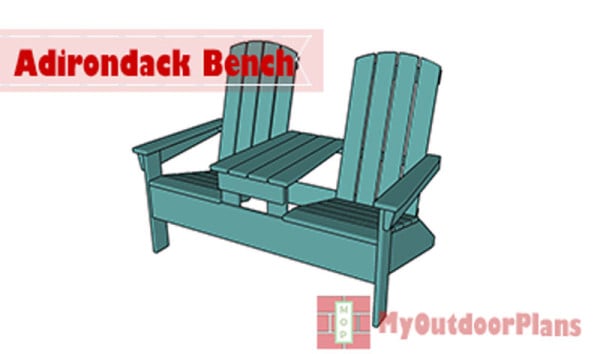
Double adirondack chair plans
One of the last steps of the woodworking project is to take care of the finishing touches. Therefore, fill the pilot holes with wood putty and smooth the surface with 120-grit sandpaper.
Top Tip: If you want to enhance the look of the project and to protect the wooden adirondack bench from decay, we recommend you to cover the components with paint or stain. Premium Plans available for this project in the Shop.
This woodworking project was about double adirondack chair plans. If you want to see more outdoor plans, we recommend you to check out the rest of our step by step projects. LIKE us on Facebook and Google + to be the first that gets out latest projects and to hep us keep adding free woodworking plans for you.
EXPLORE MORE IDEAS FOR:
 |
 |
 |
 |
18 comments
Going to give this a try, and I hope your measurements are right……
You shouldn’t have issues. Let me know how it comes out!
Thanks for the plans, I am going to attempt the double Adirondack table chair this weekend. If i want to make wider seats, what modifications should I make?
You need to make the 46 1/2″ frame longer and then the backrest and seat slats longer. Other than this, same steps.
You should try using Google Sketchup for your plans; much more accurate & reproducible.
Ralph
That’s what I use. Thanks.
Do you have the total amount and length of boards for all the cuts, ie how many feet to get on the 1×4 and 1×4
Also, I couldn’t figure out how to print plans, don’t see the icon the the left to do it as described in the FAQ
Try with another browser or disable the adblocker. I have updated the shopping list.
This is a great looking plan and is a ez build.
Thank you keep them coming.
Boyd
Thank you.
These are great plans and I have had a fun time building this! Made two at the same time to go on our side patio. Good project during “social distancing”!
Found a slight discrepancy: in the cut-list you call for 8 total pieces for the backrests 1×4 @ 28 1/4″ but in the step by step drawings it shows the backrest pieces to be 1×4 @ 29 1/4″. I used the cut-list to precut everything, so I didn’t notice the difference until I got to the assembly stage. I just adjusted the rear support to 26 1/2″, so I still had room to shape the tops.
Otherwise – great plans! Thank you!
Thank you. I’ve updated the list. Congrats for the project! I would love to see a pic of the bench… if you want you could send it here: https://myoutdoorplans.com/contact/ Looking forward!
could this be made out of 2×4 ‘s ?
Yes. I recommend you to take a look on this: https://myoutdoorplans.com/furniture/2×4-adirondack-bench-plans/. It’s easier to modify than this plan.
Kind of a big guy, would it take much adjustment to make the front and rear legs out of 2×4 or 6 one bys don’t look that strong. Most of the time I see 250 lbs listed on a lot of these as limit, we’re a bit more than that but thought the 2x4s would be stronger.
Thanks
The back legs in the materials list indicates the use of a 1×8 but the cut plans show a 1×7??
There s no such thing as 1×7. You cut the 1×8 to the dimensions shown in the diagrams.