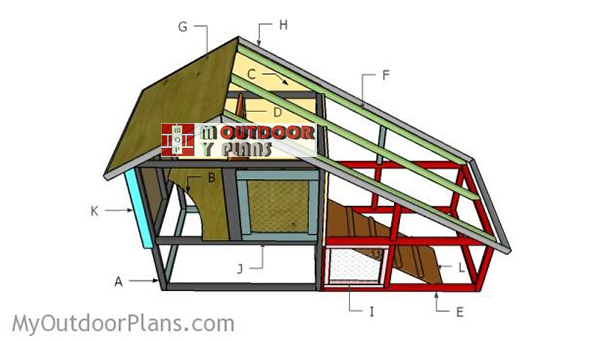
This step by step diy woodworking project is about free rabbit hutch plans. The project features instructions for building a 3×4 rabbit hutch with a spacious run attached. If you are looking for detailed plans for a sturdy rabbit hutch with easy to access doors, chances are you came to the right place. Make sure you take a look over the rest of plans to see alternatives and more projects for your garden.
When buying the lumber, you should select the planks with great care, making sure they are straight and without any visible flaws (cracks, knots, twists, decay). Investing in cedar or other weather resistant lumber is a good idea, as it will pay off on the long run. Use a spirit level to plumb and align the components, before inserting the galvanized screws, otherwise the project won’t have a symmetrical look. If you have all the materials and tools required for the project, you could get the job done in about a day. See all my Premium Plans HERE.
Projects made from these plans
It’s that easy to build a rabbit hutch!
Building a rabbit hutch
Building-a-rabbit-hutch
Cut & Shopping Lists
- A – 4 pieces of 2×2 lumber – 48″ long, 6 pieces – 45″ long, 3 pieces – 25″ long, 8 pieces – 33″ long, 1 piece of 2×4 lumber – 25″ long FRAME
- B – 1 piece of 3/4″ plywood – 36″x48″ long FLOOR
- C – 2 pieces of 3/4″ plywood – 28″x36″ long, 2 pieces – 43 1/4″x48″ long WALLS
- D – 1 piece of 3/4″ plywood – 25 3/4″x33″ long PARTITION
- E – 4 pieces of 2×2 lumber – 45 3/4″ long, 2 pieces – 18 1/2″ long, 2 pieces – 20 long, 2 pieces – 36″ long RUN
- 12 piece of 2×2 lumber – 8′
- 1 piece 0f 2×4 lumber – 4′
- 3 pieces of 3/4″ plywood – 4’x8′
- 200 pieces of 1 5/8″ screws
- 200 pieces of 2 1/2″ screws
Tools
![]() Hammer, Tape measure, Framing square, Level
Hammer, Tape measure, Framing square, Level
![]() Miter saw, Drill machinery, Screwdriver, Sander
Miter saw, Drill machinery, Screwdriver, Sander
![]() Safety Gloves, Safety Glasses
Safety Gloves, Safety Glasses
Time
![]() One week
One week
Related
Free Rabbit Hutch Plans
Framing-the-front-and-back-frames
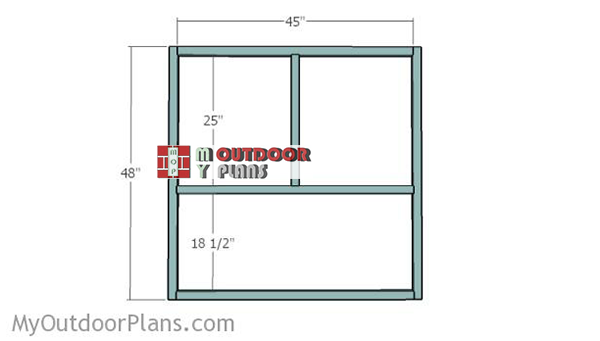
The first step of the project is to frame the back wall of the rabbit hutch. Cut the components from 2×2 lumber at the right dimensions. Drill pilot holes through the components and insert 2 1/2″ screws. Align the edges and make sure the corners are square. Alternatively, you can drill pocket holes and inset 2 1/2″ screws.
Building the front wall frame
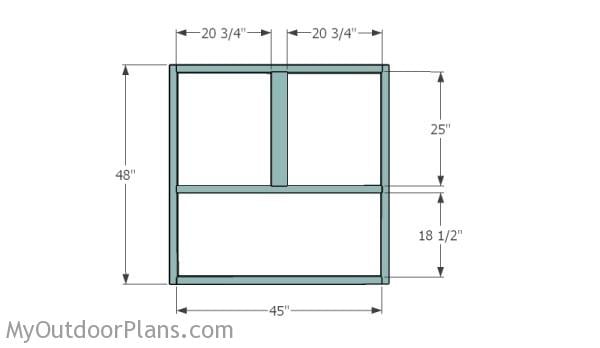
Build the front wall in the same manner. However, you need to fit a 2×4 support to the middle of the frame. Drill pilot holes and use 2 1/2″ screws to create rigid joints. Align the edges with attention for a professional result.
Opposite-side-wall
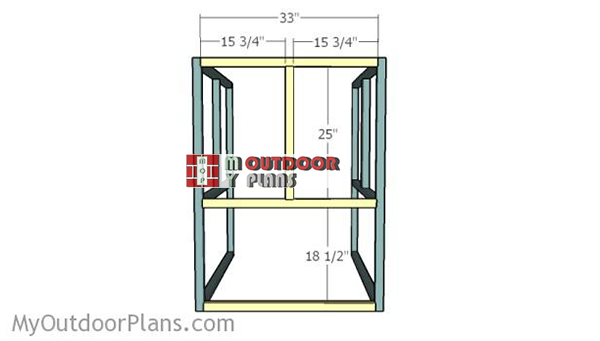
After building the front and back walls, you need to assemble the frame of the rabbit hutch by attaching the side components. Drill pilot holes and fit the supports, as shown in the diagram. Make sure the corners are square and align the edges with attention.
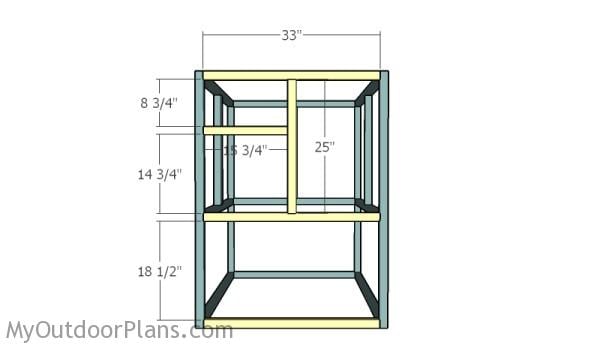
Framing the side wall
Build the opposite side wall for the rabbit hutch. As you can easily notice, we recommend you to frame an opening for access to the run.
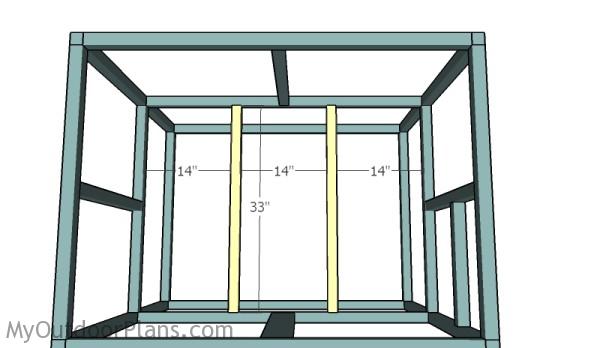
Fitting the floor supports
In order to enhance the rigidity of the floor, you have to attach 2×2 supports, as shown in the image. Drill pilot holes through the frame and insert 2 1/2″ screws into the supports. Make sure the corners are square before inserting the screws.
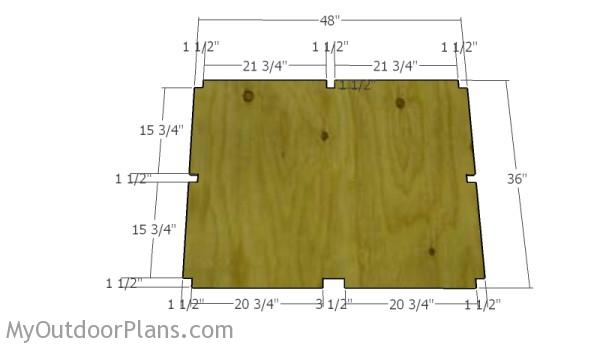
Building the floor
Build the floor from 3/4″ plywood. Mark the cut lines and create the notches using a circular saw. Smooth the edges with sandpaper.
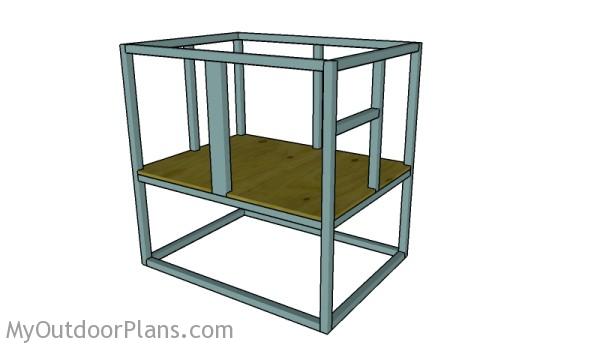
Fitting the floor
Fit the floor into place and leave no gaps between the components. Use 1 5/8″ screws to lock the sheets to the supports.
Fitting the exterior walls
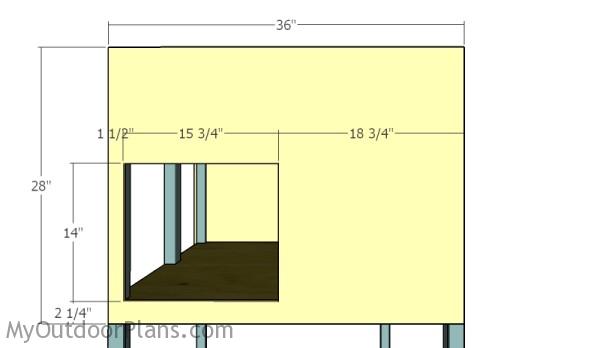
Building the side wall
Build the side wall from 3/4″ plywood. Cut out the opening after drilling a starting hole, using a jigsaw. Align the panel to the edges and secure it to the frame using 1 5/8″ screws, every 8″ along the supports.
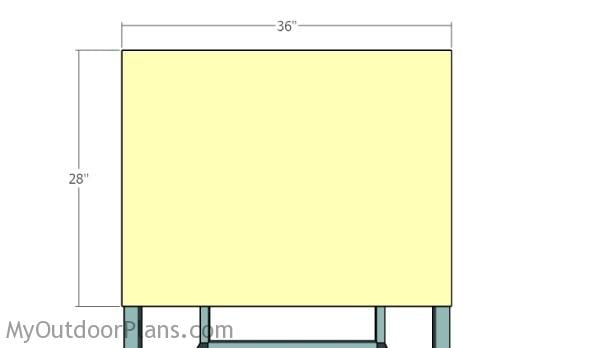
Side wall
Build the opposite side wall from 3/4″ plywood. Attach the panel to the wall frame and align the components with attention. Use 1 5/8″ screws to secure the sheet into place, every 8″ along the framing.
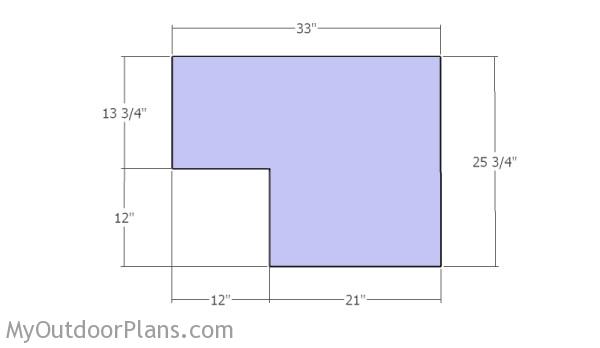
Building the partition
Build the partition from 3/4″ plywood, using the information from the diagram. Drill pocket holes along the side edges.
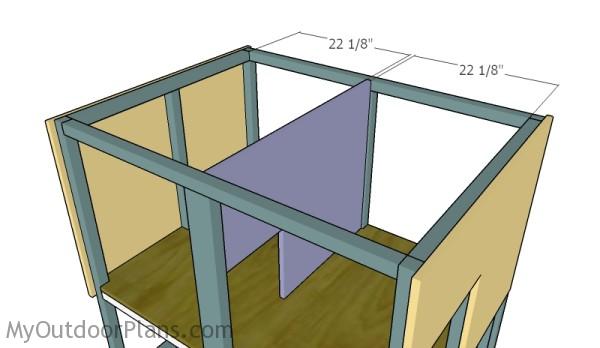
Fitting the partition
Fit the partition to the frame of the rabbit hutch. Align everything with attention and secure the panel to the studs, using 1 1/4″ screws. Use a spirit level to make sure the panel is plumb.
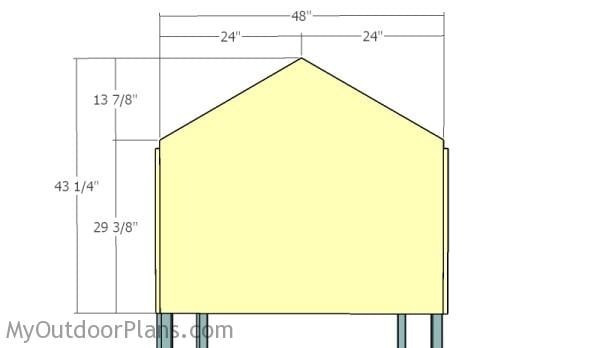
Building the back wall
Build the back wall from 3/4″ plywood. Align the edges with attention and secure it to the framing using 1 5/8″ screws.
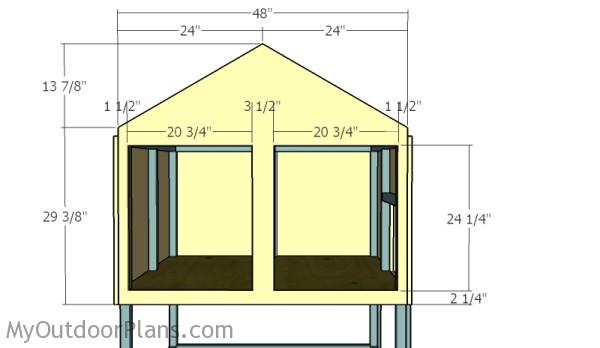
Building the front wall
Build the front wall from 3/4″ plywood. Mark the cut lines and get the job done with a circular saw. Create the door openings by using a jigsaw. Smooth the edges with sandpaper. Use 1 5/8″ screws to lock the panel to the wall frame.
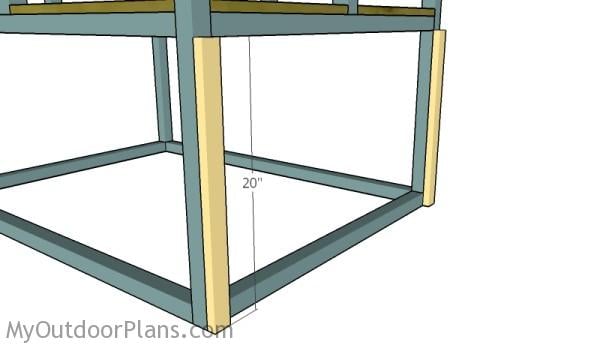
Bottom trims
Fit 1×2 trims to the right side of the rabbit hutch. Use 1 5/8″ screws to lock the trims to the vertical supports. Leave no gaps between the components for a professional result.

Building-the-run
Next, you need to assemble the run for the rabbit hutch. Cut the components from 2×2 lumber. Drill pilot holes, align the edges and insert 2 1/2″ screws to lock everything together tightly. Make sure the corners are square for a professional result.
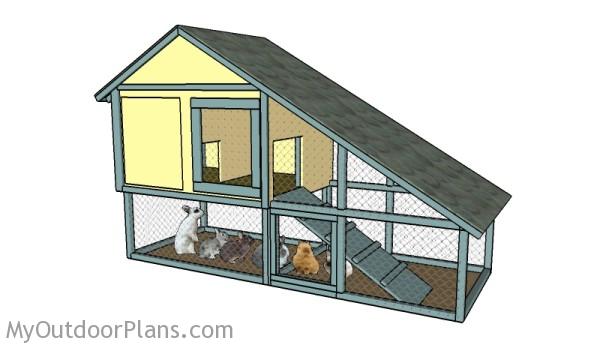
Free rabbit hutch plans
This rabbit hutch has a nice design and it is roomy enough to host your pets. It features a large run and has three access doors.

Free rabbit hutch plans – dimensions
An outdoor bunny house with an under-run is a great way to give your bunnies a safe, comfortable spot to call home. The raised house keeps them cozy and protected from the weather, while the under-run gives them plenty of space to hop around and enjoy the fresh air. It’s a practical and fun project that lets you create a space where your bunnies can thrive right in your own backyard.

How to build a rabbit hutch
Creating an outdoor bunny house with an under-run is an enchanting project that’ll likely cost you between $500 and $1,000, depending on the materials and features you choose. You can put this cozy haven together in about 1 to 2 weekends, transforming your backyard into a bunny paradise. Each step of the build is a hop closer to giving your furry friends a safe, comfortable, and downright adorable home.

Rabbit hutch – free plans
Top Tip: Make sure you check out the PART 2 of this project, to learn more about how to build the roof for the rabbit hutch. If you want to get PREMIUM PLANS for this project, in a PDF format, please press GET PDF PLANS button bellow. Thank you for the support.
This woodworking project was about free rabbit hutch plans. If you want to see more outdoor plans, check out the rest of our step by step projects and follow the instructions to obtain a professional result.


18 comments
I noticed that the materials list seems off by quite a bit. The first two items call for 17- 2×4’s and 8 – 1×3’s. The plans show one 2×4 25″ long and no 1×3’s. Are the first two items on the materials list just not supposed to be there or is the whole list wrong? Also, am I to assume that the 2nd phase of this project with a completely different material list is in addition to this one? I am thinking about building this for my daughters rabbits but didn’t want to have to go through and verify what to buy at the lumber store. I will likely do that anyway…
Sorry for that. The first two items on the materials list were copied from another project. Yes, the materials for the roof and doors are listed on Part 2 of the project. I double checked the list to make sure it’s accurate. I also recommend you to take a look over the plans before buying the materials. Good luck with your project!
The material list actually is inaccurate. I’m building this and have found that I needed 8-33” 2×2’s not 6 (floor support takes 2, walls take 6) I will be slightly modifying the dimensions on the 48” frame members of the run because two sit on top the 1×2 supports and two but up against it. Nothing that will be too detrimental for my build but less experienced builder may get frustrated trying to square things up.
Thank you for the comment and feedback. Looking forward to seeing your project!
How does the run attach exactly??
You can use pocket holes and screws, or you can just toe nail the run frame to the hutch. The ideal technique would be to drill pocket holes and insert 2 1/2″ screws, though. Hope this helps.
It would be really helpful to have detailed instructions of where to place screws, and how many etc. I’ve never done a building project this big before, and the question of how best to attach everything has been my biggest headache with this project (especially the corners where I didn’t want screws running into each other). That having been said, I really love this design! I would just love it even more if the joining instructions were as detailed as the rest of the plans. Thanks.
These seem like pretty good plans, mostly what I am looking for… but I wonder if you would consider a couple of small improvements to make it more rabbit owner friendly, and if so could you work up the specifics for materials and such. Quite a few rabbit hutches have the open area (outside the rabbit hole/ cozy hideaway area) having a hardware cloth floor instead of a solid floor so that droppings and urine can fall down below, (often into a shallow drawer with a plastic tray) keeping the rabbit dryer and healthier and making it easier to clean. Could you work out this modification? Also, how about a modification where the bottom level floor is also hardware cloth so that their feet don’t touch the soils (they get mites and parasites from the soil).
I am sure you can make these small modifications by yourself. Thank you for the feedback, but I am working on other plans at the moment.
On the run, is the bottom board at the far end 36′ as well or would it be 33′ due to being fastened on the insides of the boards?
It’s 36″ long. If you want to place it inside the other components, you need tp cut those 1 1/2″ longer.
Hi- I signed up and never received the plans via email. Is there somewhere else I can get the plans via the website?
Please read the FAQs: http://myoutdoorplans.com/faq/
So I’m reading the comments and I’m seeing the material list is messed up. I’m making this for a school project were I have to provide the materials. Could someone clear me through what the exact materials you need. I’m worried I’ll get the wrong materials and mess up on my project.
Thank you.
I have updated the list long ago. It’s correct. You won’t mess up on the project because building means finding solutions! That’s the secret! You can do it!
Can I request a printable copy be emailed to me. I am the maintenance supervisor at the Carroll County Farm Museum and I am looking to build this hutch to house our rabbits in year round
The print function will be available again in a few days. I had issues with unethical use of my plans. That was very hurtful, since I worked 10 years to make all these plans available for free.
I for one am very sorry to hear that. I hope it does not dim your creativity and willingness to share. I find the information you provide very helpful and has improved my grandkids rabbit experience. Happy bunnies. Thank you, thank you!