This step by step diy woodworking project is about dog kennel plans. If you want to build a simple backyard kennel for your dogs, but you haven’t found the right plans and instructions for your needs, we recommend you to pay attention to this article. There are many things that you should take into account before starting the actual constructions and assembly, so we recommend you to plan everything from the very beginning.
There are many shapes and designs that you could choose from, so make sure you make the right adjustments to this project, as to suit your needs. In addition, we recommend you to invest in high quality materials and to use the right tools for the job. Don’t forget to ask a skilled friend to assist you during the project, as two pairs of hands are always better than one. See all my Premium Plans HERE.
Projects made from these plans
Cut & Shopping Lists
- A – 2 pieces of 4×4 lumber – 80″ long, 2 pieces – 77″ long, 2 pieces – 74″ long POSTS
- B – 4 pieces of 2×4 lumber – 72″ long SUPPORTS
- C – 4 piece of 2×4 lumber – 60” long SUPPORTS
- D – 22 pieces of 2×4 lumber – 60″ long FLOOR
- E – 2 pieces of 3/4″ plywood – 48″x96″, 50 sq ft of roofing felt and shingles ROOFING
- F – 1 piece of 2×2 lumber – 53 3/4″ long, 1 piece – 51 1/4″ long, 2 pieces – 30 3/4″ long, DOOR
Tools
![]() Hammer, Tape measure, Framing square, Level
Hammer, Tape measure, Framing square, Level
![]() Miter saw, Drill machinery, Screwdriver, Sander
Miter saw, Drill machinery, Screwdriver, Sander
Time
Related
Dog Kennel Plans

Building-a-dog-kennel
Top Tip: Adjust the size of the dog kennel to suit your needs and invest in weather-resistant materials, such as: pressure-treated lumber, cedar, pine or redwood.
Building a dog kennel
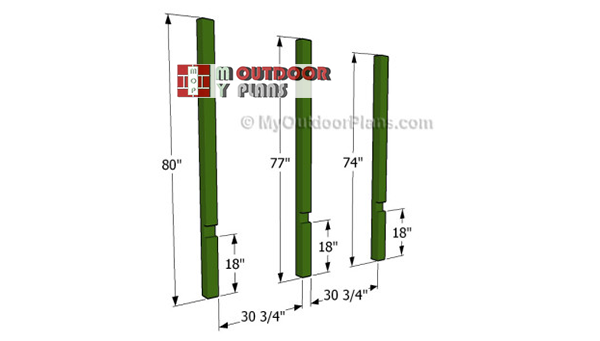
Building-the-posts
The first step of the woodworking project is to build the posts that will support the dog kennel. As you can easily notice in the image, we recommend you to use 4×4 lumber.
Cut the top of the posts at 10 degrees or at any other angle that will drain the water properly. Cut 1 1/2″ notches inside the posts with a circular saw to fit the supports. Clean the recess with a chisel and sandpaper.
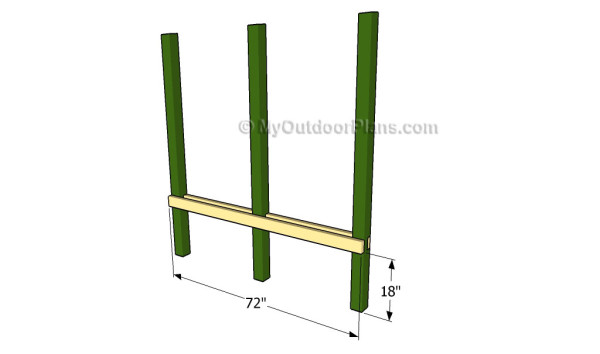
Fitting the supports
Continue the project by attaching the 2×4 supports to the posts, as shown in the image. It is essential to align the components at both ends and to check if the corners are right-angled, by using a carpentry square.
Proceed in the same manner with the opposite side of the dog kennel, if you want to get the job done in a professional manner. Drill pilot holes through the supports before inserting the screws into the posts.

Attaching-the-braces
In order to create a sturdy and rigid structure, we recommend you to lock the sides of the dog kennel together with 2×4 braces, as shown in the plans. Cut the supports at the right size and attach them into place with galvanized screws.
Top Tip: Place a spirit level on top of the supports to check if they are perfectly horizontal. Drill pocket holes before inserting the 2 1/2″ screws. In addition, plumb the sides of the dog kennel with a spirit level.
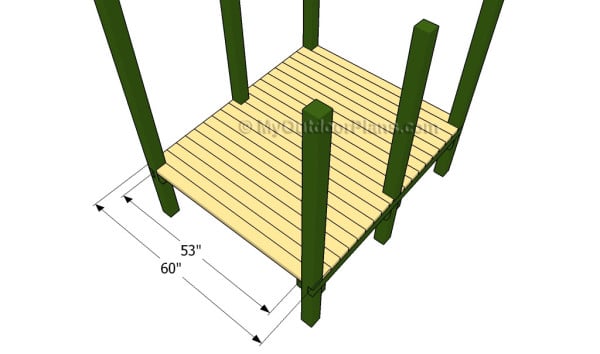
Attaching the flooring slats
Fitting the flooring into place is a straight-forward job, but there are a few things that you should pay attention to. For example, we recommend you to use 2×4 boards, as they are sturdy enough to support the weight of the dogs properly.
Top Tip: However, we recommend you to adjust their size at the right dimension and to place a nail between them, in order to make sure the water will drain properly.
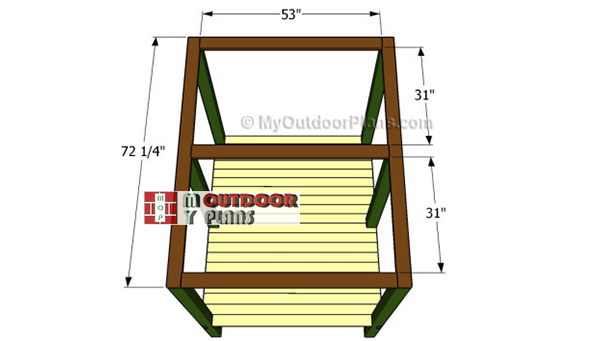
Fitting-the-rafters-to-dog-kennel
Continue the backyard project by attaching the rafters on top of the posts, as you can notice in the plans. Cut the 2×4 slats at the right size and lock them into place with galvanized screws.
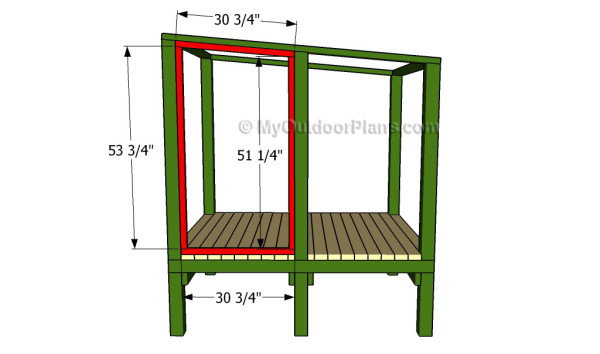
Building the door
Maybe one of the most challenging part of the project is to build the door for the dog kennel. In order to get the job done in a professional manner, we recommend you to use 2×2 lumber, several hinges and chicken wire.
Top Tip: After assembling the frame of the door we recommend you fit it inside the opening and to lock it into place with hinges. Don’t forget to fit a proper latch, as to keep the door closed.
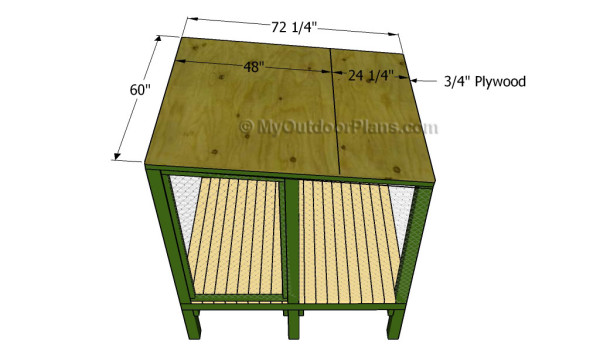
Attaching the roof sheets
Cut the pieces of plywood at the right size and lock them into place with finishing nails. Align the sheets at both ends and make sure you don’t leave any gaps between them .
Top Tip: This step of the project is essential for the end result, so make sure you plan every step with great care and use proper tools to get the job done. Make sure you insert stainless steel or galvanized screws/finishing nails.
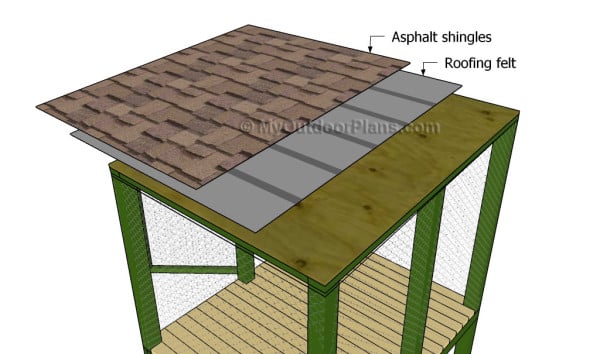
Attaching the roofing
One of the last steps of the project is to install the roofing felt and the asphalt shingles into place. Make sure the strips of underlayment overlap at least 2″, otherwise they won’t protect the roof against moisture.
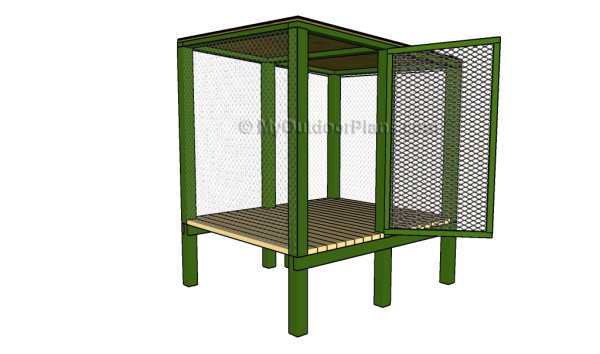
Dog kennel plans
After assembling the dog kennel we recommend you to check if the components are locked together properly. Insert the galvanized screws properly, making sure they are at the same level with the wooden surface.
Top Tip: Don’t forget to cover the exterior of the kennel with wire and to lock it into place properly. Check if the door opens properly and tou should move your pets to their new home.
This woodworking project was about dog kennel plans. If you want to see more outdoor plans, we recommend you to check out the rest of our step by step projects.
