Building a chicken coop can be a rewarding project, and in this post, I’ll guide you through the process of constructing a 6×12 chicken coop with an attached run. This design offers a spacious and secure environment for your chickens, giving them plenty of room to roam while keeping them safe from predators. With a few basic tools and materials, you’ll be able to create a durable, long-lasting home for your flock that will serve them well for years to come.
Whether you’re a beginner looking to tackle your first woodworking project or an experienced builder, this chicken coop is both practical and customizable to suit your needs. In this step-by-step guide, I’ll break down everything from framing the structure to adding the finishing touches.
Building this 6×12 chicken coop with an attached run will typically cost between $900 and $1,400, depending on your choice of materials and local prices. The majority of the cost comes from the lumber, roofing, and hardware needed for a durable structure. As for the time commitment, expect to spend around 2-3 days building the coop, especially if you’re tackling the project solo. With a bit of planning and focus, this DIY project can be completed over a weekend or two, even for beginners—just make sure to take your time with each step to ensure a solid, lasting build.
When buying the lumber, you should select the planks with great care, making sure they are straight and without any visible flaws (cracks, knots, twists, decay). Investing in cedar or other weather resistant lumber is a good idea, as it will pay off on the long run. Use a spirit level to plumb and align the components, before inserting the galvanized screws, otherwise the project won’t have a symmetrical look. If you have all the materials and tools required for the project, you could get the job done in about a day.
Projects made from these plans
Pin it for later!

Building a 6×12 Chicken Coop
Building-a-6×12-chicken-coop-with-run
Cut & Shopping Lists
Tools
![]() Hammer, Tape measure, Framing square, Level
Hammer, Tape measure, Framing square, Level
![]() Miter saw, Drill machinery, Screwdriver, Sander
Miter saw, Drill machinery, Screwdriver, Sander
![]() Safety Gloves, Safety Glasses
Safety Gloves, Safety Glasses
Time
![]() One week
One week
Related
- 8×10 Chicken Coop Plans
- 4×8 Chicken Coop Plans
- PART 1: 6×12 Chicken Coop with Run Plans
- PART 2: 6×12 Chicken Coop with Run – Roof Plans
- PART 3: 6×12 Chicken Coop with Run – Nesting Boxes
It’s that easy to build a 6×12 chicken coop!
STEP 1:Building the floor
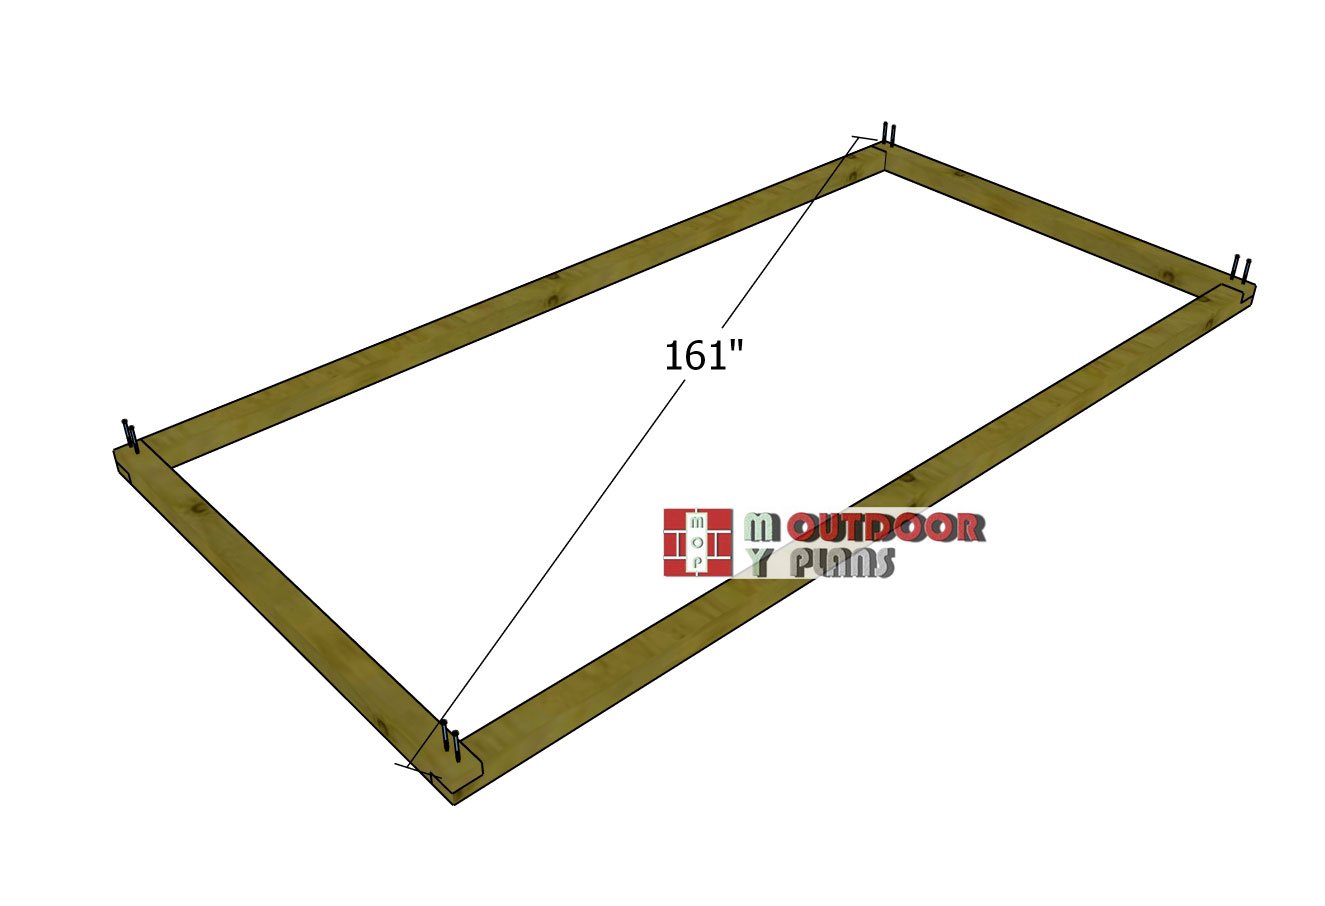
Assembling-the-skids
Lay the skids in place right where you want the chicken coop to sit. Once they’re positioned, go ahead and build out the frame using 3 1/2″ screws for a solid hold. Now here’s where precision matters: check that your corners are square using the classic 3-4-5 method.
It’s a simple trick that works every time. Then, measure the diagonals from corner to corner—those numbers should match. If they don’t, adjust the frame until they do. Before driving in your screws, drill pilot holes to keep the wood from splitting and make everything go together cleaner.
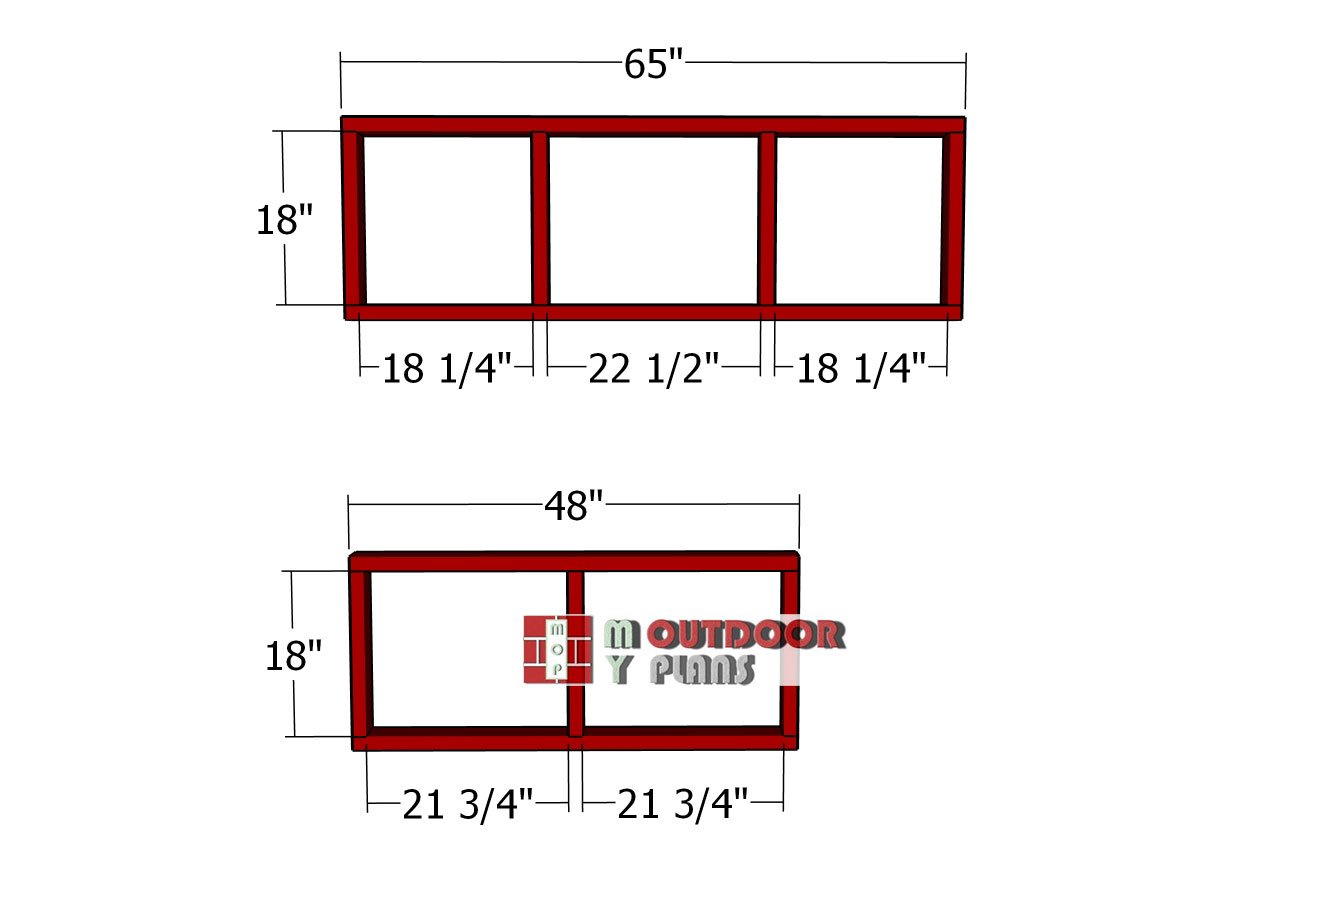
Base-wall-frames
Next up, we’re building the side frames that will support the coop area. For this part, we’re sticking with 2×4 lumber—it’s sturdy, reliable, and easy to work with. Cut all your pieces to size according to the plans, then lay them out on a flat, level surface.
This makes the assembly a whole lot easier and helps everything stay true. Once everything’s in place, pre-drill your holes to prevent any splits, then drive in 3 1/2″ screws to lock the frame together. You should end up with clean, square frames that are ready to go vertical.
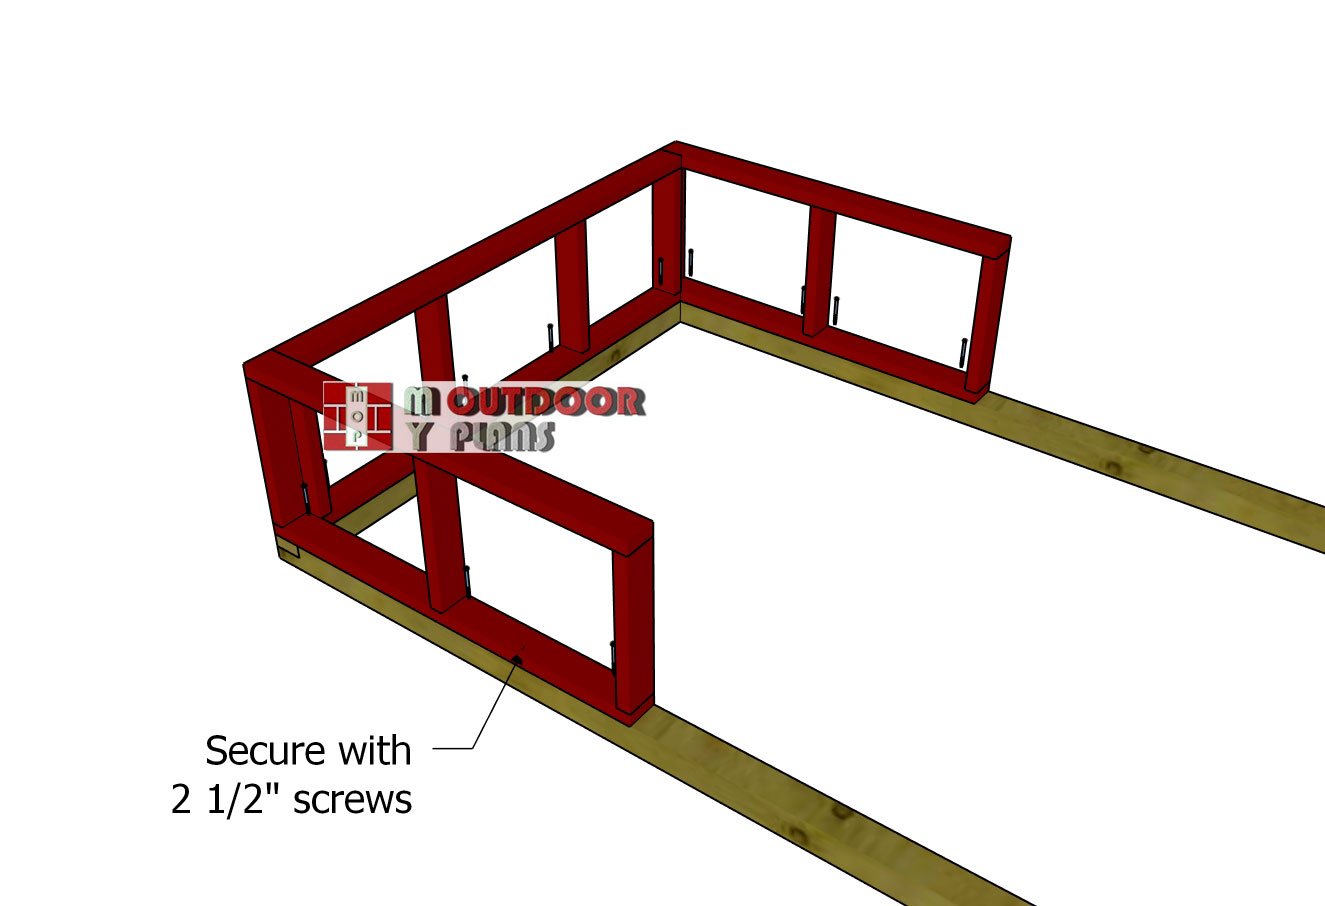
Fitting-the-base-frames
Go ahead and stand the frames up on the base, lining them up with the edges of the skids. Take your time here to make sure everything’s flush and square—this sets the tone for the whole build. Once aligned, drill pilot holes down through the bottom plates and into the skids, then drive in 2 1/2″ screws every 12 inches to really lock them in. Don’t forget to connect the adjacent walls to each other, too—same screws, same pilot holes. Tight joints now mean a sturdy coop later.
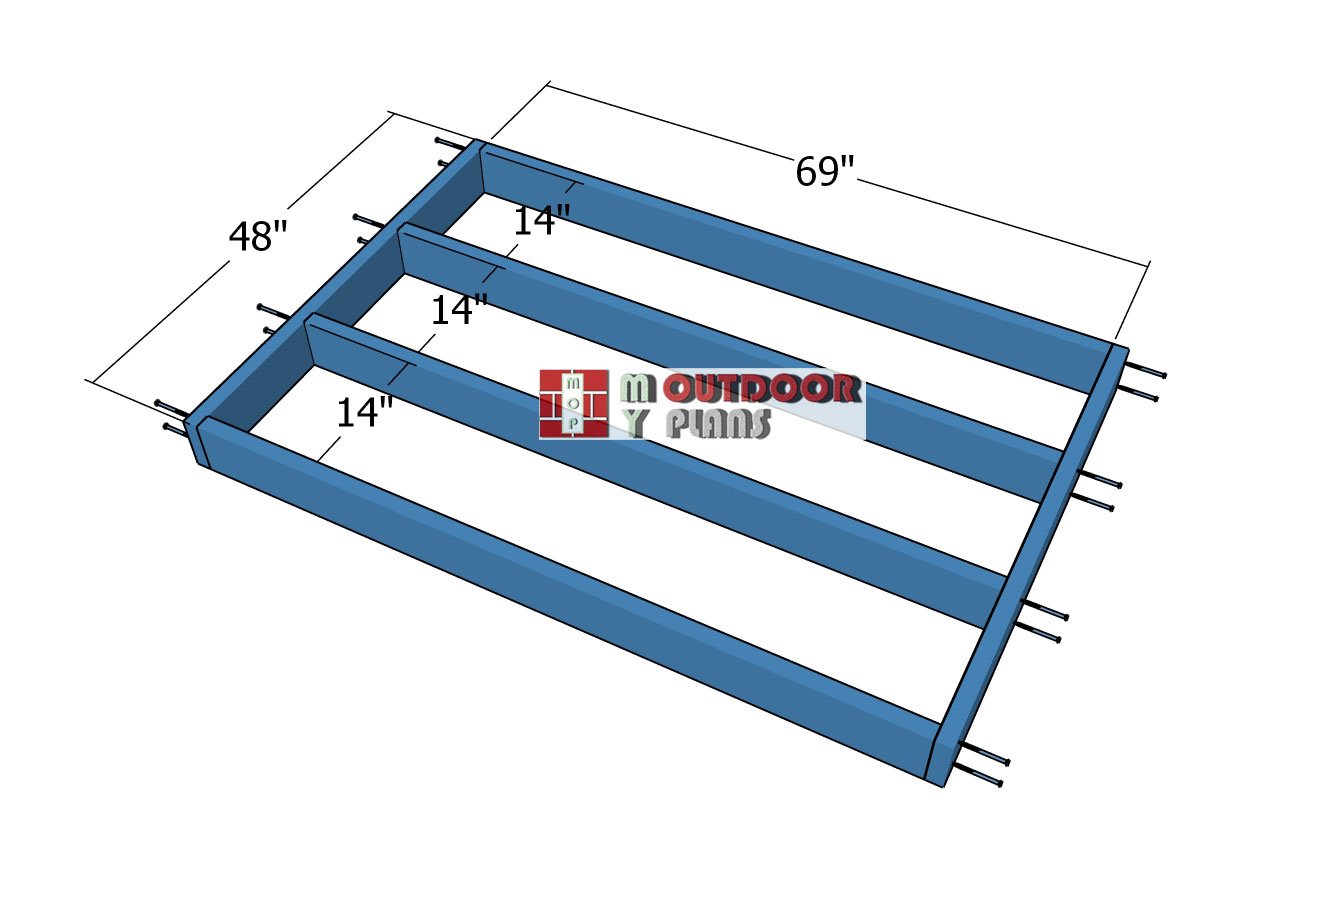
Building-the-chicken-coop-floor-frame
For the floor structure, we’re stepping it up with 2×6 lumber for the joists—strong enough to hold up over time and handle all the movement inside the coop. Start by cutting all your joists to size, then lay them out on a nice, level surface so everything stays square during assembly.
Drill pilot holes at all your connection points to avoid splitting the wood, then drive in 3 1/2″ screws to build a rock-solid frame. This is the foundation of your floor, so take a few extra minutes to make sure everything is lined up tight and true.
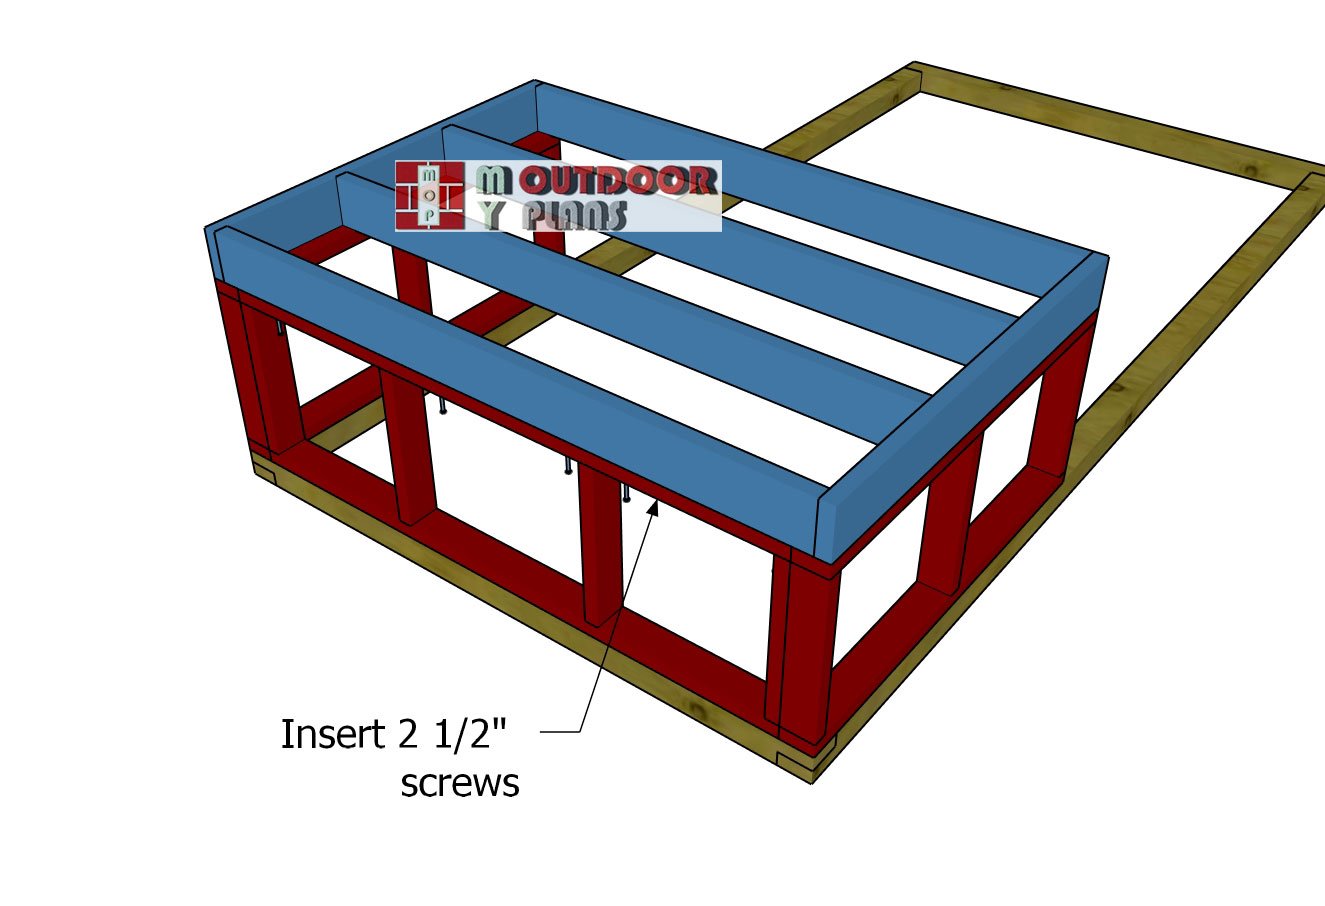
Secure-the-chicken-coop-floor-frame
Now it’s time to bring the floor frame onto the structure. Lift it into place and set it on top of the side frames, making sure all the edges are flush and everything sits nice and level. Once it’s lined up, drill pilot holes from underneath—right through the top plates and into the floor frame.
Then secure it with 2 1/2″ screws, spacing them every 12 inches for a tight, sturdy connection. This locks the whole structure together and gets us one big step closer to a fully framed coop.
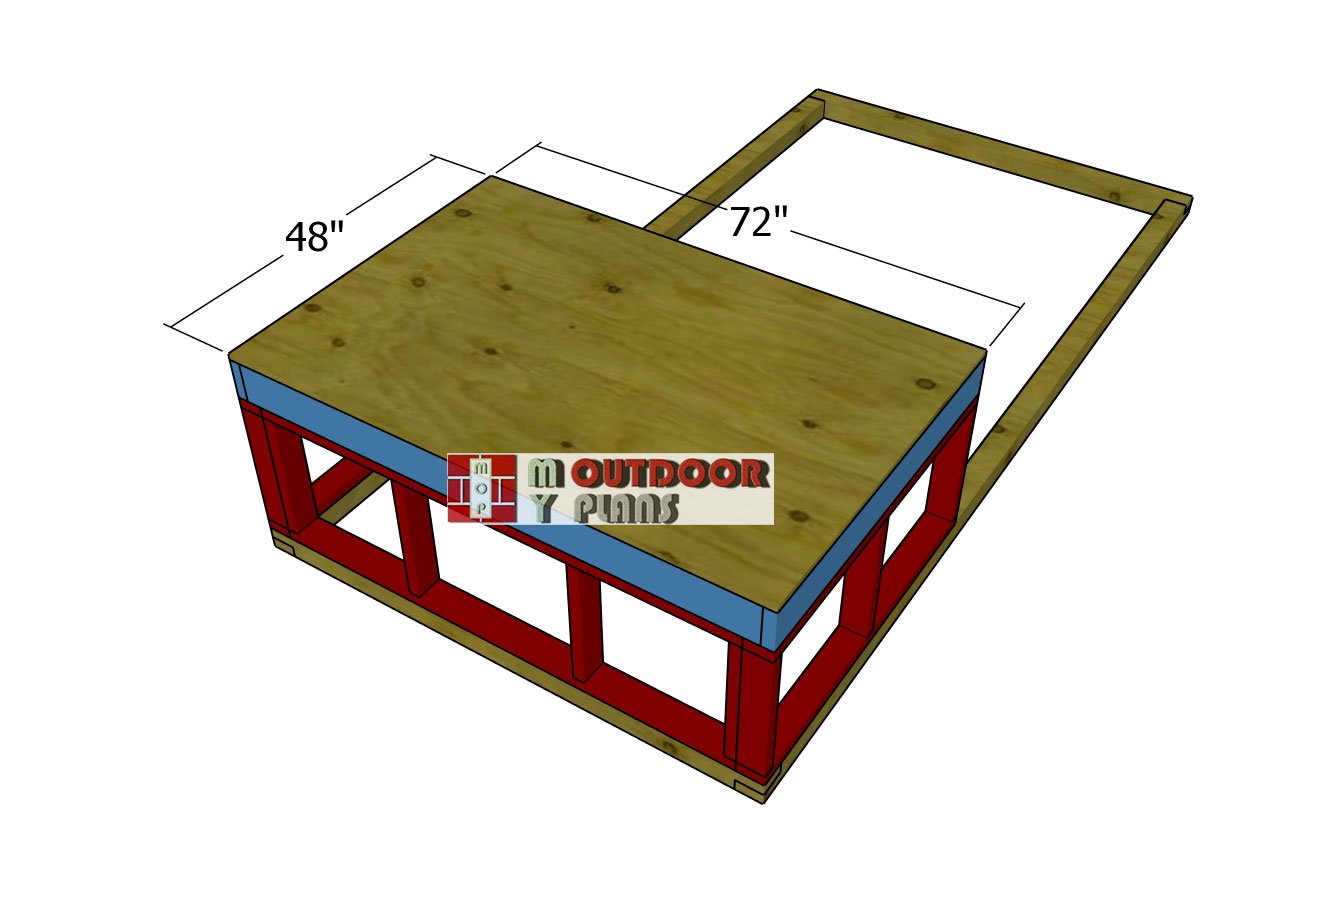
Attaching-the-floor-panel
With the floor frame in place, it’s time to sheet it with 1/2″ plywood. Drop the panel onto the frame and take a moment to line up all the edges so they’re nice and flush. Once everything’s aligned, drill it down using 1 5/8″ screws, spaced about every 16 inches along the joists. This will give you a strong, stable surface to build up from—and it already starts feeling like a real structure at this point.
STEP 2: Building the chicken coop
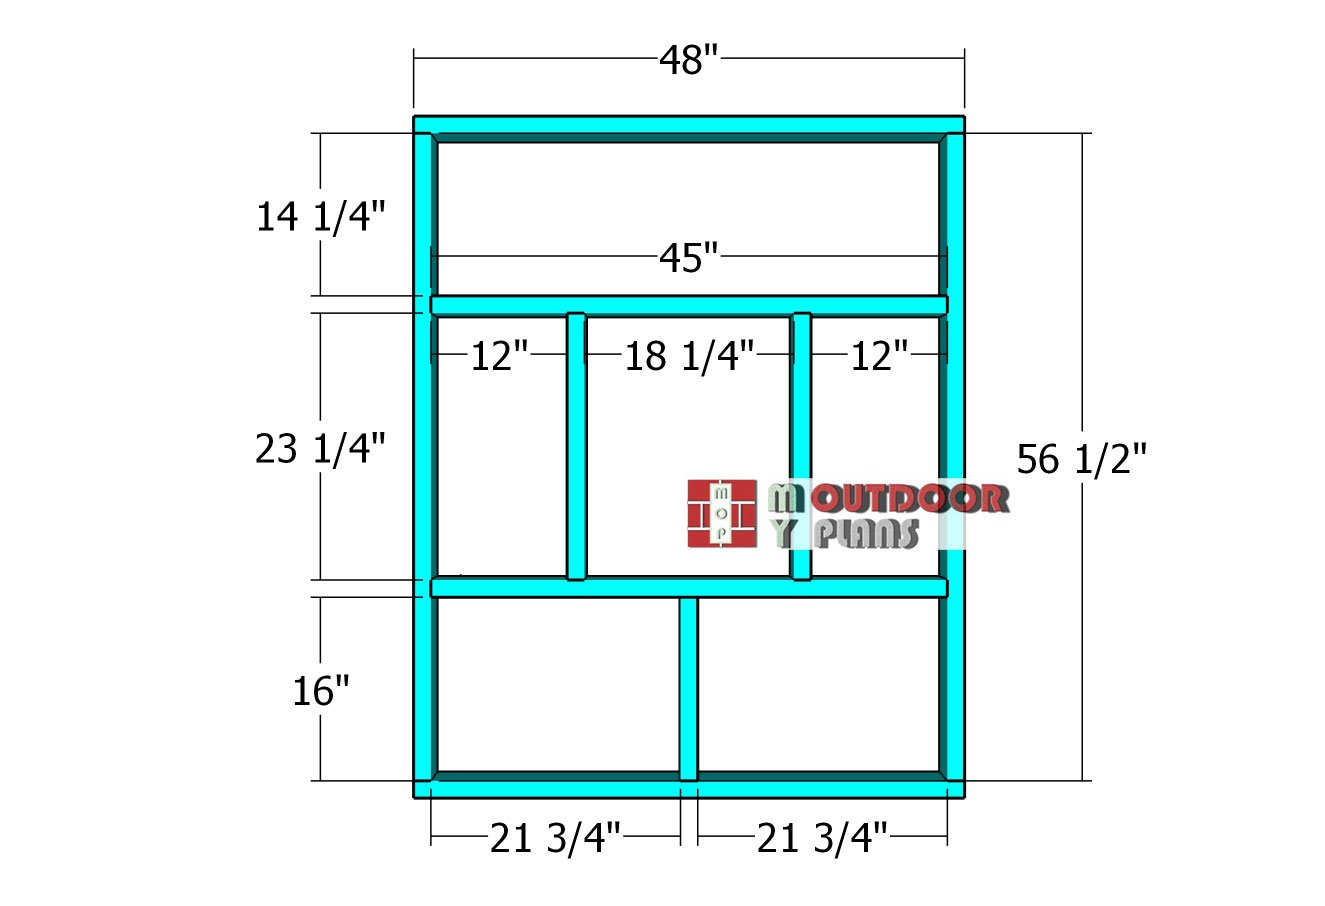
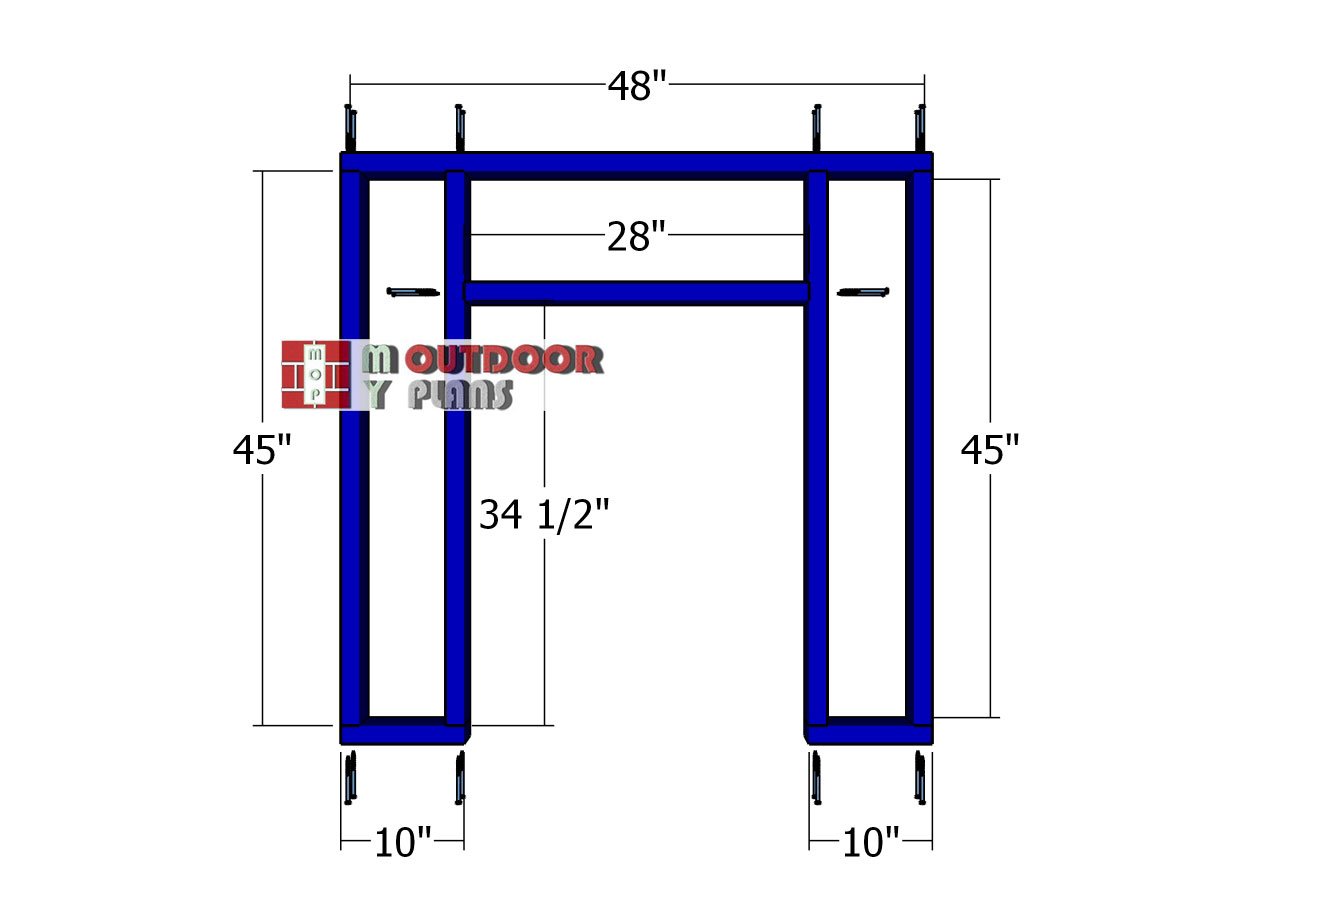
Coop-front-wall-frame
Next up, we’re moving on to the wall framing, starting with the front wall. This one includes an opening for a window, which you can tweak to fit whatever size you’ve got on hand. In this case, we’re framing for an 18″x23″ chicken coop window. Begin by cutting all the 2×4 components to size, following the plans or adjusting as needed for your window.
Lay everything out on a level surface, and start assembling the frame with 3 1/2″ screws. Make sure to drill pilot holes through the top and bottom plates before driving screws into the studs—that keeps the wood from splitting and makes assembly cleaner. Take a quick check to square up all your corners before moving on.
Back-wall-frame—coop
Now it’s time to move on to the back wall—same process as before. Cut your 2x4s to size, lay everything out, and assemble the frame using 3 1/2″ screws. This wall includes a door opening to give you easy access into the coop, which makes cleaning out the space simple and hassle-free.
Side-wall-1—coop
Frame the side wall using the same approach as before—cut your 2x4s, lay them out on a level surface, and assemble with 3 1/2″ screws. This wall includes a small door opening so the chickens can move freely between the coop and the run area.
Side-wall-frame—chicken-coop
Build the exterior side wall frame for the coop using the same method—cut your 2x4s, lay them out flat, and fasten everything together with 3 1/2″ screws. This wall includes an opening for the nest boxes, giving easy access for collecting eggs from outside the coop.
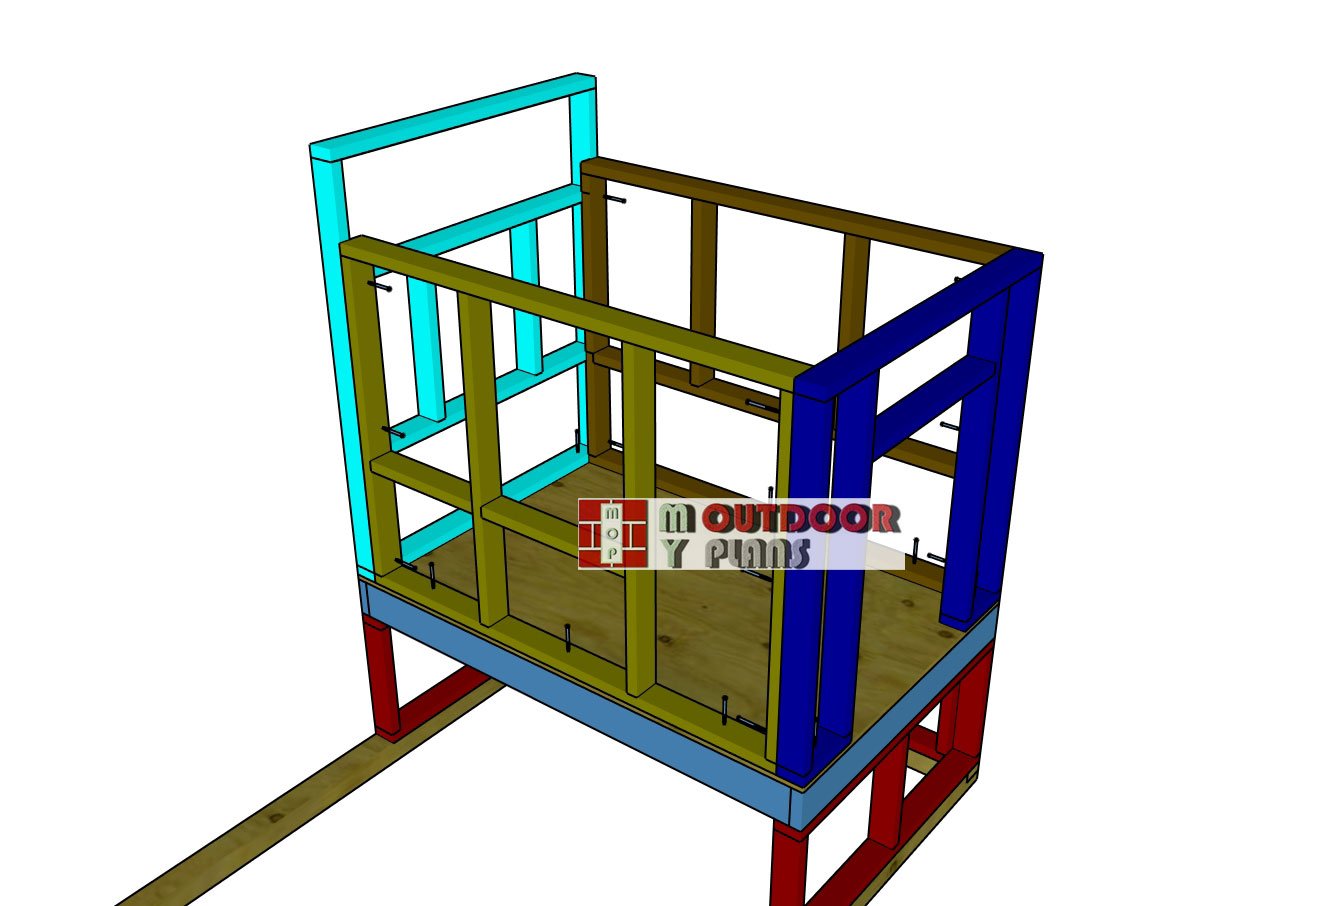
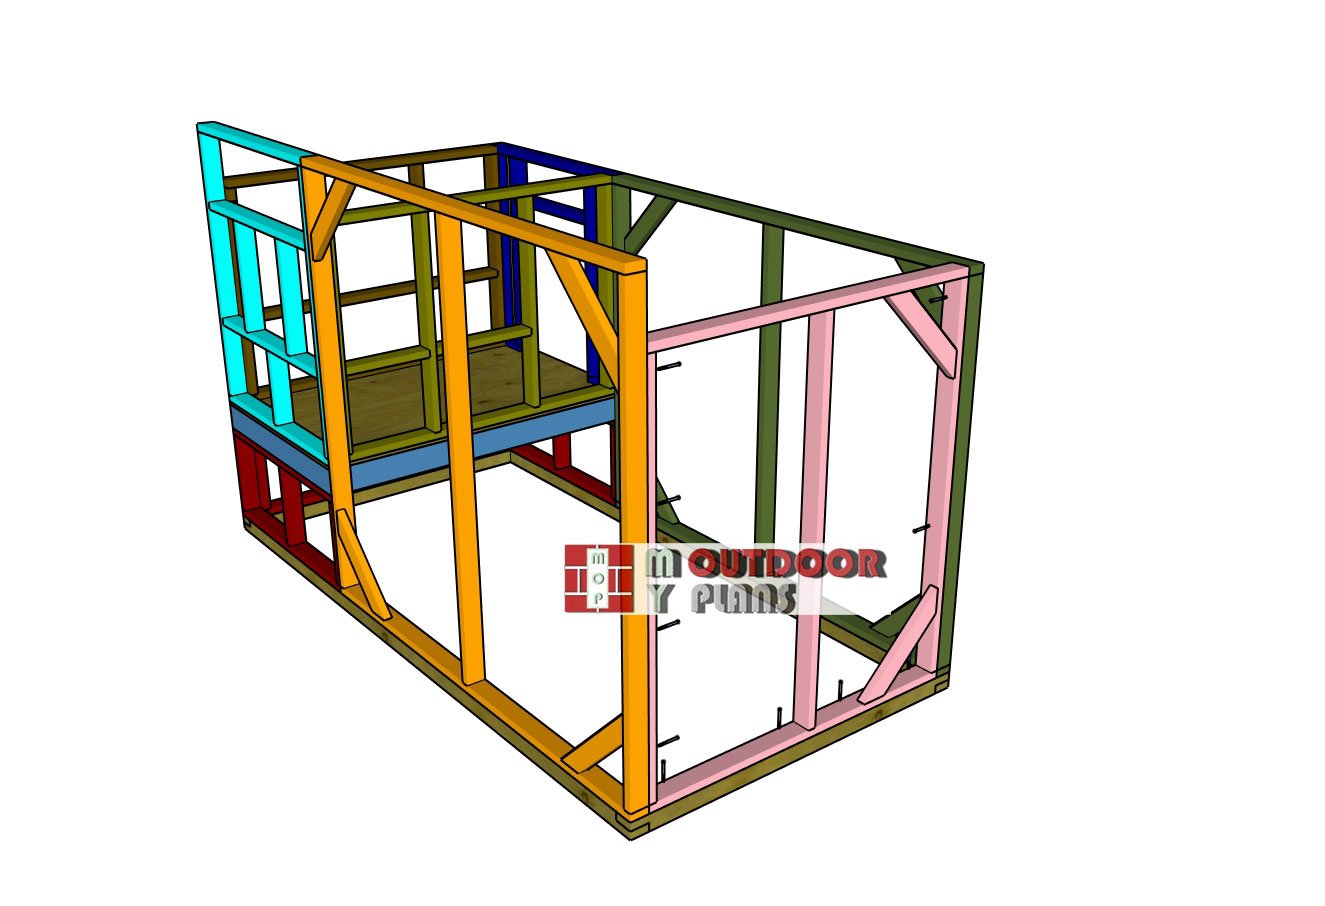
Assembling-the-chicken-coop
Set the wall frames onto the floor of the coop and make sure all the edges are flush. Drill pilot holes through the bottom plates and secure the walls with 2 1/2″ screws. Then, tie the adjacent walls together tightly using the same screws for a solid structure. This completes the main chicken coop area. Now, let’s move on to building the run.
STEP 3: Building the chicken run area
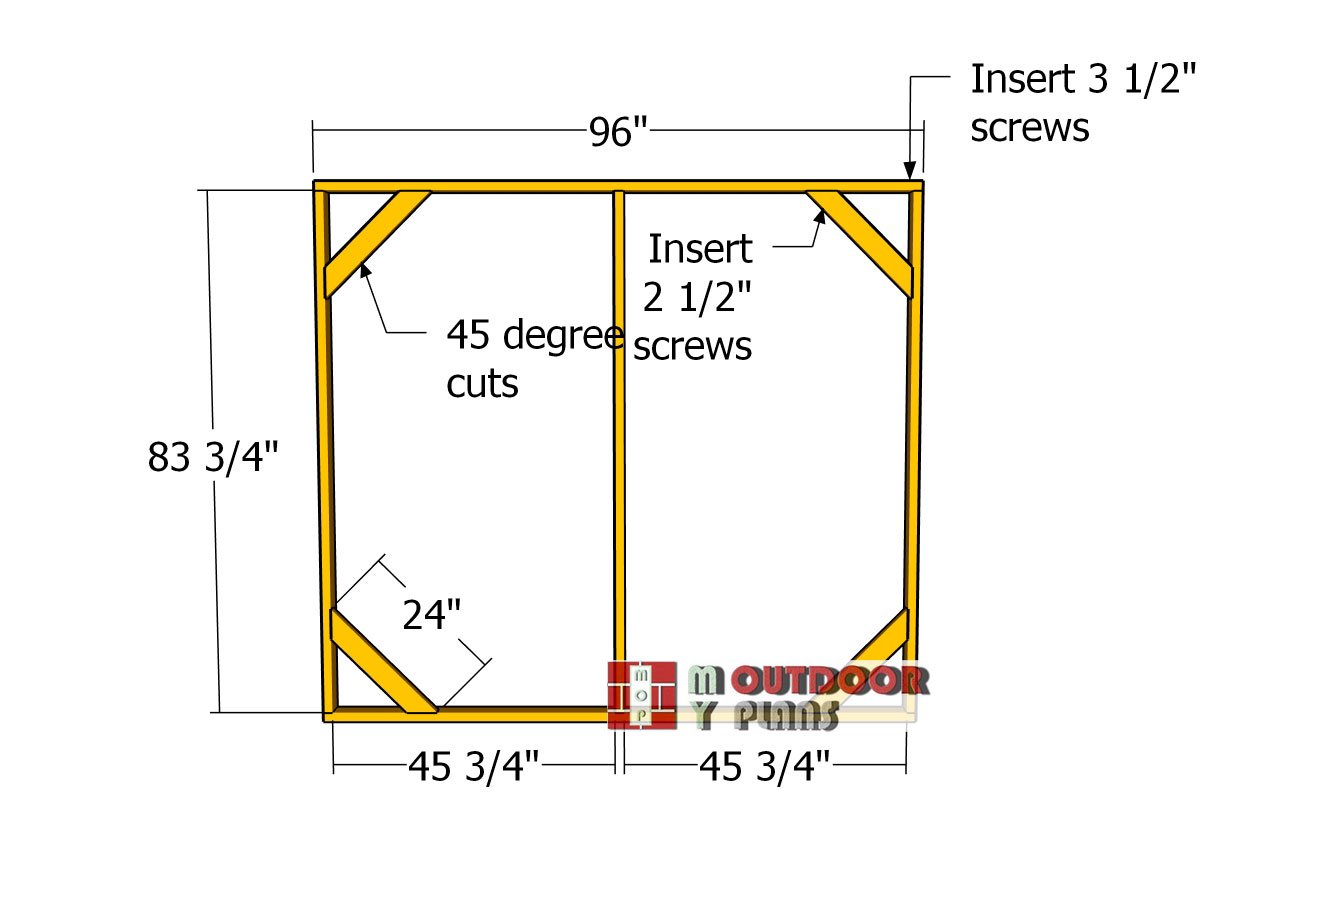
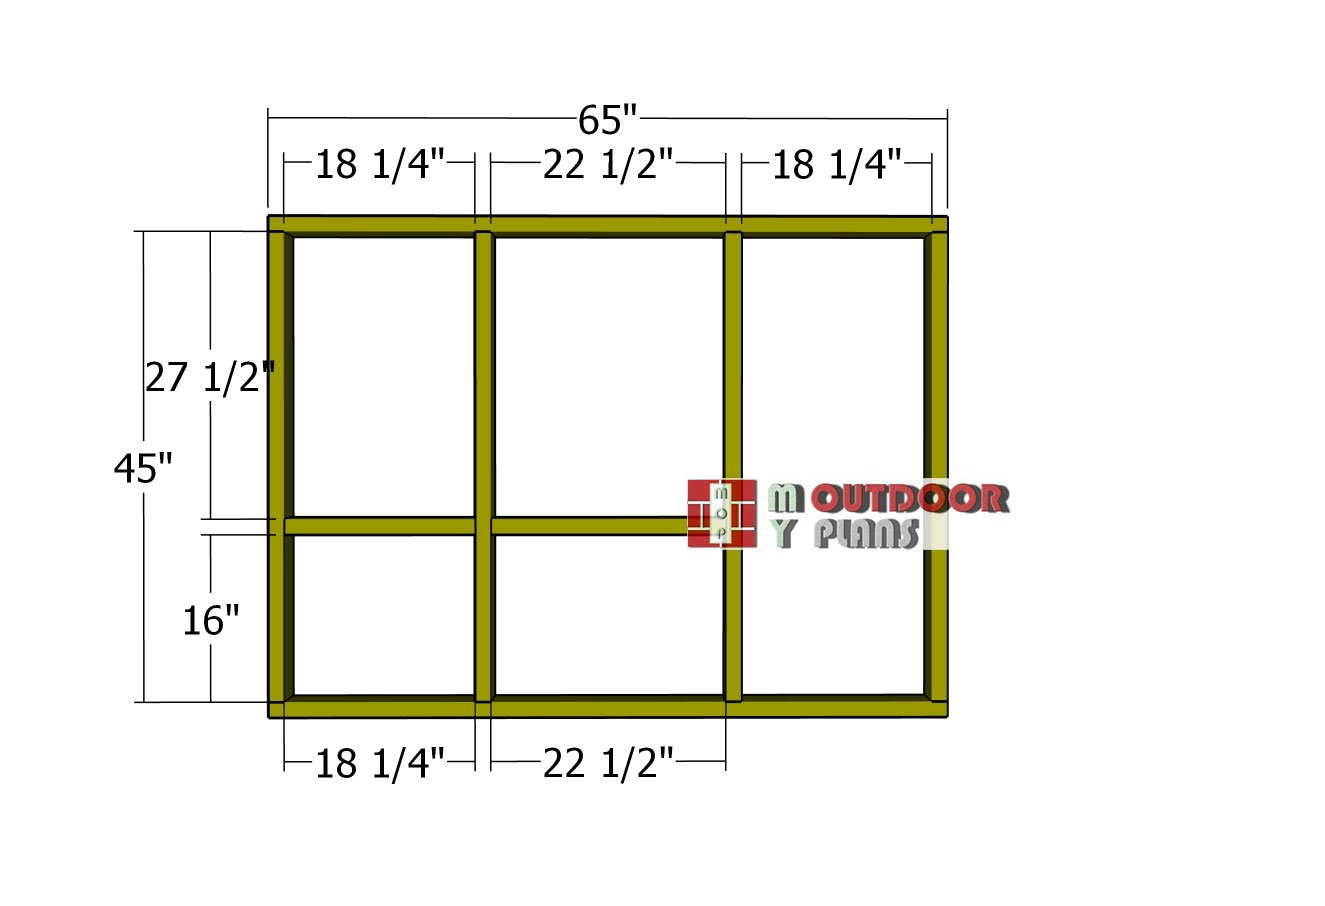
Tall-run-wall—run-area
Build the front wall frame for the run using all 2×4 boards. Lay out the pieces on a level surface, following the diagram for accurate placement. Drill pilot holes through the plates and drive 3 1/2″ screws into the studs to lock everything together. Then, add the diagonal braces at the corners and secure them with 2 1/2″ screws, drilling pilot holes first to keep things clean and precise.
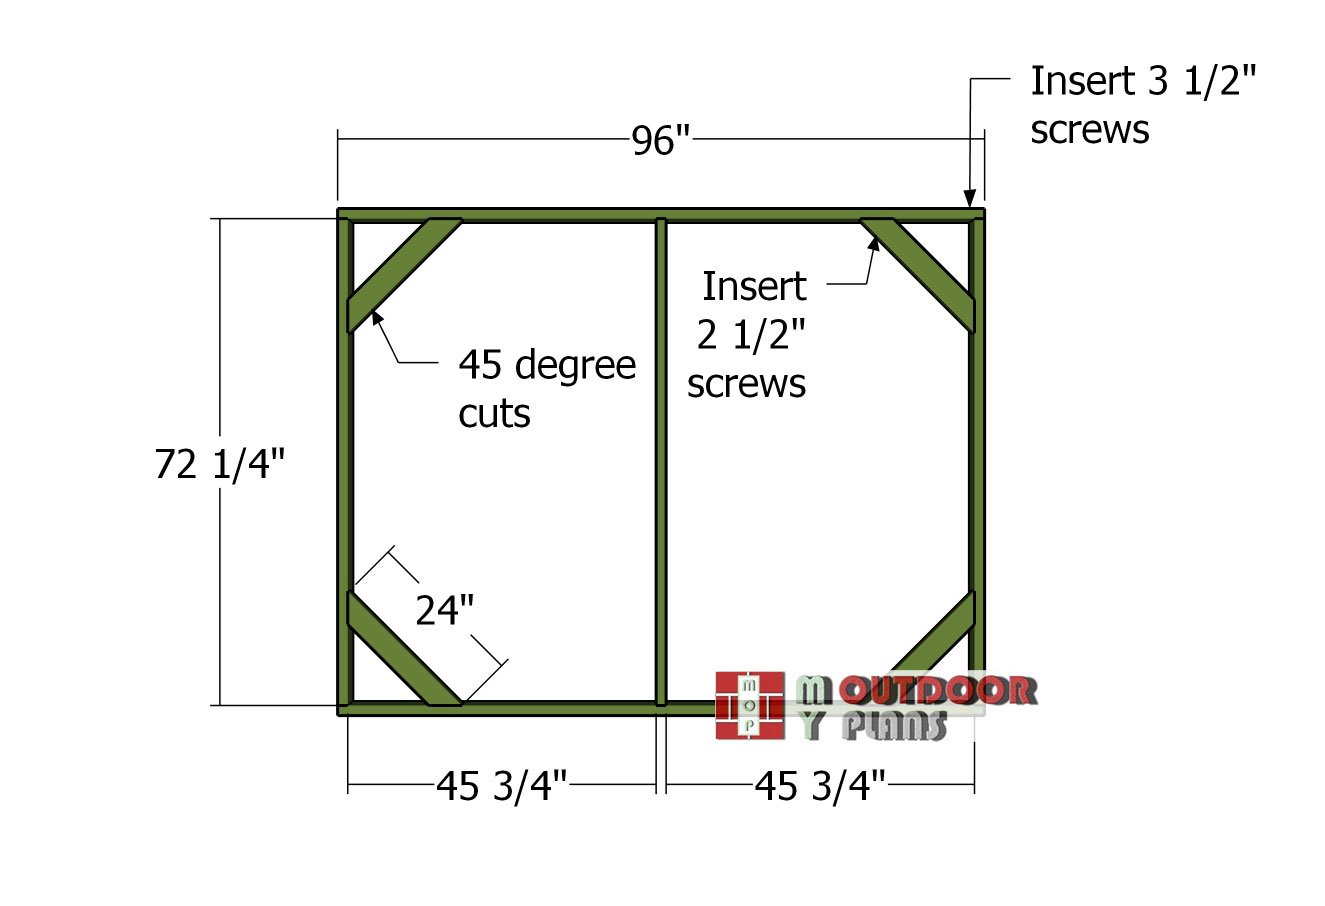
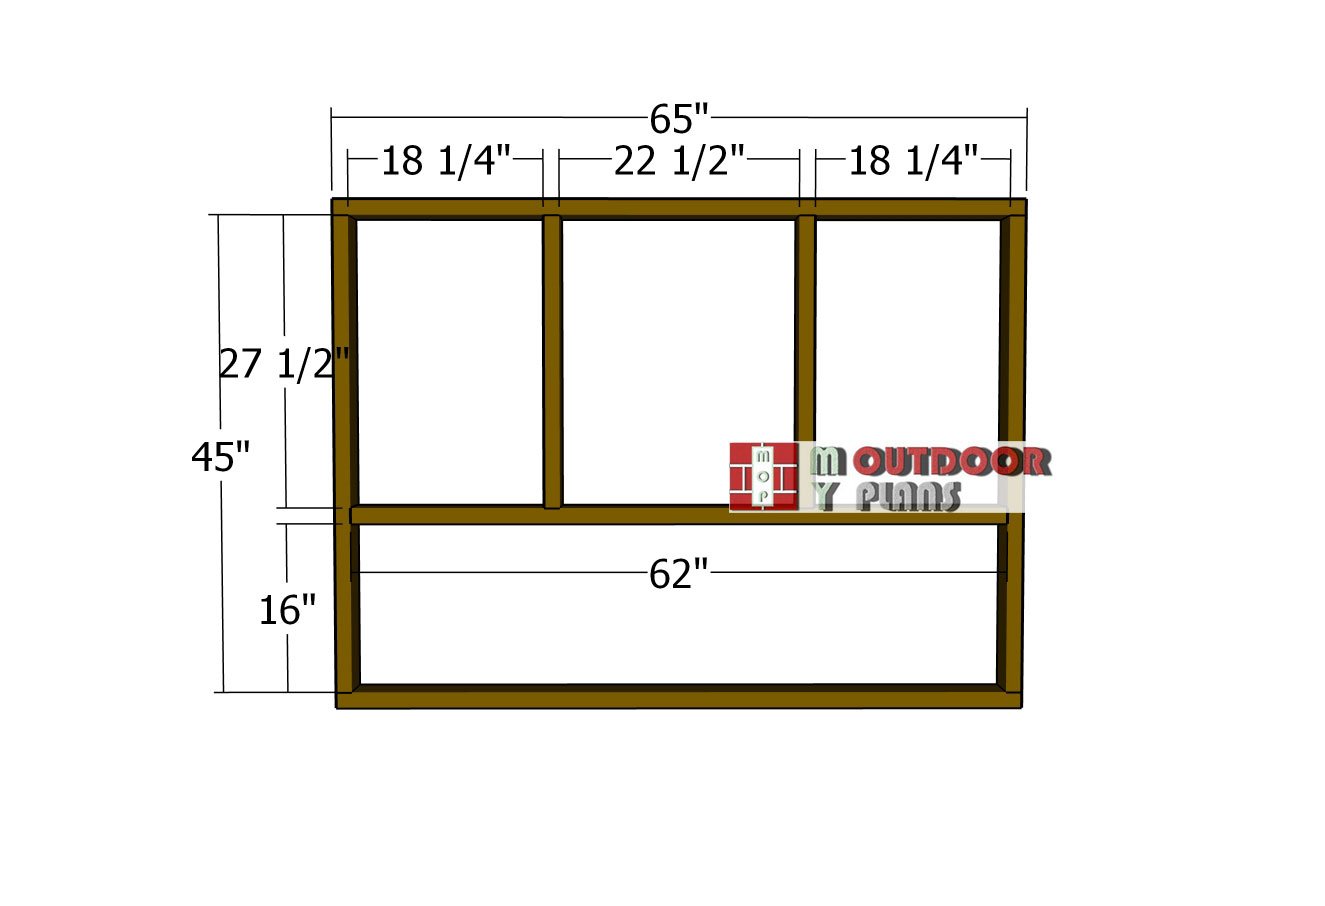
Short-wall-frame—run-area
Assemble the back wall for the chicken coop using the same method as before—cut your 2x4s to size, lay them out on a flat surface, and join the pieces together with 3 1/2″ screws after drilling pilot holes.
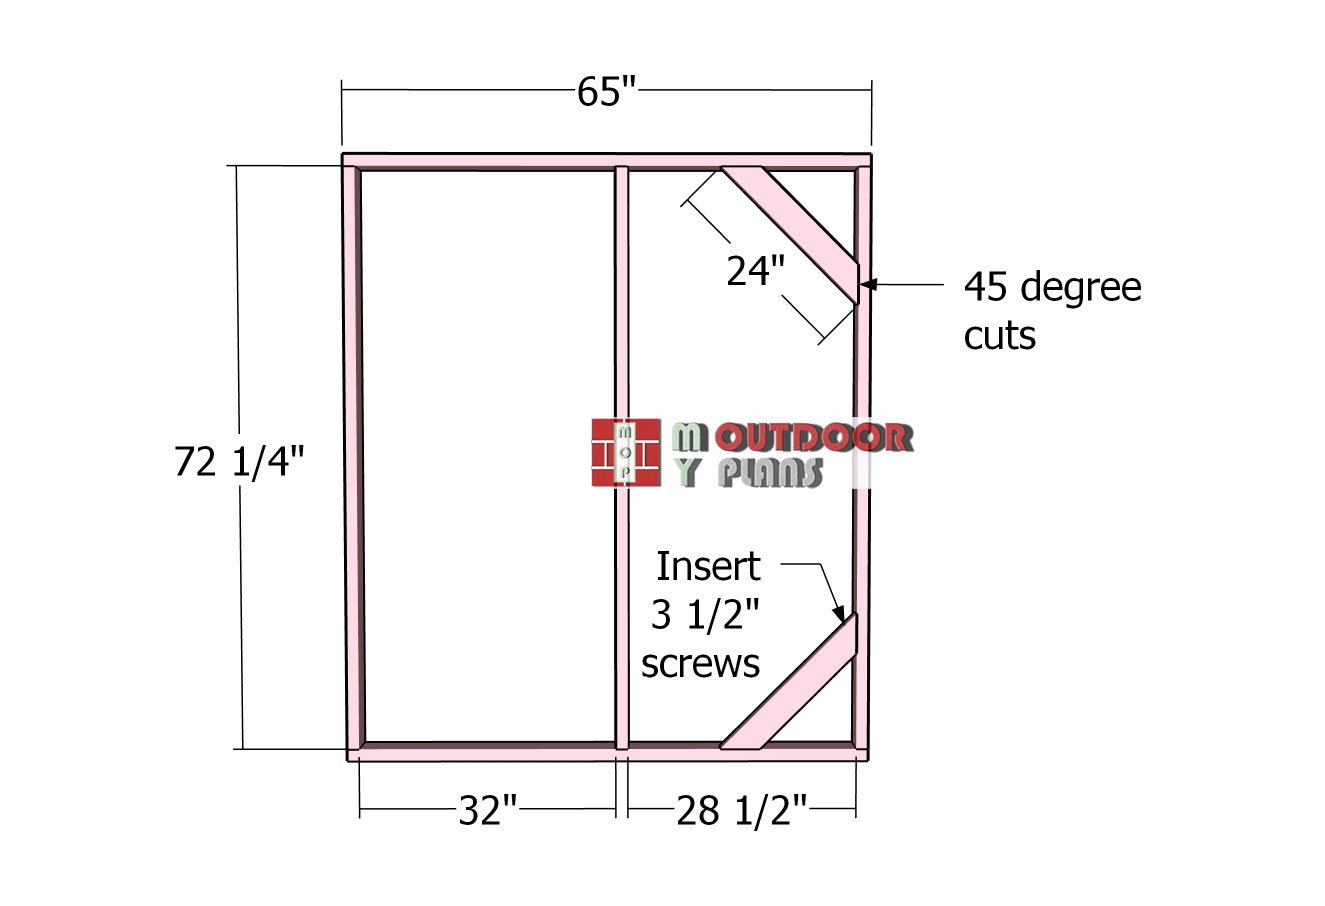
End-wall-frame—run-area
Build the end wall for the run area using the same framing technique. This wall includes an opening for a 32″ wide door, giving you easy access inside the run when needed.
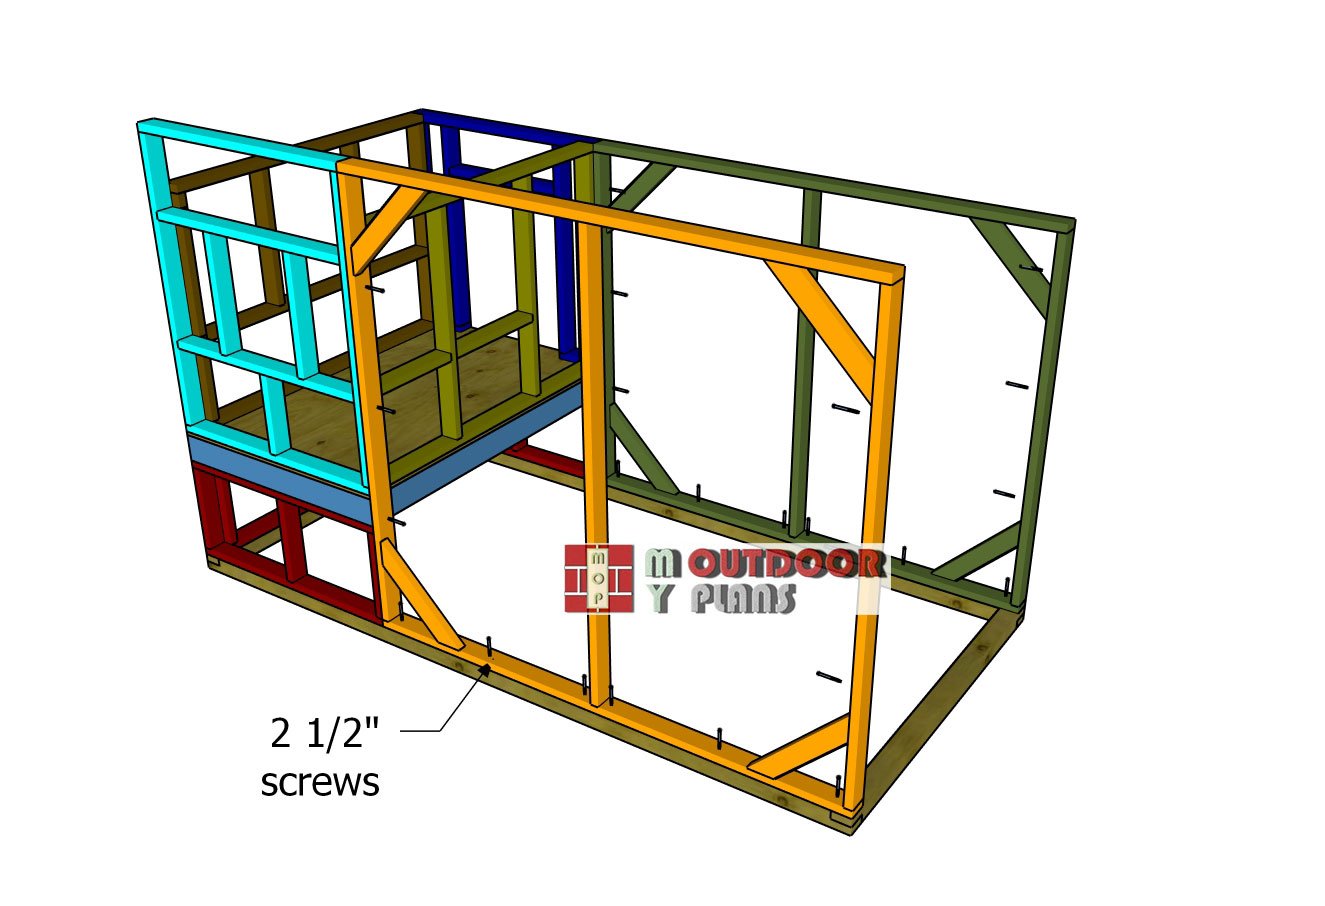
Fitting-the-run-area-frames
Attach the front and back wall frames of the run to the skids, just like shown in the image. Drill pilot holes and secure them with 2 1/2″ screws, spacing them every 16″ along the bottom. Make sure the frames are aligned flush with the front and back edges of the coop area before locking everything in place.
Fitting-the-end-wall-frame—run-area
Fit the end wall frame into place on the chicken run and align it with the skids. Secure it down using 2 1/2″ screws, drilling pilot holes first. Then, fasten the wall to the adjacent frames with 2 1/2″ screws, spaced every 16″ for a solid, tight connection.
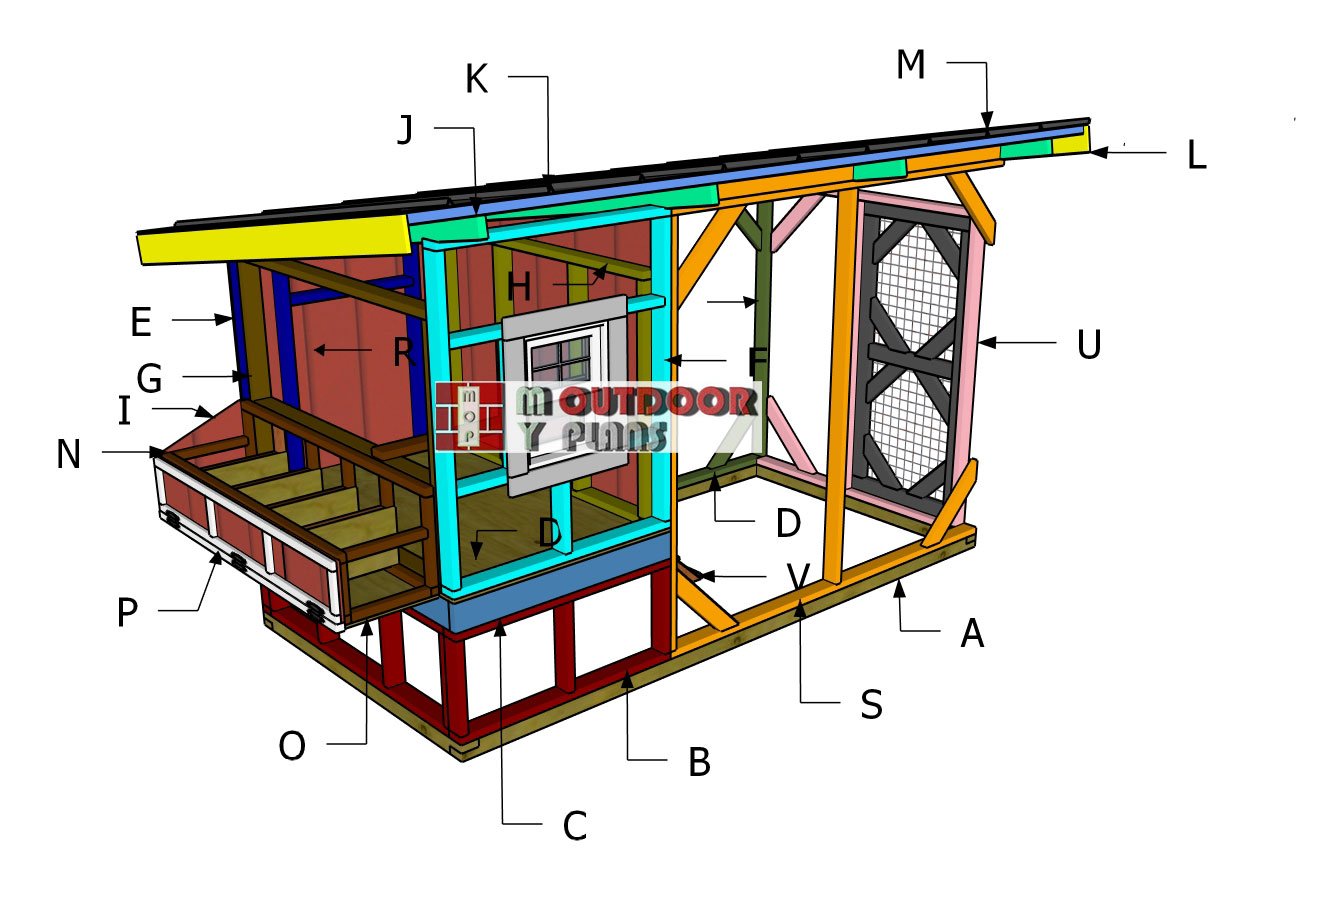
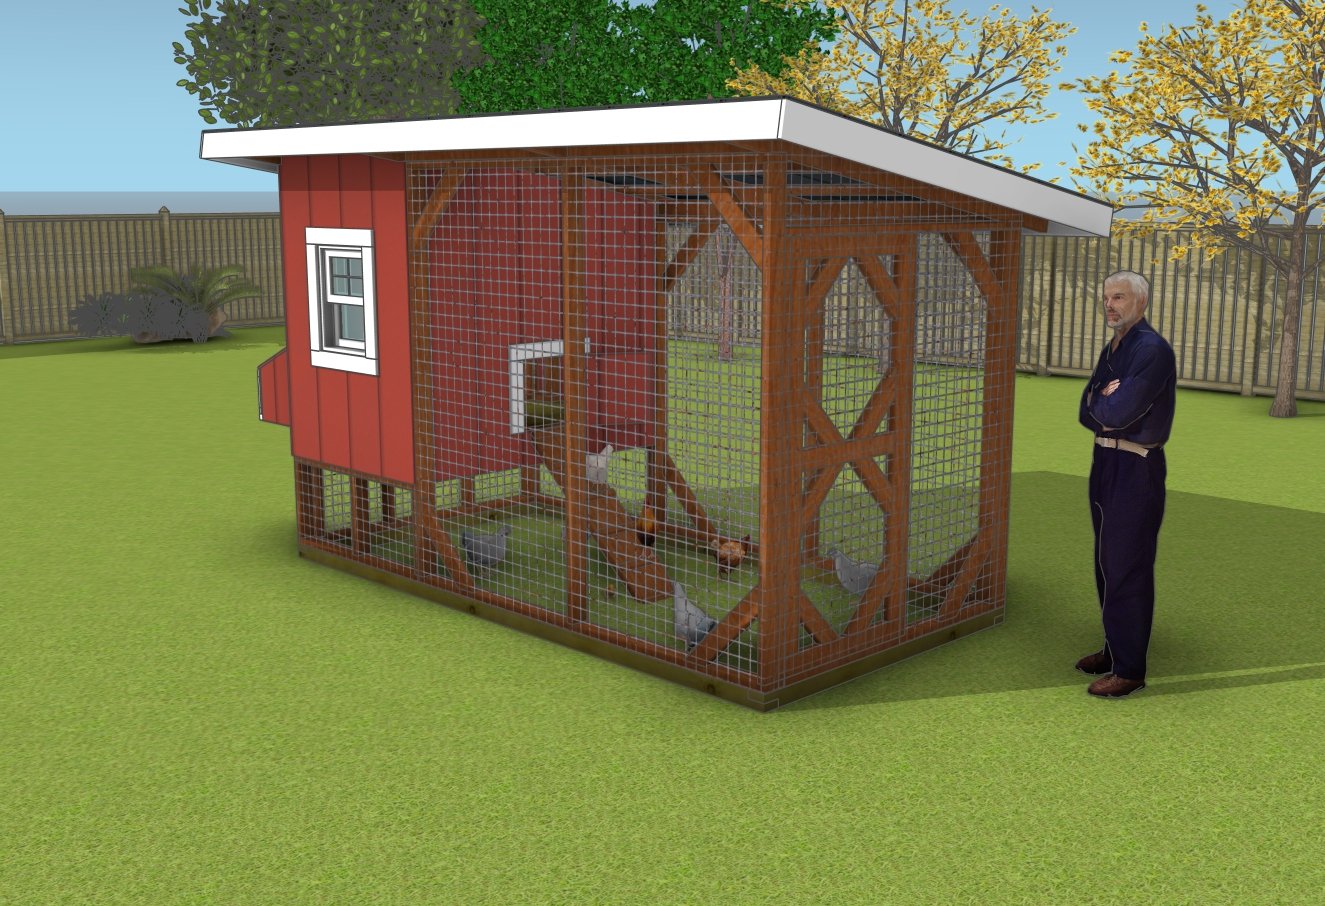
6×12 chicken coop – back view
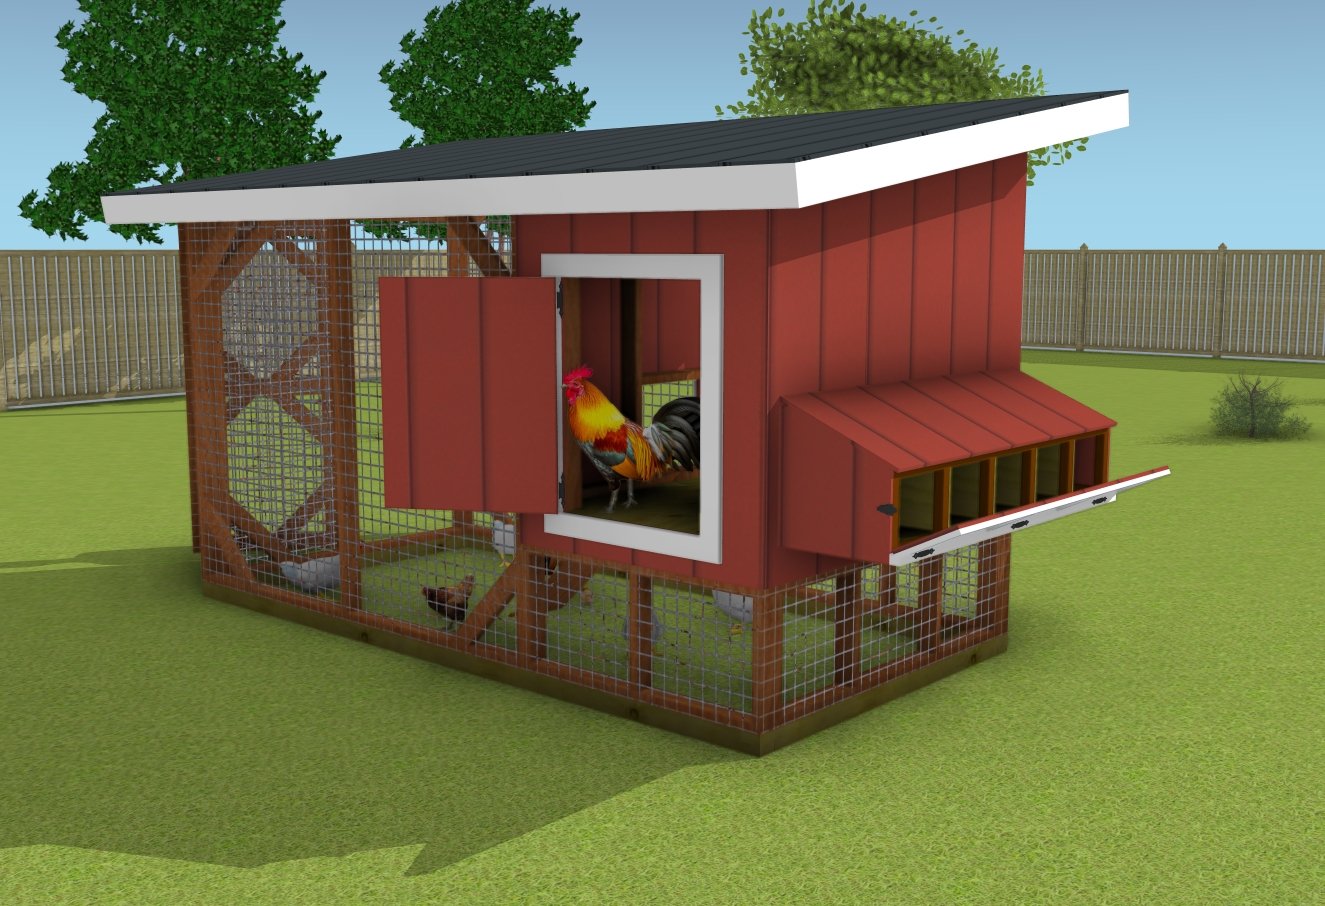
This 6×12 chicken coop with an attached run is perfect for anyone looking to raise chickens in a safe and spacious environment. It provides plenty of room for your flock to roam and roost comfortably, while the secure run keeps them protected from predators. Whether you’re a backyard hobbyist or starting your own small homestead, this coop offers a reliable solution for housing chickens, ensuring they have a healthy, comfortable space to live, lay eggs, and stay safe. Plus, the easy access doors make feeding, cleaning, and collecting eggs a breeze.
How to build a 6×12 chicken coop with run
Check out PART 2 of the project, so you learn how to continue the roof and run project.
Top Tip: If you want to get PREMIUM PLANS for this project, in a PDF format, please press GET PDF PLANS button bellow. If you want the free version of the plans, please read the blog FAQs. Thank you for your support.

This woodworking project was about 6×12 chicken coop with run plans. If you want to see more outdoor plans, we recommend you to check out the rest of our step by step projects.
