This step by step diy project is about deer feeder plans. Building a deer feeder is a nice project, as you could help the animals get trough the winter and study them for many hours in a row. You can get the job done in just one weekend, as the project requires basic skills and materials. Align the components at both ends and create rigid joints, by inserting galvanzied screws.
There are many designs and shapes you could choose from, but this project is ideal if you want to feed deer and other wild animals. This woodworking project features a wide tray, where you could place seeds or corn, and a V-shaped feeder where you could place hay. Work with attention and adjust the size and the designs of the feeder, as to suit your needs and budget. Cover the structure with wooden boards, to protect the food from water damage.
Projects made from these plans
Cut & Shopping Lists
- A – 2 pieces of 2×2 lumber – 90” long POSTS
- B – 1 piece of 2×4 lumber – 72″ long, 1 piece of 2×12 lumber – 72″ BASE
- C – 1×2 lumber – both ends cut at 6 degrees TRIMS
- D – 22 pieces of 1×2 lumber – 38″ long BALUSTERS
- E – 2 pieces of 2×2 lumber – 14″ long, 2 pieces of 1×3 lumber – 72″ long FRAME
- F – 10 pieces of 2×2 lumber – 19 1/4″ long, 1 piece – 72″ long RAFTERS
- G – 10 pieces of 1×6 lumber – 76″ long ROOFING
Tools
![]() Hammer, Tape measure, Framing square
Hammer, Tape measure, Framing square
![]() Miter saw, Drill machinery, Screwdriver, Sander, Post-hole digger
Miter saw, Drill machinery, Screwdriver, Sander, Post-hole digger
Time
![]() One weekend
One weekend
Related
Building a deer feeder
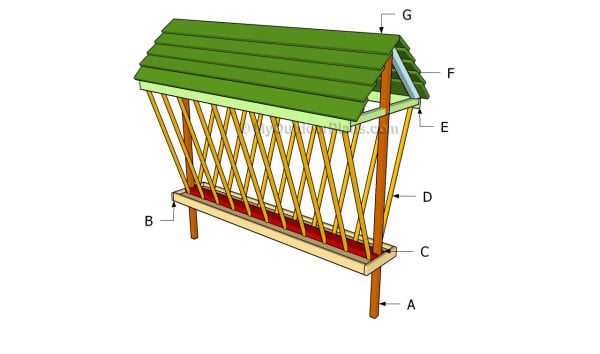
Building a deer feeder
Top Tip: Building a deer feeder is a great idea, as some animals need your help to survive the winter. Bring food for the deer every 4-5 days, if you want to help them get over winter.
Deer Feeder Plans
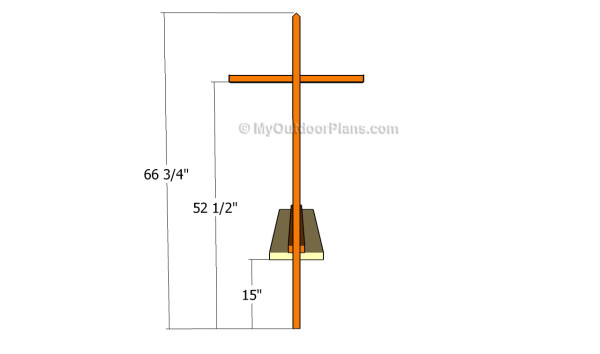
Building the posts
The first step of the project is to set the posts into place in a professional manner. Taking into account this is a temporary construction, you don’t need to set the posts into concrete. On the contrary, we recommend you to dig 2-3′ deep holes into the ground, set the posts, plumb them with a spirit level and compact the soil.
Don’t forget that you should adjust the size of the deer feeder according to your needs and budget.
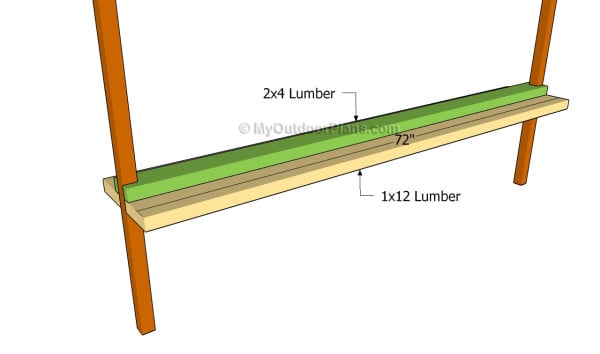
Installing the base
Building the base of the deer feeder is a straight forward job, as you just need to place a couple of wooden board to the bottom of the posts. As you can see in the image, you need to leave about 12-15″ from the ground to the tray.
Cut small notches at both ends of the slats and fit them into place, as in the image. Use a spirit level to plumb the check if the slats are perfectly horizontal. Insert several screws into the posts, trough the slats.
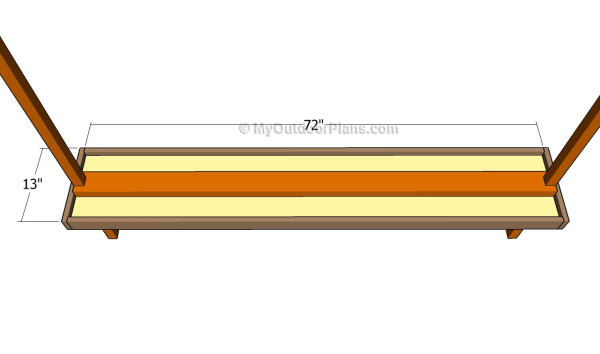
Attaching the trims
Continue the project by adding 1×3 trims to the four sides of the wooden boards. Cut the trims at the right size and lock them to the wooden boards with waterproof glue and finishing nails.
Fitting the roof supports
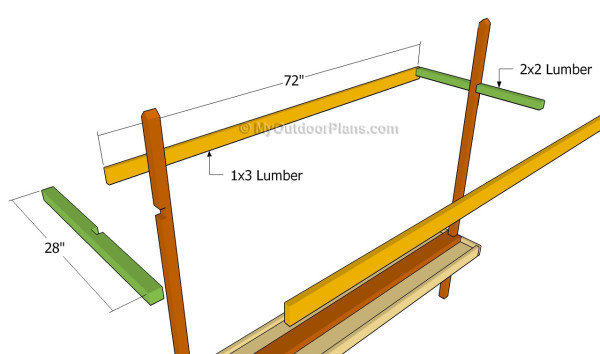
The nest step of the woodworking project is to fit the frame of the roof. As you can see in the plans, we recommend you to install the supports to both ends of the feeder. Cut small notches inside the posts and inside the supports, in order to create rigid joints.
Check if the supports are horizontal, before inserting the 2 1/2″ galvanized screws. Next, fit the side supports, made out of 1×3 lumber. Align the components ta both ends, if you want to get a professional result.
Attaching the rails
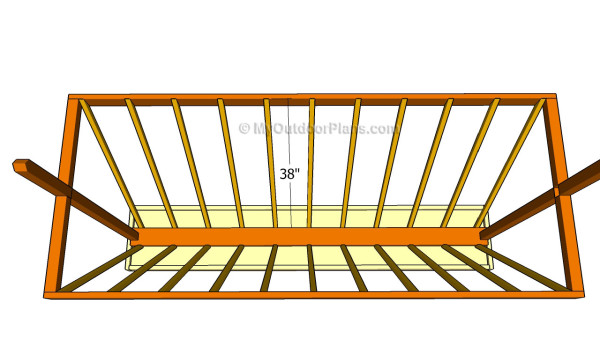
Continue the woodworking project by adding the rails into place. As you can notice in the image, we recommend you to leave about 6-10″ between the balusters. Align the 1×1 slats at both ends and lock them into place with 2 1/2″ galvanized screws.
Top Tip: Work with attention and plan everything with great care. Align everything at both ends and pre-drill the components, to prevent the wood from splitting.
Attaching the rafters
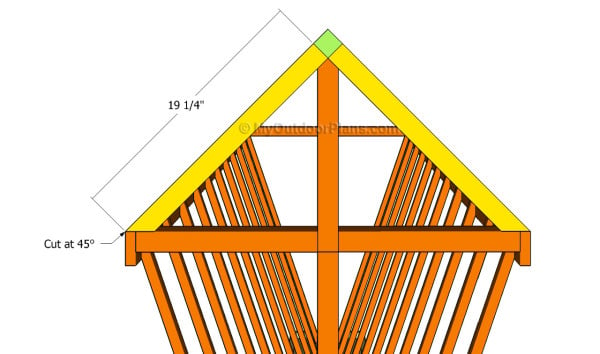
One the last steps of the woodworking project is to build the rafters and to lock them into place with galvanized screws. As you can see in the image, you need to cut one end of 2×2 lumber at 45 degrees.
Attach the top ridge into place, using the information from the diagrams. You could change the slope of the roof, but make sure it is steep enough to drain the water properly.
Attaching the slats
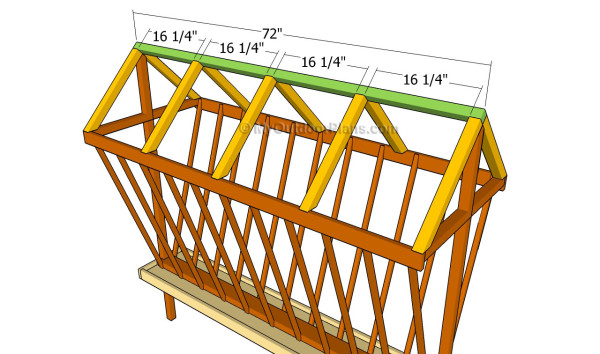
Fit the rafters into place, using the pattern shown in the free plans. As you can notice in the image, you need to place the rafters equally spaced, leaving about 16″ between them. Lock the rafters to the rails and to the top ridge, by using 2 1/2″ galvanized screws.
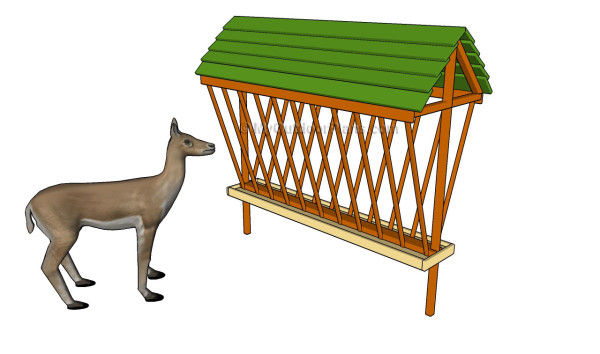
Deer feeder plans
Last but not least, you have to take care of the finishing touches. Therefore, fill the holes and the cracks with wood filler and let it dry out for several hours, before sanding the surface with 120-grit sandpaper.
Top Tip: Protect the wooden components from rot by applying several coats of paint. Choose colors that match the design of the rest of your property, as to enhance the look of the octagon table.
This woodworking project was about deer feeder plans. If you want to see more outdoor plans, we recommend you to check out the rest of our step by step projects.
