This step by step diy woodworking project is about deer box stand plans. The project features instructions for building a 4×8 deer blind. This is a heavy duty construction that will stand time for many years in a row. If you want to decrease the costs or the total weight of the construction, you should place the studs 24″ on center, instead of 16″. Make sure you take a look over the rest of plans to see alternatives and more projects for your garden. Premium Plans for this project available in the Shop.
When buying the lumber, you should select the planks with great care, making sure they are straight and without any visible flaws (cracks, knots, twists, decay). Investing in cedar or other weather resistant lumber is a good idea, as it will pay off on the long run. Use a spirit level to plumb and align the components, before inserting the galvanized screws, otherwise the project won’t have a symmetrical look. If you have all the materials and tools required for the project, you could get the job done in about a day. See all my Premium Plans HERE.
Projects made from these plans
It’s that simple to build a 4×8 deer box!
Deer Box Stand Plans
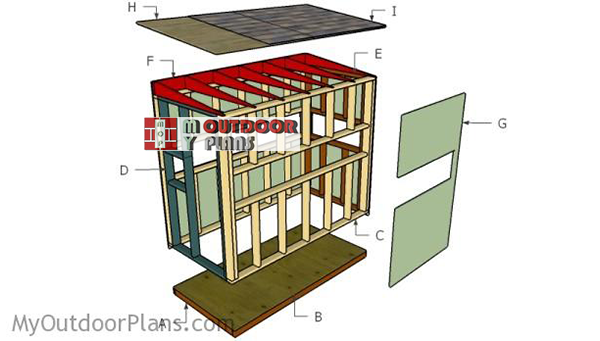
Building-a-4×8-deer-blind
Cut & Shopping Lists
- A – 7 piece of 2×4 lumber – 45″ long, 2 pieces – 96″ long JOISTS
- B – 1 piece of 3/4″ plywood – 48″x96″ long FLOOR
- C – 2 pieces of 2×4 lumber – 96″ long, 4 pieces – 72″ long, 2 pieces – 89″ long, 5 pieces – 22 1/2″ long, 5 pieces – 32 1/2″ long 2xSIDE WALL
- D – 2 pieces of 2×4 lumber – 41″ long, 3 pieces – 72″ long, 2 pieces – 14″ long BACK WALL
- E – 2 pieces of 2×4 lumber – 41″ long, 2 pieces – 72″ long, 2 pieces – 22 1/2″ long, 2 pieces – 32 1/2″ long, 2 pieces – 38″ long FRONT WALL
- F – 1 piece of 2×6 lumber -96″ long, 7 pieces of 2×6 lumber – 46 1/2″ long RAFTERS
- G – 2 pieces of 3/4″ plywood – 48″x77″ long, 4 pieces – 48″x82 1/2″ long WALLS
- H – 2 pieces of 3/4″ plywood – 34 1/2″x52 3/4″ long, 1 piece – 31 1/2″x52 3/4″ long ROOFING SHEETS
- I – 40 sq ft of tar paper, 40 sq ft of asphalt shingles ROOFING
- 37 pieces of 2×4 lumber – 8′
- 5 pieces of 2×6 lumber – 8′
- 10 piece of 3/4″ plywood – 48″x96″
- 40 sq ft of tar paper, 40 sq ft of asphalt shingles
- 500 pieces 2 1/2″ screws
- 200 pieces 1 5/8″ screws
- door latch, handle, hinges
- brackets for stand
Tools
![]() Hammer, Tape measure, Framing square, Level
Hammer, Tape measure, Framing square, Level
![]() Miter saw, Drill machinery, Screwdriver, Sander
Miter saw, Drill machinery, Screwdriver, Sander
![]() Safety Gloves, Safety Glasses
Safety Gloves, Safety Glasses
Time
![]() One day
One day
How to build a 4×8 deer stand
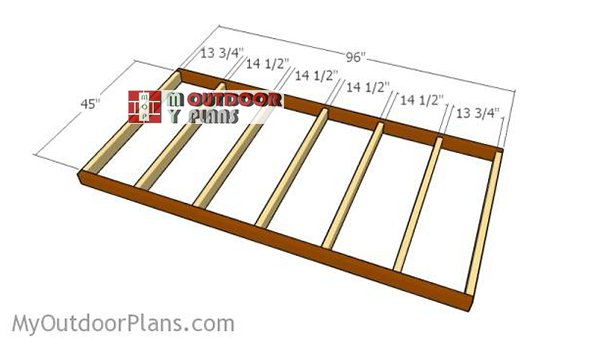
Building-the-floor-frame
The first step of the project is to build the frame of the floor. As you can easily notice in the diagram, we recommend you to cut the components at the right dimensions. Drill pilot holes through the rim joists and insert 2 1/2″ screws into the joists. Make sure the corners are square and insert screws to lock everything together tightly.
If you want to protect the joists from moisture you can fit a couple of 4×4 skids under the frame.
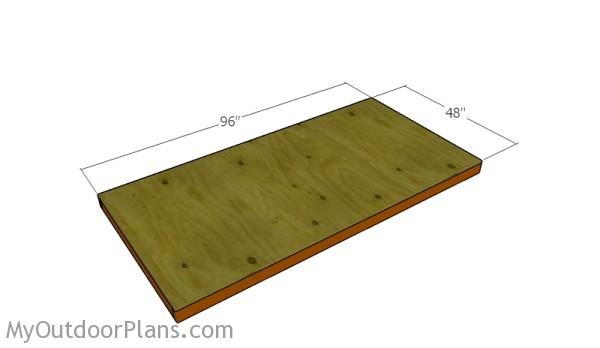
Fitting the floor
Attach the 4×8 plywood sheet to the joists and align the edges as shown in the diagram. Drill pilot holes and insert 1 1/4″ screws to lock the plywood sheet to the joists tightly.
Building the wall frames
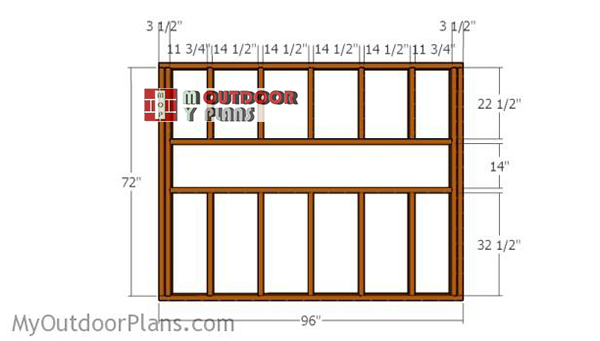
Building-the-side-wall-frames
Continue the project by assembling the side walls. Cut the components from 2×4 lumber using the information from the diagram. Drill pilot holes through the plates and insert 2 1/2″ screws into the studs, as shown in the diagram. Remember that you can modify the size of the window opening to suit your needs.
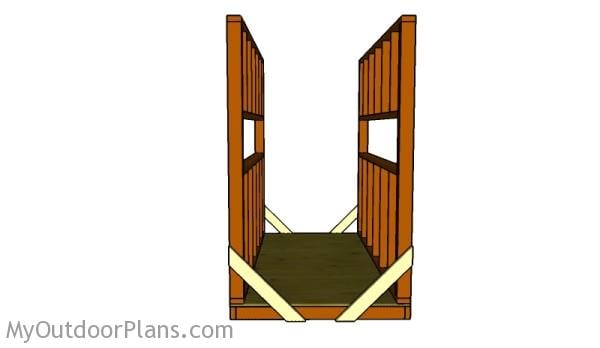
Fitting the side walls
Fit the side walls to the floor of the deer box and align the edges. Use a spirit level to make sure the walls are plumb and lock them temporarily into place using 2×4 braces. Drill pilot holes through the bottom plates and insert 2 1/2″ screws into the floor joists.
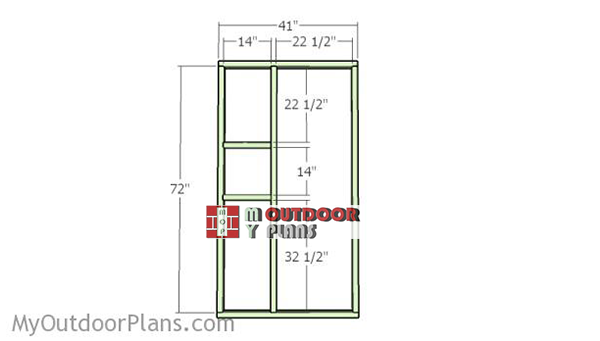
Back-wall-frame
Next, you need to build the back wall for the 4×8 deer blind. Cut the components at the right dimensions. Drill pilot holes through the bottom and top plates and insert 2 1/2″ screws into the studs. Make sure the corners are square and align everything with attention.
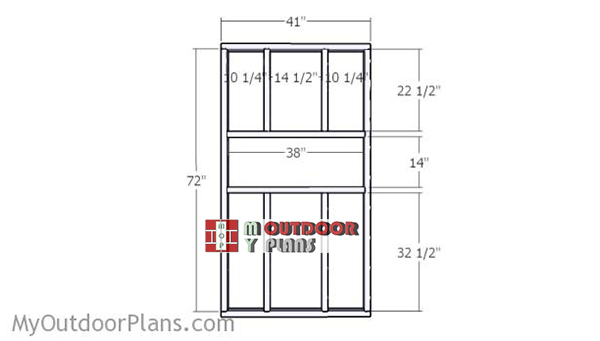
Front-wall-frame
Build the front wall in the same manner described above.
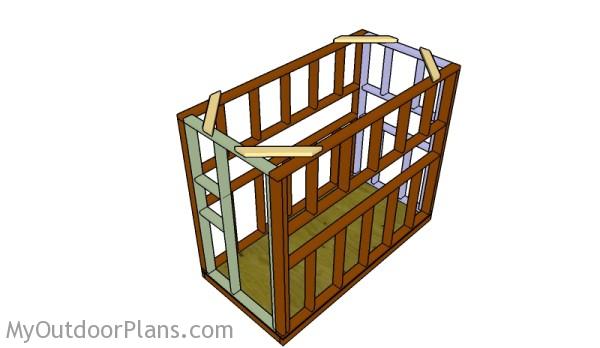
Assembling the frame of the deer box
Fit the front and the back walls to the floor of the deer blind. Align the edges with attention, making sure the corners are right-angled. Drill pilot holes and insert 2 1/2″ screws to lock the adjacent walls together tightly. Drill pilot holes through the bottom plates and insert 2 1/2″ screws into the floor joists.

Rafters
Build the rafters from 2×6 lumber. Mark the cut lines on the beams and get the job done with a circular saw. Smooth the edges with sandpaper for a professional result.
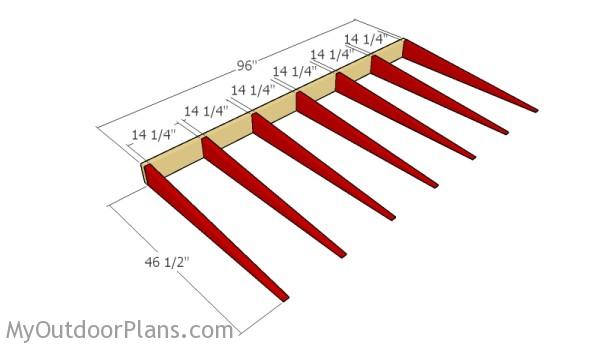
Building the rafters
Next, attach the rafters to a 2×6 beam, as shown in the plans. Drill pilot holes through the beam and insert 2 1/2″ screws into the rafters, making sure you place them equally-spaced.
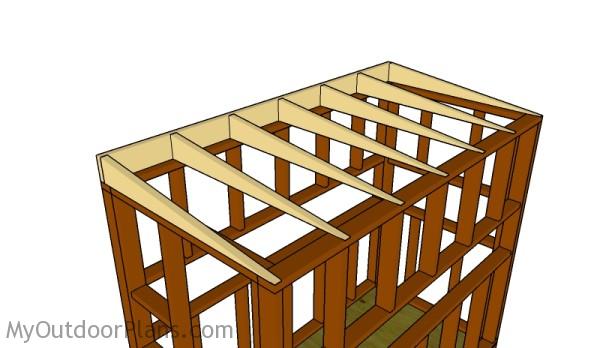
Fitting the rafters
Fit the rafters to the top of the deer box and align everything with attention. Drill pilot holes through the rafters and insert 2 1/2″ screws into the plates.
Fitting the wall panels
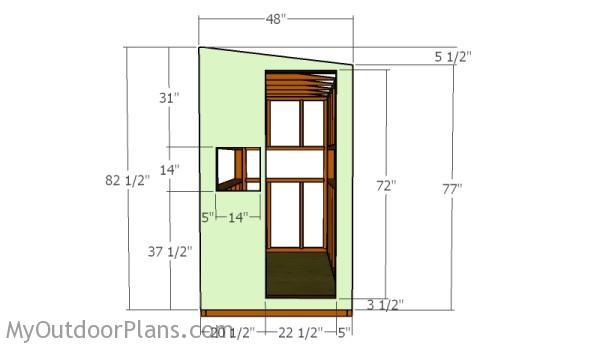
Installing the back panel
Next, attach the 3/4″ plywood panels to the back of the deer box. Make the cuts to the panel as shown in the diagram. Drill a starting holes and make the openings with a jigsaw. Attach the panels to the walls and secure them into place with 1 1/4″ screws.
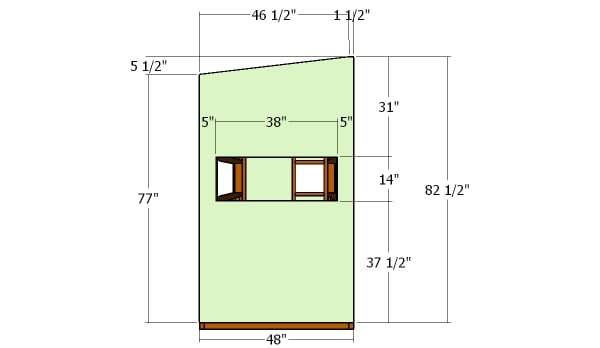
Build the back panel and secure it to the studs with 1 1/4″ screws. Make sure you leave no gaps between the studs and the panels.
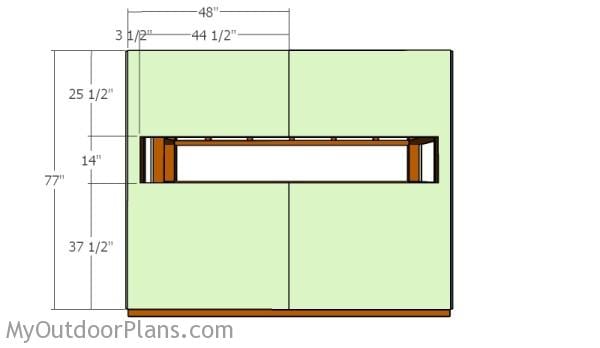
Side panels
Next, you need to attach the panels to the sides of the deer blind. Start with the short side. Make the cuts to the plywood sheets and secure them to the wall frames using 1 1/4″ screws or nails. Leave no gaps between the components for a professional result.

Attaching the side panels
Build the panels for the taller side and lock them into place with 1 1/4″ screws or nails.
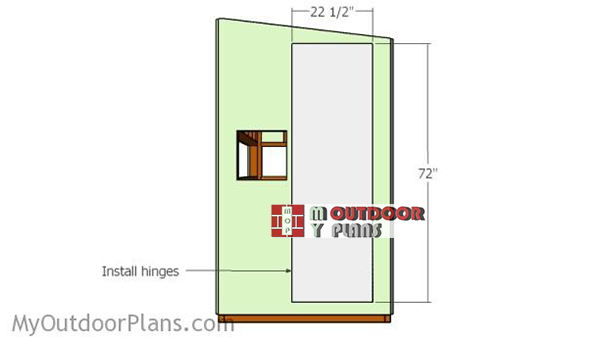
Fitting-the-door
Use the panel that you have cut out from the back wall and transform it into a door. Secure the door to the wall with several hinges. In addition, install a latch to lock the door into place tightly.
Fitting the roofing
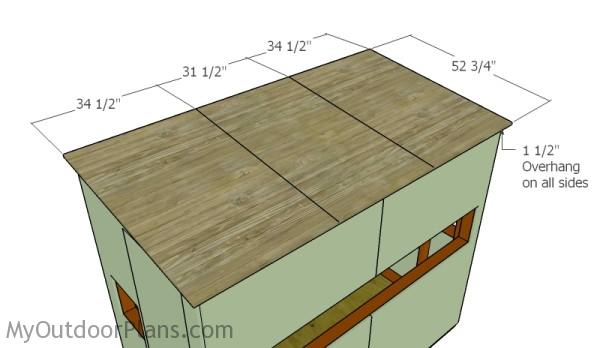
Fitting the roofing sheets
One of the last steps of the project is to attach the roofing sheets to the rafters. Cut the sheets from 3/4″ plywood and center them to the rafters, as shown in the diagram. Drill pilot holes and insert 1 1/4″ screws into the rafters, every 8″. Leave no gaps between the sheets and the rafters.
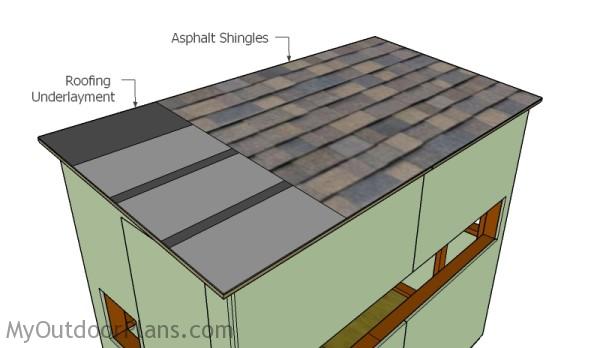
Fitting the roofing
Cover the roof with the tar paper and then install asphalt shingles. Alternatively, you can seal the roof by installing corrugated metal sheets.
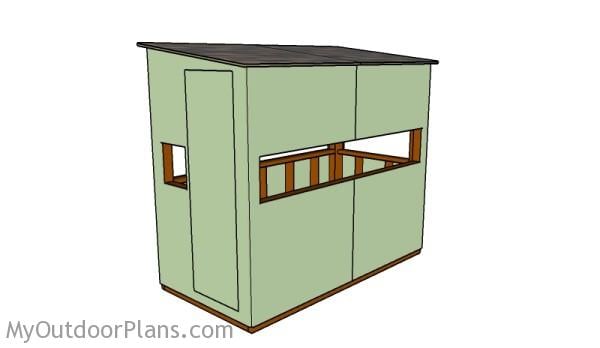
Deer box stand plans
Fill the holes and dents with wood putty and let it dry out for several hours. Use 120-200 grit sandpaper to smooth the surface. Remember that you can adjust the design and size of the deer blind to suit your needs. Check out the 6×6 deer blind plans we also have on our site.
Top Tip: If you want to enhance the look of the project and to protect the components from decay, we recommend you to apply paint or stain.

4×8 Deer Blind Plans
Take a look over the rest of the related projects for more outdoor inspiration. Premium Plans for this project available in the Shop.

Deer box stand plans – dimensions
Building a 4×8 deer stand box will likely cost you between $500 and $1,200, depending on the materials and any extra features you decide to include. Using treated lumber, quality fasteners, and weatherproofing materials will push the cost up, but it ensures your stand is sturdy and long-lasting. It’s an investment that pays off in comfort and durability, giving you a reliable spot for hunting season after season.
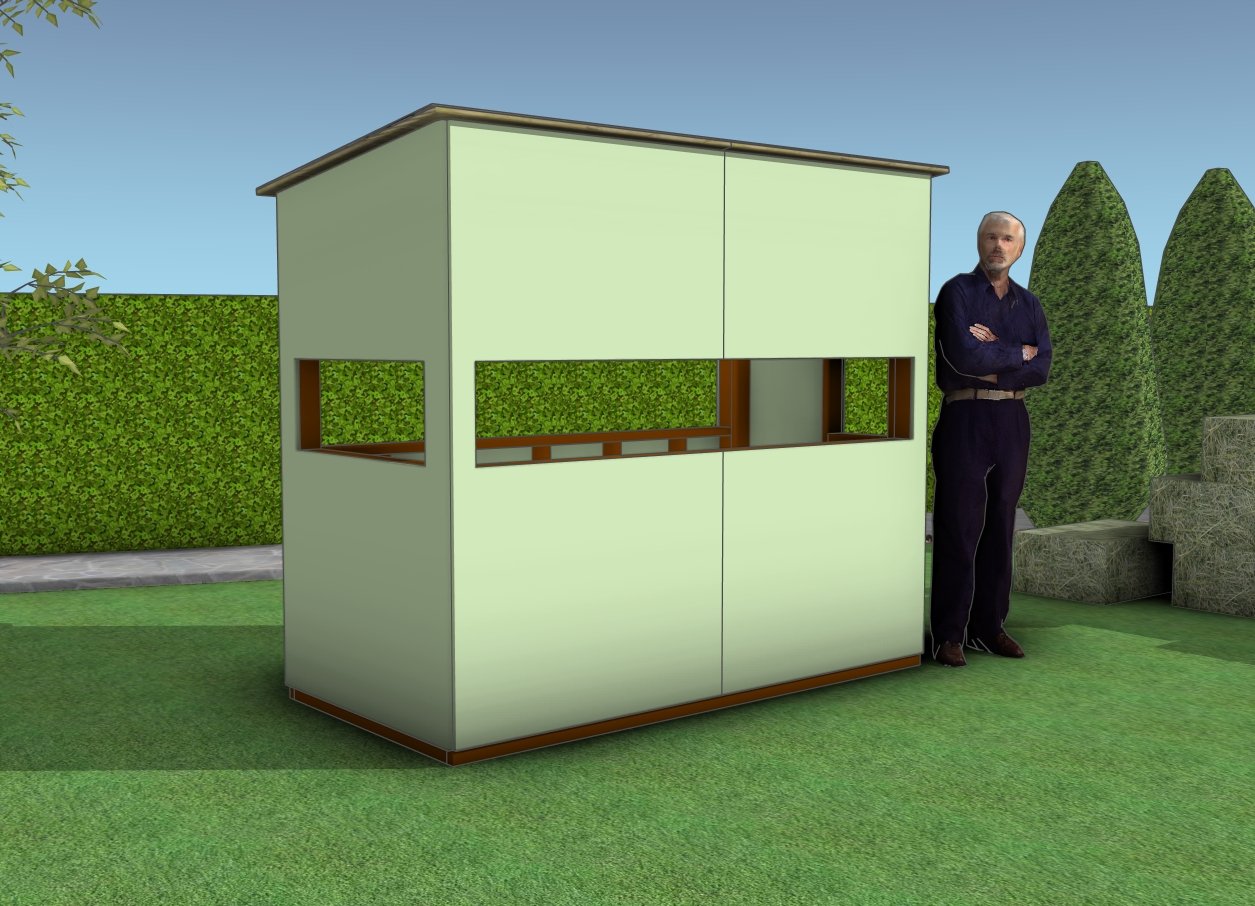
4×8 Deer stand box plans
As you wrap up your 4×8 deer stand box, you’ve done more than just build a structure—you’ve created a reliable, sturdy spot that will serve you well season after season. This project is all about functionality and comfort, providing you with a safe, elevated space to enjoy your time in the great outdoors.
With this stand in place, you’re ready for those early mornings and long days in the field, knowing you’ve built something that’s both durable and designed to give you the best vantage point for your hunts.

How to build a deer box stand
If you want to get PREMIUM PLANS for this project (different design with re-engineered structure), in a PDF format, please press GET PDF PLANS button bellow. Thank you for the support.
This woodworking project was about deer box stand plans. If you want to see more outdoor plans, we recommend you to check out the rest of our step by step projects. LIKE us on Facebook and Google + to be the first that gets out latest projects and to hep us keep adding free woodworking plans for you.


31 comments
Great plans. Thank you.
Thank you for the feedback. I’m looking forward to seeing your project.
I’m about to begin making this 4×8 shooting house. Can you tell me an estimated finished weight for this project?
I have no idea. Good luck with your project!
I just built this 4 x 8 deer box (shooting house) for my wife on our property. I put it on top of an 8 ft platform. I cut all my materials in my shop and transported them to the location she will hunt. I followed the plans to the letter since there is no electricity where the box is now set. Today I put the plywood (skin) in the frame. I did not realize until that time that the “frame” is set for all 14 inch windows. All windows (with the exception of one) on the plywood are set for 14 inches. One window is set for a 15 1/2 inch opening. When I put the plywood on the side, the lower window framing 2 x 4 is extended above the plywood opening by 1 1/2 inches. Is this a mistake on the “blue print” or is it by design? All the other windows are squared nicely, but this one window is screwed up. If it is by design, give me the reason so I can correct it. If it is a screw up on the blue print, I will fill the void with extra plywood. Other than this issue, the plans were great and looking forward to my wife hunting in comfort this year.
Thanks for pointing that out. It is an error in the blueprints and I’ve corrected it. Sorry for that, I hope you can fix it by fitting the 1 1/2″ wide piece of plywood. Alternatively you can cover it when installing the blinds. When the blinds are shut they will cover the 2×4 frame. Looking forward to seeing how your projects comes out!
I built this blind recently (actually finishing the roof today and should start painting very soon) and this was my very first project in dealing with constructing something from start to finish. There are a couple of things I want to mention ; the parts list you have doesn’t include the extra 3 sheets of plywood you need for the roof. I also needed to buy more 2×4’s as well (can’t remember how many). One thing I would make a side note for most is that the pieces of 2×4’s that I used weren’t exactly 8ft long which threw off my alignment for the framing. Other than that the plan were great!
Thank you for the feedback. I updated the cut list with the extra sheets of plywood. Congratulations for the project and we are all eager to see how your deer box comes out!
I have obtained a substantially constructed 8’x8′ steel base (deck size) on which to build a blind, and have already installed it on the site where the blind will be. Given that, I’ll have to use a different method of constructing and attaching the floor and have that worked out on how to do it.
Because my structure will support a larger blind than a 4×8 or 6×6 (almost a cabin – haha), I was wondering if there was an option for a 6′ x 8′ or even 8′ x 8′ design? I really love your designs and was hoping to make my life a little easier on building this and gathering a materials list.
I don’t have plans for a 8×8 blind, but I do have plans for a 8×8 shed. You can use that and with minimum adjustments adapt to your needs: http://myoutdoorplans.com/shed/8×8-shed-plans/
Can you make plans for a 4×6 ?
I have already designed that. See plans at: http://myoutdoorplans.com/hunting/deer-blind-plans-4×6/
I am looking for plans for a 6×8 deer blind. I have already constructed a 8×8 platform. Any thoughts would be appreciated.
I have plans for a 6×8 ice fishing house. You could make some adjustments to my plans for the blinds: http://myoutdoorplans.com/shed/6×8-ice-fishing-house-plans/ Alternatively, you could modify my 6×6 deer stand plans: http://myoutdoorplans.com/hunting/deer-blind-plans/
Hello I want to build this stand. actually 2 of them. is there anywhere to get actual windows reasonably priced for this stand. Thanks for your time orin
Any idea about how much I should expect to spend to build this blind? Is $750 too much?
I think you should manage to build it within that budget, if you have all the tools. Easily.
Building the side walls you have the window ledge measured at 89” I think it should be 90”. Also the front wall dimensions you don’t list the two 38” boards needed for the window ledge. Not complaining just thought I would point them or to help the next guy. Thanks for the plans!!
Thank you. I’ve updated the list with the 38″ pieces. The window ledges are 89″ because there is a gap of 1/2″ between the double studs placed at both ends: 96″-3 1/2″-3 1/2″= 89″
I am wondering what the cut list looks like. Specifically how the 2x4x8s are cut to get all pieces out of 30 2x4s. I am trying to get all cuts out of 30 pieces and coming up short. Any guidance would be appreciated.
Unfortunately, I don’t have a cutting layout. If you can’t get all the components cut from the 30 pieces, then just buy a few more.
Any idea of the weight of this stand when complete?
I built this year before last. It makes a good sturdy deer blind. The one item you should consider is exactly what chairs/buckets you will be sitting in. The windows were about 2 inches too low for the chairs I use making me bend over more than I would have otherwise liked. I placed carpet on the window ledges to rest the gun on when making a shot so there is no accidental sound.
Thank you for the feedback. Much appreciated.
Good Day! I was wondering if you could build this out of 2×3’s instead of 2×4’s. It would help to reduce weight and cost. Structurally would it be sound and how does it change the cuts inside the walls. I would still use 2x4s for the floor. Thanks
I will change the size of the side wall frames (the small ones). You’ll need to make them 2″ longer.
I was thinking of leaving the back wall at 84″ and dropping the front wall down to 72 ish” and just make the roof fit into the top of the blind like a pocket. With a 1 foot slope of the roof all the Northern Michigan snow should slide right off. But how should I do the rafters?
Total number of 2×4’s is off. You forgot to duplicate the 8’long side walls.
Do you have plans for the tower.
Hi, this is my first time ever building something reading plans. I generally just go at it from my head and mess up a bunch along the way, costing me more. The one problem that I’m having understanding is that on the first couple of illustrations, it looks like you have the 2×4’s for the base of the windows set starting at 32.5” high.
Then on the next couple of illustrations, it looks like the bottom of them are 37.5” high. A 5” variance.
One of the drawings shows a line below one of the windows measuring 5”, but I’m just not sure how to read what that line is.
Just to clarify, are the horizontal 2x4s for the windows starting at 32.5” from the ground? Or higher?
Thank you.
32 1/2″ is the distance between the plates. The exterior panel covers a portion of the floor frame.