This step by step woodworking project is about window flower box plans. A window planter is a straight forward project, even for inexperienced handymen, but it will definitely enhance the look of your facade. Before starting the actual construction, you should choose the right design and hanging solution for your needs. Generally speaking, wooden flower boxes have a nice appearance, so make sure you leave the wooden components exposed.
In order to get the job done like a pro, you should pay attention to several aspects. Firstly, choose lumber designed for outdoor use, such as cedar, redwood or pressure-treated. These varieties of lumber have a nice appearance and are resistant to rot. Secondly, make sure the boards are straight and don’t have any kind of visible flaws (knots, decays, twists, wanes). Always pre-drill the lumber before inserting the screws, to prevent the wood from splitting. Add glue to make the joints more rigid. See all my Premium Plans HERE.
Projects made from these plans
[tabs tab1=”Materials” tab2=”Tools” tab3=”Time”]
[tab id=1]
- A – 2 pieces of 1×2 lumber 34” long, 3 pieces of 1×3 lumber 6” long FRONT TRIMS
- B – 1 piece of 1/2” plywood 8 1/4” x 32 1/2” FRONT PANEL
- C – 2 pieces of 1×2 lumber 8” long, 2 pieces of 1×3 lumber 6” long SIDE TRIMS
- D – 1 piece of 1/2” plywood 8 1/4” x 7” SIDE PANELS
- E – 1 pieces of 1/2 lumber 31 1/2” x 7” FLOORING
- F – 2 pieces of 1×2 lumber 34 1/2”, 2 pieces of 1×2 lumber 10”, cut at 45º at both ends TOP TRIM
- 2 1/2″ screws
- 1 5/8″ screws
- wood filler
- wood glue
- wood stain
[/tab]
[tab id=2]
- Hammer, Tape measure, Framing square
- Miter saw, Drill machinery, Screwdriver, Sander
- Safety Gloves, Safety Glasses
[/tab]
[tab id=3]
[/tab]
[/tabs]
Window Planter Plans
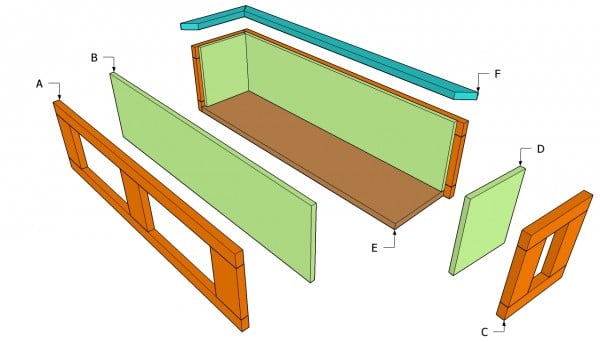
Window flower box plans free
Building a window flower box is a straight forward project, therefore it shouldn’t take more than several hours. Nevertheless, if you choose the right design for your needs, the planter box will change dramatically the look of your house, adding personality and character to the facade.
Top Tip: Buy the plastic container before beginning the actual building project, as you should know how long or wide you have to make the planter box. In addition, build a nice pair of wooden supports, in order to hang the window box to the wall.
Window Flower Box Plans
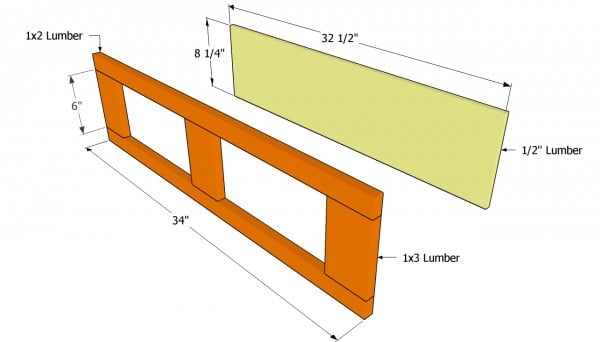
Window planter front face
The first step of the project is to build the front and the back faces of the planter. In order to build a flower box with an exquisite look, we recommend you to attach wooden trims to the pieces of 1/2” of plywood. Cut the trims with a miter saw and lock them together with pocket holes and 1 1/2” screws.
Top Tip: Alternatively, you could drive in 1” finish nails trough the plywood into the trims. Add glue to enhance the bond.
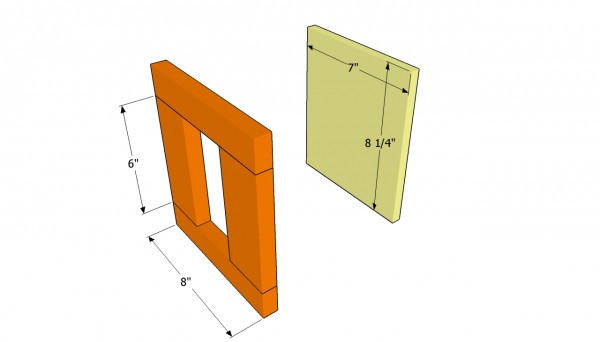
Building the sides of the window box
Afterwards, continue in the same manner and build the side faces of the window flower box. After assembling the trims, you should center them on the plywood piece, leaving an 1/2” overhang at both ends.
Top Tip: Make sure that both sides of the planter are equal in shape and size, otherwise the flower box won’t have a symmetrical look. Clean the excess glue with a dry cloth, before it hardens.
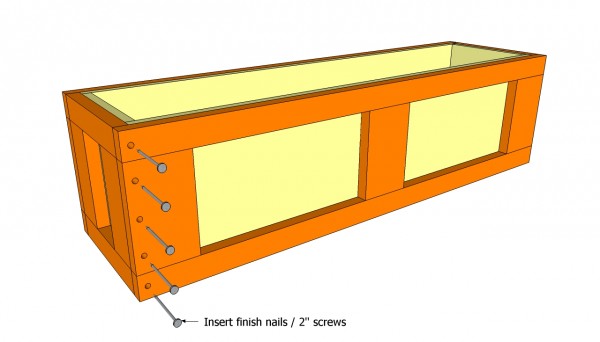
Assembling the window flower box
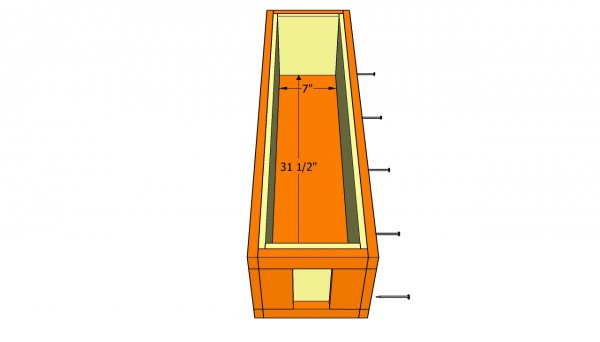
The next step of the project is to assemble the components together and to drive in 1 1/4” to lock everything tightly. Drill pilot holes trough the side trims, countersink their head and insert the screws. Add a good wood glue to enhance the bond.
Top Tip: Use a spirit level to make sure the top of the flower box is horizontal. In addition use a carpentry square, to check the corners for squareness.
Installing the floor of the window box
Next, you have to install the flooring of the flower box. In order to get the job done as a professional, we recommend you to cut a piece of 1/2” plywood to the proper size or to adjust a board of 1×8 lumber.
Top Tip: Add glue to the edges of the bottom components, fit it into place and secure it with several finish nails trough the outside trims. Make sure the bottom is perfectly level, before driving in the nails.
Instaling the top trims
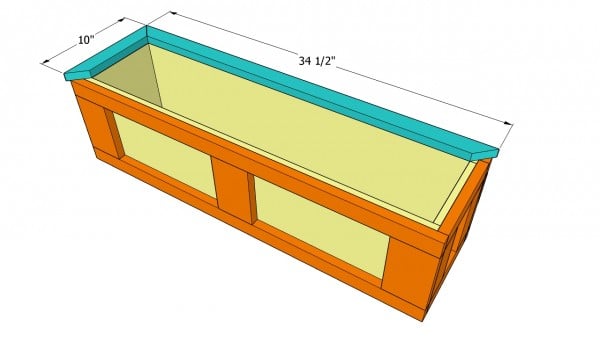
If order to enhance its look, you should also hide the exposed edges, by installing nice top trims. Build the top trims from 1×2 lumber, making sure you cut their ends at 45º. Glue the trims together and secure them with pocket screws, before centering them on top of the flower box.
Drive in several finish nails trough the top trims in the box, to secure them properly. Make sure there are no gaps between the trims and the box.
Window planter support
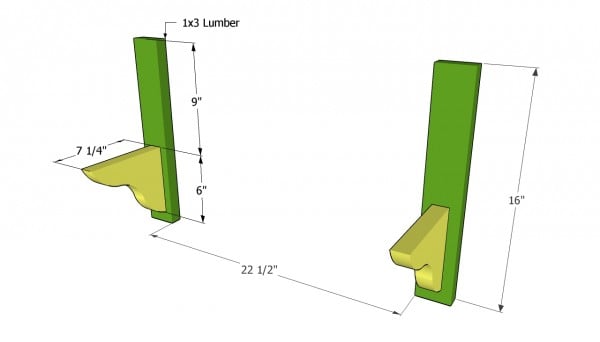
In order to hang the planter box to the wall, you have to build simple supports, from several wooden boards. Therefore, build the wall supports from 1×2 lumber and the box supports from 1×8 lumber. Use a jigsaw to cut out the supports.
Top Tip: In order to enhance the look of the supports, you should round their edges with a router and 1/4” bit. Lock the components together with 2” screws and wood glue.
Window flower box plans
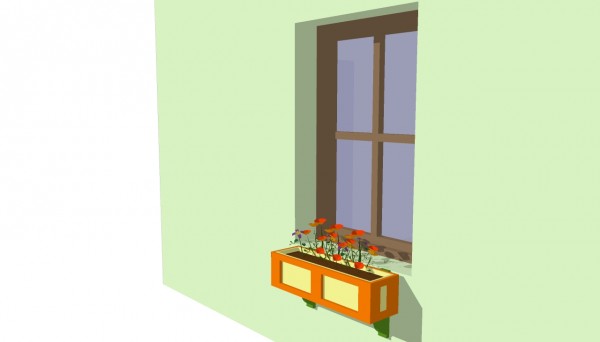
Last but not least, take care of the finishing touches. Therefore, fill the holes with wood filler and let it dry out for several hours. Afterwards, sand the surface with 120-grit sandpaper, along the wood grain. Vacuum the residues, before applying the primer.
Top Tip: In order to protect the flower box from rot, you should apply several coats of wood stain. Install the supports and fit the window box.
This woodworking project was about window flower box plans. If you want to see more outdoor plans, we recommend you to check out the rest of our step by step projects. Follow the step by step instructions, in order to obtain a professional result.

2 comments
Great plans. It’s my first time on this site and i plan upon returning.
Thank you for stopping by and you are welcomed to return any time you want. I am looking forward to seeing the projects you are working on.