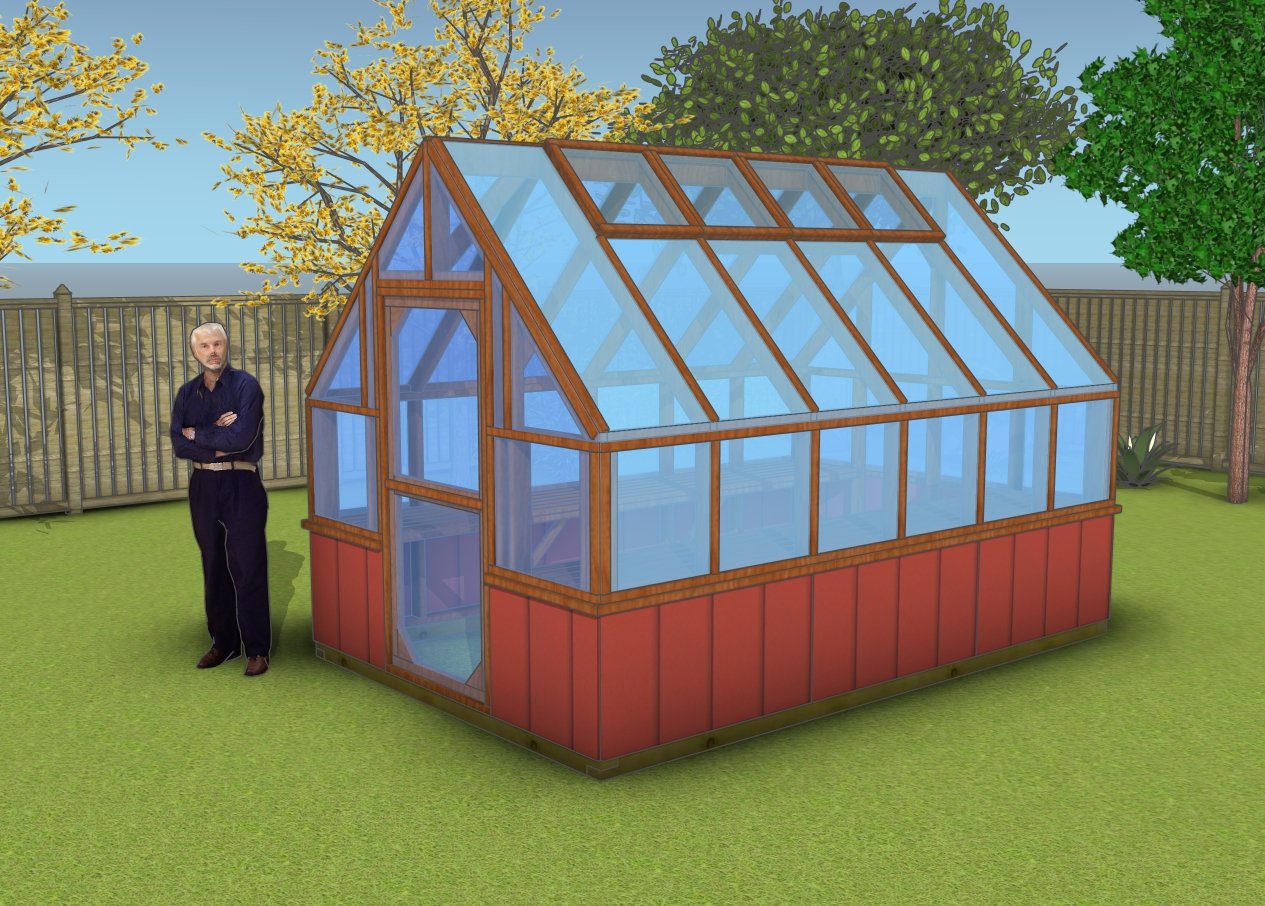
Home Garden DIY 8×12 Greenhouse Plans – PART 2

DIY 8×12 Greenhouse Plans – PART 2

by Ovidiu
291 views 8 minutes read


Welcome to Part 2 of my DIY 8×12 greenhouse build! In this section, we’re focusing on the key elements that bring your greenhouse to life: installing the vents, constructing the door, and fitting the greenhouse plastic. These steps are essential for creating a functional, weather-ready structure that’s tailored to your gardening needs. With clear instructions and helpful tips, we’ll guide you through building a well-ventilated, secure, and durable greenhouse that’s ready to nurture your plants year-round.

When buying the lumber, you should select the planks with great care, making sure they are straight and without any visible flaws (cracks, knots, twists, decay). Investing in cedar or other weather resistant lumber is a good idea, as it will pay off on the long run. Use a spirit level to plumb and align the components, before inserting the galvanized screws, otherwise the project won’t have a symmetrical look. If you have all the materials and tools required for the project, you could get the job done in about a day.


Projects made from these plans

Add-image


8×12 Greenhouse Plans – Part 2

Building-a-8x12-greenhouse

Building-a-8×12-greenhouse


Cut and Shopping Lists

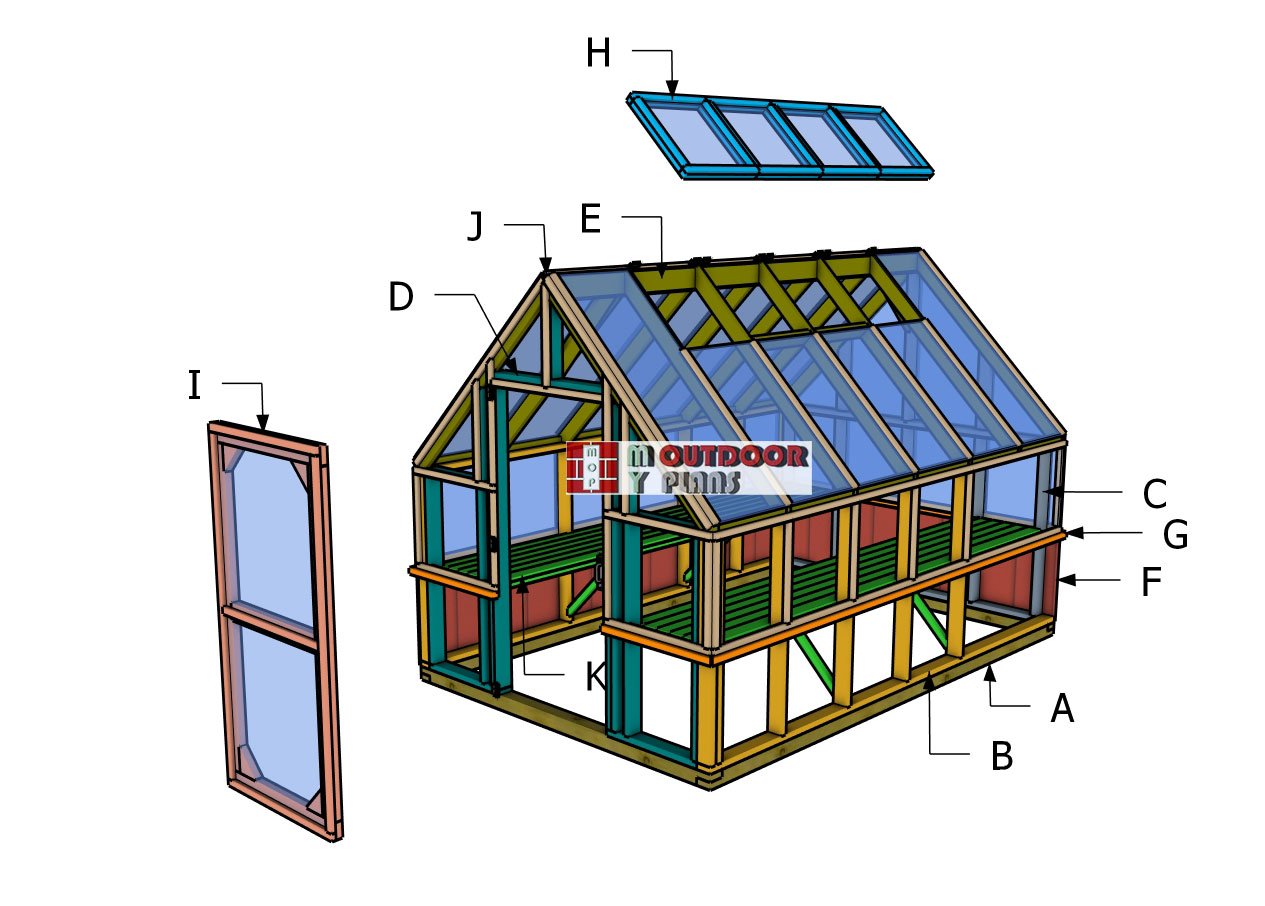
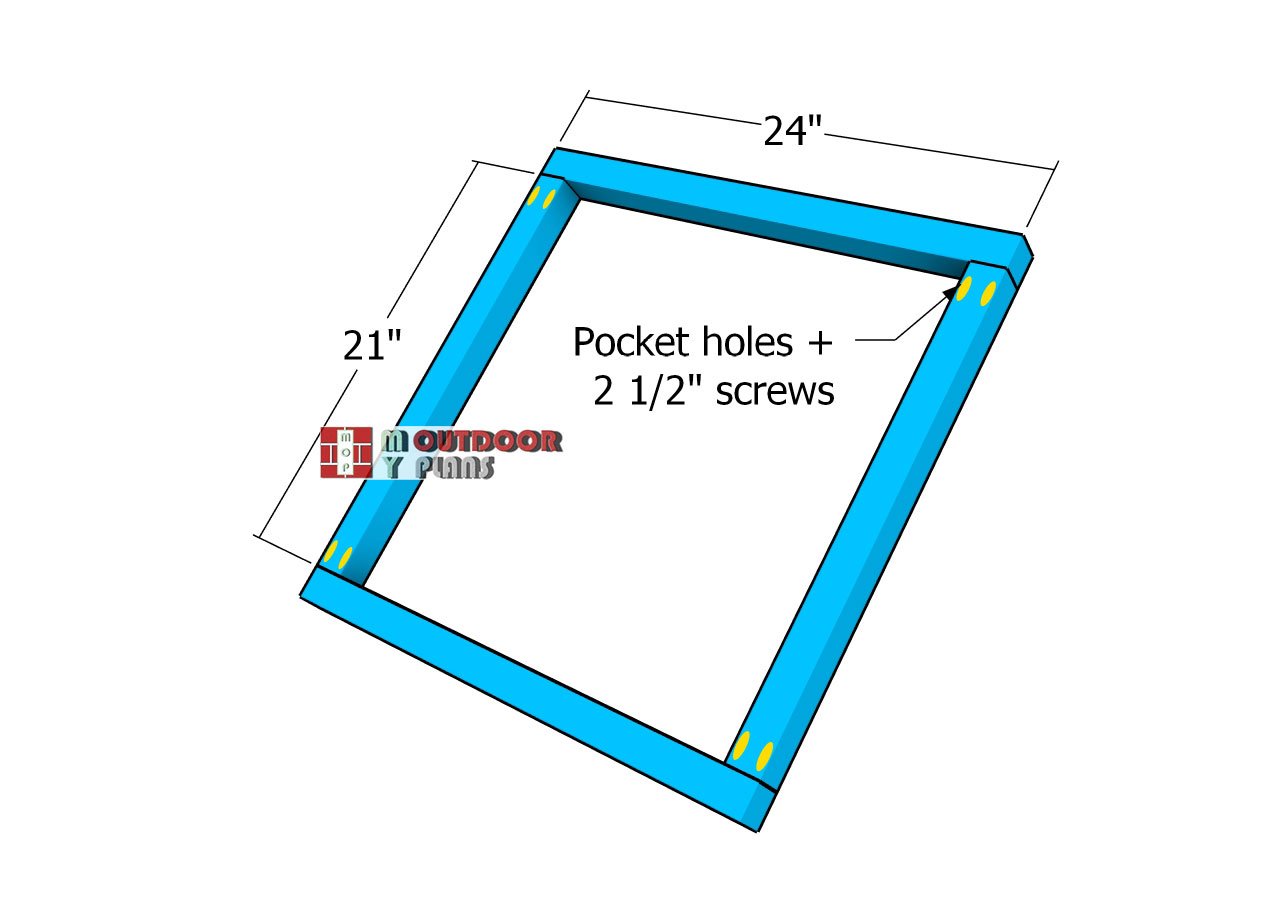
H – 4xVENT – 2 pieces of 2×2 lumber – 24″, 2 pieces – 21″, 2 pieces of 1×2 lumber – 24″, 2 pieces – 21″
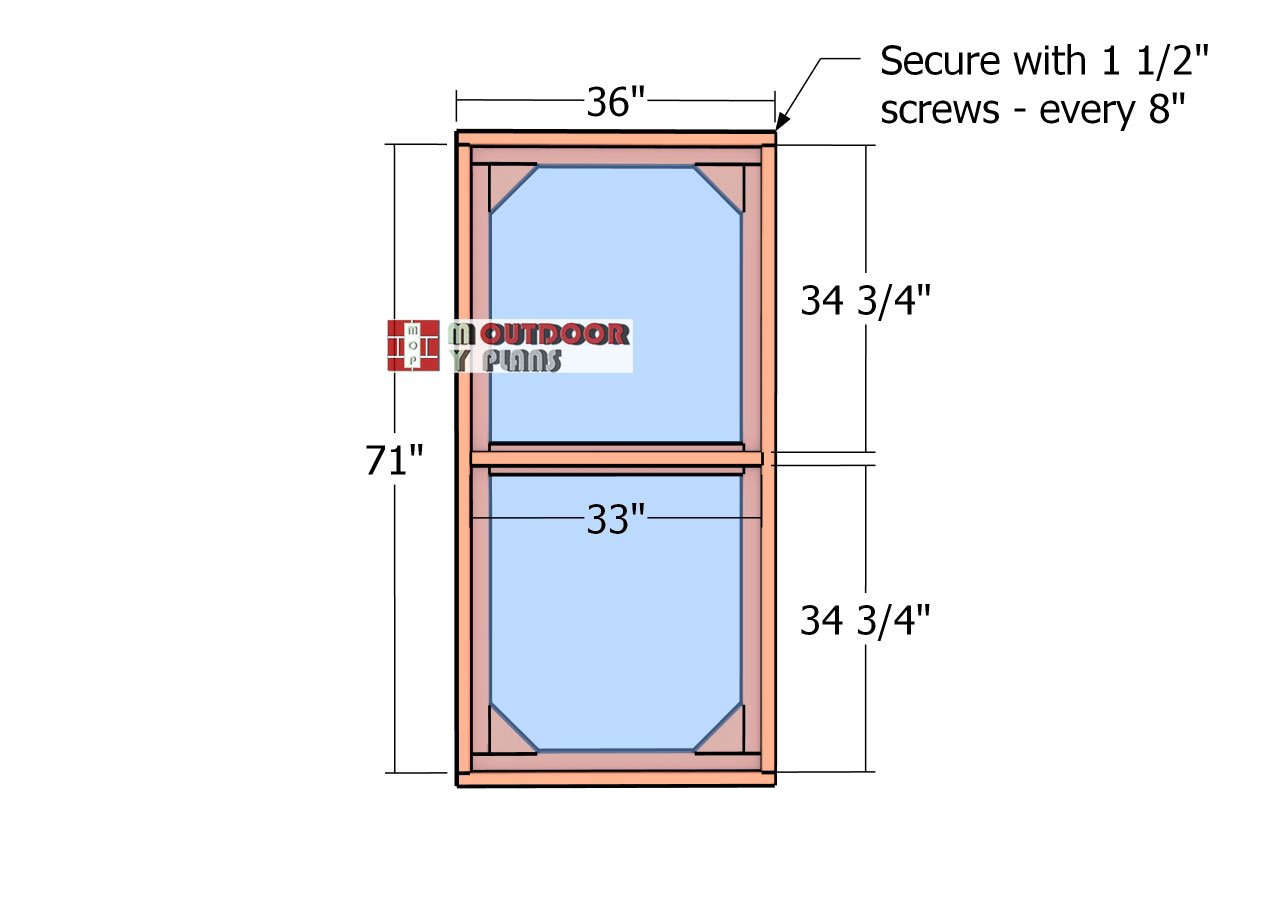
I – DOOR – 2 pieces of 2×4 lumber – 36″, 2 pieces – 67″, 1 piece – 29″, 2 pieces of 1×2 lumber – 36″, 2 pieces – 71″, 1 piece – 33″
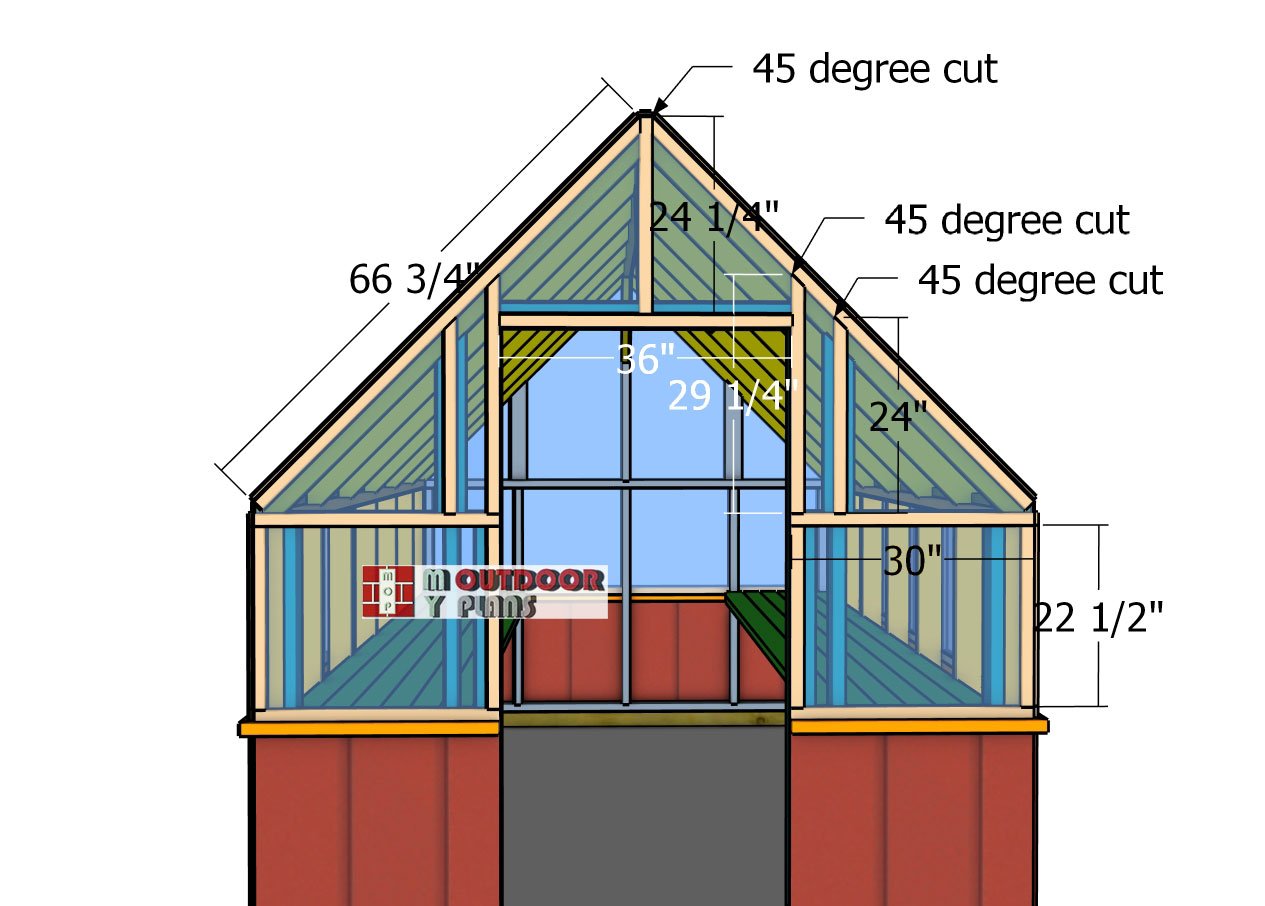
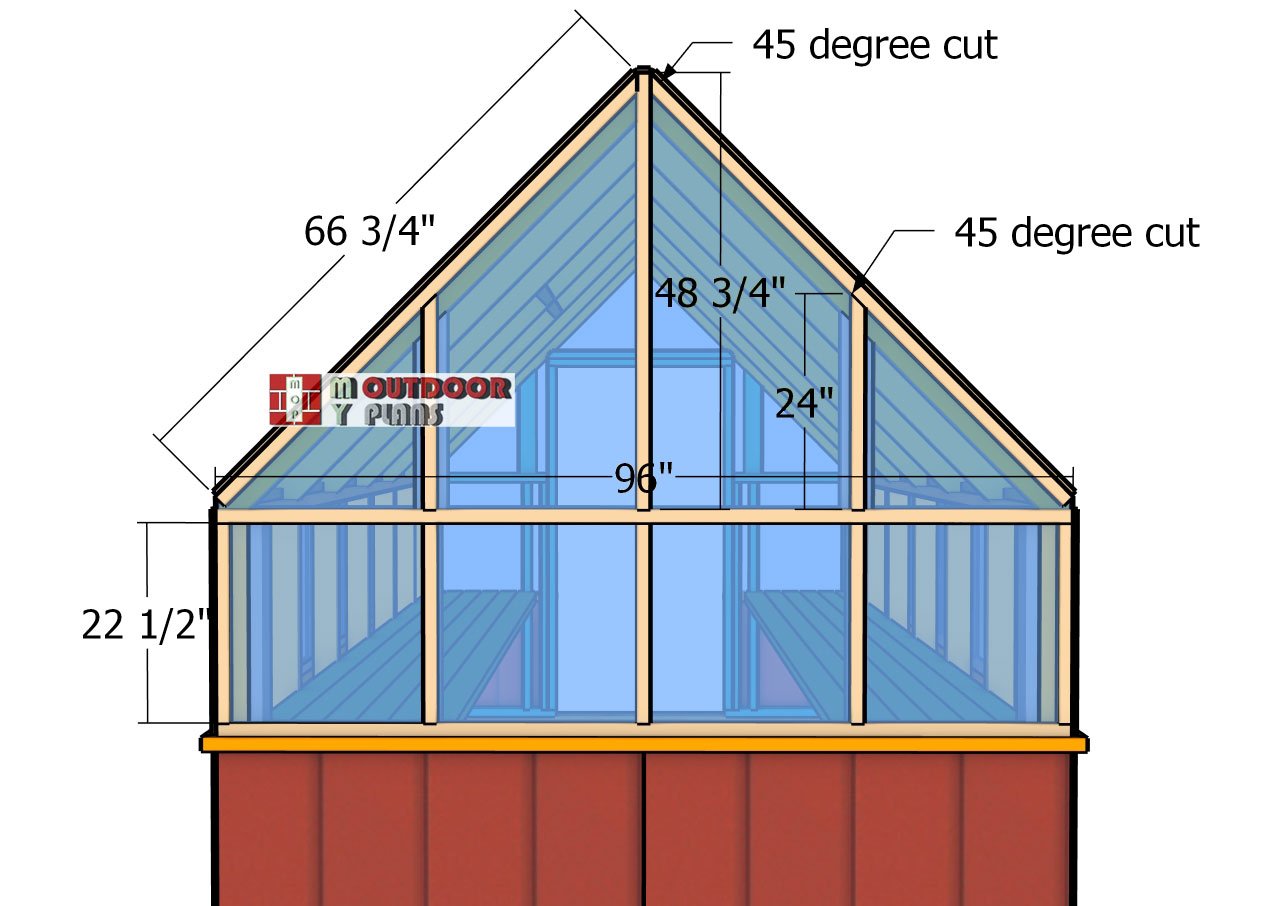
J – TRIMS – 2 pieces of 1×2 lumber – 8 ft, 5 pieces – 12 ft, 23 pieces – 22 1/2″, 13 pieces – 66 3/4″, 5 pieces  – 42 3/4″, 4 pieces – 30″, 4 pieces – 24″, 1 piece – 24 1/4″, 1 piece – 48 3/4″, 2 pieces – 29 1/4″, 1 piece – 36″


  • 1×2 lumber 8 ft – 6 pieces
  • 1×2 lumber 12 ft – 20 pieces
  • 1×2 lumber 12 ft – 7 pieces
  • 2×2 lumber 8 ft – 4 pieces
  • 2×2 lumber 10 ft – 2 pieces
  • 2×2 lumber 12 ft – 7 pieces
  • 2×2 lumber 14 ft – 2 pieces
  • 5/8″ T1-11 siding 4’x8′ – 2 pieces
  • 5/8″ T1-11 siding 4’x4′ – 1 piece
  • A88 strong tie – 4 pieces
  • L88 strong tie – 4 pieces
  • 1 1/2″ structural screws / nails – 1 box
  • 300 sq ft of greenhouse plastic
  • 1 5/8″ screws – 500 pieces
  • 2 1/2″ screws – 200 pieces
  • 3 1/2″ screws – 500 pieces
  • 8d nails – 300 pieces
  • automatic vent opener – 4 pieces
  • 3″x3″ hinges – 11 pieces
  • door latch & handle – 1 piece

Tools

 Hammer, Tape measure, Framing square, Level

 Miter saw, Drill machinery, Screwdriver, Sander

 Safety Gloves, Safety Glasses

Time

One weekend

Related


Trim---Facebook-BoxMake sure you follow me on Facebook to be the first that gets the latest plans and for some other exclusive content. Also, follow me on Pinterest and Instagram to get many ideas for your backyard from all the internet! Check out my YouTube channel! See how you can Support  Me with no extra costs to you. Trim---Facebook-Box-Down


Step 5: Fitting the greenhouse plastic
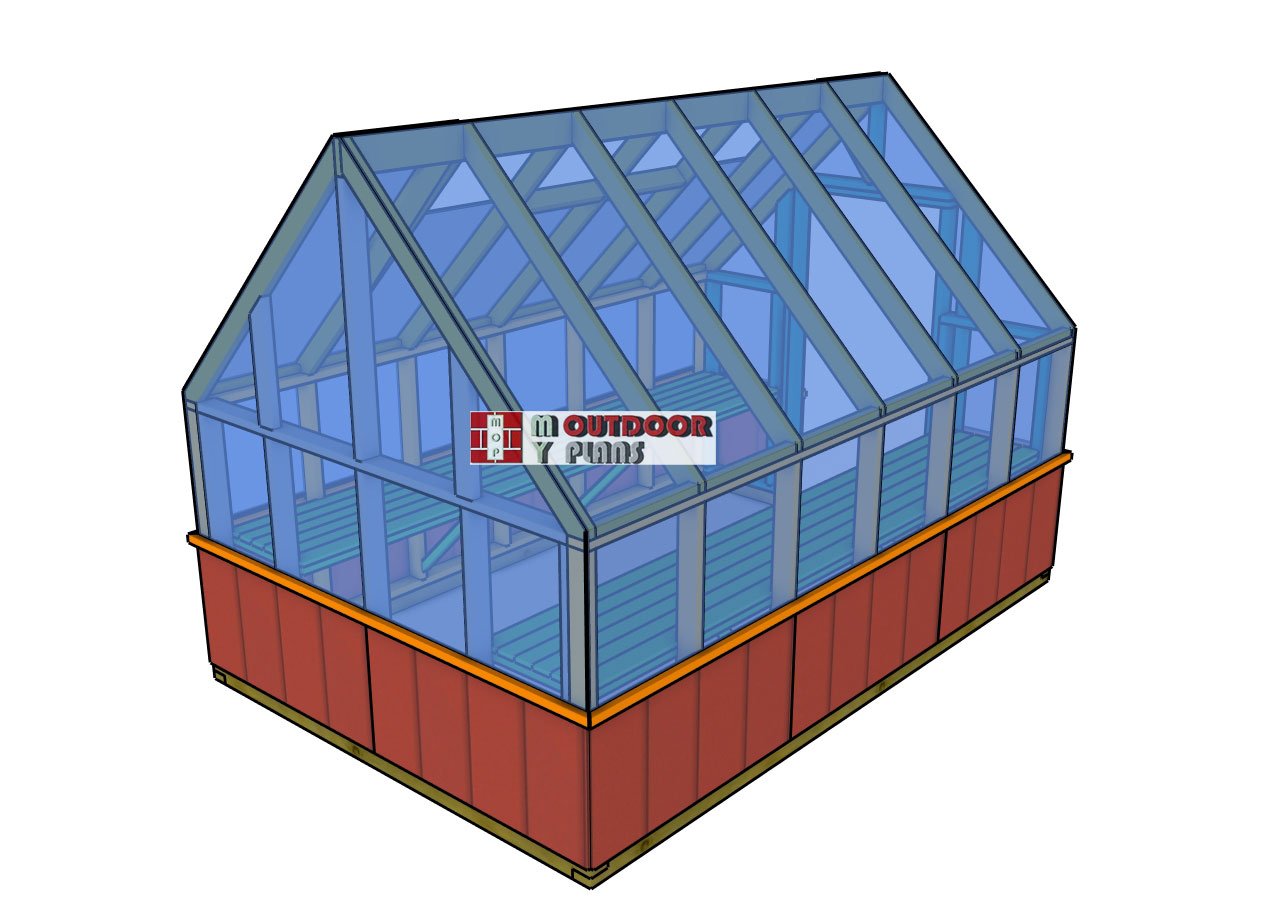
Attaching-the-greenhouse-plastic

Attaching-the-greenhouse-plastic

Fitting the greenhouse plastic is a critical step in creating a sealed and efficient growing environment. Start by cutting the plastic sheeting to size, ensuring enough material to cover the frame and allow for overlap at the edges. Secure the plastic by stapling it to the frame, pulling it taut as you work to eliminate wrinkles and sagging.
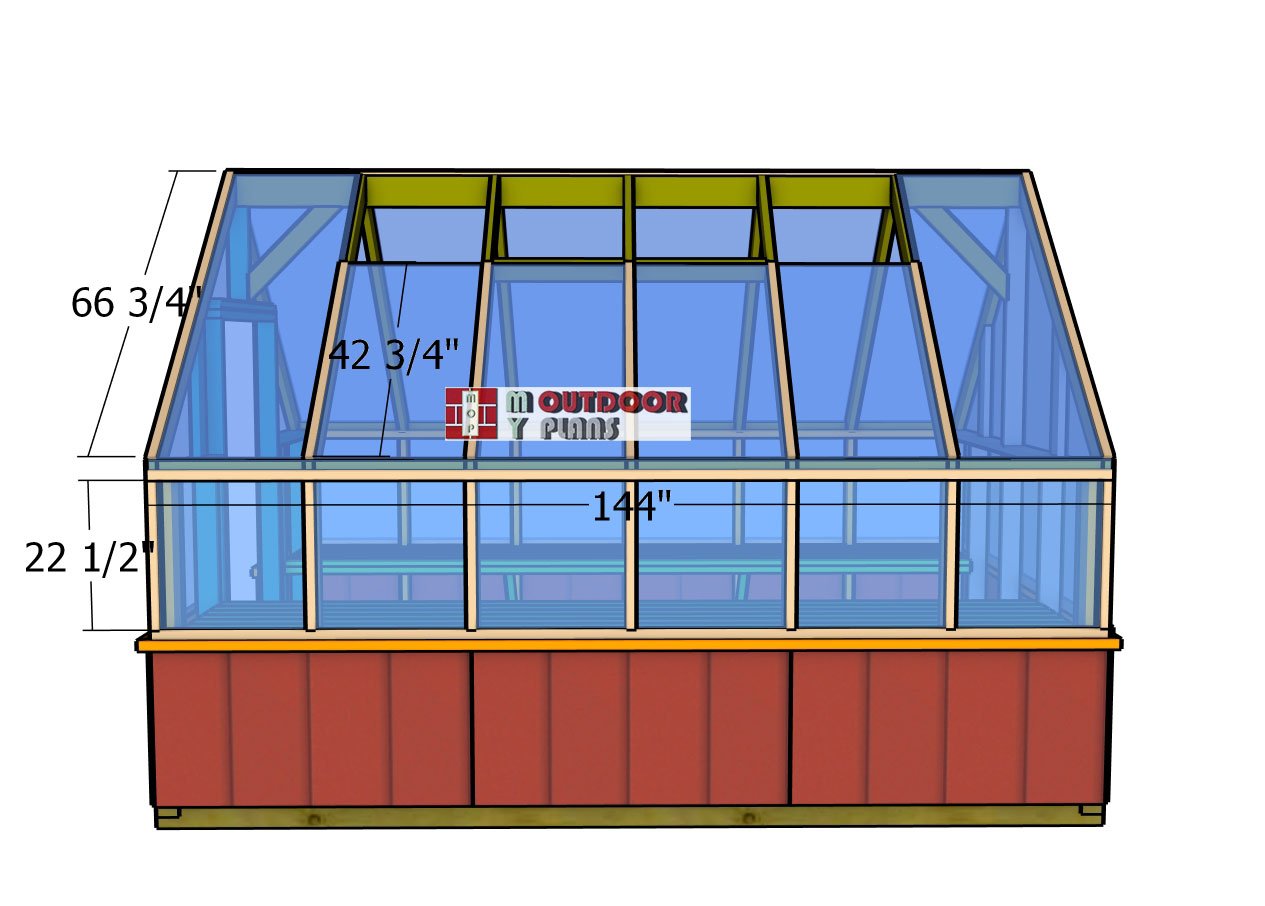
Side-trims-1

Side-trims-1

Use 1×2 wooden battens or plastic clips to reinforce the attachment, particularly around the edges and corners, for added durability. Make sure the plastic is tightly secured to prevent wind damage and create a well-insulated space for your plants. Properly installed, the greenhouse plastic will provide the ideal environment for your gardening needs. Use 1 5/8″ screws to secure the battens to the frame of the greenhouse.
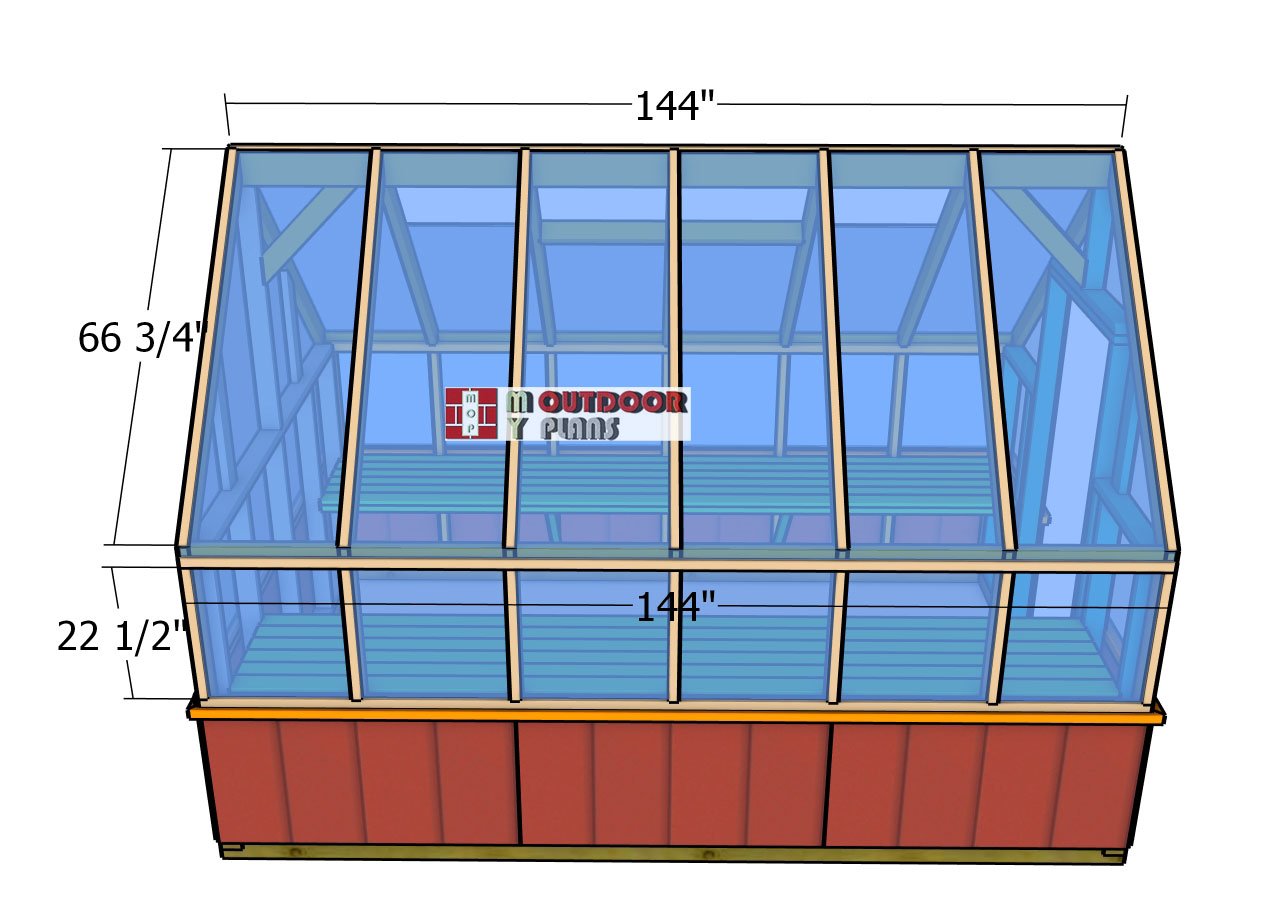
Side-trims-2

Side-trims-2

Attach the 1×2 battens to the other side of the greenhouse, as well.
Front-wall-trims

Front-wall-trims

Attach 1×2 battens to the front of the greenhouse to secure and reinforce the structure. Position the battens evenly across the surface, ensuring they align with the framing beneath for maximum support. Drill pilot holes to prevent splitting, then secure the battens with 1 1/2″ screws for a sturdy and lasting connection. These battens not only add structural integrity but also help secure the plastic sheeting, giving your greenhouse a clean and polished appearance.
Back-wall-trims

Back-wall-trims

Attach 1×2 battens to the back of the greenhouse, as well.  Alternatively, you can attach 1/4″ polycarbonate sheets for your greenhouse. This is an excellent choice for durability and efficiency. These sheets are lightweight, impact-resistant, and provide superior insulation, making them ideal for maintaining a controlled growing environment.

hey allow ample natural light to filter through while offering protection against UV rays to safeguard your plants. To install, cut the sheets to size and secure them to the frame using screws with weatherproof washers, ensuring a snug and watertight fit. Polycarbonate sheets are a long-lasting option that not only enhances the functionality of your greenhouse but also gives it a sleek, professional finish.


Step 6: Building the vents

Assembling-the-vent-frame

Assembling-the-vent-frame

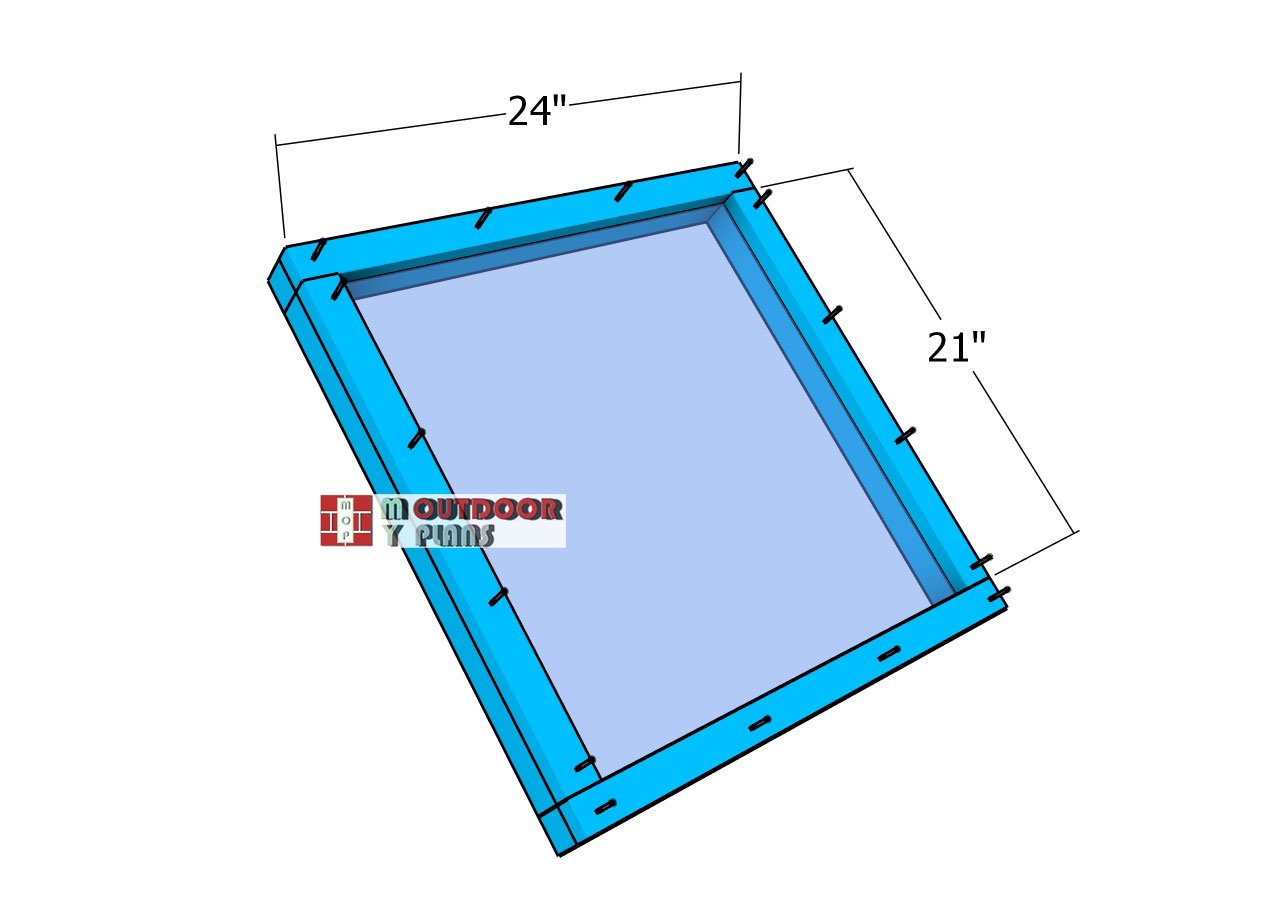
Construct the greenhouse vents using 2×2 lumber for a lightweight yet sturdy design. Cut the components to 21″ and 24″, then drill pocket holes at both ends of the 21″ pieces. Lay the parts out on a flat, level surface, aligning the edges and ensuring the corners are square for a precise fit. Assemble the vent frame by securing the pieces with 2 1/2″ screws through the pocket holes, creating a strong and reliable structure for your greenhouse ventilation.

Vent-trims

Vent-trims

Attach the greenhouse plastic to the vent frame by stapling it securely along the edges, ensuring the plastic is tight and wrinkle-free. Once in place, lock the plastic with 1×2 trims, securing them with 1 5/8″ screws for a clean and durable finish. This method not only keeps the plastic in place but also adds a polished look to your greenhouse vents.

Fitting-the-vents

Fitting-the-vents

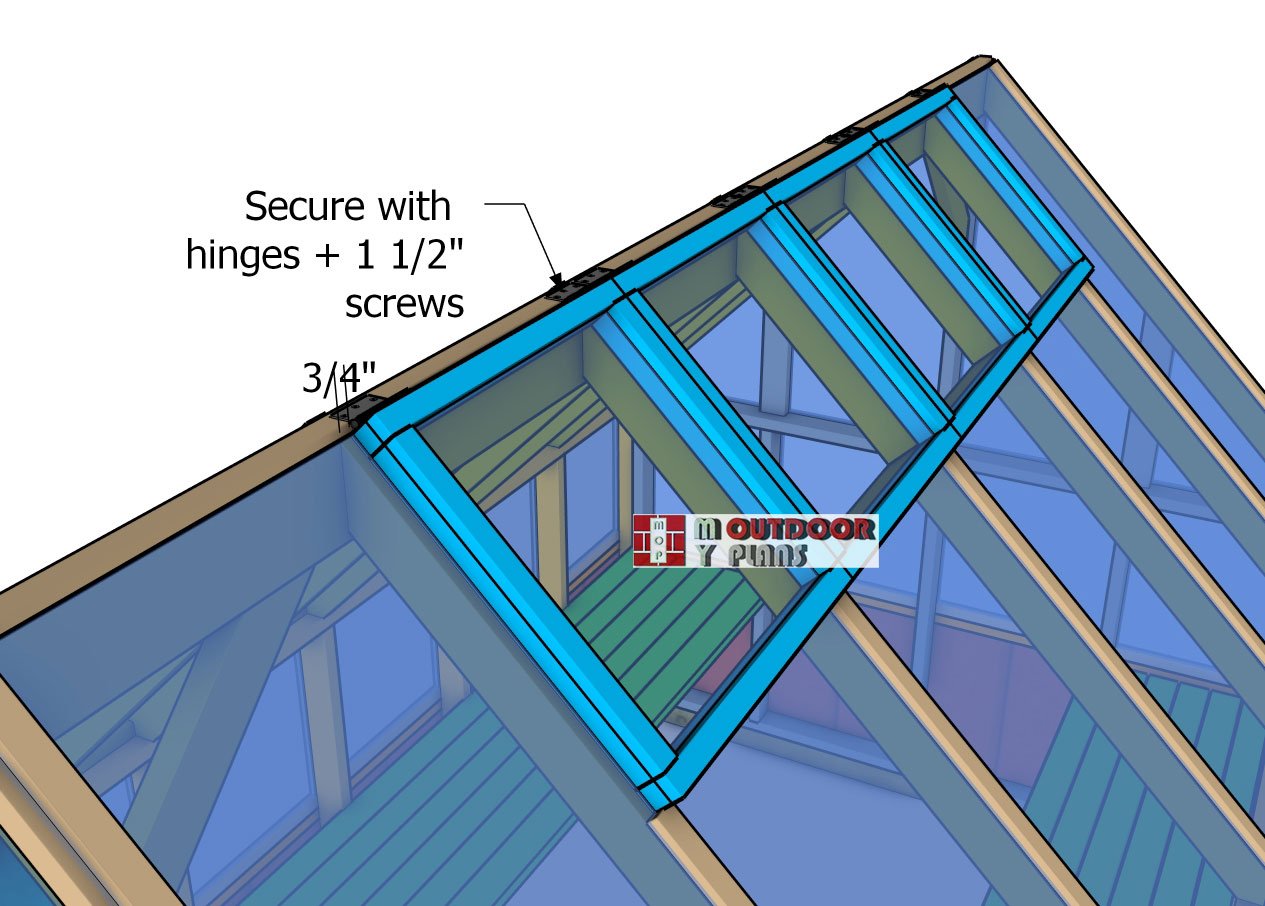
Attach the vents to the top of the greenhouse, centering them between the rafters for proper alignment. Secure each vent with two sturdy hinges, ensuring smooth operation and a snug fit.

For enhanced functionality, install automatic openers to maintain optimal airflow effortlessly. These openers adjust based on temperature, ensuring your greenhouse stays ventilated without manual intervention. Simply follow the manufacturer’s instructions to attach and calibrate the openers for seamless, temperature-sensitive operation—a game-changer for efficient and hassle-free greenhouse management!


Step 7: Building the door

Door-frame

Door-frame

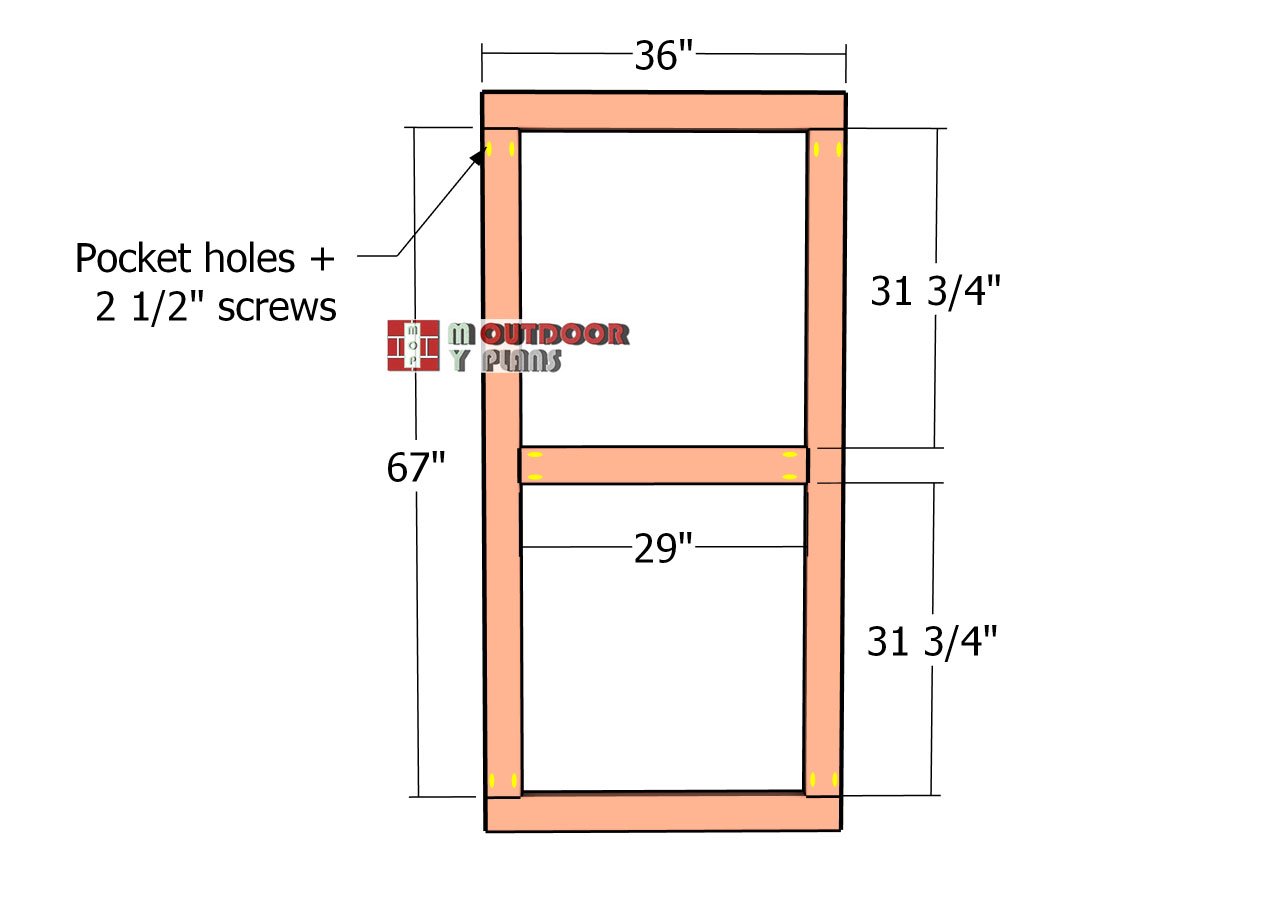
Construct the door frame using 2×4 lumber, cutting the pieces to the dimensions specified in your diagram. Lay the components out on a flat, level surface, ensuring the edges align flush and the corners are perfectly square for a precise fit. Drill pocket holes at both ends of the vertical and middle components to create strong, secure joints. Assemble the door frame by fastening the pieces tightly with 2 1/2″ screws, resulting in a sturdy frame ready for installation.

Fitting-the-braces---door

Fitting-the-braces—door

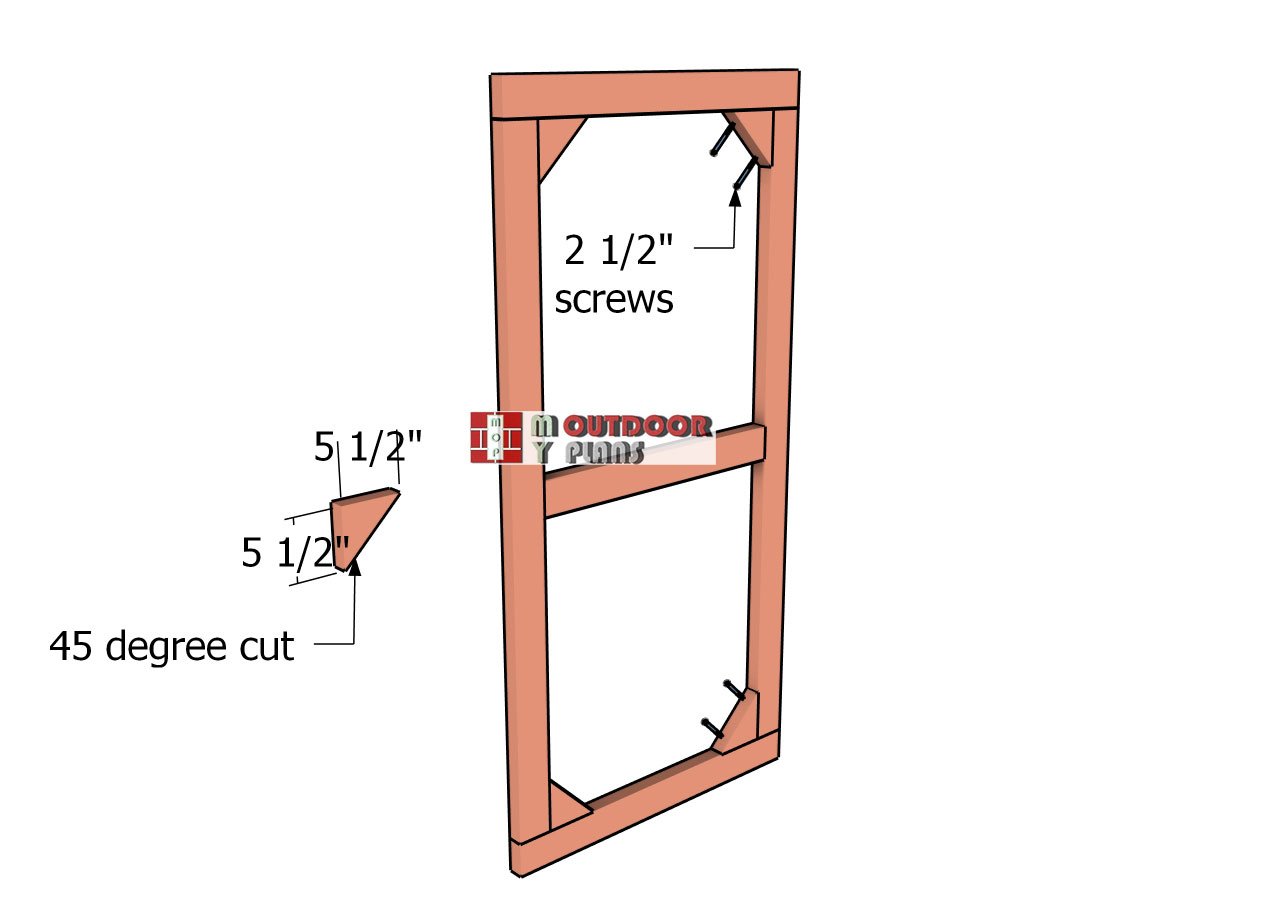
Reinforce the door frame by adding corner braces for extra stability. Cut the slats at 45-degree angles to create the braces, using scrap wood from your workshop. Materials like 2×6, 2×8, or even 2×10 lumber work perfectly for these small braces. Secure the braces to the corners of the door frame with screws, ensuring a tight and sturdy connection.

Door-trims

Door-trims

Cover the door with greenhouse plastic, pulling it taut to eliminate wrinkles for a clean finish. Lock the plastic securely in place by attaching 1×2 trims around the edges. Fasten the trims to the door frame with 1 5/8″ screws, spacing them every 8 inches along the framing. This ensures the plastic stays firmly in place while giving the door a polished and durable look.

Attaching-the-door

Attaching-the-door

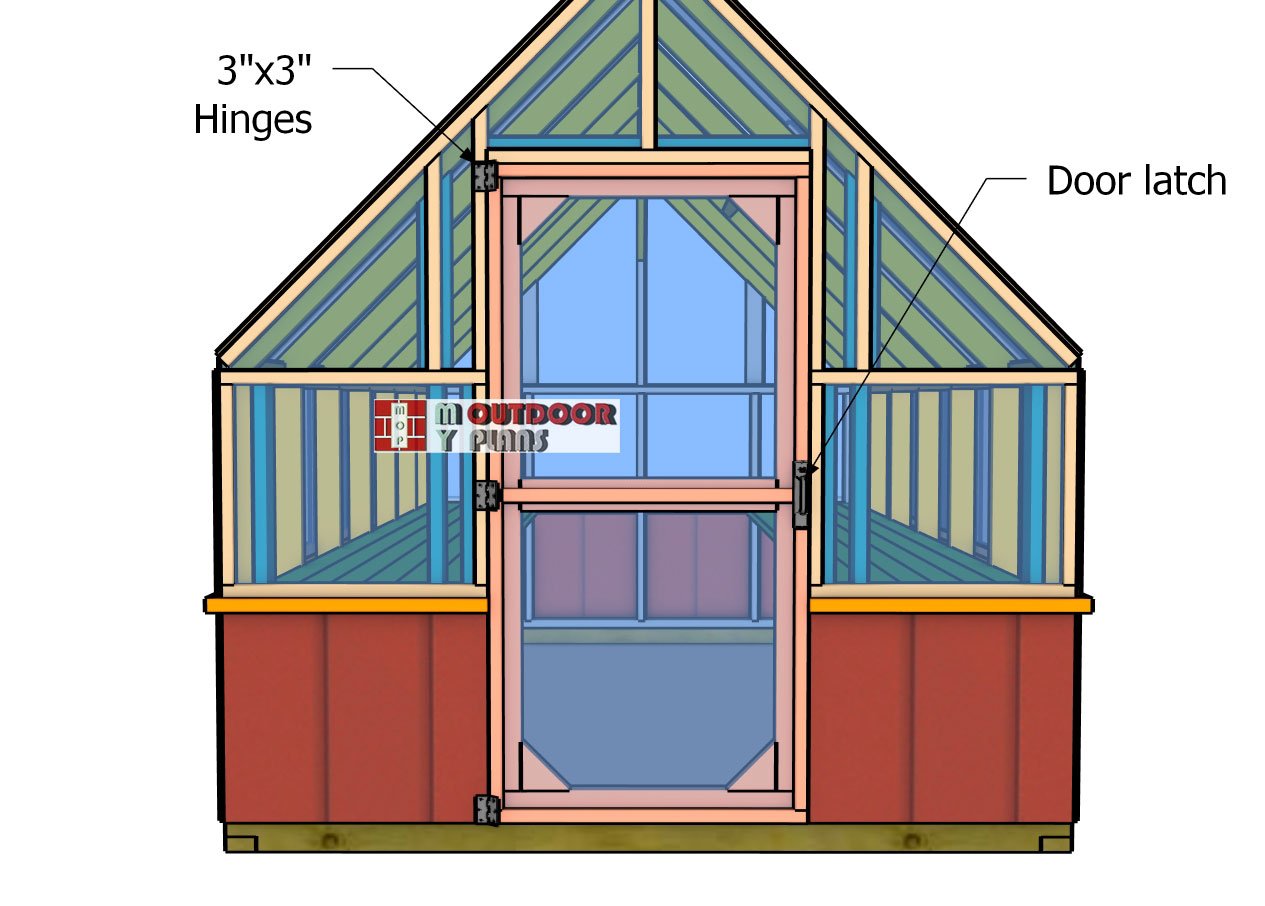
Fit the door into the opening, ensuring it aligns perfectly with the jambs for smooth operation. Secure the door to the jambs using sturdy hinges, attaching them evenly along the edge for proper support. Complete the installation by adding a latch to keep the door securely closed, ensuring both functionality and convenience for your greenhouse.


Step 8: Finishing touches

DIY 8x12 greenhouse plans

DIY 8×12 greenhouse plans

The finishing touches are what bring your greenhouse project together, both in functionality and style. Add trims around the doors and vents to give the structure a clean, polished look while also reinforcing the edges. Seal any gaps with weather-resistant caulk to ensure a well-insulated environment for your plants.

DIY 8x12 gable greenhouse plans

DIY 8×12 gable greenhouse plans

A fresh coat of outdoor-grade paint or stain on the wooden elements will protect against the elements and enhance durability. Finally, consider adding decorative elements like flower boxes or a small path leading to the entrance to make your greenhouse both practical and visually inviting. These final details elevate the project from great to truly exceptional!

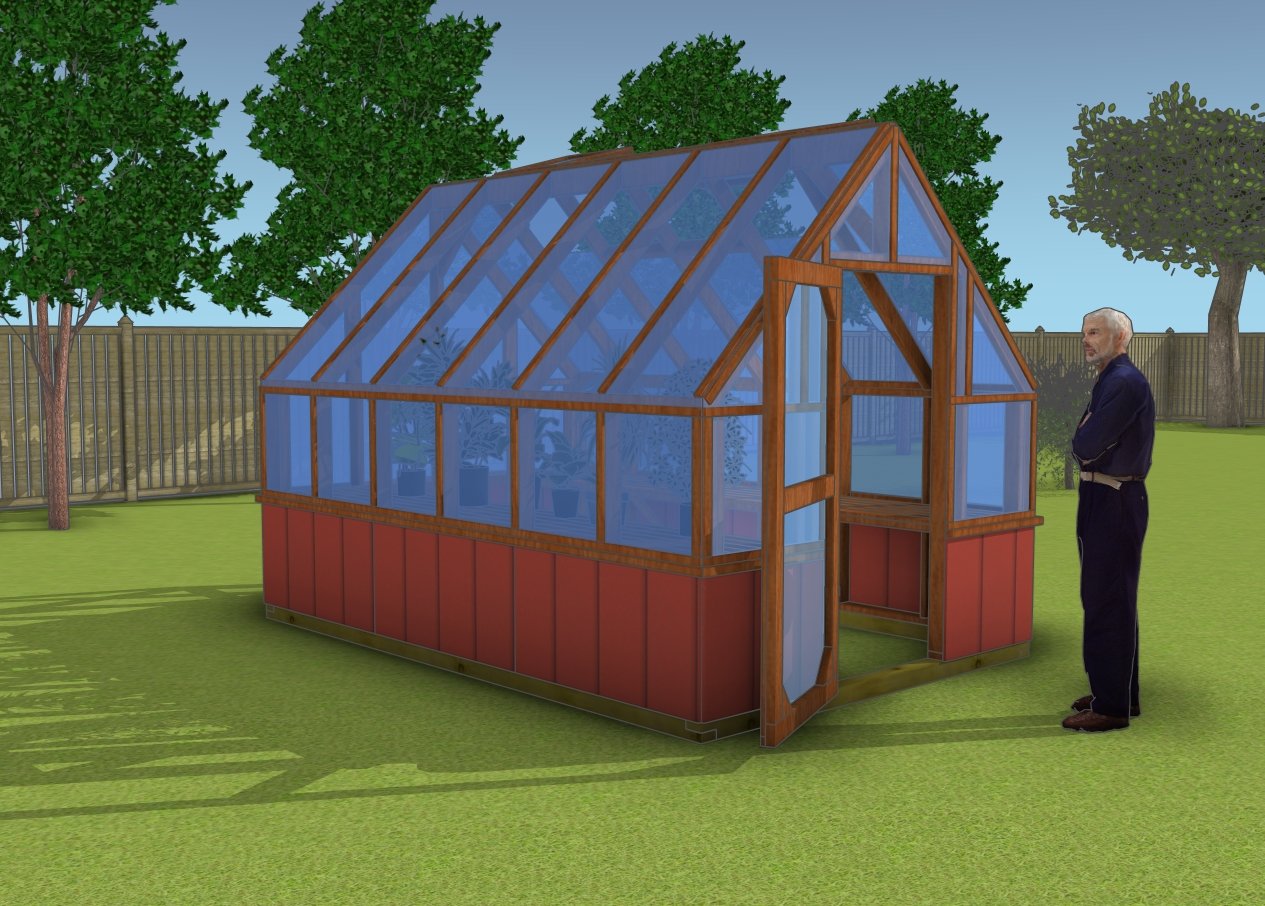
This is a sturdy greenhouse that offers an ideal mix of space and it is also cost friendly. You can adjust the slope of the greenhouse if you live in an area with heavy precipitations.


This woodworking project was about 8×12 greenhouse plans. If you want to see more outdoor plans, check out the rest of our step by step projects and follow the instructions to obtain a professional result.


Previous


- EXPLORE MORE IDEAS FOR -

You may also like

Leave a Comment