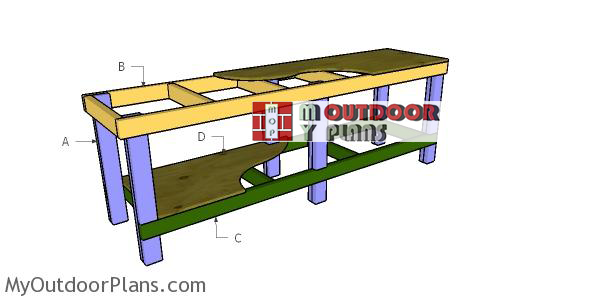
This step by step diy woodworking project is about 2×4 8 ft workbench plans. I have designed this basic 8 ft workbench, so you can organize your show and build projects with ease. This workbench features a low shelf. Moreover the frame of the bench is built entirely from 2x4s, so you can find the materials very easily. Take a look over the rest of our woodworking plans, if you want to get more building inspiration.
When buying the lumber, you should select the planks with great care, making sure they are straight and without any visible flaws (cracks, knots, twists, decay). Investing in cedar or other weather resistant lumber is a good idea, as it will pay off on the long run. Use a spirit level to plumb and align the components, before inserting the galvanized screws, otherwise the project won’t have a symmetrical look. If you have all the materials and tools required for the project, you could get the job done in about a day. See all my Premium Plans HERE.
Projects made from these plans
2×4 8 ft Workbench Plans
Building-a-8-ft-workbench
Cut & Shopping Lists
- A – 6 pieces of 2×4 lumber – 31 1/4″ long, 6 pieces – 18 1/4″ long, 6 pieces – 6″ long LEGS
- B – 2 pieces of 2×4 lumber – 96″ long, 6 pieces – 21″ long FRAME
- C – 2 pieces of 2×4 lumber – 93″ long, 4 pieces – 21″ long FRAME
- D – 1 piece of 3/4″ plywood – 24″x96″ long, 1 piece – 24″x86″ long TOPS
- 10 pieces of 2×4 lumber – 8′
- 1 piece of 3/4″ plywood – 4’x8′
- 2 1/2″ screws
- 2″ nails
- wood glue, stain/paint
- vise
Tools
![]() Hammer, Tape measure, Framing square, Level
Hammer, Tape measure, Framing square, Level
![]() Miter saw, Drill machinery, Screwdriver, Sander
Miter saw, Drill machinery, Screwdriver, Sander
Time
Related
Building a 8 ft workbench from 2x4s
Building-the-top-frame-workbench
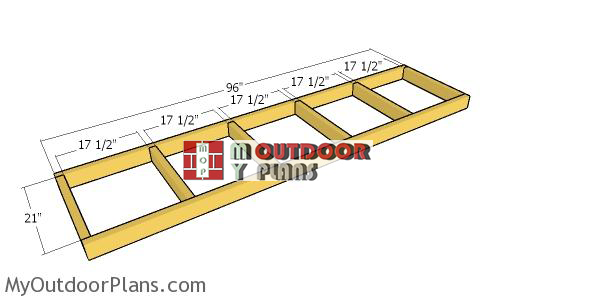
The first step of the project is to build the top frame for the 8 ft workbench. Cut the components from 2×4 lumber. Drill pilot holes through the 96″ long beams and insert 2 1/2″ screws into the perpendicular components. Make sure the edges are flush and the corners are square.
Building the legs
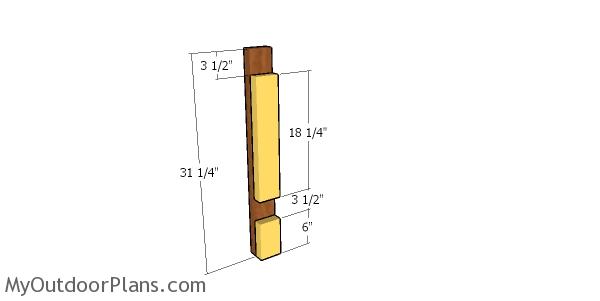
Next, build the legs for the workbench from 2x4s. Cut the components from 2×4 lumber at the dimensions shown in the plans. Drill pilot holes through the yellow components and insert 2 1/2″ screws into the legs. Add glue to the joints and align the edges flush. Fit a scrap piece of 3 1/2″ lumber between the yellow components, so you make sure the braces will fit properly.
Assembling-the-front-frames
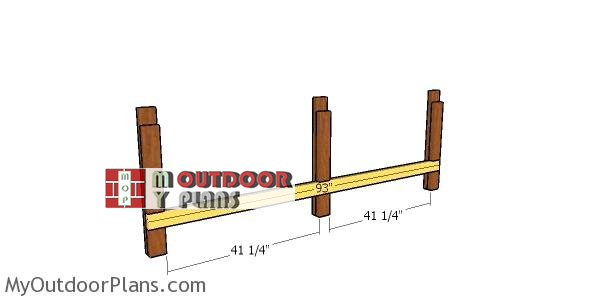
Fit the braces to the legs, as shown in the plans. Drill pilot holes, add glue to the joints and insert 2 1/2″ screws.
Assembling the lower shelf frame
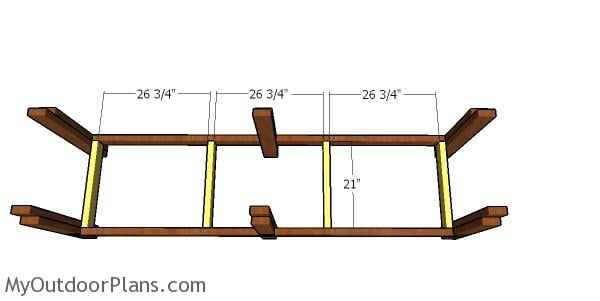
Next, attach the 2×4 supports to the base shelf frame. Drill pilot holes through the braces and insert 2 1/2/” screws into the supports. Check if the corners are right-angled with a carpentry square.
Lower-shelf
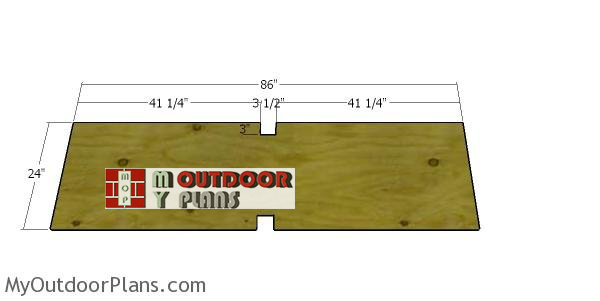
Continue the project by cutting the lower shelf. Mark the cut lines on the 3/4″ plywood and then cut the notches with a saw.
Fitting the lower shelf
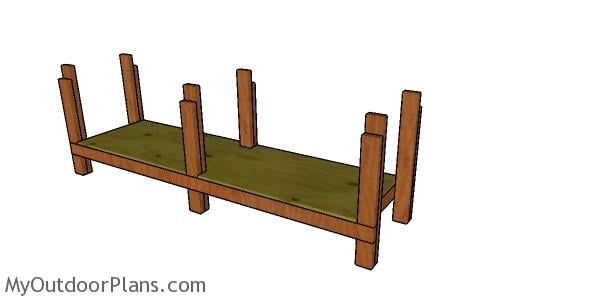
Fit the panel to the frame of the workbench and lock them into place with 1 5/8″ screws. Align the edges with attention for a professional result. Insert the screws every 8″ along the framing.
Fitting the top frame
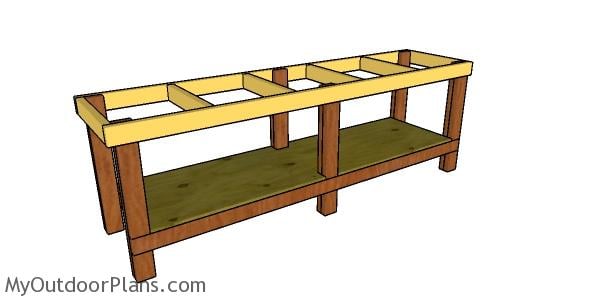
Afterwards, you need to assemble the workbench together by attaching the top frame. Use a carpentry square to make sure the corners are right-angled. Drill pilot holes through the legs and insert 2 1/2″ screws into the top frame.
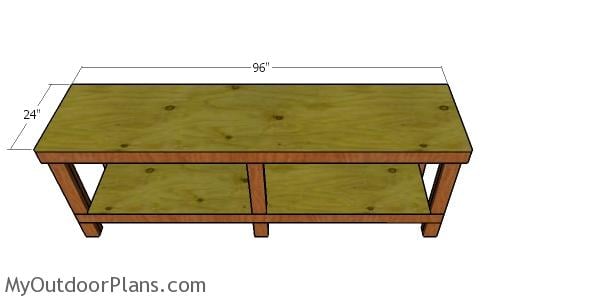
Fitting the workbench top
Cut and fit the 3/4″ plywood sheet to the top of the workbench. Align the edges and lock it into place with nails or screws.
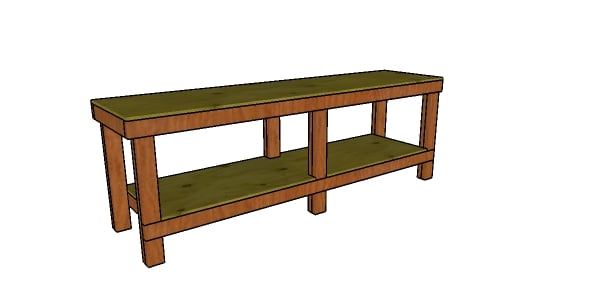
2×4 8 ft Workbench Plans
Last but not least, you need to take care of the finishing touches. Therefore, fill the holes and sand the surface with 120-220 grit sandpaper. Apply a few coats of stain or paint to enhance the look of the workbench.
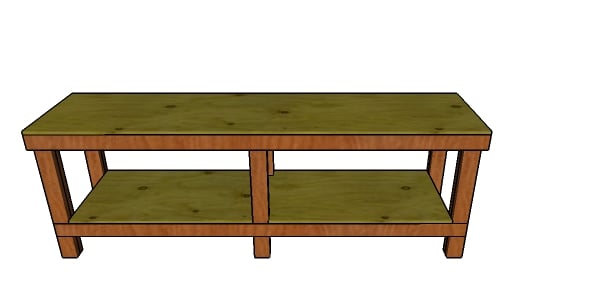
8 ft Workbench Plans
Add a vise or other features to the workbench, such as a power outlet or hooks to keep the power tools organized.
Top Tip: Apply a few coats of paint or stain to the components, to enhance the look of the project.
This woodworking project was about 8 ft workbench plans free. If you want to see more outdoor plans, check out the rest of our step by step projects and follow the instructions to obtain a professional result. 1/4

21 comments
I was wondering and have a question about your 2×4 8 ft. workbench plan can it be modified to have and upper shelf. I was thinking if I were to use 8 ft. 2X4’s on the backside and use miter cuts screwed to them. And lay lets says a half inch ply wood for the shelf. Do you think this would support an upper shelf. If not can you draw one for me. Thanks for being there.
That will work. It is a basic add on.
Hi
Is this bench worktop strong enough to let’s say hammer a nail into something on top of the workbench?
You can glue together two sheets of 3/4″ plywood if you think it’s not strong enough for that.
These plans look great but I just have one question: If the frame 2x4s are 21″ long with a 2″ apron on each side, then wouldn’t that mean that the plywood would need to be 25″ and not 24″?
Would it be better to cut the frame lumber to 20″ to achieve a 24″ width?
No, because the actual thickness of 2x4s is 1 1/2″
Thank you for informing me about that. I wasn’t aware that 2x4s were smaller than 2″x4″ until now.
I have another question: If I want to make the top surface strong enough to add dog holes, could I use rows of 2x4s instead of plywood? If I did this, could I use less supports under the 2x4s, ie: wider than 17 1/2″ or should I keep it the same? Are there any other considerations I should be aware of if I make the top surface out of 2x4s?
Thank you for this website. I have been looking through your categories and looking forward to trying some of the easier projects!
Yes, you can make the top from 2x4s. /you can adjust the size of the tabletop, it will work just fine.
Great bench. easy to build, sturdy.
Thank you for the plans. I increased the height to 42” and used 4x4s in the corners to accommodate the size. It is a fantastic workbench.
How do I get a copy of this plan – 2×4 8ft Workbench Plan? Can not print
I would like a printable copy of the 8 ft work bench plan
See the FAQs
Thank you for sharing your plan. It was a father son(s) weekend project!
Glad it was a fun project and I could help
Thank you for this easy to follow plans. This was my first build. I was going to buy a workbench on the marketplace for $275. Then I found your website and built it myself for less than $80 for lumber. (I had all the other tools and screws). I really can’t believe I did it myself at age 60.
Congrats. You did great, age is just a number 🙂
Thank you for the plans. I want to make this 10 feet long. What would the support piece spacing be for the top and bottom frame. I look forward to your advice.
Add an extra support and make the gaps equal between them supports.
Built this workbench today just as directed in your instructions. Turned out perfect. I would share a picture but cannot link to this comment. Thankyou for these plans. Very sturdy and just what I needed.
Congrats for the project. I would love to see your workbench. You can submit pictures here: https://myoutdoorplans.com/contact/