This step by step diy woodworking project is about 3 bin compost plans. If you want to grow vegetables with organic compost, you should take a look on the plans. the project features a compost bin with three compartments. In addition, invest in weather-resistant lumber. Make sure you take a look over the rest of plans to see alternatives and more projects for your garden.
When buying the lumber, you should select the planks with great care, making sure they are straight and without any visible flaws (cracks, knots, twists, decay). Investing in cedar or other weather resistant lumber is a good idea, as it will pay off on the long run. Use a spirit level to plumb and align the components, before inserting the galvanized screws, otherwise the project won’t have a symmetrical look. If you have all the materials and tools required for the project, you could get the job done in about a day. See all my Premium Plans HERE.
Projects made from these plans
It’s that simple to build a compost bin!
3 Bin Compost Plans

Building-a-3-bin-compost
Cut & Shopping Lists
- A – 2 pieces of 2×4 lumber – 116 3/4″ long, 2 pieces – 41″ long, 3 pieces – 38″ long BASE
- B – 18 pieces of 1×6 lumber – 42 1/2″ long FLOOR
- C – 8 pieces of 1×4 lumber – 42″ long, 4 pieces of 1×6 lumber (4″ wide) – 37 3/4″ long, 2 pieces of 2×3 lumber – 37 3/4″long, 2 pieces of 2×2 lumber – 37 3/4″ long POSTS
- D – 6 pieces of 1×6 lumber – 120″ long BACK
- E – 12 pieces of 1×6 lumber – 38 1/2″ long, 6 pieces – 34 1/4″ long, 6 pieces – 38 1/2″ long FRONT WALL
- F – 1 piece of 1×6 lumber – 120″ long, 4 pieces – 42 1/2″ long TOP
- G – 2 pieces of 1/2″ polycarbonate – 37 1/2″x41 1/2″ long, 1 piece – 36 1/2″x37 1/2″ long LIDS
Tools
![]() Hammer, Tape measure, Framing square, Post hole digger, Level
Hammer, Tape measure, Framing square, Post hole digger, Level
![]() Miter saw, Drill machinery, Screwdriver, Sander
Miter saw, Drill machinery, Screwdriver, Sander
Time
![]() One day
One day
Building a compost bin
Building-the-floor-frame
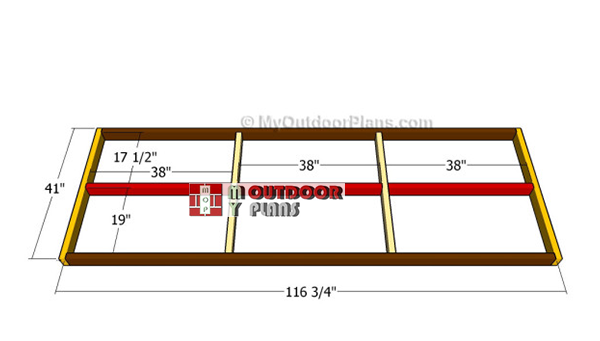
The first step of the project is to build the frame of the 3 compost bin. As you can notice in the image, we recommend you to use 2×4 beams for the frame and to lock them together with 2 1/2″ screws.
Drill pocket holes through the components before inserting the screws, in order to prevent the wood from splitting. Check if the corners are right-angled by using a carpentry square.
Attaching the floor
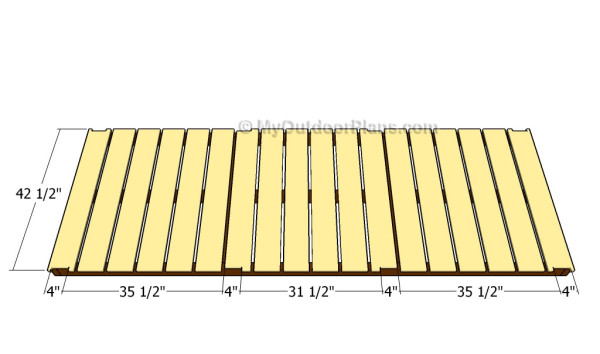
The next step of the project is to attach the 1×6 slats to the frame, as shown in the image. If you want to get the job done in a professional manner, we recommend you to place the slats equally spaced and to cut out small notches at both ends of the slats, if you want to make enough room for the vertical posts.
Drill pilot holes through the slats before inserting the 1 5/8″ screws, in order to prevent the wood from splitting. Take accurate measurements, if you want to get a professional look. The slats should overhand 3/4″ at both ends. Leave about 1″ between the slats.
Building-the-rails
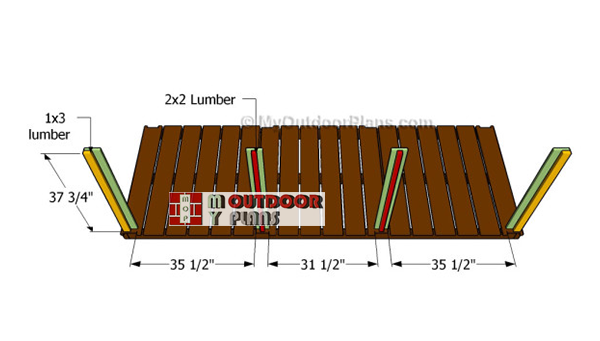
Continue the project by fitting the front posts to the frame of the compost bin. Cut the components at the right size and lock them together, as in the image before attaching them to the frame. The posts are 4″ wide. You can make the slats from 1×6 lumber using a table saw. Alternatively, you should adjust the plans for using 1×4 slats.
Top Tip: Use a spirit level to plumb the components before inserting the screws into place.
Attaching the rails
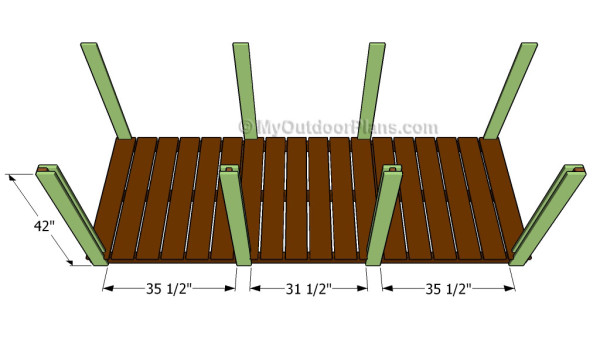
The next step of the garden project is to attach the rails to the front of the bins and the supports to the back of the frame. Plumb the 1×4 components with a spirit level and lock them into place with finishing nails.
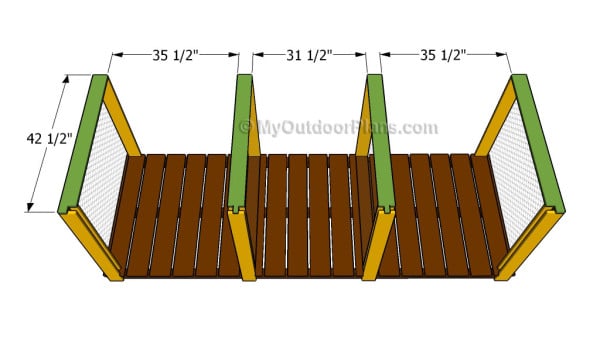
Fitting the lid supports
Fitting the lid supports is a straight-forward job, but we recommend you to work with attention and to align everything at both ends. Cut the ends of the slats as shown in the image, if you want to get the job done in a professional manner. Make the notches using a saw.
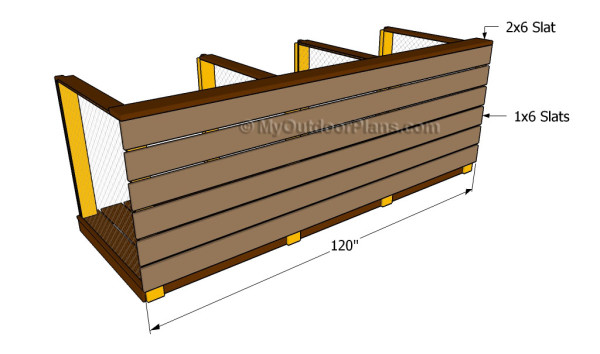
Attaching the back of the compost bin
Attaching the 1×6 slats to the back of the compost bin is a straight-forward project, if you follow the right steps. First of all, we recommend you to drill pilot holes at both ends of the slats and to insert 1 1/4″ screws into the supports.
It is essential to properly space the slats, in order to let the air get inside the compost bins. Continue the job by attaching the support for the lids. Use screws to lock it into place.
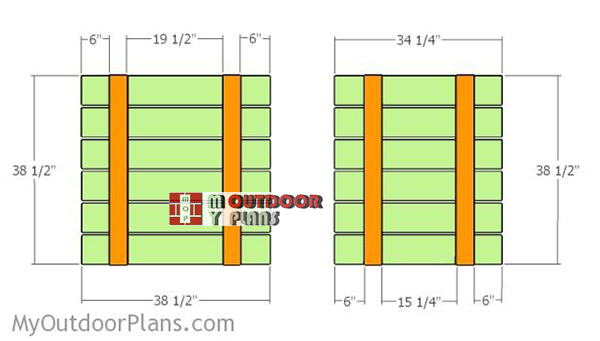
Front-doors
Build the front doors from 1×6 slats and 1×4 supports. Drill pilot holes through the supports and insert 1 5/8″ screws into the slats.
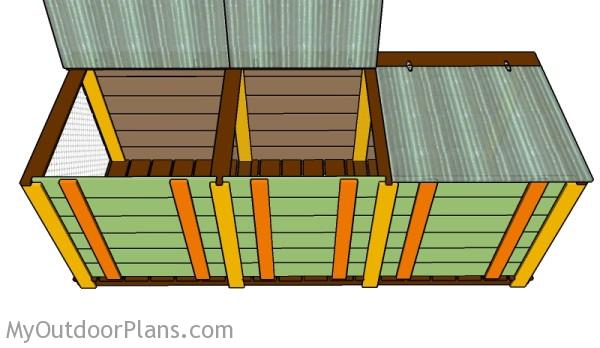
Sliding the front doors
Slide the front doors into place, as shown in the diagrams. You can remove them whenever you want to have access to the compost.
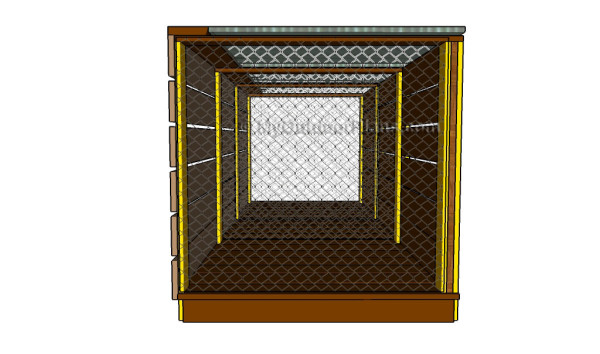
Attaching the wire walls
Fit chicken wire to the sides of the 3 bin compost and between them, as in the image. If you want to get the job done in a professional manner. Stretch the wire as much as possible, as to get a professional look. Secure the wire in place with finishing nails.
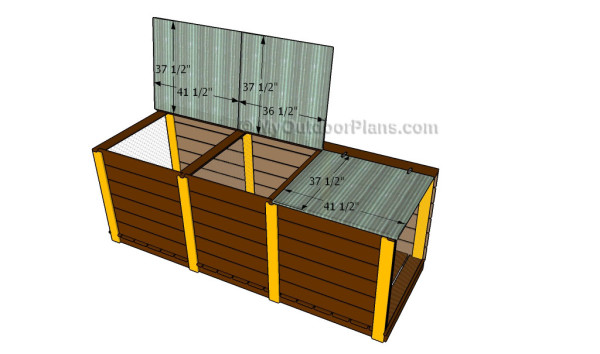
Attaching the lids
If you want to build the lids in a professional manner, we recommend you to use polycarbonate. Mark the cut lines with a marker on the sheet and make the cuts with a saw with fine teeth.
It is essential to smooth the cut edges with fine-grit sandpaper before fitting them into place. Check if the lids open properly before locking them to the back support with metal hinges.
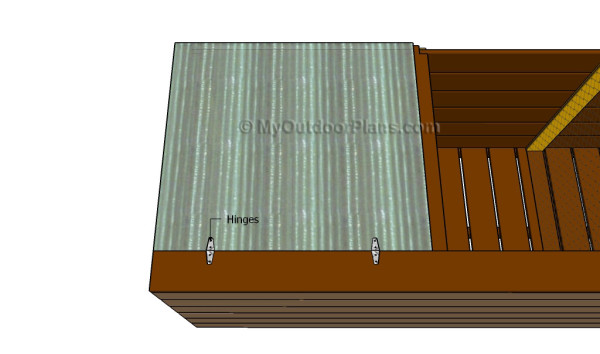
Fitting the lid with hinges
In order to lock the lids into place, we recommend you to use metal hinges. Drill pilot holes before inserting the screws and align the lid at both ends.
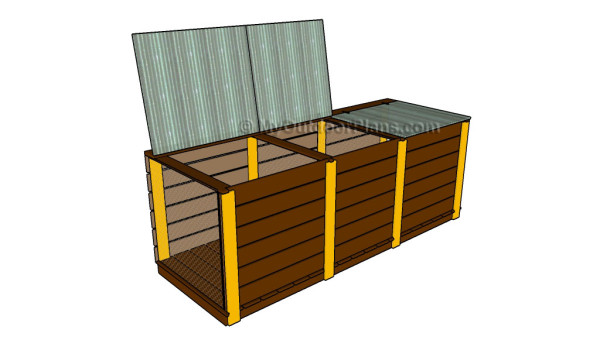
3 bin compost plans
One of the last steps of the woodworking project is to take care of the finishing touches. Therefore, fill the pilot holes with wood putty and smooth the surface with 120-grit sandpaper.
Top Tip: In order to protect the lumber from water damage, we recommend you to cover the components with several coats of paint. Place the compost bins in a proper location and move it whenever necessary.
This woodworking project was about 3 compost bin plans. If you want to see more outdoor plans, we recommend you to check out the rest of our step by step projects. LIKE us on Facebook and Google + to be the first that gets out latest projects.


5 comments
Just what I was looking for, now to get started!!
Good luck! Let me know how it goes.
Hello,
We have started building this but we are having a hard time finding the material for the lids. Where do we find polycarbonate to use for this? And Is it super expensive for this material?
You don’t necessarily need polycarbonate. You could use acrylic glass, as well, or other materials. You can even use lumber for the lid.
I really appreciate you posting this and having so much detail. I am not a great DYI guy, but this seems like something I can to in order to make my own compost. thank you