This step by step diy woodworking project is about wooden trash bin plans. If you want to learn how to build a really simple trash bin using common materials, you have to pay attention to the instructions and diagrams featured on this article. Don’t forget that you should adjust the design and the size of the trash bin to suit your needs and to match the style of your backyard.
It is essential to plan every aspect of the woodworking project from the very beginning, otherwise the components might not fit together properly. If you are going to expose the trash bin to moisture, we strongly recommend you to invest in weather-resistant plywood and to use galvanized screws. Using a pocket system for the joints will not only hide the screws but also create a rigid structure. See all my Premium Plans HERE.
Projects made from these plans
Cut & Shopping Lists
- A – 4 pieces of 2×2 lumber – 18″ long LEGS
- B – 4 pieces of 3/4″ plywood – 9″ x 17″ long SIDES
- C – 4 pieces of 1×1 – 8″ long SUPPORTS
- D – 1 piece of 3/4″ plywood – 9 1/2″ x 9 1/2″ BOTTOM
Tools
![]() Hammer, Tape measure, Framing square, Level
Hammer, Tape measure, Framing square, Level
![]() Miter saw, Drill machinery, Screwdriver, Sander
Miter saw, Drill machinery, Screwdriver, Sander
![]() Post hole digger, Concrete mixer
Post hole digger, Concrete mixer
Time
Related
Wooden Trash Bin Plans
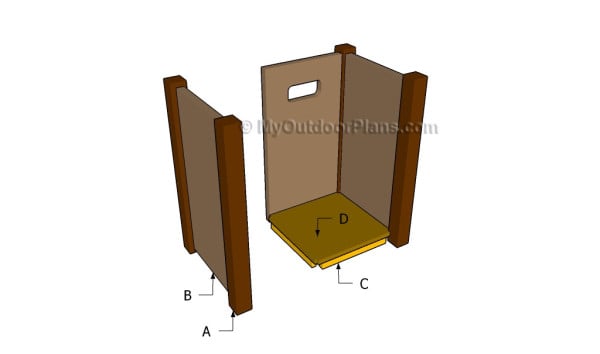
Building a trash bin
Top Tip: Building a wooden trash bin is a straight-forward project, but you should make sure the size of the project is appropriate. Use weather-resistant materials, if you are going to place the trash bin in an unprotected area.
Wooden Trash Bin Plans
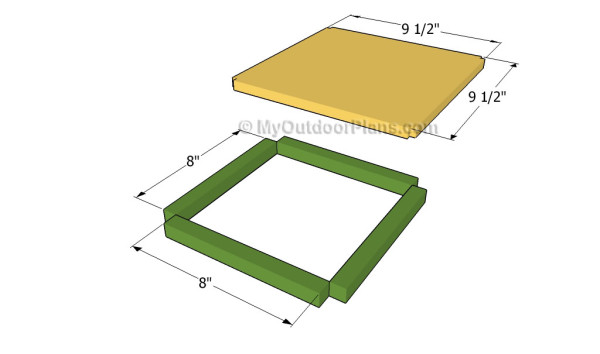
Building the bottom of the bin
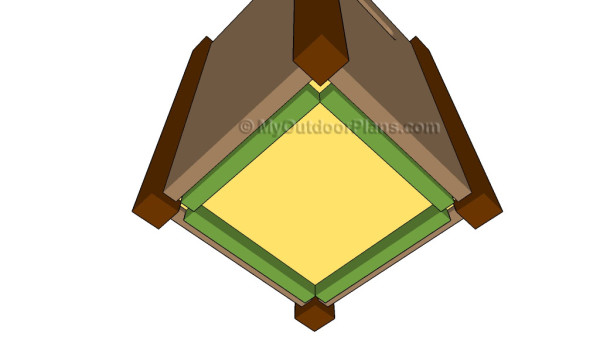
The first step of the project is to build the floor of the trash bin. As you can notice in the plans, we recommend you to attach a piece of 3/4″ weather-resistant plywood over 1×1 supports. Make sure you cut 1/4″ x 1/4″ notches in the four corners of the floor, otherwise you won’t be able to fit the legs.
Drill pilot holes through the supports and insert 1 1/4″ screws into bottom. Align everything at both ends, if you want to get the job done in a professional manner.
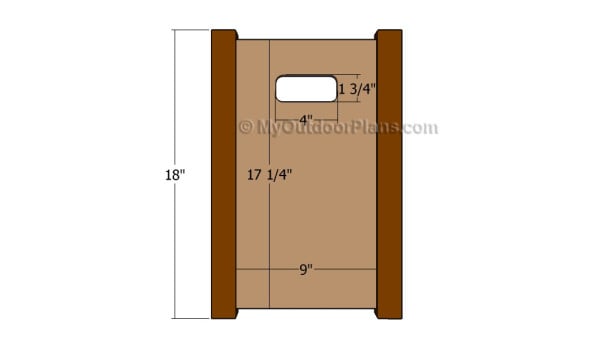
Building the faces of the bin
The next step of the project is to build the faces of the trash bin. As you can notice in the diagram, we recommend you to cut a piece of 3/4″ plywood at the right size and to fit it between the two wooden legs.
Top Tip: Make sure you cut out a small holes inside the plywood panel, by using a jigsaw. Smooth the cut edges with medium-grit sandpaper. Leave 1/4″ from the interior of the legs to the side walls.
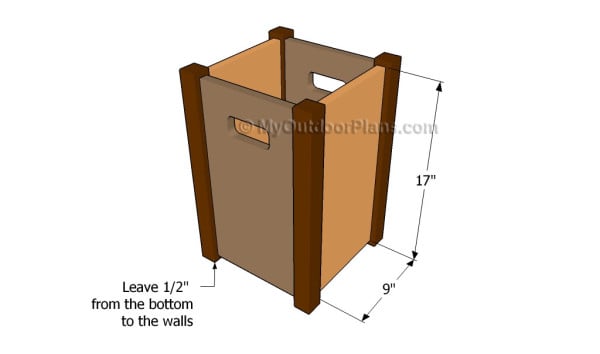
Attaching the sides of the bin
Continue the woodworking project by attaching the sides of the trash bin between its faces. After cutting the plywood parts at the right size, we recommend you to drill pocket holes on both sides of the components and to insert 1 1/4″ screws into the legs.
Align everything at both ends and add waterproof glue to the joints, if you want to enhance the bond of the joints. Plumb the sides with a spirit level for a professional result.
Fitting the bottom into place
One of the last steps of the garden project is to attach the bottom between the sides of the trash bin and to lock it into place properly. Drill pocket holes through the piece of plywood and insert 1 1/4″ screws into the sides components.
It is essential to make sure the floor fits around the legs, before leveling properly and inserting the screws. Add waterproof glue to secure everything properly.
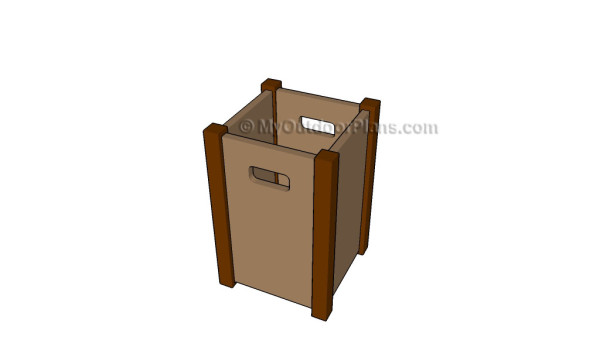
Wooden trash bin plans
Last but not least, you have to take care of the finishing touches. Therefore, fill the pilot holes with wood putty and smooth the surface with 120-grit sandpaper.
Top Tip: In order to protect the lumber from water damage, we recommend you to cover the components with several coats of paint. Place the small table in a proper location and move it whenever necessary.
This woodworking project was about wooden trash bin plans. If you want to see more outdoor plans, we recommend you to check out the rest of our step by step projects. LIKE us on Facebook and Google + to be the first that gets out latest projects.
