This step by step project is about lemonade stand plans. Building a lemonade stand out of wood is easy, especially if the right plans and techniques are used. Taking into consideration there are so many plans and designs you can choose from, we recommend you to check out the alternatives and adjust the project to your needs. Work with attention and with great acre, if you want to get an accurate result.
There are several aspects that any person should take into account before starting the woodworking project. First of all, you need to use weather-resistant lumber, such as cedar, pine or redwood. Drill pocket holes at both ends of the components, if you want to lock them together tightly. In addition, add wood glue to the joints and check if the corners are right-angled. Plan everything from the very beginning, if you want to get a professional result. See all my Premium Plans HERE.
Projects made from these plans
Cut & Shopping Lists
- A – 2 pieces of 2×2 lumber – 61 1/2″, 2 pieces of 2×2 lumber – 66 1/2 LEGS
- B – 9 pieces of 2×2 lumber – 21″, 6 pieces of 2×2 lumber – 45″ FRAME
- C – 30 pieces of 1×4 lumber – 19″ long, 2 pieces of plywood – 24×48″ SLATS
- D – 7 pieces of 1×4 lumber – 49 1/2″ COUNTERTOP
- E – 2 pieces of 1×4 lumber – 54″, 2 piece of 1×4 lumber – 27″ TRIMS
- F – 2 pieces of 1×2 lumber – 24 3/4″, 3 pieces of 1×2 lumber – 49 1/2″ ROOF
- G – 2 pieces of 5″ casters CASTERS
Tools
![]() Hammer, Tape measure, Framing square
Hammer, Tape measure, Framing square
![]() Miter saw, Drill machinery, Screwdriver, Sander
Miter saw, Drill machinery, Screwdriver, Sander
Time
Related
It’s that easy to build a lemonade stand!
Building a lemonade stand

Building a lemonade stand
Top Tip: Building a lemonade stand is a great way to entertain your kids and to involve them in an easy woodworking project. Follow the step by step instructions and adjust the design of the stand, if you want to get the job done in less than a day.
Lemonade Stand Plans

Building the frame
The first step of the project is to build the frame of the lemonade stand. In order to get a professional result, we recommend you to use 2×2 lumber and 2 1/2″ wood screws. Always align the pieces of lumber at both ends, before drilling pocket holes and inserting the screws.
Use a carpentry square to check if the corners are right-angled before continuing the woodworking project.
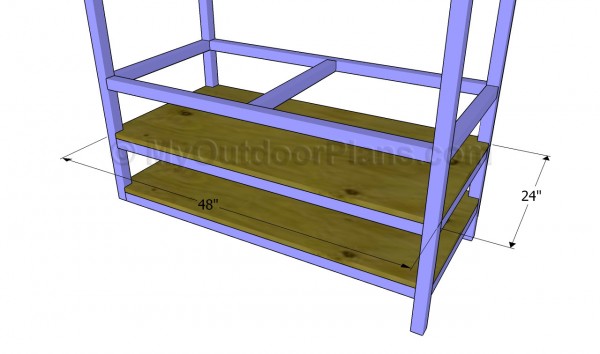
Fitting the plywood shelves
The next step of the project is to install 1/4 – 3/4″ plywood shelves. If you want to get a professional result, we recommend you to cut small notches, as to fit around the corner posts.
Top Tip: Secure the shelves on top of the frame and secure them into place with 1 1/4″ galvanized screws. Don’t forget to check if the shelves are flush with the exterior edges of the frame, before inserting the screws.
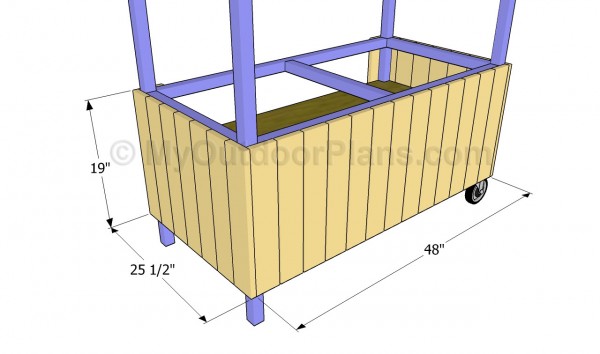
Fitting the side slats
Continue the construction of the lemonade stand by fitting the exterior slats. In order to get a professional result, we recommend you to place the 1×4 slats to the frame and lock them into place with 1 1/4″ screws, after drilling pilot holes.
Don’t forget to countersink the head of the screws, if you want to get a professional result. Place the slats equally spaced, in order to get a lemonade stand with a symmetrical look.

Installing the top of the stand
Installing the countertop of the stand is not difficult, if the right plans and tools are used. Cut the slats at the right size and secure them to the frame with galvanized screws.
As you can easily notice in the image, you need to cut small notches in the slats, otherwise they won’t fit around the 2×2 posts. Drill pilot holes and countersink the head of the screws, if you want to get a professional result.
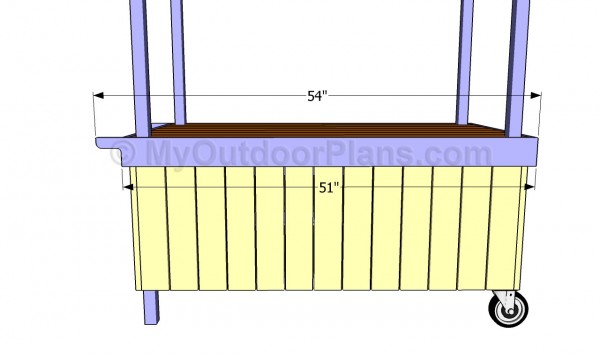
Fitting the trims
It is also essential to fit 1×4 trims to the exterior of the counter-top, in order to enhance the look of your woodworking project. As you can notice in the image, you should cut out handles at one end of the trims. In this manner, you can lift the stand and move it to a new location easily.
Secure the trims to the slats with 1 1/4″ finishing nails. In addition, make sure the top of the trims are flush with the counter-top slats.
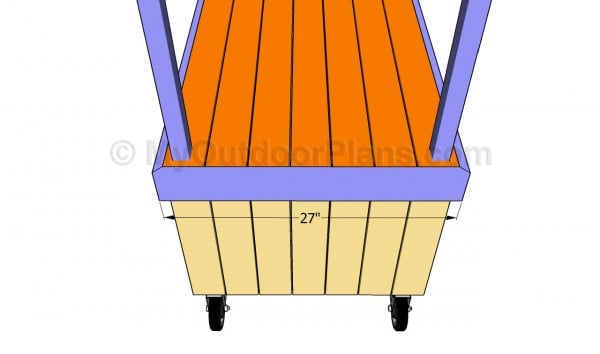
Countertop trims
Continue installing the trims to the counter-top, using the step by step plans. In addition, miter cut the ends of the trims at 45º, as to get accurate joints.
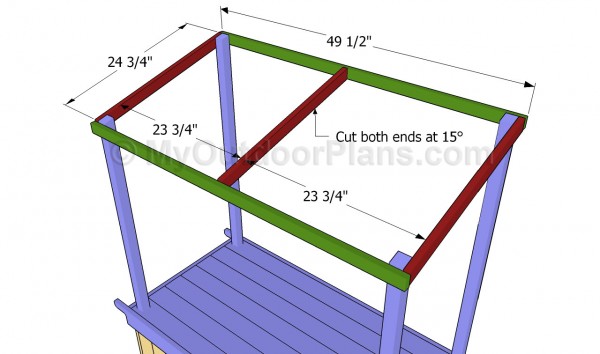
Building the roof frame
Building the frame of the roof doesn’t require too many materials or complex woodworking skills. From our experience, any person can get the job done in just a few minutes, if you have all the materials at hand.
Use 1×2 slats to build the frame of the roof, as in the image. Cut the ends of the slats at 15º and attach them to the 2×2 legs. Continue by fitting the front and the back frames, as well as the middle component.

Installing the roof sheet
Cut a small sheet of plastic roofing (52″ x 28″) and secure it into place with several screws. Work with attention and with great care, otherwise you might damage the sheet. Drill pilot holes trough the plastic sheet, before securing it to the frame.
Top Tip: Moreover, center the sheet into place, otherwise the lemonade stand won’t have a nice look. You can also use metal sheets or other materials, but make sure you don’t use heavy materials.
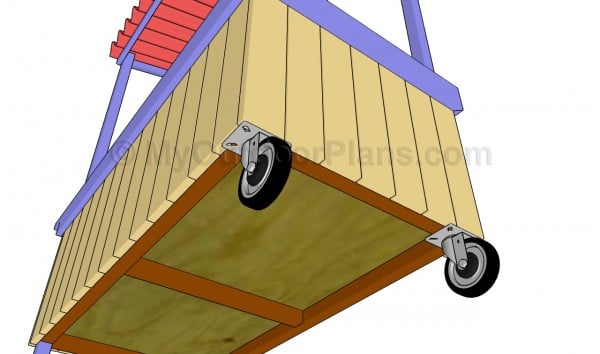
Fitting the casters
Fit the casters to the frame of the lemonade stand, using the appropriate screws (usually 1/4″ lag screws). Make sure you place the casters properly, in order to avoid the screws that hold the frame locked together.

Back view
You can see in the image the lemonade stand seen from the back. If you want to fit a cooler box on the top shelf, you should consider cutting a small holes in the countertop. In this manner, you will have a good access to the storage box.

Lemonade stand plans
Last but not least, you should take care of the finishing touches. Therefore, fill the holes with wood putty and let the compound to dry out for several hours. Smooth the surface with medium-grit sandpaper along the wood grain.
Top Tip: Apply several coats of stain or paint to enhance the look of the outdoor storage box and to protect the components from decay. Check out the rest of the project, to how how to build the deck stair rails.
If you want to get this plan as a PDF file with 1 full Cut list and 1 full Shopping list, please take a look over the GET PDF PLANS bellow. Thank you for your support!
This project was about lemonade stand plans. If you want to see more outdoor plans, we recommend you to check out the rest of the projects. Don’t forget to share our projects with your friends, by using the social media widgets.

