This step by step diy project is about flower box plans. If you like flowers and you want to enhance the look of you garden or windows, you should consider building a beautiful planter, using common materials and basic tools. Any person that knows the basic woodworking skills can get the job done in several hours, as you just need to cut the components and to join them with screws or nails.
There are certain things you should take into account if you want to get a professional result. First of all, we recommend you to choose weather-resistant wood, such as cedar, redwood or pine. In addition, if you are willing to invest in quality materials, you flower box will also have a beautiful look. Pre-drill the components before inserting the wood screws, to prevent the wood from splitting. See all my Premium Plans HERE.
Projects made from these plans
Cut & Shopping Lists
- A – 4 pieces of 2×2 lumber – 10 1/2” long CORNER POSTS
- B – 6 pieces of 1×4 lumber – 36” long, 6 pieces of 1×4 lumber – 10 1/2” long FRAMING
- C – 2 pieces of 1×4 lumber – 31 1/2” long, 8 pieces of 1×4 lumber – 10 1/2” long BOTTOM
- D – 2 pieces of 1×2 lumber – 37 1/2” long, 2 pieces of 1×2 lumber – 9 3/4” long TRIMS
Tools
![]() Hammer, Tape measure, Framing square
Hammer, Tape measure, Framing square
![]() Miter saw, Drill machinery, Screwdriver, Sander
Miter saw, Drill machinery, Screwdriver, Sander
Time
Related
Building a flower box
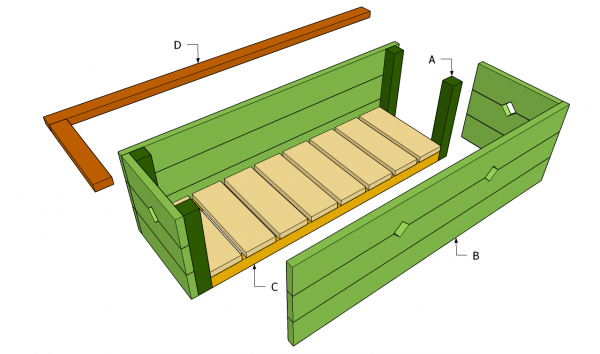
Building a flower box
Building a flower box is an easy woodworking project, ideal for woodworking beginners. Although there are many plans and designs you could choose from, we show you a straight forward project, that requires common materials and basic woodworking skills.
Top Tip: In order to enhance the look of the flower box, you should round the exposed edges of the trims, using a router and a 1/4” bit.
Flower box plans
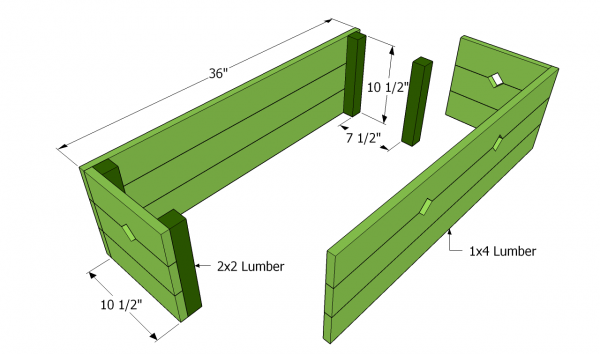
Assembling the flower box
The first step of the project is to assemble the frame of the flower box. As you can see in the image, you need to cut the 1×4 slats at a proper size and lock them together to the 2×2 corner posts.
In order to get rigid joints, we recommend you to drive in 2” wood screws trough the interior of the flower box, after drilling pilot holes. Check if the corners are right-angled, using a carpentry square.
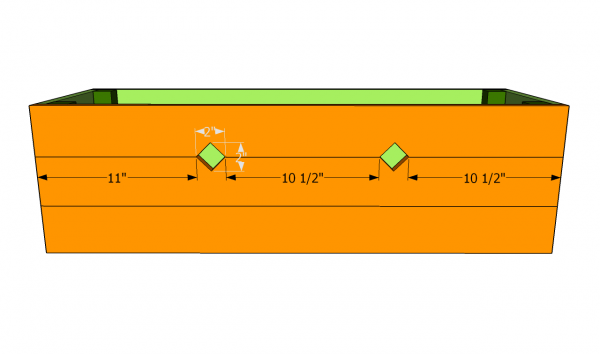
Side view
If you want to enhance the look of the flower pot, we recommend you to cut out several shapes on the front and side faces of the flower box. Use a jigsaw to cut out the rhombs , as in the image. Smooth the cut edges with a fine-grit sanding block.
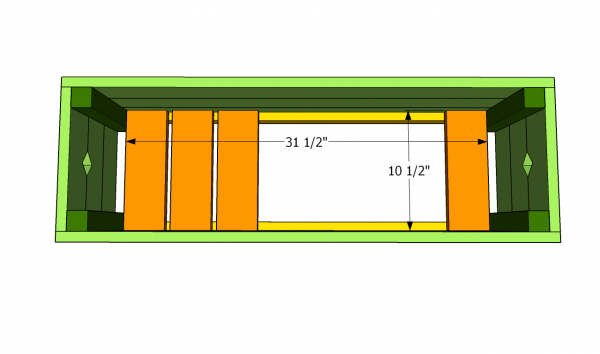
Fitting the bottom of the box
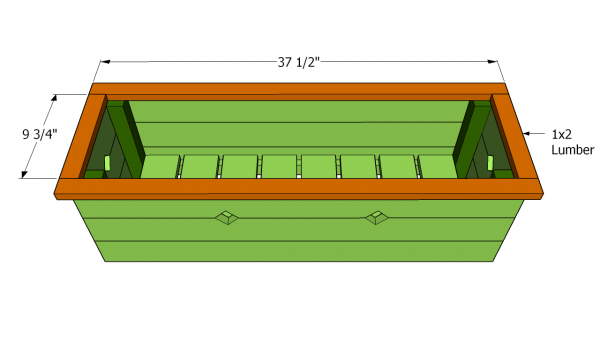
The next step of the woodworking project is to build the bottom of the flower box. As you can see in the image, you need to attach two 1×2 wooden pieces to bottom of the front and back faces of the flower planter.
Top Tip: Attach 1×4 slats over the cleats, as in the plans and secure them into place with 1 1/4” galvanized screws. Make sure you place the slats equally spaced, leaving between them about 1/4”.
Installing the trims
Cover the top edges of the flower box with 1×2 trim, as in the image. If you want to enhance the look of the planter and to get a neat design, we strongly recommend you to fit them into place. Use finishing nails to secure the trims into place after aligning them with attention.
Top Tip: As we have already pointed out, round the exposed edges of the trims with a router or make them smooth with a sanding block.
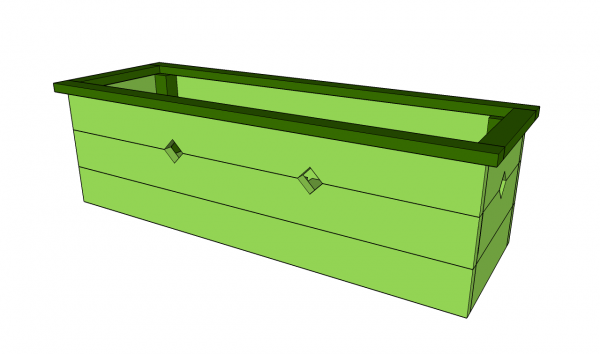
Flower box plans
Last but not least, you need to take care of the final touches. As you might imagine, you have to fill the holes and the cracks with wood filler. Let the compound to dry out for several hours, before smoothing the surface with 120-grit sandpaper.
Top Tip: Apply several coats of stain or paint to protect the wooden components from decay. Place the posts in the flower box and enjoy the result of your work.
This project was about flower box plans. If you want to see more outdoor plans, we recommend you to check out the rest of the projects. Don’t forget to share our projects with your friends, by using the social media widgets.


2 comments
Hi, this plan seems simple and easy. This is good because I have never done a woodworking project before and will probably screw this up to some level anyway. So hopefully it won’t be totally useless when I get done.
I would like to modify it however, as I would like to make it larger and put a cover on top and use it as a bench, so then basically it is a covered box.
And then I would like to put a couple holes on the sides so it is a decorative bench that my outdoor cats could use for shelter when it is cold or raining or both.
I would need the top of the bench to be able to be slightly tilted up so when it rains, the rain would run off. I am thinking a cover with hinges and a locking metal arm to be able to keep the lid at an angle and then put it down flat when the weather is not rainy so it can be a nice seat.
Is this do able?
Or maybe I don’t need the top to be tilted. I just need to make sure that it doesn’t leak.
Thanks for any help or advice anyone can give me. 🙂
Anything is doable, but why don’t you want to build a separate cat house. Something like this http://myoutdoorplans.com/cat/cat-house-plans/ or this http://myoutdoorplans.com/animals/outdoor-cat-house-plans/ If you are a beginner to DIY projects you will find it more rewarding to start with smaller projects, instead of complex metal arms with locking mechanisms.