This step by step project is about simple shed roof plans. This article features detailed plans for building a basic roof for a 6×6 shed. If you want to spend as little as possible in terms of money and time when building a shed roof, we recommend you to pay attention to the instructions described in the article. Adjust the size and the slope of the shed roof to suit your needs, especially if you live in an area rich in precipitations.
There are several aspects that any person should take into account before starting the woodworking project. First of all, you need to use weather-resistant lumber, such as cedar, pine or redwood. Drill pocket holes at both ends of the components, if you want to lock them together tightly. In addition, add wood glue to the joints and check if the corners are right-angled. Plan everything from the very beginning, if you want to get a professional result. See all my Premium Plans HERE.
Projects made from these plans
Simple Shed Roof Plans
Building-a-simple-shed
Cut & Shopping Lists
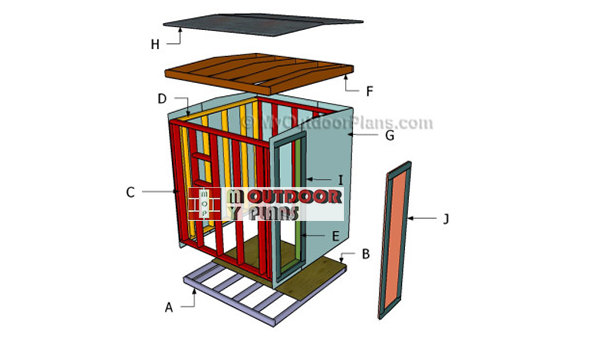
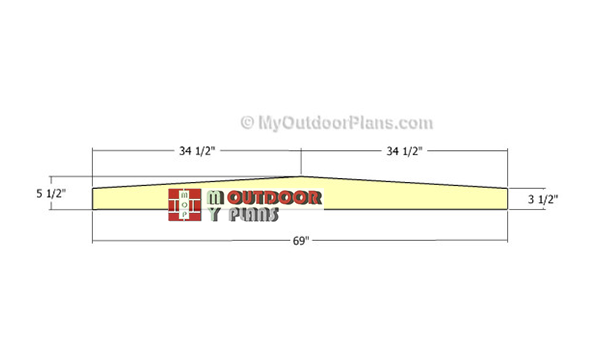
- F – 6 pieces of 2×6 lumber – 69″ long, 2 pieces of 2×4 lumber – 72″ long RAFTERS
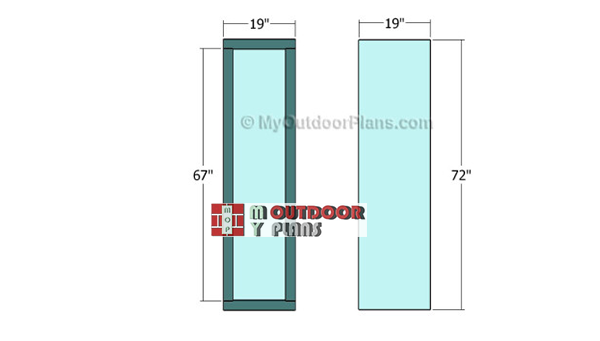
- G – 2 piece of 5/8″ siding – 48″ x 82 3/4″, 2 pieces – 24″x82 3/4″, 2 pieces – 48″x84 3/4″, 2 pieces – 24″x84″ SIDING
- H – 2 piece of 3/4″ plywood – 40″ x 84″ long, 60 sq ft of tar paper and shingles ROOF
- I – 2 piece of 1×3 lumber – 72″ long, 2 pieces – 24″ long JAMBS
- J – 2 piece of 1×3 lumber – 65″ long, 2 pieces – 72″ long, 1 piece of 5/8″ siding – 19″x72″ long DOOR
- 6 pieces of 5/8″ T1-11 siding – 4’x8′
- 3 pieces of 2×6 lumber – 12 ft
- 1 piece of 2×4 lumber – 12 ft
- 2 pieces of 3/4″ plywood – 4’x8′
- 6 pieces of 1×3 lumber – 8 ft
- 60 sq ft of tar paper & asphalt shingles
- 1 5/8″ screws
- 2 1/2″ screws
- wood glue
- wood filler
- wood stain
Tools
![]() Hammer, Tape measure, Framing square, Level
Hammer, Tape measure, Framing square, Level
![]() Miter saw, Drill machinery, Screwdriver, Sander
Miter saw, Drill machinery, Screwdriver, Sander
Time
![]() One day
One day
Related
- Part 1: Simple shed plans
- Part 2: Simple shed roof plans
Building a simple shed roof
Building-the-rafters
The first step of the woodworking project is to build the rafters for the roof of the 6×6 shed. In order to get a professional manner, we recommend you to mark the cut lines on the 2×6 lumber and to get the job done with a circular saw.
Top Tip: You could adjust the angle of the rafters to suit your needs. Smooth the cut edges with sandpaper and remove the residues with a vacuum cleaner.

Attaching the roof
After building the rafters for the shed roof, assemble the structure and to secure it to the top plates. Cut the side rafters out of 2×4 lumber and drill pilot holes before inserting the 2 1/2″ screws into the rafters. Place the rafters equally-spaced and make sure the corners are square.
Leave no gaps between the components and add glue to enhance the joints. Drill pilot holes through the side components and insert 2 1/2″ screws into the plates.

Attaching the exterior side walls
After assembling the structure of the shed, we recommend you to attach the exterior siding to the construction. In order to get a professional result, we recommend you to use 5/8″ T1-11 siding. Mark the cut lines on the sheets and get the job done with a circular saw.
Attach the sheets to the wall frames and make sure the edges are flush. Afterwards, secure the sheets into place by using 1 1/4″ finishing nails along the studs.

Attaching the back exterior wall
Mark the cut lines on the plywood sheets and use a saw to make the cuts. Smooth the edges with sandpaper in order to get a professional result. Attach the siding to the exterior of the walls and insert 1 1/4″ screws to lock it to the studs and wall plates. Leave no gaps between the components and make sure the edges are flush.

Attaching the front exterior wall
Next, attach the siding to the front face of the shed. Make sure you cut out the door opening and store the excess material attentively, as you will need it when assembling the door. Secure the siding to the frames by using 1 1/4″ screws and waterproof glue.

Fitting the roofing sheets
After attaching the siding to the exterior of the shed structure, we recommend you to install the roofing sheets. In order to get the job done in a professional manner, we recommend you to cut the roofing sheets out of 3/4″ plywood. Smooth the cut edges with sandpaper and remove the residues with a vacuum.
Center the plywood sheets to the roof and secure them to the rafters by using 1 1/4″ screws. Leave no gaps between the components and make sure the overhangs are enough to drain the water properly.

Fitting the roofing
In order to get the job done in a professional manner, we recommend you to cover the roofing sheets with tar paper. Install the tar paper starting with the bottom of the roof and make sure the strips overlap for at least 2″. In addition, fit a 12” strip over the top ridge.
Install the shingles starting with the left- bottom of the roof, after fitting the starting course. See more about fitting the shingles here. Use roofing tacks to secure the shingles into place.
Building-the-door-for-shed
Next, build the door for the 6×6 shed. As you can notice in the diagram, we recommend you to use the piece of siding that was cut out in the previous steps. Smooth the edges with sandpaper and cut the trims out of 1×3 lumber.
Lay the 1×3 trims to the door panel, making sure there are no gaps between the components. Check if the edges are flush and add glue to the joints. Insert 1 1/4″ finishing nails to create a rigid bond between the components.

Fitting the door jambs
In order to secure the door of the shed into place, you need to fit 1×3 trims around the door opening. Take accurate measurements and secure the door jambs to the shed by using 2″ finishing nails and waterproof glue. Align the components at both ends and check if the edges are flush.
Secure the hinges to the door and fit it inside the door opening. Make sure the door opens properly and lock it into place by using a door latch.

Fitting the window trims
If you want to enhance the look of the simple shed, we recommend you to fit 1×3 trims around the window opening. Use 2″ finishing nails and waterproof glue to secure the trims into place properly. Leave no gaps between the components and make sure the edges are flush.

Simple shed plans
Last but not least, you should take care of the finishing touches. Therefore, fill the holes with wood putty and let the compound to dry out for several hours. Smooth the surface with medium-grit sandpaper along the wood grain.
Top Tip: Apply several coats of stain or paint to enhance the look of the 6×6 shed and to protect the components from decay. Check out the rest of the project to see how to build the frame of the shed.
This project was about simple shed roof plans. If you want to see more outdoor plans, we recommend you to check out the rest of the projects. LIKE us on Facebook to the the first that gets our latest projects and send us pictures with your woodworking projects.

EXPLORE MORE IDEAS FOR:
 |
 |
 |
 |