This step by step diy project is about wooden mailbox plans. Building a wood mailbox for your yard is a fun project that can be done by anyone, if the right plans, tools and materials are used. Always adjust the size of the mailbox to your needs, before starting the construction. Don’t forget to take a look on the rest of the project, to see how to build the posts for the mail box.
As you will see in the project, we show you basic plans for a wooden mailbox. If you want to build a durable construction with a nice appearance, we recommend you to invest in quality materials, such as cedar, pine or redwood. Always pre-drill the components before inserting the screws/nails, in order to prevent the wood from splitting. Add waterproof glue to the joints, in order to create a rigid structure. See all my Premium Plans HERE.
Projects made from these plans
Cut & Shopping Lists
- A – 1 pieces of 1×8 d – 6×16 3/4” long BASE
- B – 2 piece of 1×10 lumber – 16 3/4×8 1/4″ long SIDES
- C – 2 pieces of 1×8 lumber – 11 1/4″ long FACES
- D – 1 pieces of 1×8 lumber – 6″ long DOOR
- E – 2 pieces of 1×8 lumber – 17 3/4″ long ROOF
Tools
![]() Hammer, Tape measure, Framing square
Hammer, Tape measure, Framing square
![]() Miter saw, Drill machinery, Screwdriver, Sander, Post-hole digger
Miter saw, Drill machinery, Screwdriver, Sander, Post-hole digger
Time
![]() One weekend
One weekend
Related
- Part 1: Wooden Mailbox Post Plans
- Part 2: Mailbox Post Plans
Building a wooden mailbox
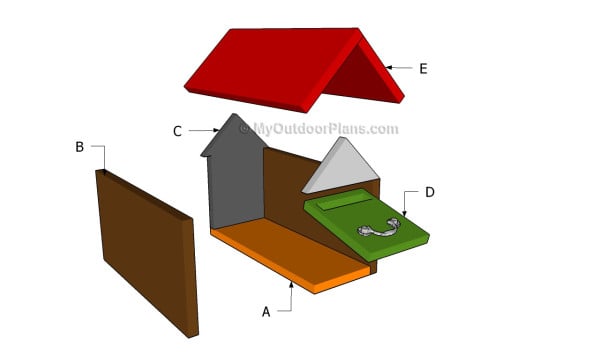
Building a wooden mailbox
Top Tip: Building a wooden mailbox by yourself is a fun weekend project, but in the same time it will also add value to your property. There are many designs that you could choose from, but in this project we show you how to build a house-shaped mailbox.
Wooden Mailbox Plans
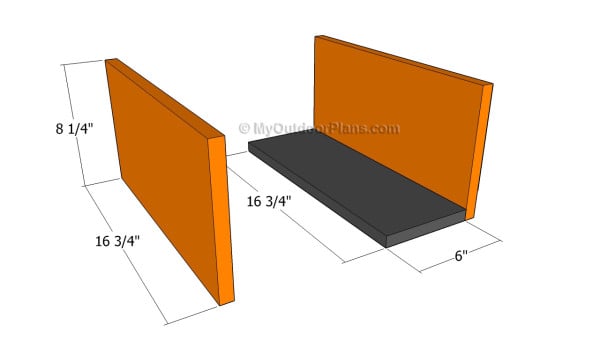
Building the frame of the mailbox
The first step of the woodworking project is to build the frame of the mailbox. As you can see in the image, you need to use 1×8 lumber and adjust the slats to the size shown in the plans.
Top Tip: Add the side components to the base, align them at both ends and apply waterproof glue to the joints. Drill pilot holes tough the side walls and insert finishing nails, in order to create rigid joints.
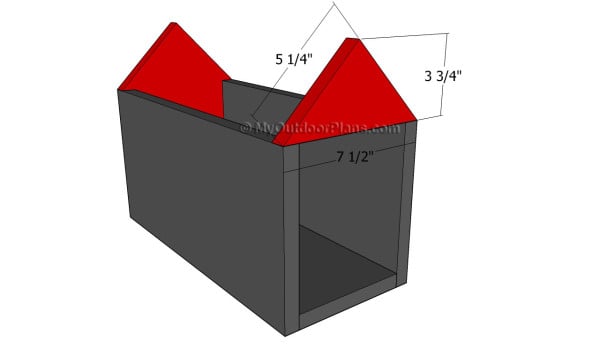
Building the gable front face
The next step is to build the front and the back faces of the mini-house mailbox. As you can see in the image, you need to leave an opening to the front face of the mailbox, as you have to fit the sliding panel.
Top Tip: Mark the cut lines on the piece of 1×8 lumber and use a good saw to get the job done as accurately as possible (cut at 45º). Smooth the cut edges with sandpaper.
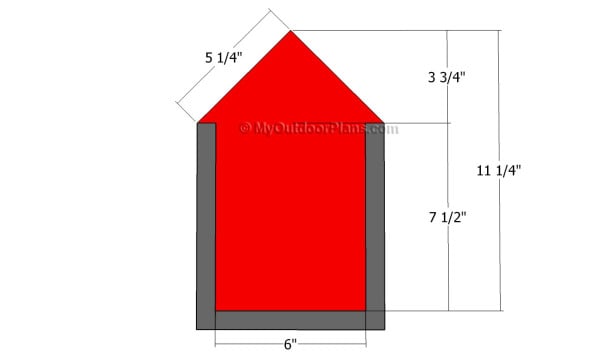
Building the gable back face
Building the back face of the mailbox is similar to the previous step, but you need to make a component that closes the gap between the side walls. Cut the piece of wood out of 1×8 lumber and fit into place.
Apply waterproof glue to the edges and insert 1 1/4″ finishing nails trough the side walls into the component.
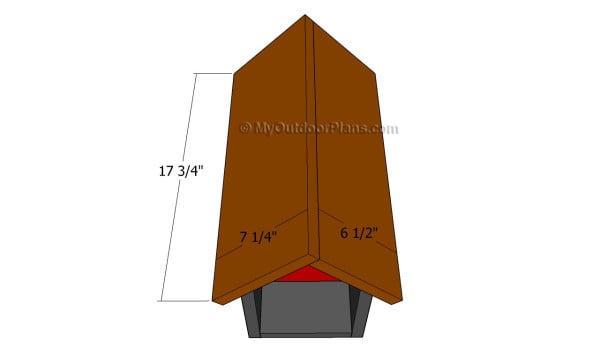
Attaching the roof
The next step of the woodworking project is to build the roof of the mail box. Therefore, we recommend you to build the two components of the roof out of 1×8 lumber.
Top Tip: Align the components at both ends, apply waterproof glue to the joints and insert 1 1/4″ finishing nails trough the roof into the gable ends. Make sure the top of the roof is perfectly horizontal, before driving the nails in.
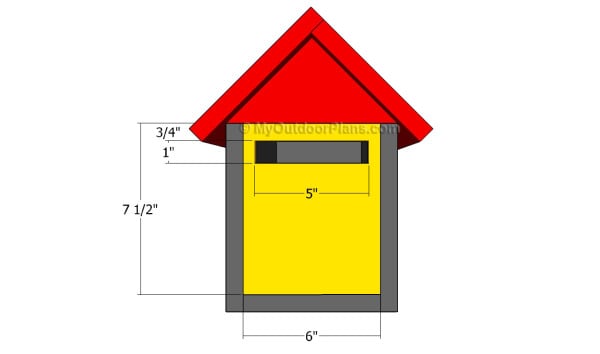
Building the front door
Afterwards, we recommend you to build the front face of the mailbox. There are several choices for the door, as you could attach it with hinges to the side wall, or you could secure it with nails on both sides (it will slide).
Cut the piece of lumber at the right size and cut out the small piece of wood inside the panel, as in the image. Adjust the notch according to your needs and use a jig saw to get the job done.

Attaching the handle
Smooth the cut edges of the door until it fits easily int0 place. Next, drill pilot holes through the side walls (slightly larger than the nails) and insert the nails. We strongly recommend you not to insert the nail up to the face of the wood.
In this manner, you can remove the nails and the front panel, as to clean the inside of the mailbox. Fit the handle as well as a latch (to the bottom) to the structure. Work with attention and check if the components are inserted properly.
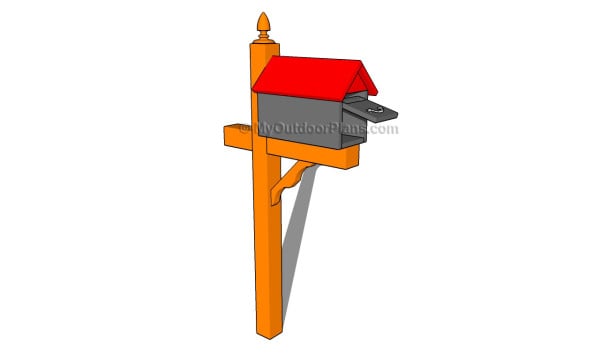
Wooden mailbox plans
Last but not least, you have to take care of the finishing touches. Therefore, fill the holes and the cracks with wood filler and let it dry out for several hours, before sanding the surface with 120-grit sandpaper. Don’t forget to caulk the gaps between the components to make the mailbox waterproof.
Top Tip: Protect the wooden components from rot by applying several coats of paint. We strongly recommend you to check out the rest of the project, about building the support for the wood mailbox.
This woodworking project was about wooden mailbox plans. If you want to see more outdoor plans, we recommend you to check out the rest of our step by step projects.


6 comments
Great plans
Thank you. Looking forward to seeing your projects.
I THINK YOUR PLANS ARE AWESOME!
Thank you. I m looking forward to seeing your projects.
Looks terrific, as date would have it, someone in my neighborhood hit my mailbox and turned it to splinters. So I decided to make my own replacement, searched online for some plans and came across this. I’m going to try and build it this week in my garage. I’ll let you know how it comes out.
Good luck. Looking forward to that