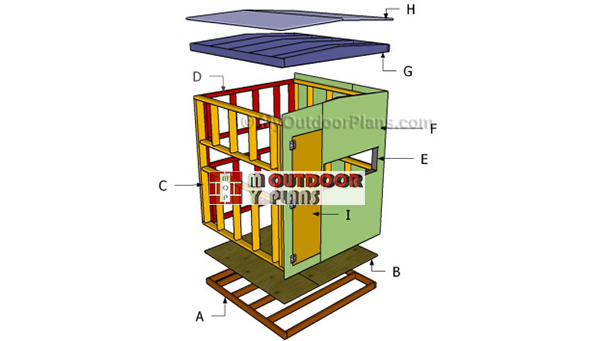
This step by step project is about building deer blind roof. After building the frame of the 6×6 deer blind, we recommend you to consider building the roof and the door. Fit the components into place accurately and secure everything tightly. You should adjust the slope of the roof, according to the area where you want to use it. cover the components with waterproof paint to protect the components from moisture.
There are several aspects that any person should take into account before starting the woodworking project. First of all, you need to use weather-resistant lumber, such as cedar, pine or redwood. Drill pocket holes at both ends of the components, if you want to lock them together tightly. In addition, add wood glue to the joints and check if the corners are right-angled. Plan everything from the very beginning, if you want to get a professional result. See all my Premium Plans HERE.
Projects made from these plans
Building a Deer Blind Roof
Building-a-deer-blind
Cut & Shopping Lists
- G – 6 pieces of 2×6 lumber – 69″ long, 2 pieces of 2×4 lumber – 72″ long RAFTERS
- H – 2 piece of 3/4″ plywood – 36 3/4″ x 73 1/2″ long ROOF
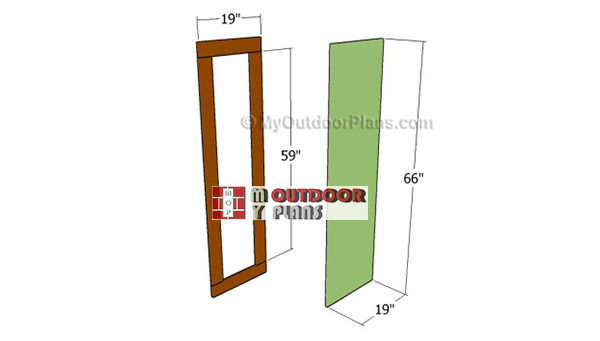
- I – 2 piece of 1×4 lumber – 19″ long, 2 pieces – 59″ long, 1 piece of 3/4″ plywood – 19″x66″ long DOOR
- 6 pieces of 2×6 lumber – 8′
- 2 pieces of 2×4 lumber – 8′
- 2 pieces of 3/4″ plywood – 4’x8′
- 3 pieces of 1×4 lumber – 8′
- 100 pieces of 2 1/2″ screws
- 200 pieces of 1 5/8″ screws
- metal connectors
- 500 pieces of 1 5/8″ screws
- 500 pieces of 2 1/2″ screws
Tools
![]() Hammer, Tape measure, Framing square
Hammer, Tape measure, Framing square
![]() Miter saw, Drill machinery, Screwdriver, Sander
Miter saw, Drill machinery, Screwdriver, Sander
Time
Related
Part 1: Deer Blind Plans
Part 2: Building a deer blind roof
Building a Deer Blind Roof
Building-the-rafters
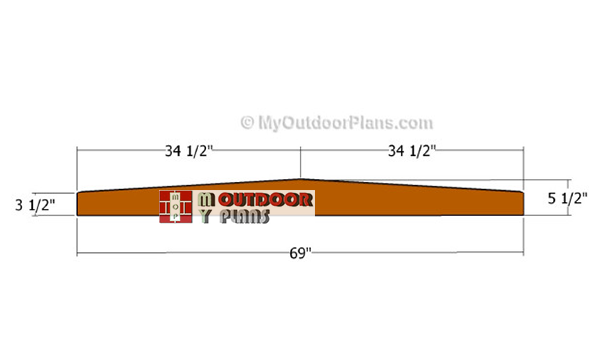
The first step of the outdoor project is to build the rafters for the deer blind. As you can easily notice in the diagram, we recommend you to build the rafters out of 2×6 lumber. Mark the cut lines on the slats and get the job done with a circular saw.
Smooth the cut edges with sandpaper and repeat the process for the rest of the components. Make sure you cut the rafters perfectly straight using a sharp blade.
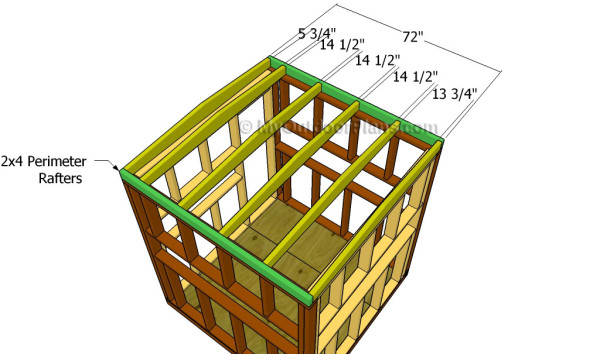
Next, we recommend you to assemble the structure of the roof. Drill pilot holes through the perimeter rafters and insert 2 1/2″ screws into the regular rafters. Place the rafters equally-spaced and leave no gaps between the components.
Lay the rafters over the wooden structure and secure them to the top plates by using 2 1/2″ screws. Leave no gaps between the components and make sure the edges are flush.
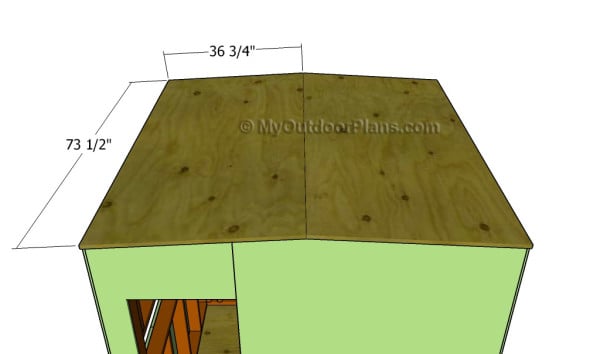
Afterwards, attach the 3/4″ plywood roofing sheets over the rafters and secure them into place. Cut the plywood sheets at the right size and align them at both ends.
Top Tip: Drill pilot holes through the 3/4″ plywood sheets, to prevent the wood from splitting. Insert 1 1/4′ screws into the rafters, every 8″ and make sure you leave no gaps between the plywood sheets and the rafters.
Building-the-door-for-deer-stand
One of the last steps of the woodworking project is to build the door for the deer blind. In order to get a professional result, we recommend you to use the piece of 3/4″ plywood that you have cut out previously.
Build the frame of the door out of 1×4 lumber, as described in the diagram. Drill pocket holes at both ends of the vertical components and insert 1 1/4″ screws into the top components. Attach the door panel to the frame using 1 1/4′ screws.
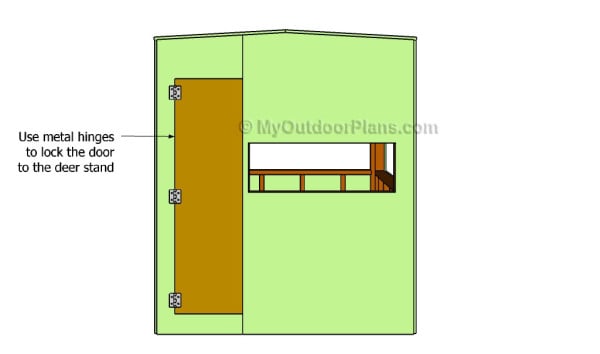
Fit the door into the opening and secure it into place by using several metal hinges. Make sure all the components are aligned with great care and fit a latch to close the door properly.
Top Tip: Leave no gaps between the door and the deer blind frame. Apply a few coats of camouflage waterproof paint over the components, to protect them from moisture and to enhance the look of the structure.
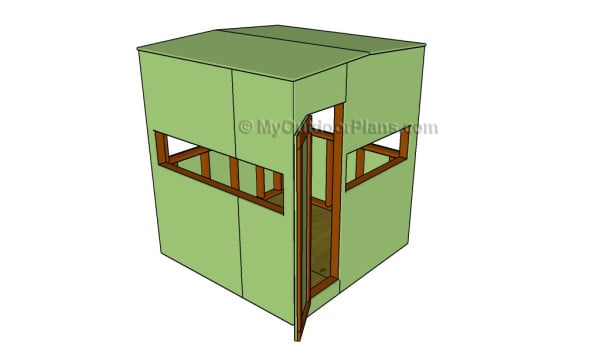
Last but not least, you should take care of the finishing touches. Therefore, fill the holes with wood putty and let the compound to dry out for several hours. Smooth the surface with medium-grit sandpaper along the wood grain.
Top Tip: Apply several coats of stain or paint to enhance the look of the deer stand and to protect the components from decay. Check out the rest of the projects to see how to build the frame of the hunting blind.
This project was about building a deer blind roof. If you want to see more outdoor plans, we recommend you to check out the rest of the projects. Don’t forget to share our projects with your friends, by using the social media widgets. LIKE us on Facebook to be the first that gets our latest updates.


10 comments
This is a good stand, and probably easy to build. My next project thanks for the insight.
Thank you Tommy! Can’t wait to see the results.
Seems a bit overbuilt for a deer stand. What are some changes that would lighten it a bit so it could be elevated to 15-20′ on a platform?
You could use 2x2s instead of 2x4s for the frame, if you want to reduce the weight. However, I don’t guarantee it will work.
To lighten this, buy 2 x 6’s instead of 2 x 4’s and rip them to make 2 x 3’s. This lightens it and saves cost. Plenty strong enough.
Thanks for the tip, B-Rad.
Hello
I’m thinking of building this blind! Question: Why doesn’t the plywood roof have an overhang? Am I missing something?
thanks,
It’s just my design. I don’t see any point in adding the overhang, since it’s a deer blind. However, you can add the overhangs to it with minimal overhangs.
The overhang helps to insure the rain drips away from the blind
How do I print these plans? I want to build this on the land I hunt on, and I don’t think it is a good idea to have my laptop in the field with me when I assemble it. Lol. Thanks