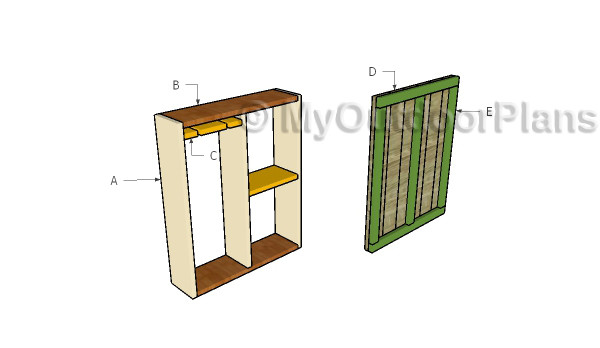
This step by step diy project is about flip down murphy bar plans. I have designed this folding bar so that you can use the space efficiently and add some rustic appeal to your backyard. It is a basic box which can be transformed easily into a bar table. This is a beginner friendly project as it only requires some cuts and inserting a few screws. Moreover, you can easily adjust the size of the outdoor bar, so that it suits your needs. Take a look over the rest of our woodworking plans, if you want to get more building inspiration.
When buying the lumber, you should select the planks with great care, making sure they are straight and without any visible flaws (cracks, knots, twists, decay). Investing in cedar or other weather resistant lumber is a good idea, as it will pay off on the long run. Use a spirit level to plumb and align the components, before inserting the galvanized screws, otherwise the project won’t have a symmetrical look. If you have all the materials and tools required for the project, you could get the job done in about a day. See all my Premium Plans HERE.
Projects made from these plans
Flip Down Bar Plans
Building a murphy bar
Cut & Shopping Lists
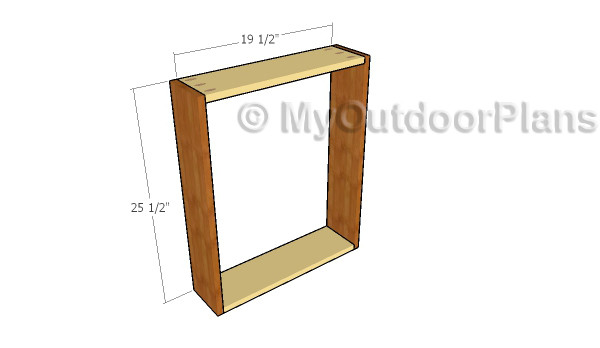
- A – 2 pieces of 1×6 lumber – 25 1/2″ long, 1 piece – 24″ long FRAME
- B – 2 pieces of 1×6 lumber – 19 1/2″ long FRAME
- C – 1 piece of 1×6 lumber – 9 1/4″ long, 1 piece – 9 3/4″ long PARTITIONS
- D – 6 pieces of 1×4 lumber – 25 1/2″ long PANEL
- E – 2 pieces of 1×2 lumber – 21″ long, 3 pieces – 22 1/2″ long TRIMS
- 2 pieces of 1×6 lumber – 8′
- 2 pieces of 1×4 lumber – 8′
- 2 pieces of of 1×2 lumber – 8′
- 100 pieces of 1 1/4″ screws
- 2″ brad nails
- folding hinges
- latch, knob, hinges
- wall brackets
- wood glue, stain/paint
Tools
![]() Hammer, Tape measure, Framing square, Level
Hammer, Tape measure, Framing square, Level
![]() Miter saw, Drill machinery, Screwdriver, Sander
Miter saw, Drill machinery, Screwdriver, Sander
Time
![]() One day
One day
Related
Fold down murphy bar plans
Assembling the frame for the bar
The first step of the project is to build the frame for the fold down bar. Cut the components from 1×6 lumber and smooth the cut ends with sandpaper. Drill pocket holes at both ends of the horizontal slats and insert 1 1/4″ screws into the vertical components. Make sure the corners are square and add glue to the joints. Make sure you place the horizontal slats with the pocket holes oriented to the outside of the bar frame.

Fit the partition
Fit a 1×6 partition to the frame of the bar. Use 2″ brad nails and glue to lock the slat into place. Use a carpentry square to make sure the corners are right-angled.
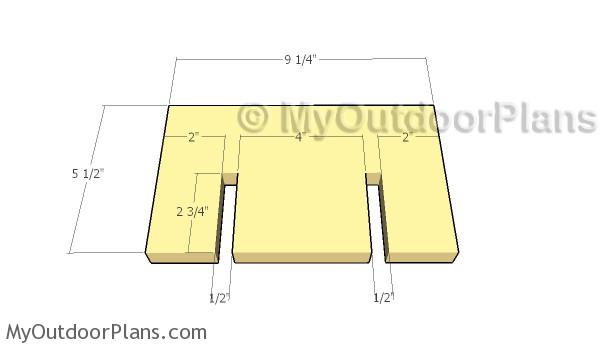
Building the wine rack support
Build a small rack for two wine glasses. Mark the cut lines and make the cuts with a jigsaw. Use a chisel to remove the excess and smooth the edges with sandpaper. If you want, you can make more grooves, but just take accurate measurements so your glasses will fit into place.

Fitting the partitions
Fit the wine glass rack to the frame of the bar. Leave 3/4″ from the top and secure the component into place with 2″ brad nails. Drive the nails through the frame of the bar, after making sure the corners are square and after aligning the edges flush. In addition, fit a partition to the right section of the fold down bar, so you can enhance the utilization of space.

Building the door panel
Build the flip down panel from 1×4 slats. Add glue to the joints, align the edges and clamp them together for several hours. Make sure the panel is level and perfectly horizontal. If you want to add extra appeal to the project, just slightly bevel the edges so you create small grooves between the slats.
It would be a good idea to paint or stain the panels now, before attaching the trims, especially if you want to go for a two color scheme.
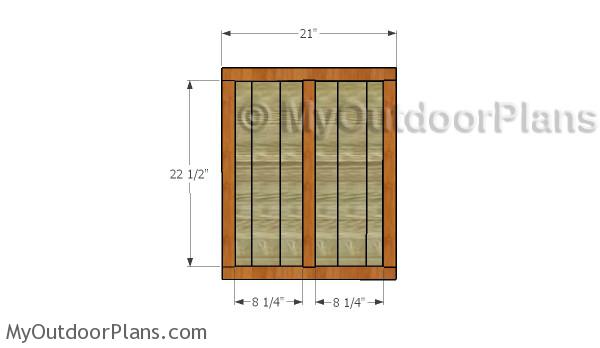
Fitting the trims
Attach 1×2 trims to the front panel. Use glue and 1 1/4″ brad nails to secure the trims to the panel. Make sure the edges are flush and leave no gaps between the components. Paint or stain the trims before fitting them into place, for a professional result.
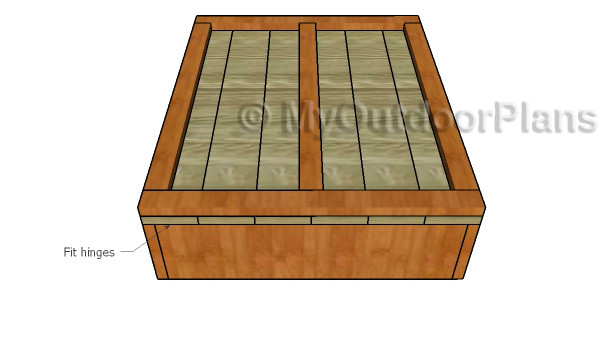
Fitting the hinges
Fit the lid to the bar frame and add hinges to the bottom, so you can open and close it easily. Use two hinges placed on the sides of the frame, as shown in the diagram.
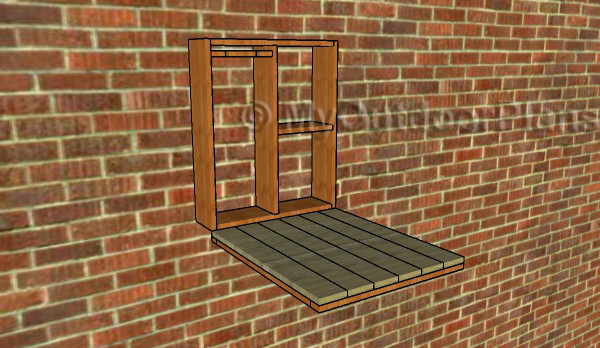
Flip down bar plans
One of the last steps of the project is to fit the folding hinges to the bar frame and to the front door. Use a spirit level so you make sure the table is perfectly horizontal, before securing the fold down hinges. In addition, you need to install a knob to the fold down panel and a latch, so it stays closed when needed. In addition, you need to use brackets to hang the murphy bar to the wall.
Use a spirit level before hanging the bar to the wall. It would be also a great idea to ask a friend to assist you, as the bar will get quite heavy after adding all the components. I personally love this design, as I find it an extremely easy project to make, but with a significant impact on the look of your backyard.

Fold down bar plans
This rustic project is both easy to build and highly functional. The best part is that you can build it for free, if you use pallet wood. In addition, there are so many potential uses for this project. You can use it as an outdoor bar, a fold down table or even as a garden work bench. Fill the holes with wood putty and smooth the surface thoroughly with sandpaper before applying the paint or stain coats.
This woodworking project was about flip down murphy bar plans free. If you want to see more outdoor plans, check out the rest of our step by step projects and follow the instructions to obtain a professional result.
EXPLORE MORE IDEAS FOR:
 |
 |
 |
 |
2 comments
On the initial box in step 1, the horizontal boards are listed at 19-1/2″, but the first divider inserted says that there should be 9-1/4″ on the left and 9-3/4″ on the right.
When you account for the divider, which is 3/4″ wide, the measurements do not seem to add up. It currently equals 19-3/4″. Either the width on the horizontals is off by 1/4″ or the measurements denoted on the sides of the divider are off.
That’s a very good observation. The interior width is 19 1/2″. The softer I use wasn’t set to measure 1/8″s, so that is why it rounded the size for the shelves.