This step by step wood woodworking project is about free deck char plans. Building a nice patio chair is a fun woodworking project, as you combine your skills with your imagination and create an unique piece of outdoor furniture. As you probably know, there are so many designs and plans to choose from, so you should thoroughly asses your needs, before choosing a shape that fits your tastes.
In order to get the job done in a professional manner, we recommend you to buy quality lumber, such as pine, cedar or redwood. In addition, check if all the slats are in condition and perfectly straight, before starting the project. Always align the components before driving in the screws and drill pilot holes in the lumber, to prevent the wood from splitting. Moreover, add glue to make the joints more rigid. See all my Premium Plans HERE.
Projects made from these plans
Cut & Shopping Lists
- A – 2 pieces of 2×4” lumber 21 3/4” – one end cut at 10º, the other end cut at 95º BACK LEGS
- A – 2 pieces of 2×4” lumber 20” – one end cut at 5º, the other end cut at 100º FRONT LEG
- B – 2 pieces of 2×4 lumber 20 1/4” – one end cut at 5º, the other end cut at 10º SUPPORTS
- B – 2 pieces of 2×4 lumber 26” – one end cut at 5º SUPPORTS
- C – 2 pieces of 2×4 28 3/4” long -one end cut at 20º BACK REST FRAME
- D – 2 pieces of 2×2 lumber – 19” long, 2 pieces of 2×2 lumber – 16” long BRACES
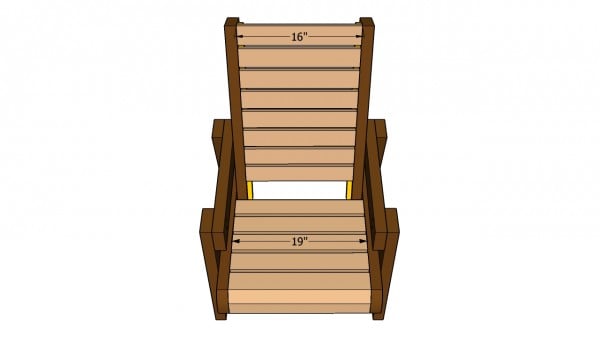
- E – 7 pieces of 1×3 lumber -19” long, 8 pieces of 1×3 lumber – 16” long SLATS
Tools
![]() Hammer, Tape measure, Framing square
Hammer, Tape measure, Framing square
![]() Miter saw, Drill machinery, Screwdriver, Sander
Miter saw, Drill machinery, Screwdriver, Sander
Time
![]() One day
One day
Free wood deck chair plans

Wood deck chair plans
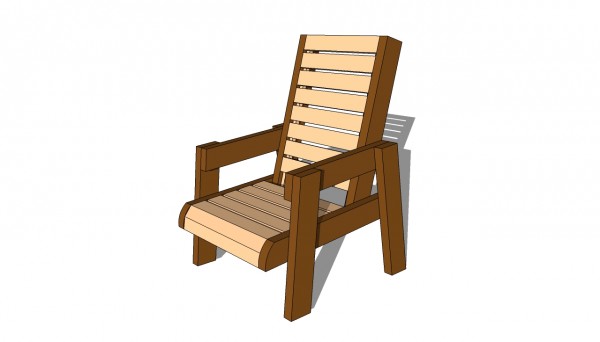
Building a free wood deck chair is nice project, as you can build something with your own hands and add value to your backyard. If you master the basic woodworking techniques, you can get the job done by yourself in just a weekend.
Top Tip: You should round the exposed edges of the deck chair with a router and a 1/4” bit. Alternatively, you could round the corners with a jigsaw and thoroughly sand the edges with a sand-block.
Deck chair plans
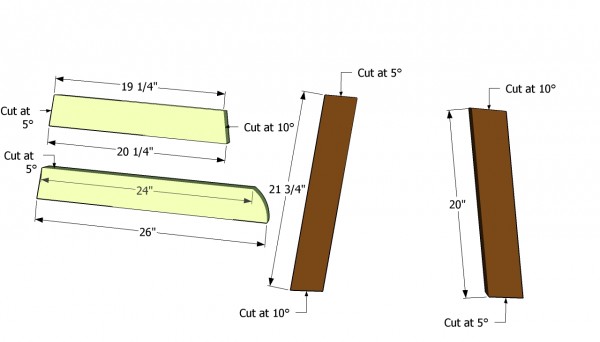
Legs and braces plans
The first step of the project is to build the wooden legs and the braces. In order to get the job done accurately, we recommend you to follow our plans and to use a good miter saw, as you have to make lots of angle cuts.
Top Tip: Use a jigsaw to round one end of seat support, as in the image. After cutting the components, you could also round the exposed edges with a router.
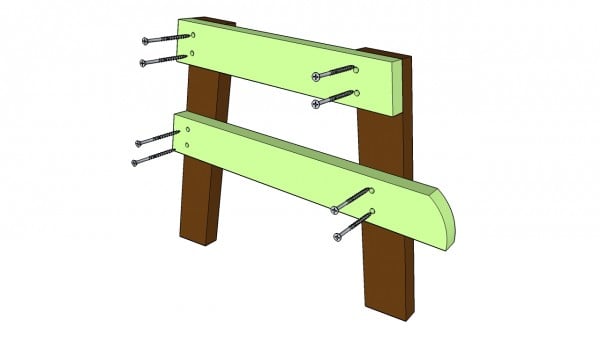
Building the sides of the chair
Next, align the components and secure them with screws. Don’t forget to pre-drill the braces before inserting the 2 1/2” screws into the legs. The bottom edge of the seat support should join the middle points of both legs.
Top Tip: Work on a level surface if you want to obtain consistent results. Add glue to enhance the bond of the joints, before driving in the wood screws.
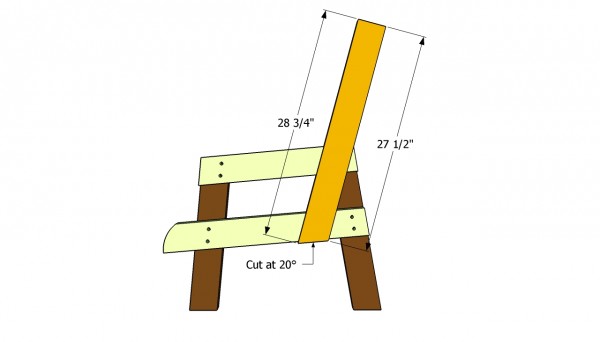
Installing the back rest
After building the sides of the deck chair, it’ time to make the back support frame and attach it into place. As you can see in the image, you should cut one end of the supports at 20º, using a miter saw or a circular saw and an angle tool.
Top Tip: Align the components properly, drill pilot holes and secure it to the seat support, as well as to the arm rest, with 2 1/2” stainless steel wood screws.
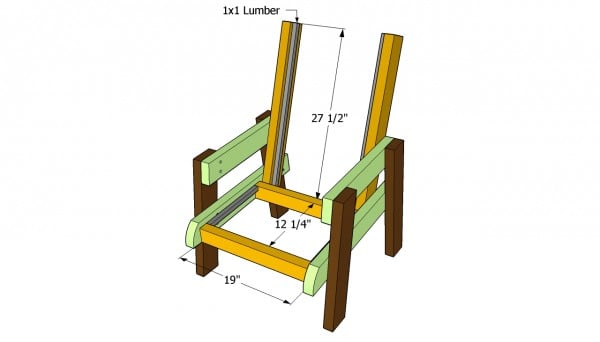
Attaching the supports
Next, you should join the two sides of the wood chair together, using 2×2 lumber. Before driving in the screws trough the seat supports into the components, you should plumb the sides of the chair and align the wooden elements at both ends.
Afterwards, don’t forget to attach the 1×1 cleats to the supports, about 3/4” from the top edges. Drive in 1 1/4” galvanized screws to secure the cleats into place tightly.
Installing the seat slats
Once the frame of the frame is ready and the cleats are attached into place, you should install the seat and backrest slats. As you can see in the image, the seat slats are a little wider than the backrest slats. Nevertheless, you should cut them from 1×3 lumber and attach them into place with 1 1/4” galvanized wood screws.
Drill pilot holes and countersink the head of the screws, before inserting the screws.
Deck chair plans
Last but not least, you should take care of the finishing touches. First, you need to fill the holes and the head of the screws with a good wood filler and let it harden properly for several hours. Next, sand the surface along the wood grain, using 120-grit sandpaper.
Top Tip: Clean the surface with a clean cloth, apply the primer and stain the chair to the desired color and finish.
This article was about deck chair plans free. If you want to see more garden projects, we recommend you to check out the rest of the plans.

2 comments
This looks like a fun and easy build but why is the seating area of the chair angled downward? Shouldn’t it be level or maybe slightly angled upward so you don’t slide down when you’re sitting?
It’s a 5 degree lean, you can change that if you dislike the design.