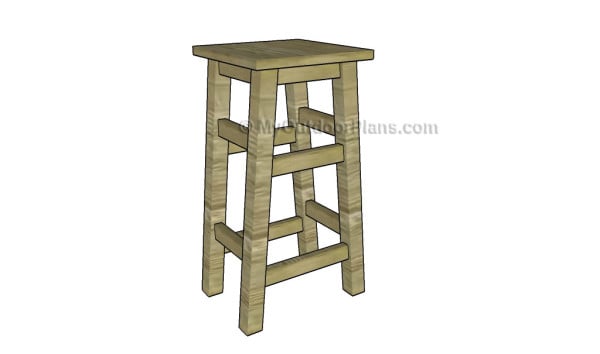
This step by step woodworking project is about footstool plans. This article features detailed instructions for building a beautiful footstool for your home. The best part of this project is that you can use it as an end table, as well. You can build the stool using 1×12 scrap, 2x2s and 1x12s. The total cost of the materials should be less than 15 dollars. We have designed the plans to keep the expenditures under control and to involve the least amount of work possible. It is an ideal project for a beginner.
When buying the lumber, you should select the planks with great care, making sure they are straight and without any visible flaws (cracks, knots, twists, decay). Investing in cedar or other weather resistant lumber is a good idea, as it will pay off on the long run. Use a spirit level to plumb and align the components, before inserting the galvanized screws, otherwise the footstool won’t have a symmetrical look. If you have all the materials and tools required for the project, you could get the job done in about a day. See all my Premium Plans HERE.
Projects made from these plans
Footstool plans

Building a footstool
[tabs tab1=”Materials” tab2=”Tools” tab3=”Time”]
[tab id=1]
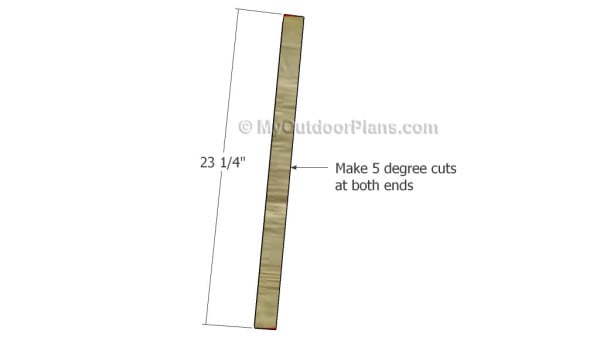
- A – 4 pieces of 2×2 lumber – 23 1/4″ long LEGS
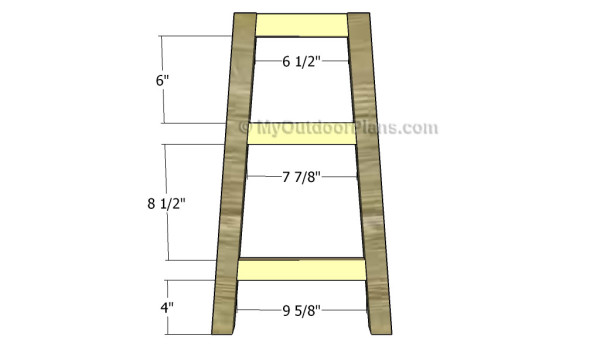
- B – 6 pieces of 1×2 lumber – 6 1/4″ long SUPPORTS
- C – 2 pieces of 1×2 lumber – 9 5/8″ long, 2 pieces – 7 7/8″ long, 2 pieces – 6 1/2″ long SUPPORTS
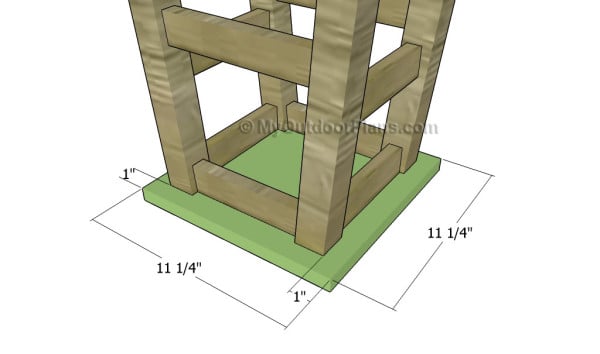
- D – 1 piece of 1×12 lumber – 11 1/4″ long SEAT
- 1 piece of 2×2 lumber – 8 ft
- 1 piece of 1×2 lumber – 10 ft
- 1 piece of 1×12 lumber – 1 ft
- 1 1/4″ screws
- 1 5/8″ screws
- 2 1/2″ screws
- filler, stain
- glue
[/tab]
[tab id=2]
![]() Hammer, Tape measure, Framing square, Level
Hammer, Tape measure, Framing square, Level
![]() Miter saw, Drill machinery, Screwdriver, Sander
Miter saw, Drill machinery, Screwdriver, Sander
[/tab]
[tab id=3]
![]() One day
One day
[/tab]
[/tabs]
How to build a footstool

Building the legs
The first step of the project is to build the 2×2 legs for the footstool. Cut both ends of the components at 85 degrees and smooth the edges with fine-grit sandpaper.

Building the supports
The next step of the project is to attach the supports to the legs. Drill pocket holes at both ends of the 1×2 supports and secure them to the legs using 1 1/4″ screws. Add glue to the joints and center the supports to the legs.

Fitting the supports
Next, you need to assemble the frame of the footstool. Build the components out of 1×2 lumber and drill pocket holes at both ends. Center the supports to the legs and lock them into place using 1 1/4″ screws. Add glue to the joints and check if the top surface is perfectly horizontal.

Attaching the seat
One of the last steps of the project is to attach the seat to the footstool. Use 1×12 lumber to build the seat and smooth the cut edges with fine-grit sandpaper. Center the frame of the stool to the seat, as described in the diagram. Drill pocket holes through the top supports and insert 1 1/4″ screws into the seat. Add glue to the joints. Alternatively, you could insert brad nails through the seat into the supports.

Footstool plans
One of the last steps of the woodworking project is to take care of the finishing touches. Therefore, fill the pilot holes with wood putty and smooth the surface with 120-grit sandpaper.
Top Tip: If you want to enhance the look of the project and to protect the wooden footstool from decay, we recommend you to cover the components with paint or stain.
This woodworking project was about footstool plans. If you want to see more outdoor plans, we recommend you to check out the rest of our step by step projects. LIKE us on Facebook and Google + to be the first that gets out latest projects and to hep us keep adding free woodworking plans for you.


