This step by step diy project is about wooden carport plans. Building a lean to carport out of wood is cheap and will protect your car from bad weather. Just follow the instructions and adjust the size of the carport as to fit your needs. If this project isn’t what you’ve been looking for, don’t forget to check out the rest of our carport plans. Plan everything from the very beginning, to prevent potential issues.
There are a few aspects that you should pay attention to, before starting the construction process. First of all, you need to study the local building codes, as there are several legal requirements you should comply with. Afterwards, choose the right plans and materials that fit your needs. Work with attention and ask a friend to assist you when securing the components into place. See all my Premium Plans HERE.
Projects made from these plans
Cut & Shopping Lists
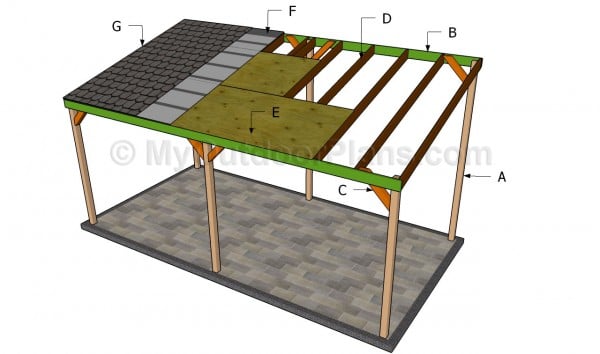
- A – 3 pieces of 4×4 lumber 96” long, 3 posts of 4×4 lumber 123 1/2″ POSTS
- B – 2 pieces of 2×4 lumber 240” long SUPPORT BEAMS
- C – 8 pieces of 4×4 lumber 25 3/4” long, cut at 45º at both ends BRACES
- D – 12 pieces of 2×4 lumber 125 3/4” long RAFTERS
- E – 8 pieces of 3/4” tongue and groove plywood 4×8′ ROOFING
- F – 250 sq ft of tar paper TAR PAPER
- G – 250 sq ft of asphalt shingles ASPHALT SHINGLES
- 3 pieces tube form
- 6 pieces of post anchor
- 500 pieces of 2 1/2″ screws
- 500 pieces of 1 1/4″ screws
- wood glue, stain/paint
- 250 sq ft of tar paper
- 250 ft of asphalt shingles
Tools
![]() Hammer, Tape measure, Framing square, Level
Hammer, Tape measure, Framing square, Level
![]() Miter saw, Drill machinery, Screwdriver, Sander
Miter saw, Drill machinery, Screwdriver, Sander
![]() Post hole digger, Concrete mixer
Post hole digger, Concrete mixer
Time
Building a wooden carport
Top Tip: Building a wooden carport is quick and useful project, especially if you want to protect your car from bad weather. Taking into account there are many plans and designs you could choose from, we recommend you to check out the rest of our carport plans.
Wooden Carport Plans
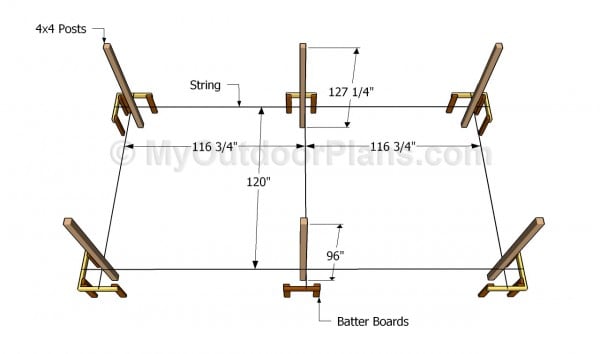
Layout the carport
The first step of the project is to lay out the posts in a professional manner. As you can easily notice in the image, you need to use batter boards and string. Check if the corners are right angled, by using a large carpentry square or the well-known 3-4-5 rule.
It is also essential to check if the diagonals are equal and to make the necessary adjustments. Wok with attention and with great care, if you want to get a professional result.
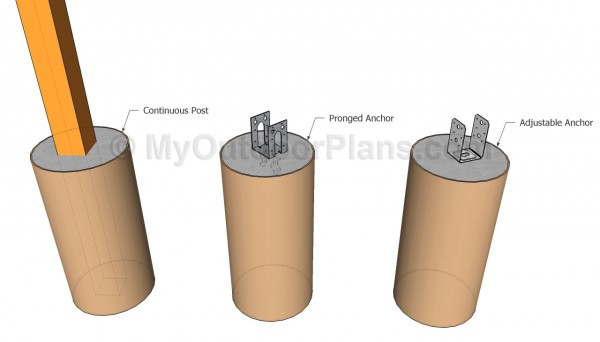
Anchoring the post into concrete
It is essential to set the posts into concrete, otherwise the structure of the wooden carport won’t support the weight. As you can see in the image, you need to dig 2-3″ deep holes and fit tube forms. Prepare a concrete, fill the tubes and level the surface.
On one hand you could set the posts into concrete, while on the other hand you could use metal anchors. Use a spirit level to plumb the wooden posts and brace them temporarily.
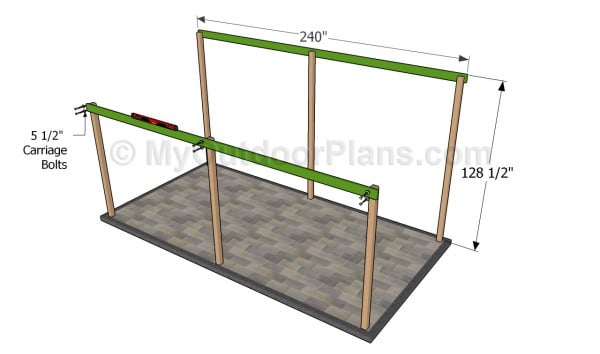
Installing the supports beams
After the concrete has dried out, you should attach the support beams to the exterior edges of the posts. You have to use 2×6 lumber and drill pilot holes trough the beams and trough the posts. Clamp the beams to the posts and make sure they are horizontal, by using a spirit level.
Insert 5 1/2″ carriage bolts trough the components and tighten the bolts. If you want to increase the rigidity of the frame, you should also attach beams to the inside edges of the posts.
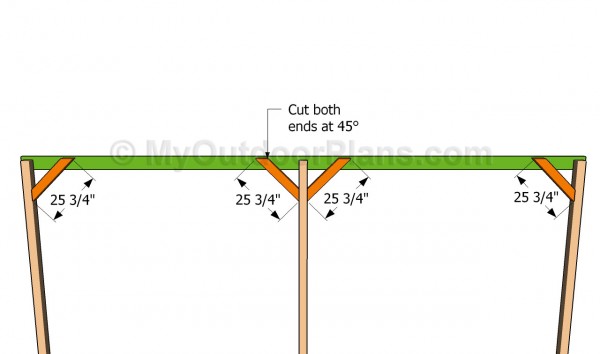
Fitting the braces
If you live in a windy area or you have to face harsh winters, you have to fit 4×4 braces to the posts, as in the image. In order to reinforce the structure of the carport, we recommend you to cut the ends of the braces at 45º.
Attach the braces into place and lock them to the beams and to the posts with 4 1/2″ galvanized screws, after drilling pilot holes. Make sure you don’t leave any gaps between the components, by making the angle cuts with a miter saw.
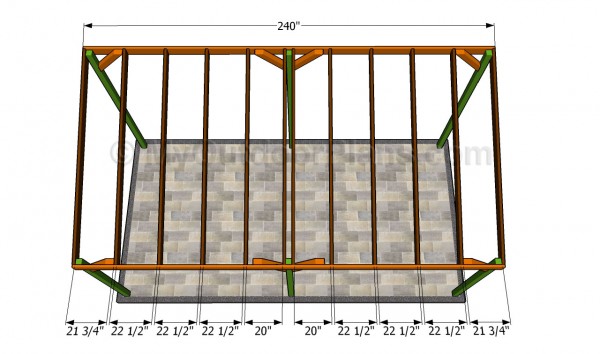
Fitting the rafters
Fitting the 2×4 rafters into place is a straight forward procedure, if you have pay attention to the rest of the project. As you can see in the image, you need to cut the ends of the rafters at 75º and fit them between the beams, every 24″ on center.
Top Tip: Drill pilot holes trough the support beams and insert 3 1/2″ galvanized screws into the rafters. If you want to get a professional result, we recommend you to ask a friend to assist you when installing the rafters.
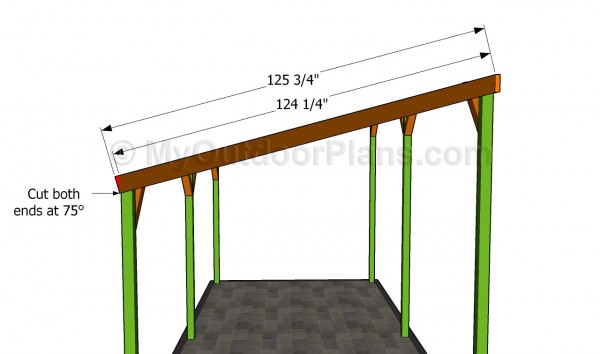
Building the rafters
As you can see in the image, you need to build the rafters from 125 3/4″ long 2×4 lumber. Cut the ends of the rafters at 75º using a good miter saw with a sharp blade. Don’t forget that you should adjust the slope of the carport, as to fit your needs and tastes.
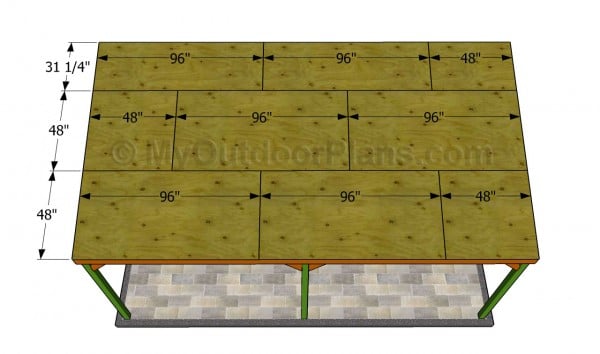
Attaching the plywood sheets
The next step of the project is to attach the roofing sheets. As you can notice in the plans, we recommend you to use 3/4″ tongue and groove plywood sheets. Adjust the size of the sheets, using a circular saw with a sharp blade.
Top Tip: Start installing the sheets from the bottom of the roof, following the pattern shown in the plans. Insert 1 1/4″ galvanized screws trough the sheets into the rafters, every 8″.
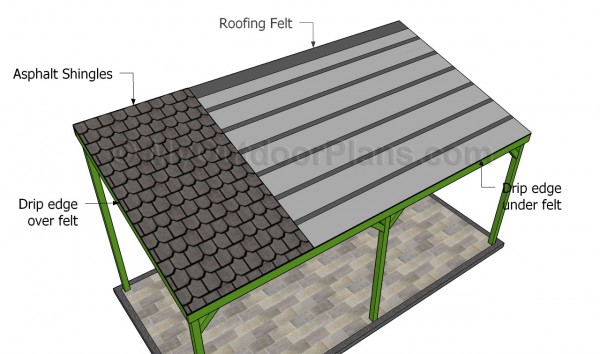
Installing the roofing
Install the roofing felt, starting from the bottom left of the roof. Secure the paper to the roofing, using a stapler. Make sure the tar paper overlaps at least 2”. Don’t forget to cover the top ridge with a 14” strip of paper .
Start the first course of shingles with a full tab, the second with 2 1/2 tabs, the third with 2 tabs, the forth with 1 1/2 tabs, the fifth with 1 tab, the sixth with half tab and the seventh with a 3 tabs.
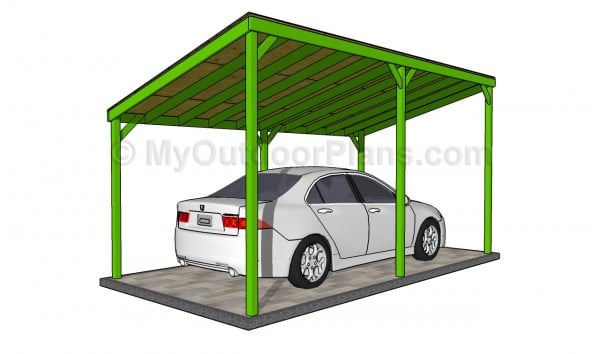
Wooden carport plans
Last but not least, you should take care of the finishing touches. Fill the gaps with wood putty and let the compound dry out for several hours, before sanding the surface with 120-grit sandpaper. Clean the surface with a cloth and apply several coats of wood stain, to protect the wood from rot.
Top Tip: You could fit lattice panels between the posts, if you want to protect your car from bad weather. In addition, the panels would add character to your construction.
This woodworking project was about wooden carport plans. If you want to see more outdoor plans, we recommend you to check out the rest of our step by step projects.

3 comments
Thankyou for your large variety of plans. We would like to build a free standing (not a lean to) carport 8′ by 12′ for our lot we own at our campground for shade. If you would have directions for something that size, we wouldn’t mind paying for that. We would only be using 4 4×4’s and using metal for the roof. Thankyou
Take a look over this: https://myoutdoorplans.com/pergola/8×12-outdoor-pavilion-free-diy-plans/ It uses 6×6 lumber, but you can use it as a reference for the building techniques.
How can I purchase the plans for the 16 x 24 lean to patio plans? And is it possible to get them stamped by architect for permit approval?