This step by step diy project is about small chicken coop plans. Building a small backyard chicken coop is a complex project, but the construction will be durable. There are many plans that you can choose from when building the backyard chicken coop, so you should really pay attention to the related projects on this site before starting the actual construction of the shelter.
It is essential to use weather-resistant lumber when building the chicken coop, so make sure you select the components with attention. Moreover, take accurate measurements before making the cuts, otherwise the components might not fit together. Adjust the size of the chicken coop according to your needs, but make sure you follow the instructions described in this article. See all my Premium Plans HERE.
Projects made from these plans
Cut & Shopping Lists
- A – 2 pieces of 2×4 lumber – 96″ long, 5 pieces – 45″ long FLOOR FRAME
- B – 1 pieces of 3/4″ plywood – 48″x96″ long FLOORING
- C – 5 pieces of 2×4 lumber – 82 3/4” long, 14 pieces – 71″ STUDS
- D – 4 pieces of 2×4 lumber – 96 “, 4 pieces – 41” PLATES
- E – 8 pieces of 2×4 lumber – 20″ long, 2 pieces – 69 1/2″, 1 piece – 31″ FRAMING
- F – 5 pieces of 2×4 lumber – 50 1/2″ long RAFTERS
- G – 6 pieces of 5/8″ grooved plywood – 48″x86″ SIDING
- H – 2 pieces of 3/4″ plywood – 48″x96″ long ROOFING
- I – 50 sq ft of tar paper UNDERLAYMENT
- J – 50 sq ft of asphalt shingles SHINGLES
Tools
![]() Hammer, Tape measure, Framing square, Level
Hammer, Tape measure, Framing square, Level
![]() Miter saw, Drill machinery, Screwdriver, Sander
Miter saw, Drill machinery, Screwdriver, Sander
Time
Related
- Part 1: Small Chicken Coop Plans
- Part 2: Chicken Coop Nest Plans
- Part 3: Building a chicken coop door
Building a small chicken coop
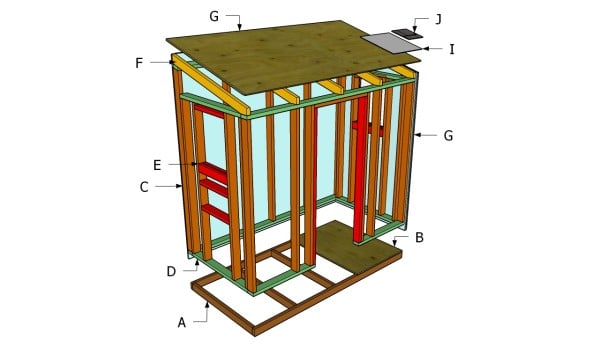
Building a small chicken coop
Top Tip: If you don’t have experience in growing chickens, we recommend you to start on a small scale. An A-frame chicken coop is the rational decisions if this is your first venture in this area.
Building a small chicken coop
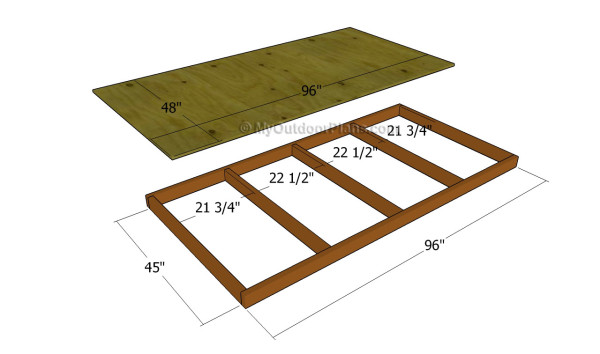
Building the frame of the floor
The first step of the outdoor project is to build the frame of the floor. As you can see in the image, you need to assemble the frame by using 2×4 lumber. Cut the components at the right size and lock them together with galvanized screws.
Check if the corners are right-angled by using a carpentry square. Attach a piece of 3/4″ plywood to the frame and lock it into place with 1 1/4″ galvanized screws.
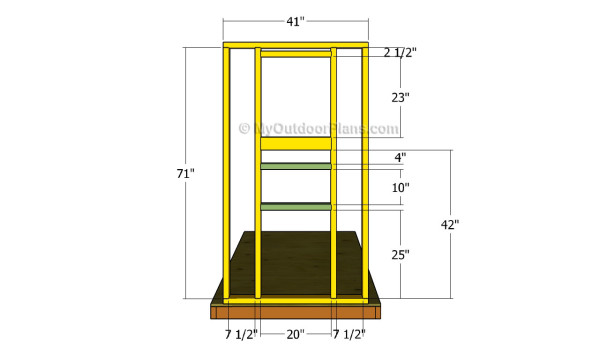
Building the side walls
The next step of the project is to build the walls frames and to lock them to the floor. Use 2×4 lumber to build the walls by using the information from the plans. Drill pilot holes through the plates and insert 2 1/2″ screws into the studs.
Check if the corners are right-angled before inserting the screws if you want to get a professional look. Plumb the walls and lock them temporarily with braces before inserting the screws into the floor.
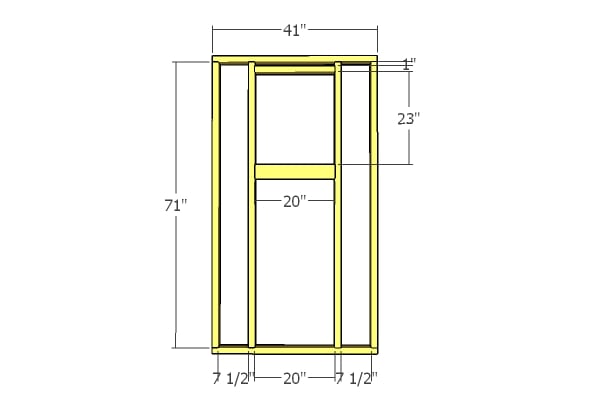
Side wall
Build the opposite wall, as well, using the instruction from the diagram.
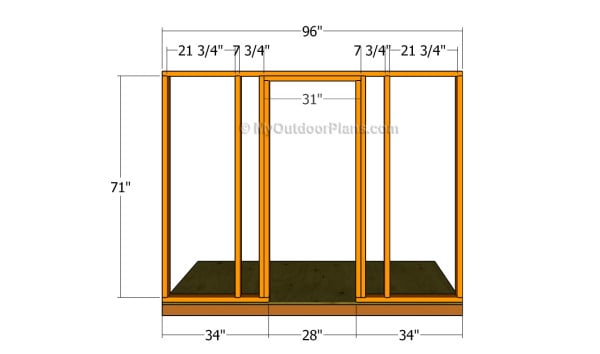
Building the front wall
As you can notice in the free plans, the front face should be built using 2×4 lumber. Cut the studs at the right size and assemble the frame on a level surface. Drill pilot holes through the plates and insert the screws into the studs.
Top Tip: You should provide support to the frame by adding trimmer studs to the door opening. Work with attention and take accurate measurements for a professional results.
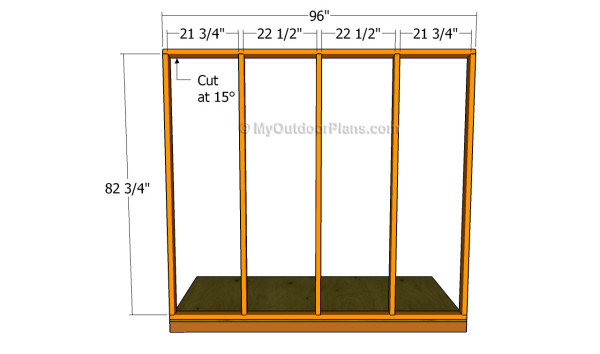
Back wall plans
Building the back wall of the small chicken coop is a straight-forward process, as you just need to assemble the frame as seen in the plans. In order to get a professional result, we recommend you to cut the top of the studs at 15 degrees with a miter saw.
Check if the corners are right-angled before locking the wall frames to the floor frame. Drill pilot holes through the plates and insert galvanized screws into the floor frame.
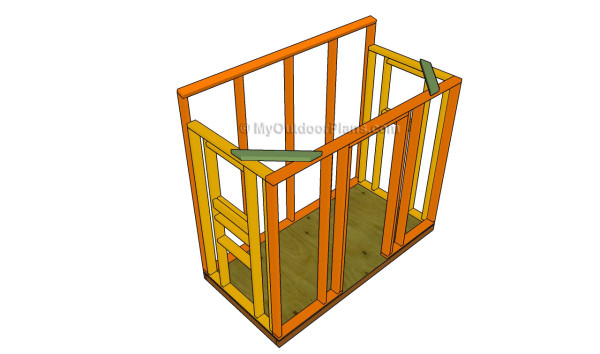
Building the frame of the chicken coop
Attach the wall frames on top of the floor, plumb them with a spirit level and secure them temporarily into place with braces. Drill pilot holes thorough the bottom plates and insert 3 1/2″ galvanized screws into the floor.
Work with attention and ask a friend to assist you when fitting the walls into place. It is essential to lock the walls to the floor in a professional manner, if you want to create a long term construction.
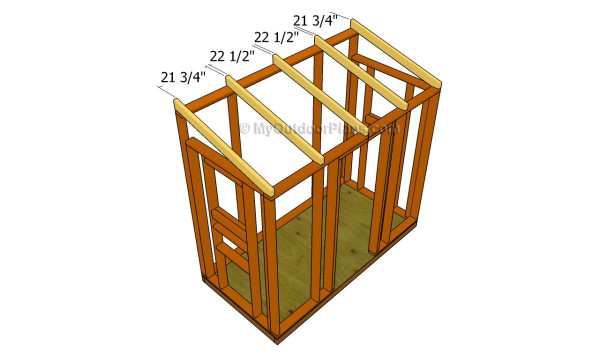
Fitting the rafters
Building the roof of the lean to chicken coop is a straight-forward process, as you need to make several rafters and lock them to the top plates as in the image. Use 2×4 lumber to make the rafters. Use a good miter saw to make the angle cuts.
Drill pilot holes at both ends of the rafters and insert the screws into the top plates. In addition, we recommend you to place the rafters equally spaced, as to support the weight of the roof efficiently.
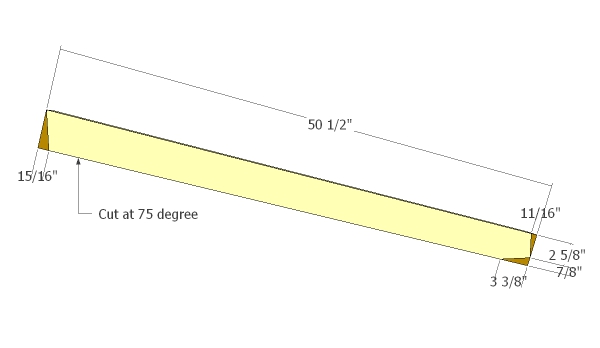
Cutting the rafters
Building the rafters is a straight-forward job, but you need to use professional plans to get the job done properly. Pay attention to the information from the diagram, before making the cuts.
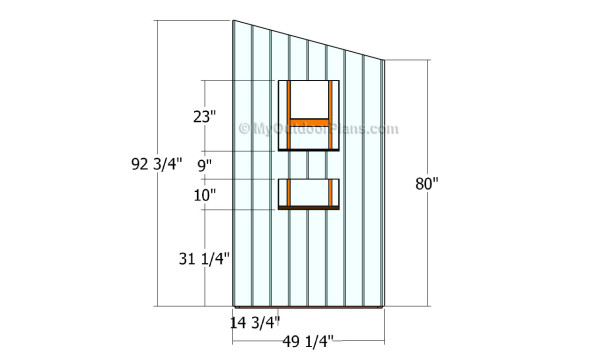
Fitting the side walls
The next step of the woodworking project is to attach the siding to the small chicken coop. As you can see in the image, we recommend you to use 5/8″ grooved plywood. Mark the cut lines over the sheets and cut out the openings with a jigsaw.
Top Tip: It is essential to take accurate measurements, otherwise the sheets might not fit into place. Attach the siding to the exterior of the wall frames and lock them with 1 1/4″ nails.
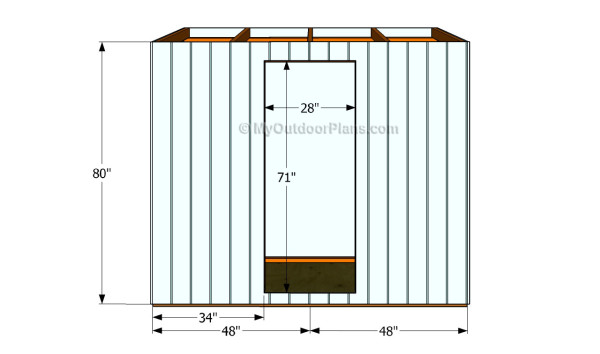
Attaching the siding to the front face
Attaching the siding to the front face of the backyard chicken coop is a complex process, as you need to cut out the door opening. Nevertheless, anyone can perform this step if accurate measurements are taken or if the right tools are used.
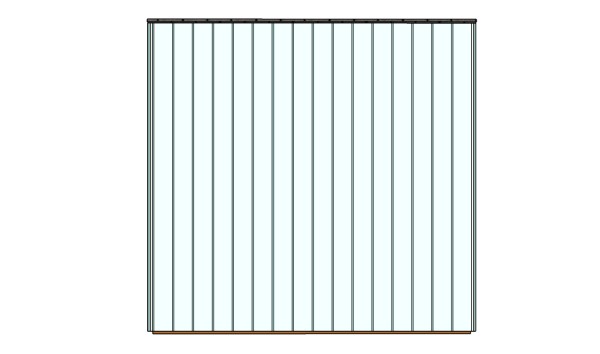
Attaching the back wall
One of the last steps is to attach the siding sheets to the back of the chicken coop. Use two 4×8′ sheets of 5/8″ grooved plywood. Attach them to the frame and make sure they are aligned at both ends.
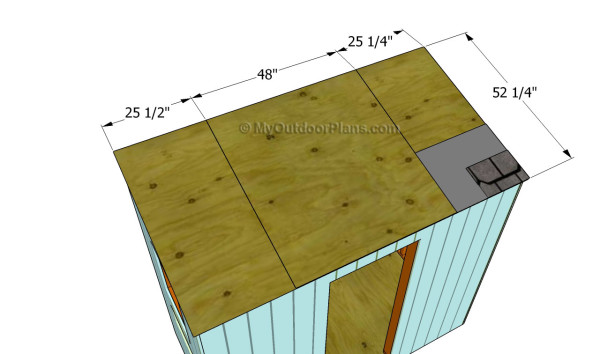
Building the roof of the coop
Building the roof of the lean to chicken coop is easy, as you need to cover the structure with 3/4″ plywood, tar paper and asphalt shingles. Therefore, cut the plywood at the right size and lock the sheets to the rafters with 1 1/4″ nails.
Cover the surface with tar paper, making sure the strips of tar paper overlap at least 2″. Afterwards, attach the asphalt shingles to the roof starting with the bottom section. Read the manufacturer’s instructions before installing them.
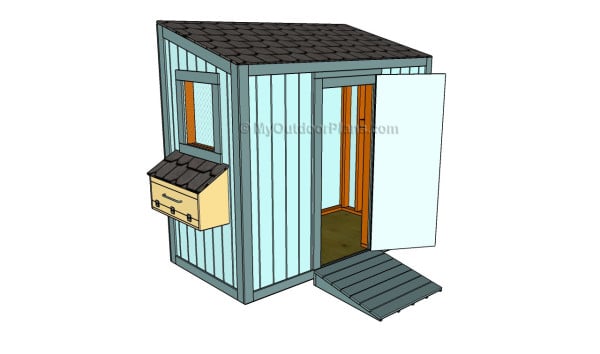
Small chicken coop plans
After building the frame of the chicken coop we recommend you to take care of the finishing touches. Therefore, check if all the components are locked together tightly and aligned properly.
Top Tip: Don’t forget to take a look over the rest of the project, if you want to learn how to build the door and how to build the nest for the chickens. In addition, in the next parts of the project we show you how to fit the trims.
This woodworking project was about small chicken coop plans. If you want to see more outdoor plans, we recommend you to check out the rest of our step by step projects. LIKE us on Facebook to be the first that gets our latest updates and submit pictures with your DIY projects.
<< Previous | Next >>

9 comments
very good
Thank you. Looking forward to seeing your projects!
So I started building this today and I believe that there are some errors in the material list because some of it doesn’t match up to the plans. For instance, in the floor frame it calls for 2-45” and 5-96” but the plan calls for the other way around. Also, the framing calls for only 2-96” but I believe that the plan calls for 4. I could be wrong for sure because this is my first time building something substantial but I just want to let someone know what I found so far. Thank you!
You are right regarding the floor components. I’ve updated the list with the right dimensions. The diagrams are always right. Regarding the 96″ long components for the walls, they are listed as plates and they are correct.
Also, (sorry to bother lol) the specific plan for the other shorter side of the coop is not known too well and since i’m learning as I go I was hoping someone could confirm what I was thinking! Put 2-69.5” vertical with the 2-31” running between them to create the window?
I’ve added a new diagram for that wall, as well. Feel free to ask as many questions as you need. This is an older plan so it’s not as detailed as the newer ones, so I understand some things are not clear.
Where are the UPDATED PLANS? Thanks ……. Doc
These are the updated plans. I constantly update the plans as I get feedback from you guys. My other chicken coop plans are here: http://myoutdoorplans.com/category/chicken-coop/
Where do you get the premium plans for this coop? I would like to start building this. Also does the premium option have the door and nest boxes?