If you’re looking to upgrade your workshop setup, building a DIY tote storage workbench is a game-changer. These free plans combines a solid, spacious work surface with ample storage space, making it ideal for any DIY enthusiast, whether you’re into woodworking, repairs, or crafting. In this guide, we’ll walk you through each step of building a workbench that’s both sturdy and mobile, helping you stay organized and work efficiently. Let’s get started on creating a workbench that’ll become the backbone of your workshop!
This DIY storage workbench project is both affordable and quick to complete, making it a great weekend build. For materials, expect to spend around $60-$100, depending on whether you choose single or double layers of plywood for the top, and if you already have some supplies on hand. Essential materials include 2×4 boards, 3/4″ plywood, 1×4 braces, 27-gallon storage totes, and 3″ casters for mobility. In terms of time, the whole project should take about 4-6 hours, including assembly, cutting, and finishing touches. It’s a cost-effective way to add a functional, organized, and mobile work surface to your workshop. Take a look over the rest of my woodworking plans, if you want to get more building inspiration. Premium Plans for this project available in the Shop.
For this project, I recommend using cedar or hardwood for their durability and natural resistance to the elements. Cedar is a fantastic option because it’s lightweight, rot-resistant, and has a beautiful, rustic look. Hardwood, on the other hand, provides superior strength and longevity, making your project a sturdy and stylish addition to your home.
Projects made from these plans
Tote Storage Workbench Plans – Free DIY Plans
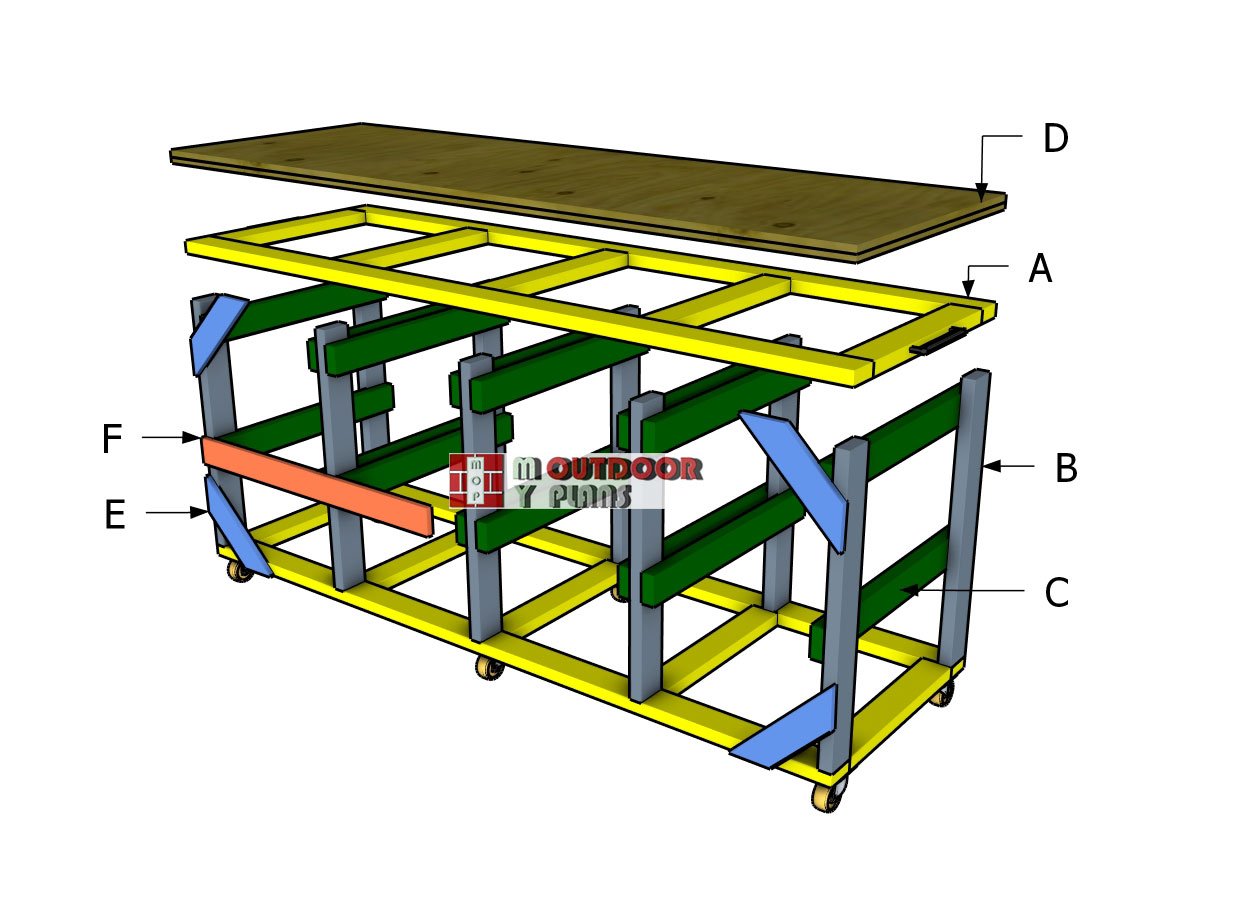
Building-a-tote-storage-workbench
Cut and Shopping Lists
A – FRAME – 2×4 lumber 93 1/2″ long – 4 pieces
A – FRAME – 2×4 lumber 23 1/2″ long – 10 pieces
B – UPRIGHTS – 2×4 lumber 33 1/2″ long – 10 pieces
C – SUPPORTS – 2×4 lumber 30 1/2″ long – 16 pieces
D – TABLETOP – 3/4″ plywood 31 1/4″x93 1/2″ long – 2 pieces
E – BRACES – 1×4 lumber 16″ long – 4 pieces
F – SUPPORT – 1×4 lumber 93 1/2″ long -1 piece
- 2×4 lumber 6 ft – 1 piece
- 2×4 lumber 8 ft – 9 pieces
- 2×4 lumber 10 ft – 5 pieces
- 1×4 lumber 6 ft – 1 piece
- 1×4 lumber 8 ft – 1 piece
- 3/4″ plywood -4’x8′ – 2 pieces
- 27 gallon tote – 8 pieces
- 200 pieces of 2 1/2″ screws
- 50 pieces of 1 5/8″ screws
- Wood glue – 1 can
- Stain – 1 can
- 3″ caster wheels – 6 pieces
- handle – 2 pieces
Tools
![]() Hammer, Tape measure, Framing square, Level
Hammer, Tape measure, Framing square, Level
![]() Miter saw, Drill machinery, Screwdriver, Sander
Miter saw, Drill machinery, Screwdriver, Sander
![]() Safety Gloves, Safety Glasses, Pocket hole jig
Safety Gloves, Safety Glasses, Pocket hole jig
Time
Related
Pin for Later!
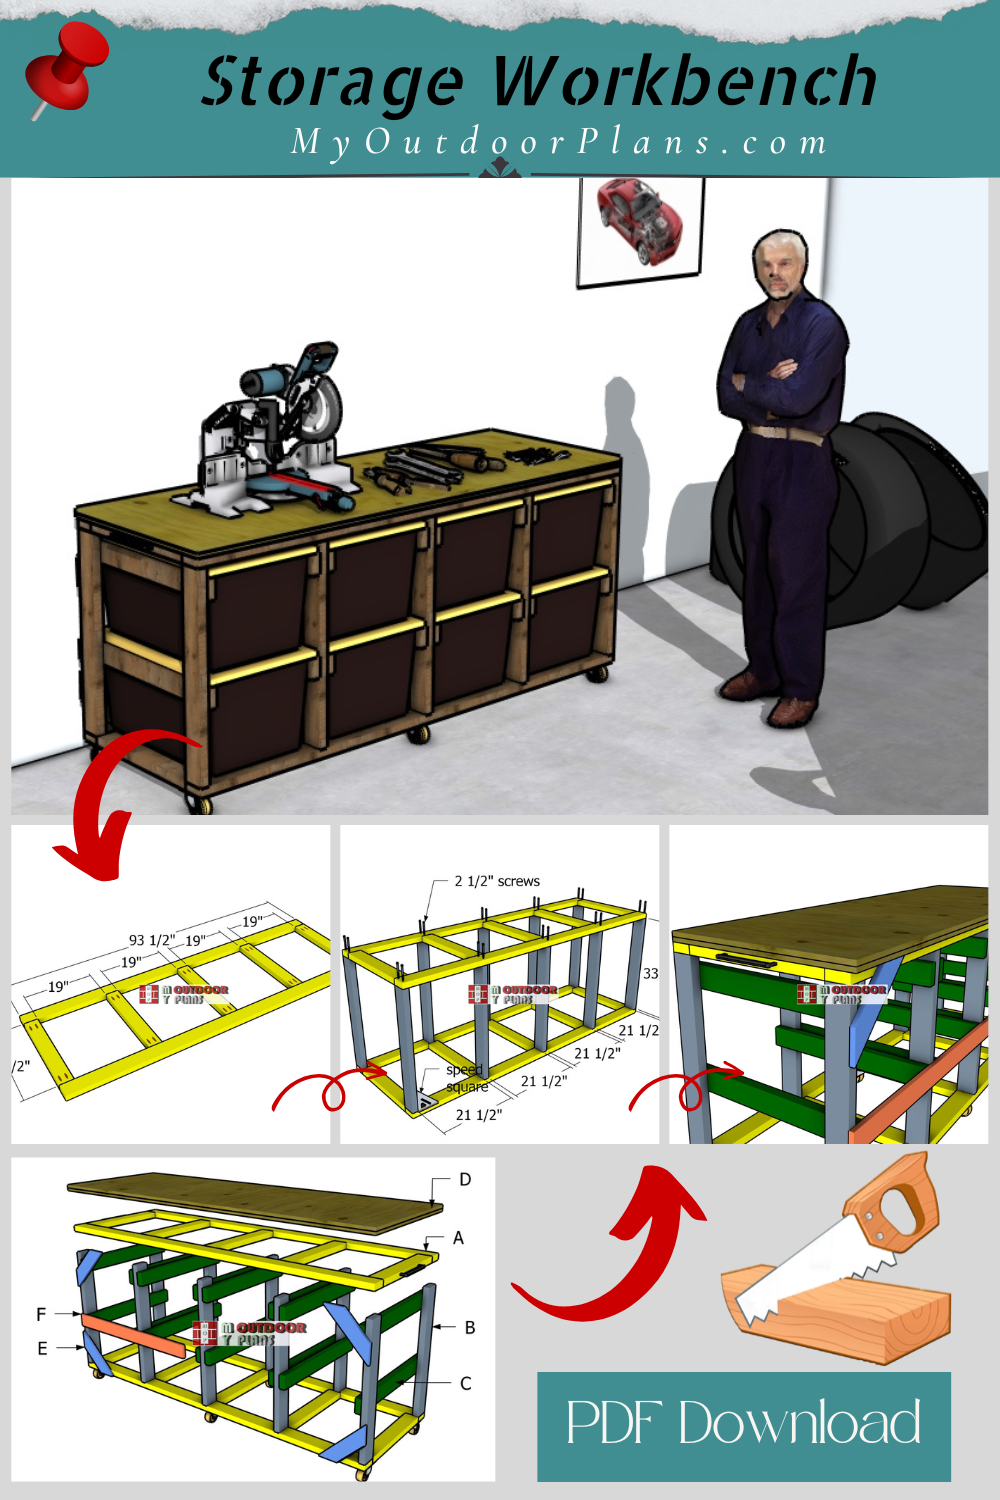
It’s that easy to build a tote workbench!
Building the sides
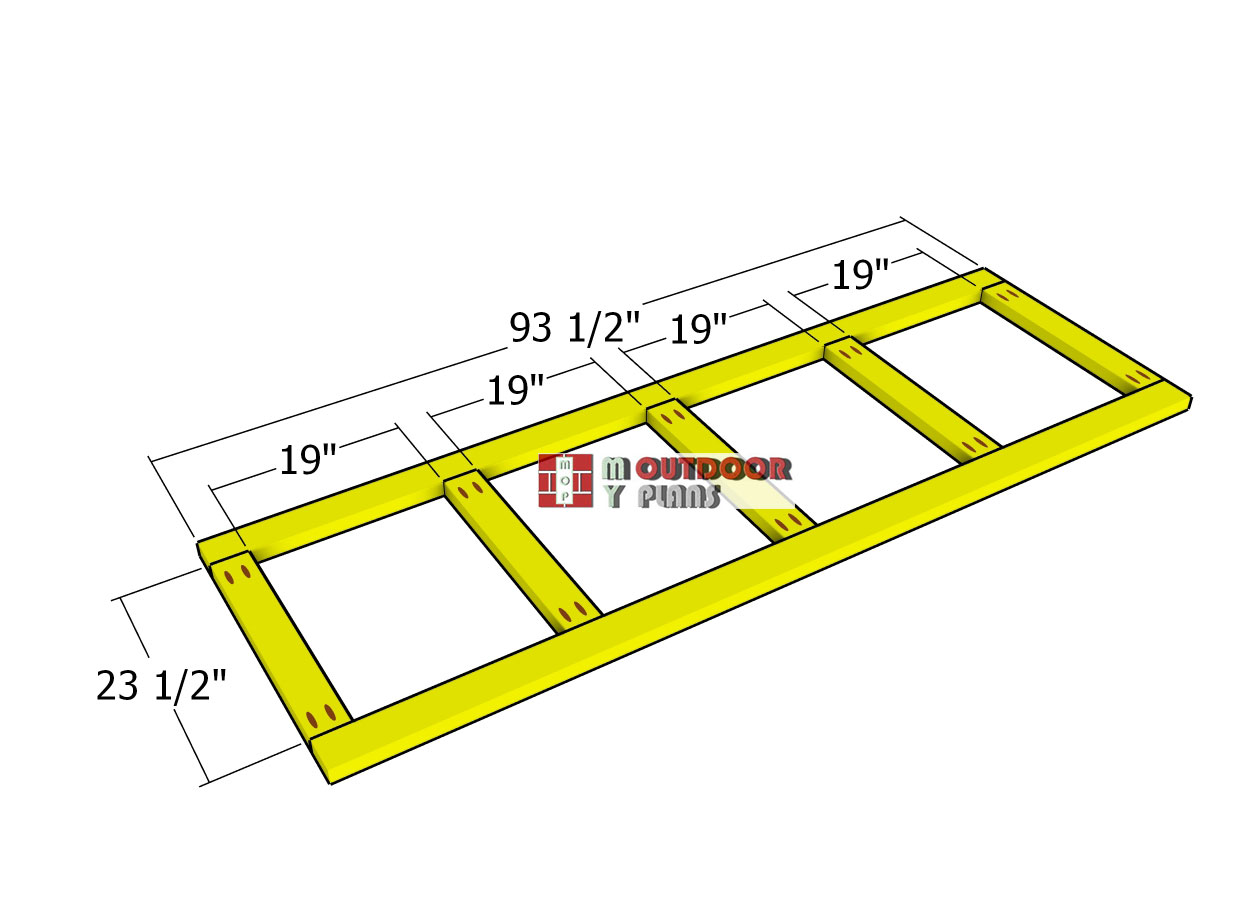
Assembling-the-frames
To kick off the project, let’s start by building the two frames for the storage workbench. Begin by cutting the boards from 2×4 lumber, and drill pocket holes at both ends of the shorter pieces.
Lay everything out on a flat surface, making sure the edges line up nice and flush. Grab a speed square to check those corners for accuracy, then secure it all with 2 1/2″ screws. This is the foundation, so take your time to get it solid and square!
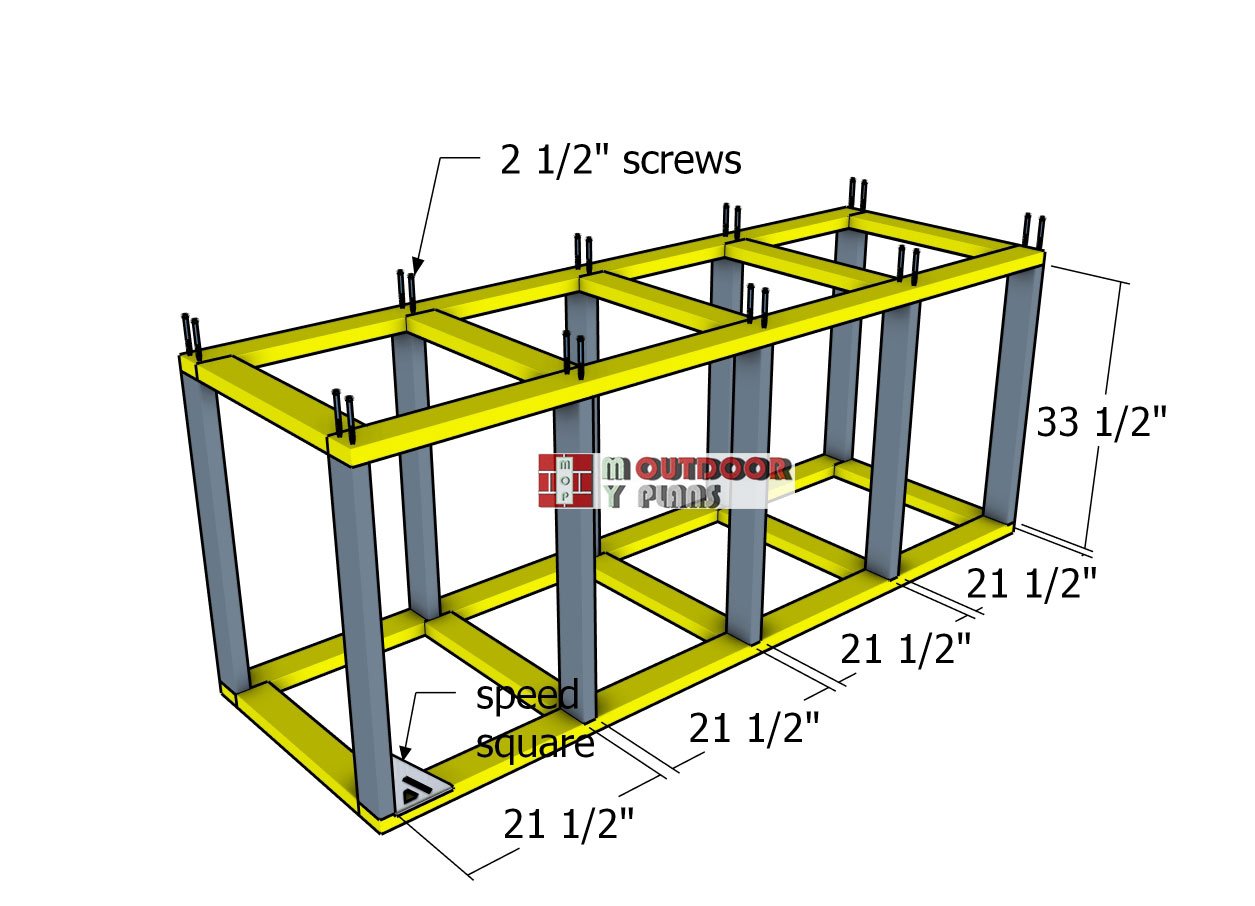
Assembling-the-frame-of-the-workbench
With the two frames assembled, it’s time to bring structure to the workbench by adding the uprights. Position the uprights as shown in the diagram, and use a spirit level to make sure they’re perfectly plumb.
Double-check that the corners are square, then drill pilot holes through the frames and secure each upright with 2 1/2″ screws. This step is all about getting a sturdy, straight framework, so take a moment to ensure everything’s aligned before moving on.
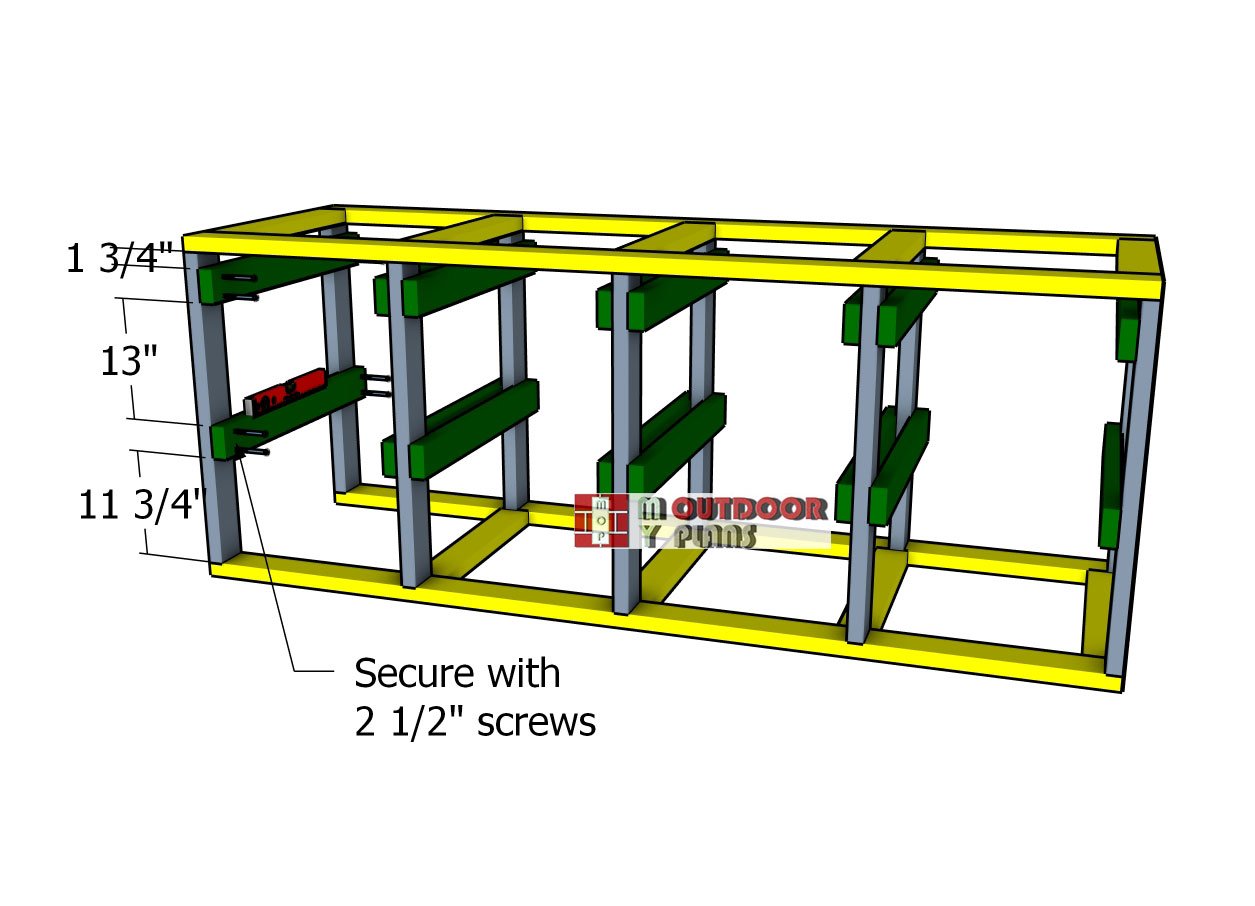
Fitting-the-cleats
Next up, let’s attach the 2×4 cleats to the workbench frame. Align each cleat with the frame, and clamp them securely in place. Drill pilot holes to avoid splitting, then fasten each joint with two 2 1/2″ screws, just like in the diagram. These cleats will support the shelves, so make sure they’re sturdy and well-positioned for the best results!
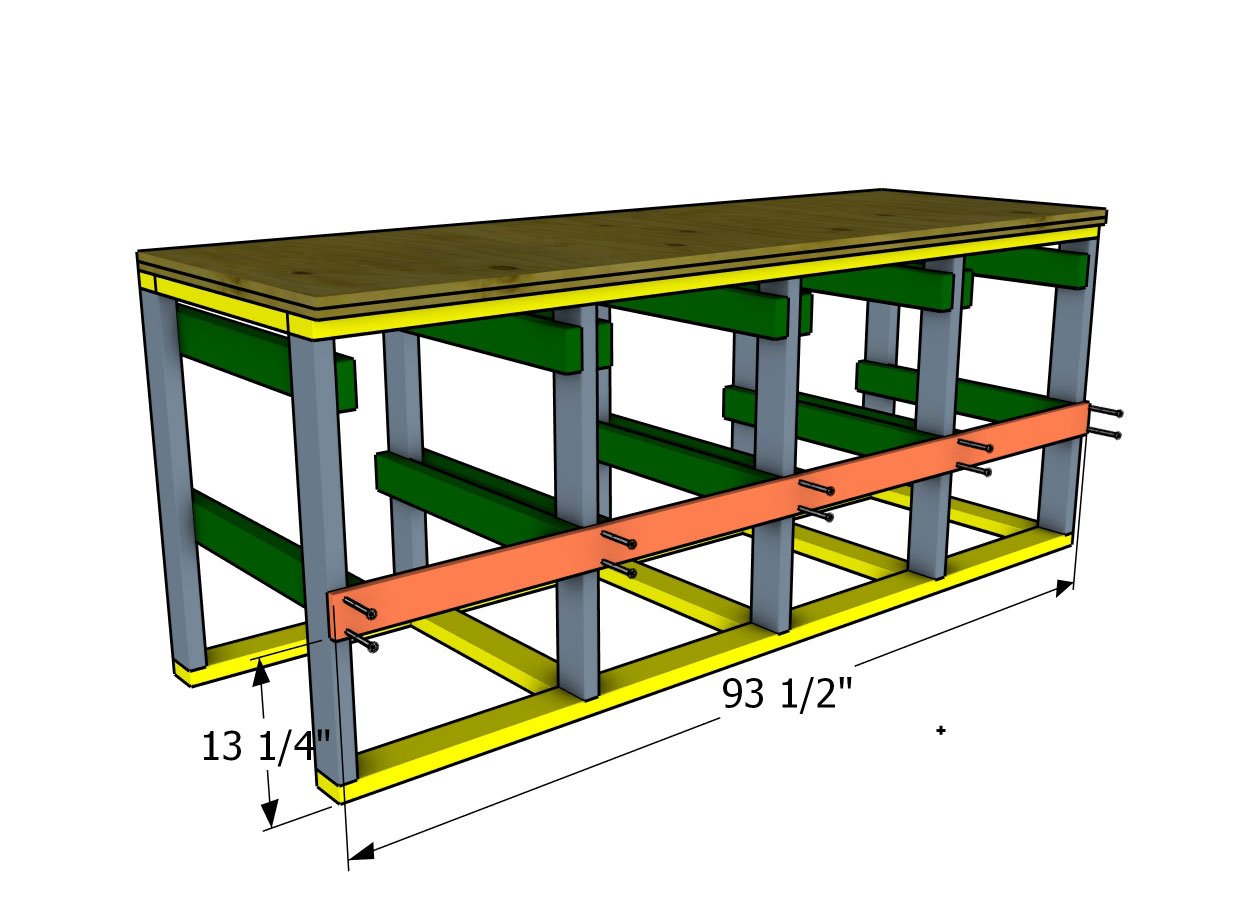
Attaching-the-back-support
Now, attach the 1×4 support to the back of the workbench to tie the compartments together securely. Position the board as shown, drill pilot holes, and fasten it with 1 5/8″ screws. For a solid hold, use at least two screws for each compartment. This step will add extra stability to the whole structure, making sure everything stays tight and aligned.
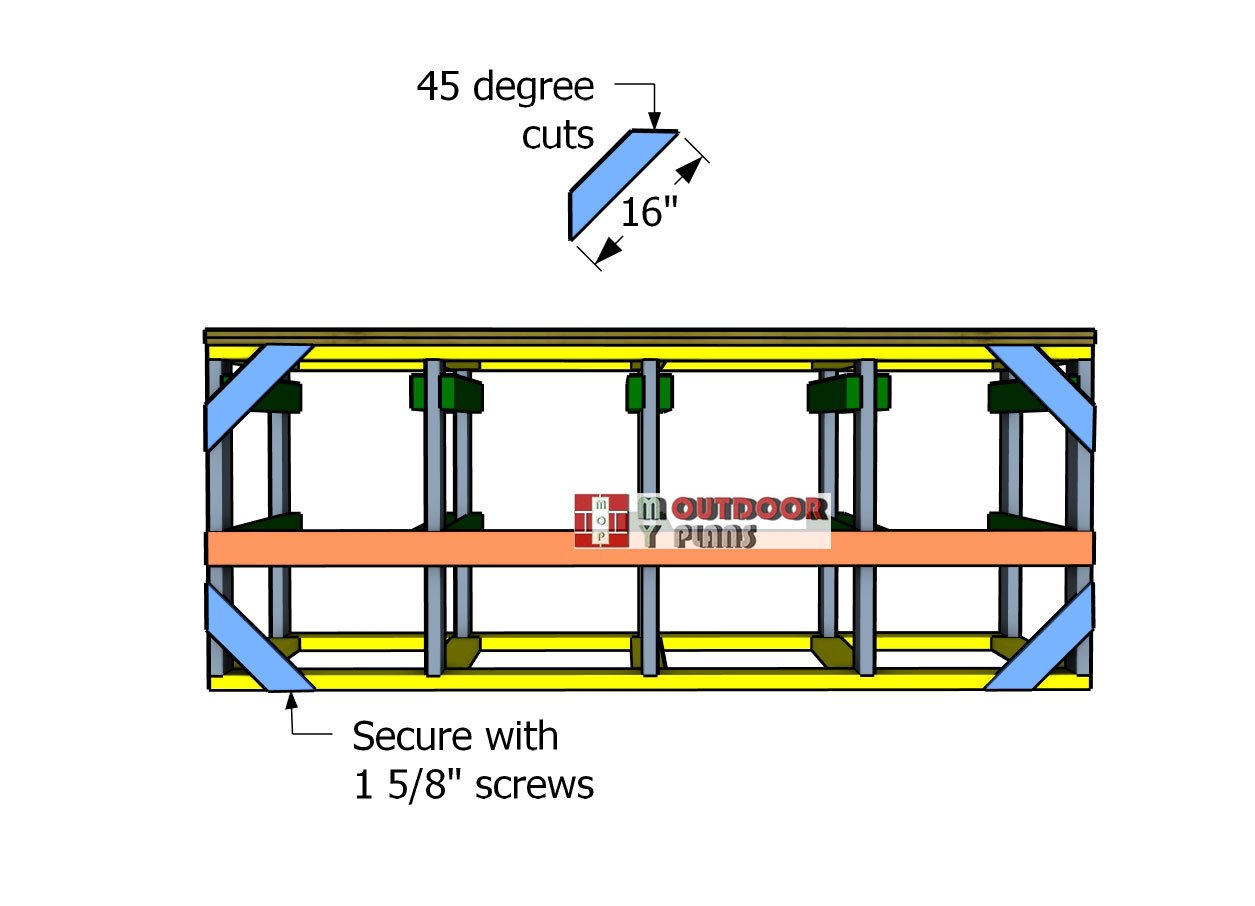
Fitting-the-back-braces
To ensure the workbench is sturdy and rigid, add 1×4 braces to each of the four corners. Cut the ends of each brace at a 45-degree angle for a snug fit, then position them and secure with 1 5/8″ screws.
For maximum stability, use at least two screws per joint. These corner braces will keep the workbench solid and prevent any wobbling, giving you a reliable structure for all your projects.
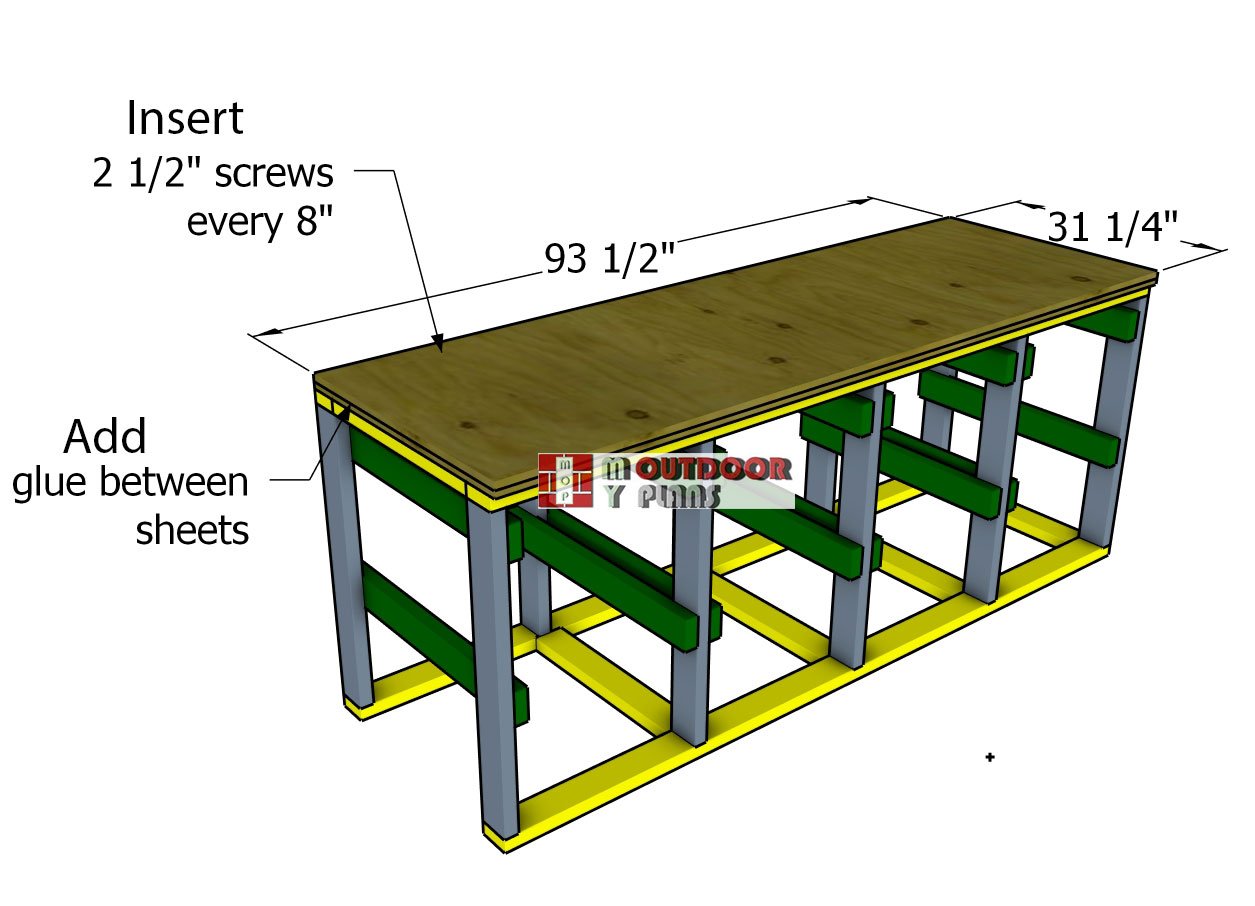
Attaching-the-tabletop
For the workbench top, we’ll be using 3/4″ plywood. You can go with a single layer, but if you’ll be handling heavy loads, it’s best to double up with two sheets for extra strength.
Once the panels are cut to size, lay them over the workbench frame, aligning the edges flush. Start by gluing the base panel to the frame, then add a layer of glue between the two sheets if you’re doubling up. Secure everything in place with 2 1/2″ screws or finish nails to ensure a sturdy, long-lasting work surface.
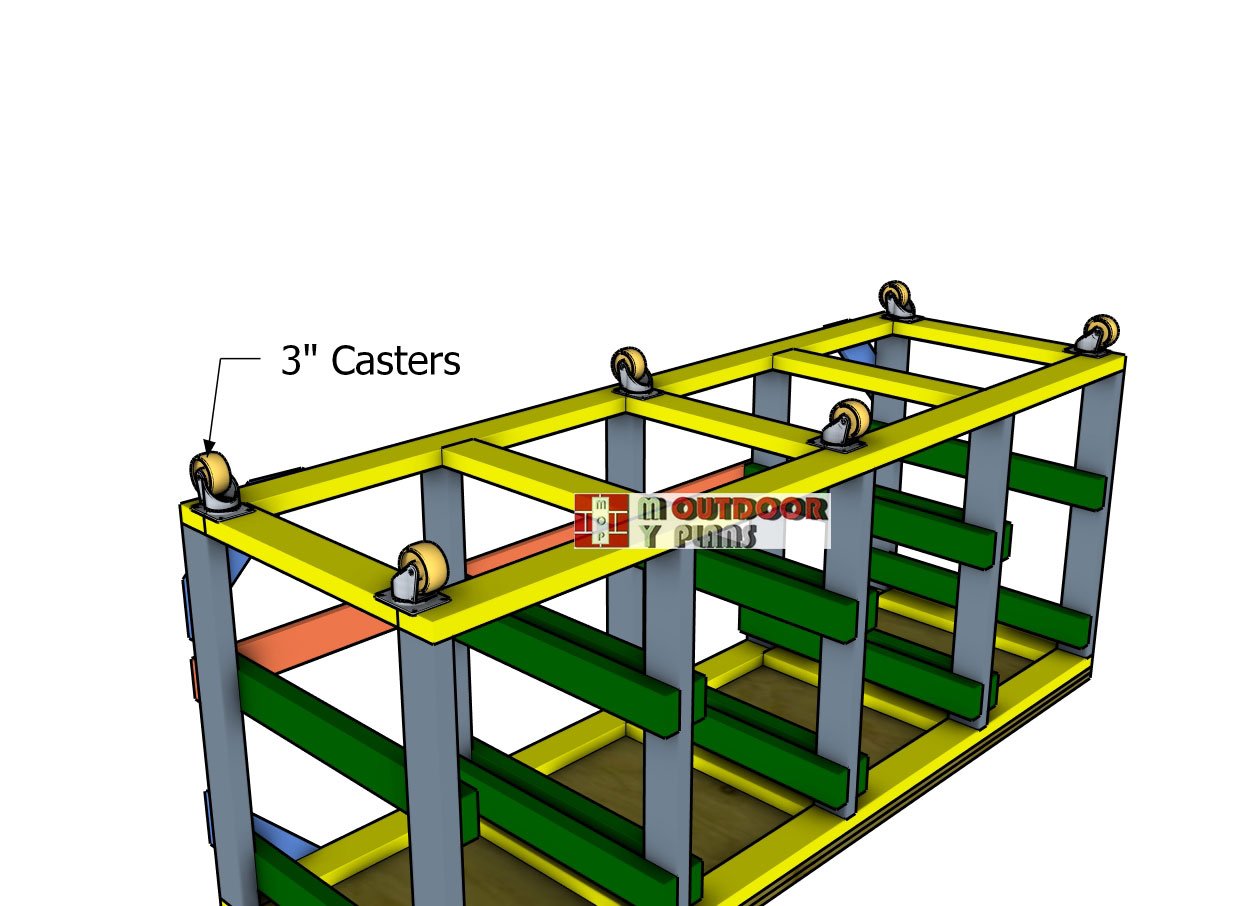
Fitting-the-caster-wheels
Adding 3″ casters to the base of the workbench will make it easy to roll around the workshop, giving you flexibility to move it wherever you need. Just secure one caster to each corner, and you’ll have a sturdy, mobile workbench that’s ready to roll when you are!
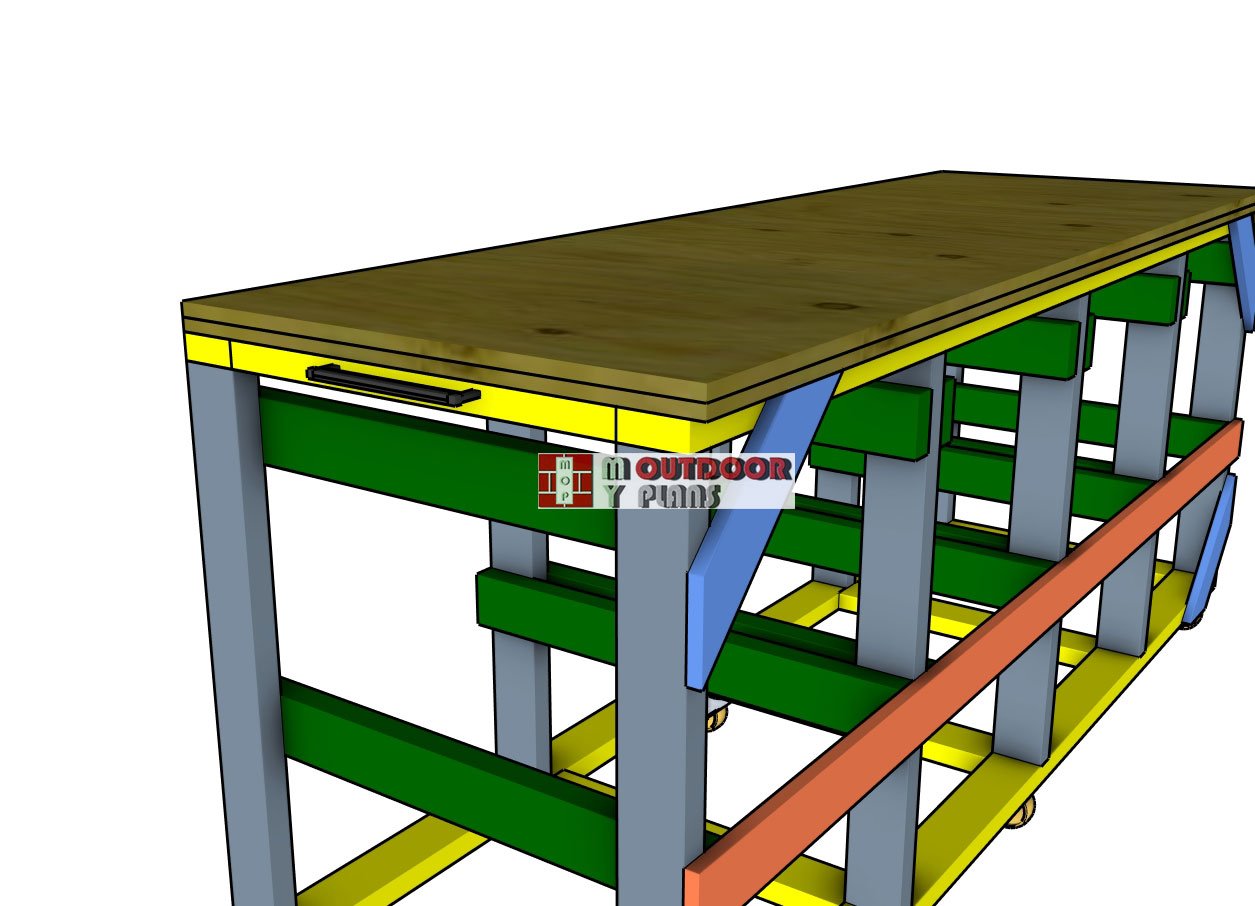
Attaching-the-handles
For added convenience, attach sturdy handles to both sides of the workbench to make moving it around even easier. Simply position the handles at a comfortable height, drill pilot holes, and secure them with screws for a reliable grip.
Finishing touches
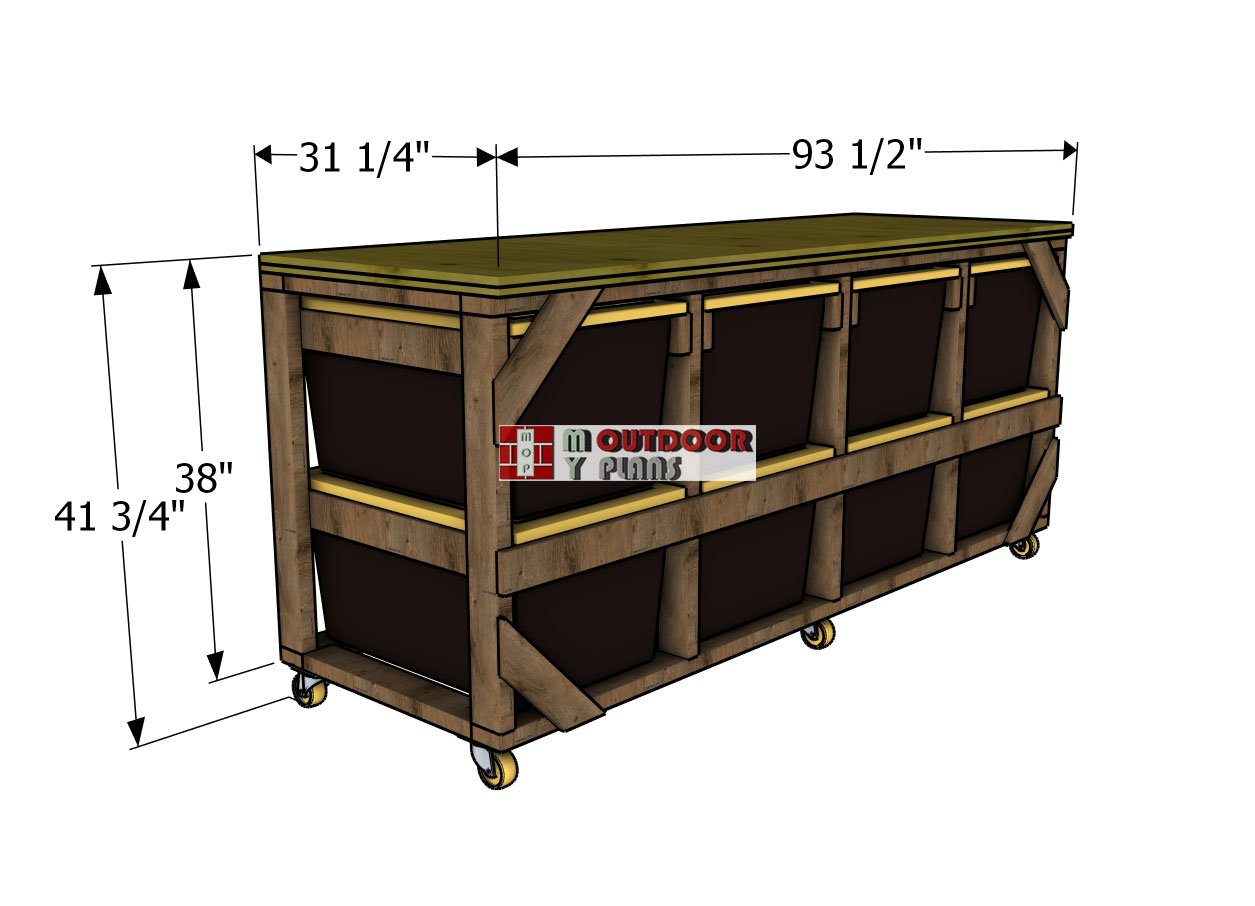
Tote-storage-rack—dimensions
The final step is to slide those 27-gallon totes into place, and your versatile workbench is ready to go! Whether you’re into woodworking, repairs, or DIY projects, this workbench will be your perfect project companion.
The flat surface provides ample space for assembling parts or tackling small repairs, while the eight storage totes keep all your tools and supplies organized and within reach. It’s a practical, efficient setup for any hobbyist or maker!
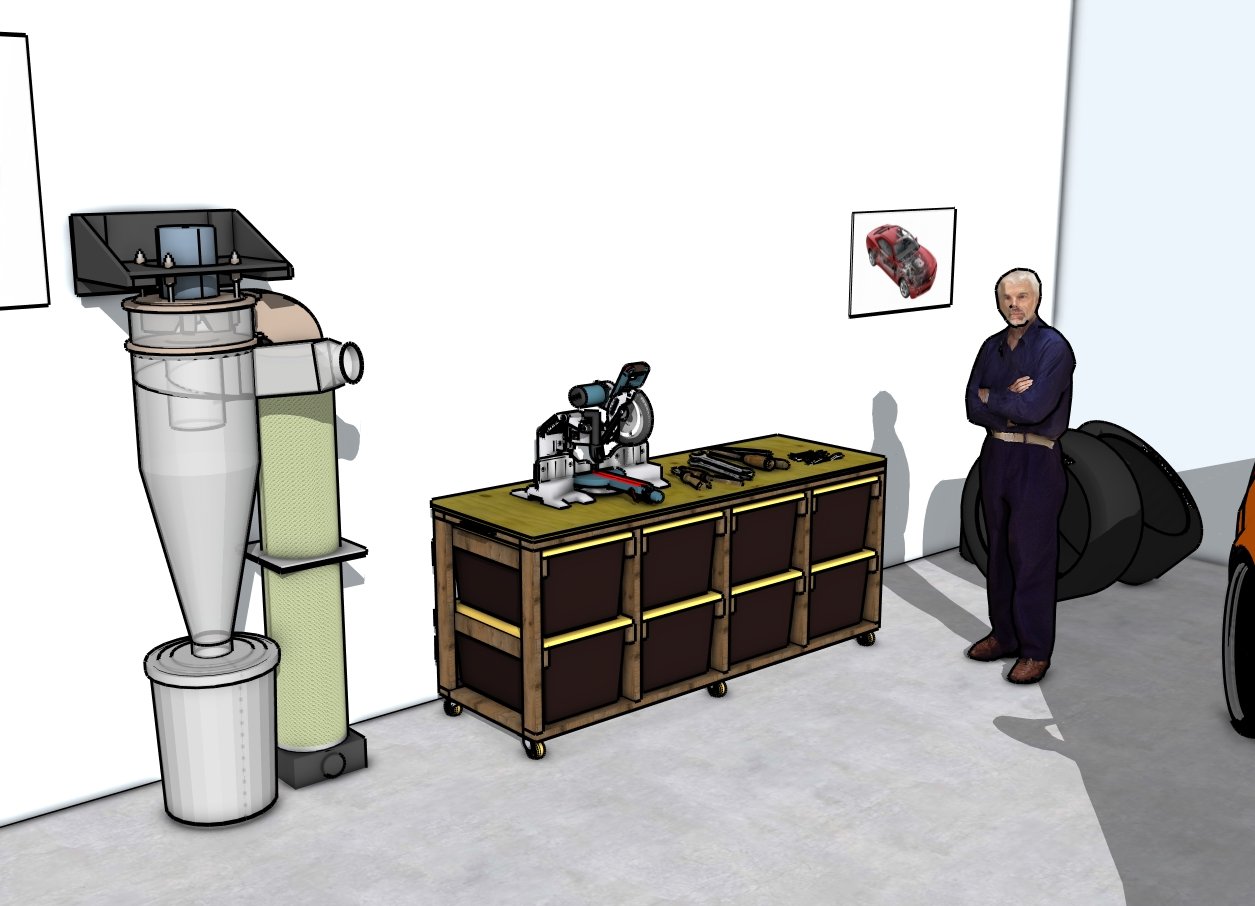
Tote storage rack plans
This workbench project brings a whole new level of organization and efficiency to your workspace, making your projects more enjoyable and less cluttered. With a sturdy, spacious surface for working and ample storage in the totes below, you’ll have all your tools, materials, and hardware neatly arranged and within reach.
Its mobility means you can easily reposition it around your workshop or even roll it outside for extra light and ventilation. This setup not only saves time but also keeps your space tidy and your tools protected, making every DIY task smoother and more satisfying.
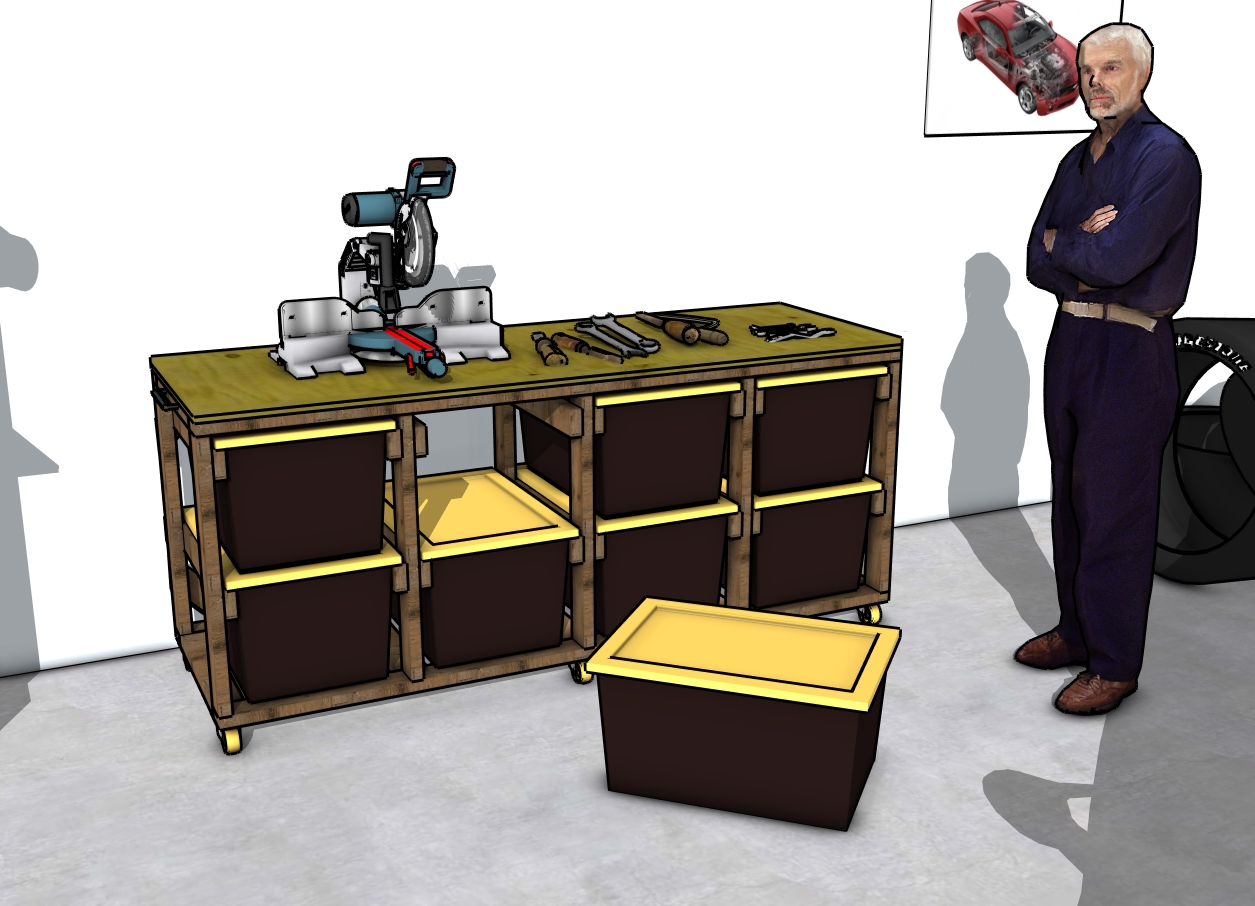
How to build a tote storage rack
And there you have it: a sturdy, mobile, and storage-friendly workbench that’s as functional as it is easy to build. Whether you’re a seasoned DIY enthusiast or just getting started, this project adds a professional touch to your workspace and keeps everything you need organized and ready to go. Thanks for following along, and I hope this workbench serves you well for all your projects. Build your outdoor world, and don’t forget to share your creations: I’d love to see how this workbench transforms your workspace!
If you want to get the Premium plans with all the extras, just press the GET PREMIUM PLANS button bellow. If you want to get the free plans, just read the blog FAQs.
This woodworking project was about tote storage workbench – free DIY plans. If you want to see more outdoor plans, check out the rest of our step by step projects and follow the instructions to obtain a professional result.


1 comment
Ty for the tips