This step by step diy woodworking project is about miter saw table plans. The project features instructions for building a basic worktable for your miter saw. Make sure you take a look over the rest of the related projects to see alternatives and more projects for your workshop, as well as for your backyard. Remember that you might need to adjust the size of the table according to you miter saw. Don’t make the cuts before checking if it fits into place properly. Premium Plans for this project available in the Shop.
When buying the lumber, you should select the planks with great care, making sure they are straight and without any visible flaws (cracks, knots, twists, decay). Investing in cedar or other weather resistant lumber is a good idea, as it will pay off on the long run. Use a spirit level to plumb and align the components, before inserting the galvanized screws, otherwise the project won’t have a symmetrical look. If you have all the materials and tools required for the project, you could get the job done in about a day. See all my Premium Plans HERE.
Projects made from these plans
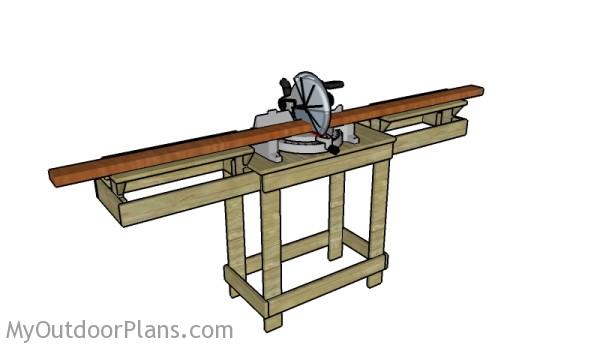
It’s that simple to build a miter saw table!
Miter Saw Table Plans
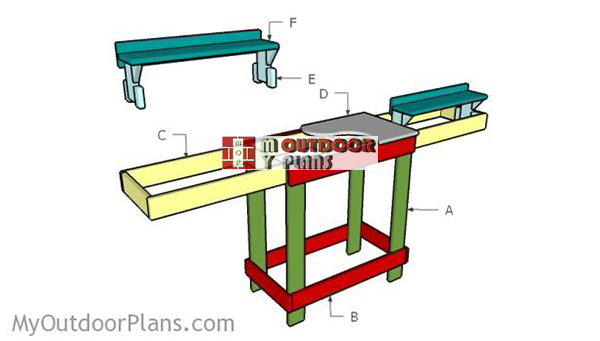
Building-a-miter-saw-table
Cut & Shopping Lists
- A – 4 pieces of 1×4 lumber – 34″ long LEGS
- B – 4 piece of 1×4 lumber – 30 1/2″ long, 2 pieces – 16 1/2″ long FRAME
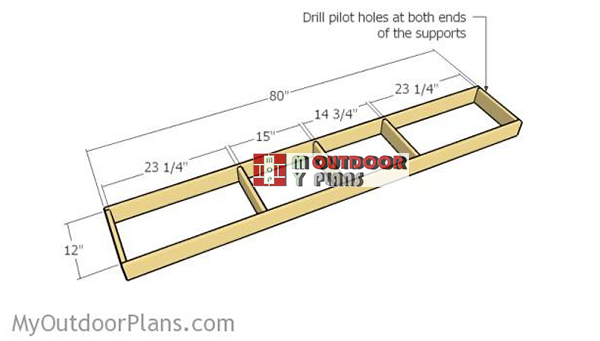
- C – 2 pieces of 1×4 lumber – 80″ long, 5 pieces – 12″ long FRAME
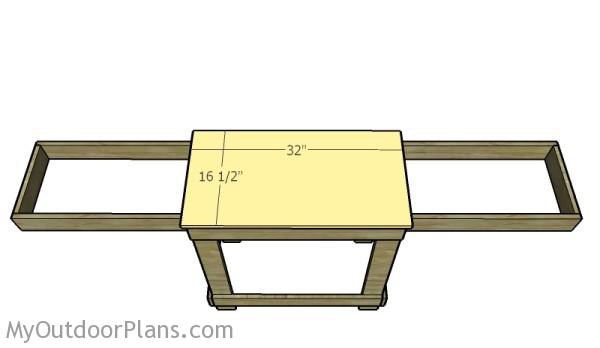
- D – 1 piece of 3/4″ plywood – 16 1/2″x32″ long TABLETOP
- E – 2 pieces of 1×4 lumber – 6″ long, 1 piece of 1×6 lumber – 24″ long, 2 pieces of 1×2 lumber – 3″ long, 2 pieces of 1×3 lumber – 3″ long 2xEXTENTION
- F – 1 piece of 1×4 lumber – 24″ long, 1 piece of 1×6 lumber – 24″ long 2xEXTENSION
- 5 pieces of 1×4 lumber – 12′
- 1 piece of 3/4″ plywood – 2’x4′
- 1 piece of 1×6 lumber – 8′
- 1 piece of 1×3 lumber – 4′
- 2 1/2″ screws
- 1 1/4″ screws
Tools
![]() Hammer, Tape measure, Framing square, Level
Hammer, Tape measure, Framing square, Level
![]() Miter saw, Drill machinery, Screwdriver, Sander
Miter saw, Drill machinery, Screwdriver, Sander
Time
![]() One day
One day
Building a miter saw stand
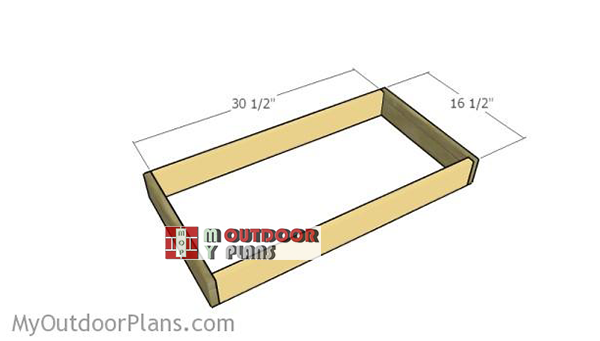
Building-the-frame-for-table
The first step of the project is to build the frame for the miter saw table. Cut the components from 1×4 lumber. Drill pilot holes through the side components and insert 1 1/4″ screws into the perpendicular components. Make sure the corners are square and align the edges with attention for a professional result.
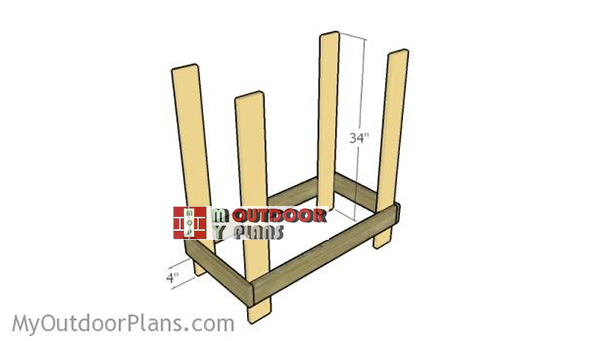
Fitting-the-legs-to-miter-table
Next, attach the 1×4 legs to the frame. Drill pilot holes through the legs and insert 1 1/4″ screws into the frame. Make sure the corners are square before inserting the screws, otherwise they won’t be plumb.
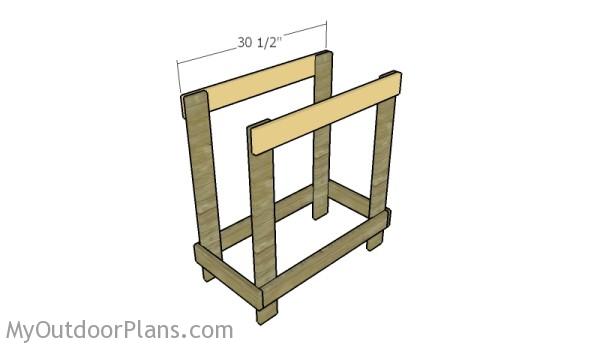
Assembling the stand
Attach the 1×4 supports to the top of the legs, as shown in the plans. Use a spirit level to make sure the supports are horizontal and a carpentry square to check if the corners are square.
Building-the-tabletop-frame
Building the frame for the tabletop is a straight-forward process. Therefore, cut all the components from 1×4 lumber. Drill pilot holes through the rim components and insert 1 1/4″ screws into the 12″ long slat. Check if the corners are square before inserting the screws. Add glue to the joints for a professional result.

Fitting the tabletop frame
Attach the frame to the top of the table, as shown in the plans. Use a spirit level to check if the frame of the table is horizontal, before inserting the screws into the legs. In addition, check if all the corners are square. Align everything with attention, otherwise the other components won’t fit into place.
Attaching the tabletop to the miter saw stand
Build the tabletop from 3/4″ plywood. Fit the panel to the frame and secure it into place with 1 1/4″ screws.
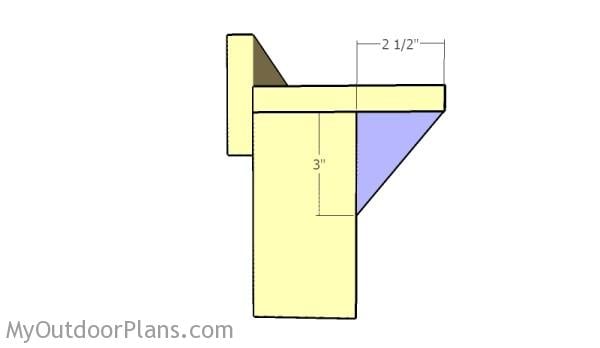
Building the frame of the extensions
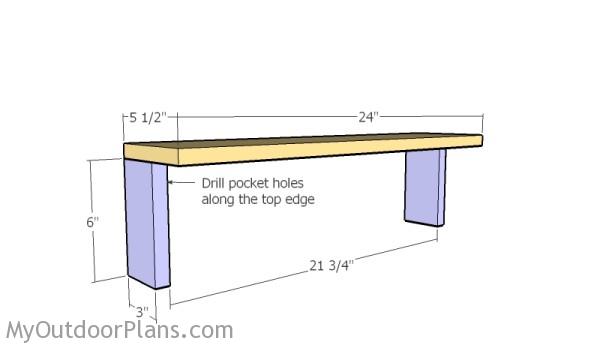
Continue the project by assembling the other components for the extensions. Build the vertical supports from 1×4 slats, making sure you adjust their width to 3″. Drill pocket holes along the top edge and insert 1 1/4″ screws into the horizontal 1×6 slat. Make sure the corners are square before inserting the screws.
Fitting the back slat to the extension
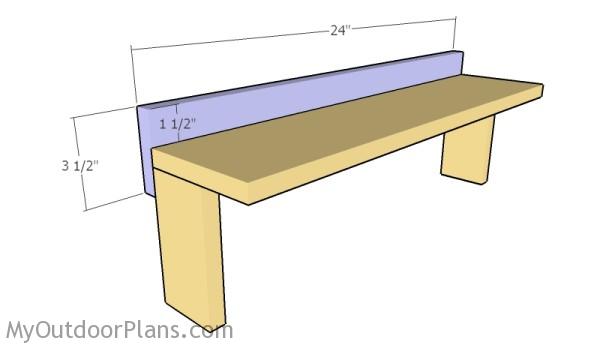
Next, attach a 1×4 slat to the back of the extension. Use 1 1/4″ screws to lock it into place, after drilling pilot holes.
Fitting the braces for the extensions
Enhance the rigidity of the extensions by attaching the braces. Use 1 1/4″ finishing nails and glue to lock the braces into place.
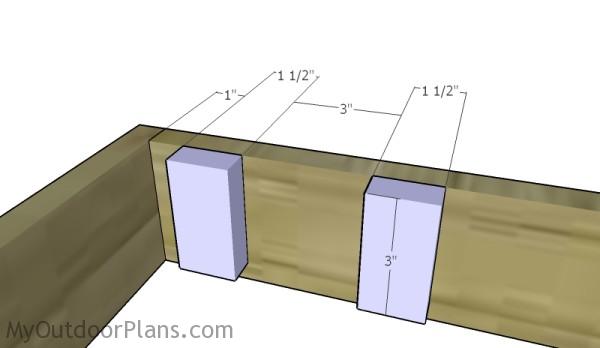
Fitting the supports for the extensions
Next, you need to attach 1×2 supports to the frame of the tabletop. These supports will guide the vertical arms of the extensions and lock them into place vertically. Drill pilot holes through the supports and insert 1 1/4″ screws into the frame.

Fitting the adjustable lumber supports
Slide the extensions between the supports, as shown in the diagram.

Fitting the extensions
Adjust the height of the extensions according to the deck of the miter saw you have. It is essential to create a horizontal surface for accurate cuts. Drill pilot holes through the vertical support and insert 1 1/4″ screws into the frame to lock the extensions into place tightly.
Miter Saw Table Plans
Fill the holes and dents with wood putty and let it dry out for several hours. Use 120-200 grit sandpaper to smooth the surface. Remember that you can adjust the design of the miter saw table to suit your needs. Premium Plans for this project available in the Shop.
Top Tip: If you want to enhance the look of the project and to protect the components from decay, we recommend you to apply paint or stain.
This woodworking project was about miter saw table plans. If you want to see more outdoor plans, we recommend you to check out the rest of our step by step projects. LIKE us on Facebook and Google + to be the first that gets out latest projects and to hep us keep adding free woodworking plans for you.
EXPLORE MORE IDEAS FOR:
 |
 |
 |
 |
15 comments
Thank you for sharing your plans. They are helpful!
You’re welcome! I’m looking forward to seeing your projects!
I like the top half, but for space I need it to fold away or just sit on my bench so I’ll have to skip the legs. I’ve been just stacking lumber on the floor, but it’s lacking accuracy.
If space is a problem for you, check out my other miter saw table design with folding sides: http://myoutdoorplans.com/workshop/miter-saw-stand-plans/ Let me know what you think.
I built my own Saw table also, will have to show you a picture with the plans for it.
That would be great. I’d love to see your design. You can send me the pictures here: http://myoutdoorplans.com/contact/
Thank you so very much for this plan. I don’t see in the notes a cut plan. Do you have one?
I don’t have that. This is all there is.
Please complete the material list as to what lumber to purchase. I only notice what screws to buy.
Done. Hope this helps.
I have an old radial arm saw that does a great job of crosscutting and miters but I have always had trouble with ripping with it even after following all the advise I have been able to find. I am considering selling it and buying a miter saw or table saw. I know that if I get a miter saw I will have to use a saber saw to do ripping which I lack accuracy doing. Any advise???
The table saw is the more versatile tool, but you must be aware of its complexity and risks. The miter saw will limit you to miter cuts and regular cuts, but no ripping the materials lengthwise.
I was searching for plans for a mitre saw table with fold down arms to save money. I look at this and think, hey, instead of folding down, which may sag with time or be difficult to level, what if the sides slid in and out like a drawer? … I may attempt a version of this table that does that. Thanks for so many great ideas, clear plans and instructions.
It would be nice to be able to download this plan so that I could transfer it to my laptop and take out to my shed to be able to build it but it’s not very helpful sitting on my desktop (no wi-fi in the shed out in the yard). I don’t see any place for downloads or is that limited to the premium plan?
Read this: https://myoutdoorplans.com/faq/