Looking to bring order to your garage, workshop, or storage area? This DIY tote storage rack is the perfect solution! With space to hold 32 durable, 27-gallon totes, this rack keeps everything neatly organized and easily accessible, eliminating the clutter and hassle of stacked bins. Whether you’re storing tools, seasonal decorations, or other essentials, this project is designed to make the most of your space and streamline your setup. Plus, our step-by-step guide makes it easy to build, even for beginners. Get ready to transform your storage with this efficient, customizable shelving system!
The DIY storage shelves for totes project is an affordable and efficient way to organize your space, and it can be completed over a weekend! Expect to spend around $100-$200, including lumber, screws, wood glue, and optional casters for mobility. Building the shelves and assembling the structure will take roughly 4-6 hours, with an additional 1-2 hours for sanding and finishing, if desired. Adding the totes and making final adjustments will take about an hour. In just 1-2 days, you’ll have a sturdy, accessible storage solution that brings order and functionality to your space! Take a look over the rest of my woodworking plans, if you want to get more building inspiration. Premium Plans for this project available in the Shop.
For this project, I recommend using cedar or hardwood for their durability and natural resistance to the elements. Cedar is a fantastic option because it’s lightweight, rot-resistant, and has a beautiful, rustic look. Hardwood, on the other hand, provides superior strength and longevity, making your project a sturdy and stylish addition to your home.
Projects made from these plans
DIY Tote Storage Rack – Free DIY Plans
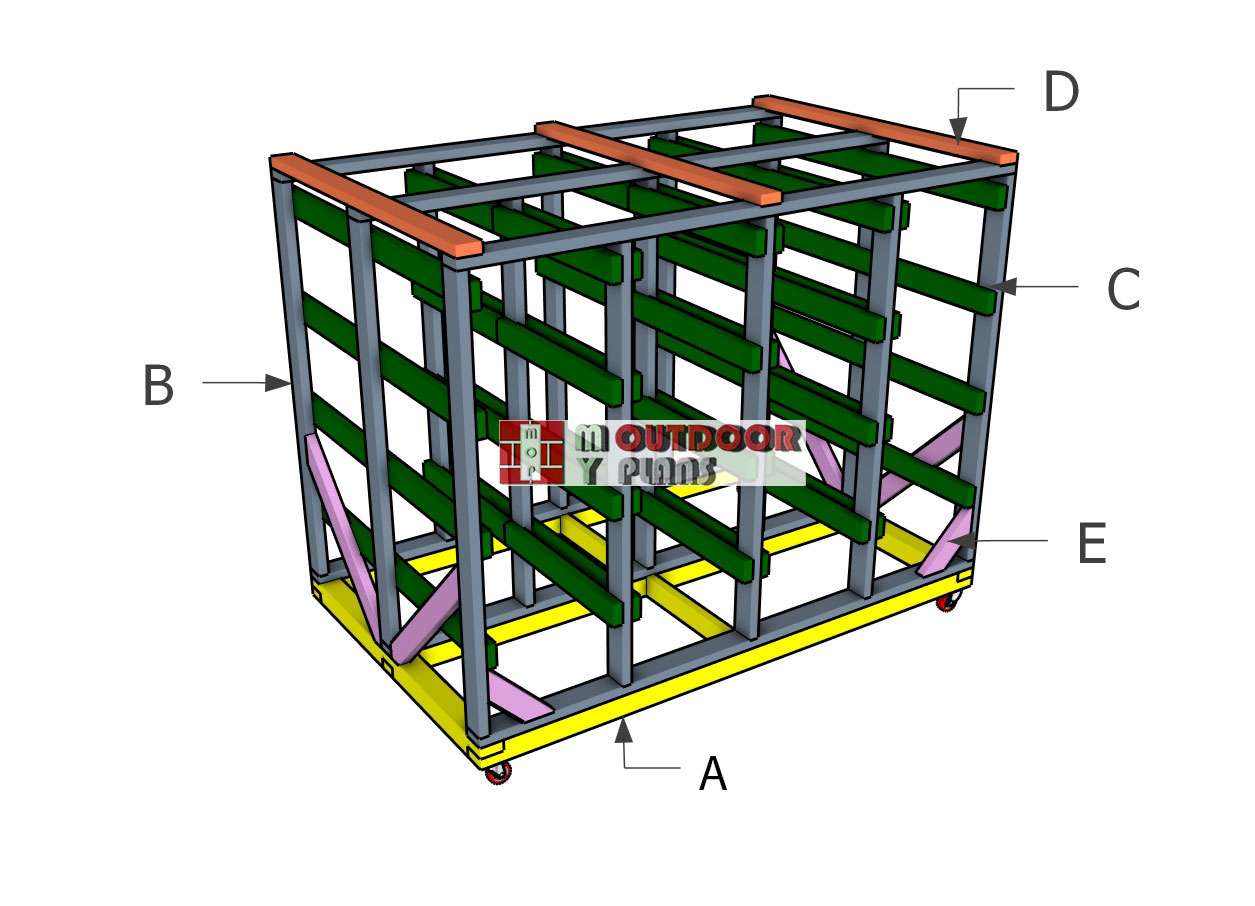
Building-a-large-storage-tote-unit-diy
Cut and Shopping Lists
A – BASE – 4×4 lumber 93 1/2″ long – 3 pieces
A – BASE – 4×4 lumber 58 1/2″ long – 2 pieces
A – BASE – 2×4 lumber 24″ long – 2 pieces
B – FRAME – 2×4 lumber 93 1/2″ long – 6 pieces
B – FRAME – 2×4 lumber 65″ long – 15 pieces
C – SUPPORTS – 2×4 lumber 58 1/2″ long – 32 pieces
D – TOP BRACES – 2×4 lumber 58 1/2″ long – 3 pieces
E – BRACES – 2×4 lumber 14 1/2″ long – 2 pieces
E – BRACES – 2×4 lumber 35 3/4″ long – 4 pieces
- 4×4 lumber 8 ft – 3 pieces
- 4×4 lumber 10 ft – 1 piece
- 2×4 lumber 12 ft – 9 pieces
- 2×4 lumber 10 ft – 18 pieces
- 2×4 lumber 8 ft – 6 pieces
- 27 gallon tote – 32 pieces
- 200 pieces of 3 1/2″ screws
- 200 pieces of 2 1/2″ screws
- Wood glue – 1 can
- Stain – 1 can
- 3″ caster wheels – 6 pieces
Tools
![]() Hammer, Tape measure, Framing square, Level
Hammer, Tape measure, Framing square, Level
![]() Miter saw, Drill machinery, Screwdriver, Sander
Miter saw, Drill machinery, Screwdriver, Sander
![]() Safety Gloves, Safety Glasses, Pocket hole jig
Safety Gloves, Safety Glasses, Pocket hole jig
Time
Related
- 9 Bucket garden stand plans
- Tote storage workbench plans
- Heavy duty workbench plans
- 16 Tote shelves plans
Pin it for Later!
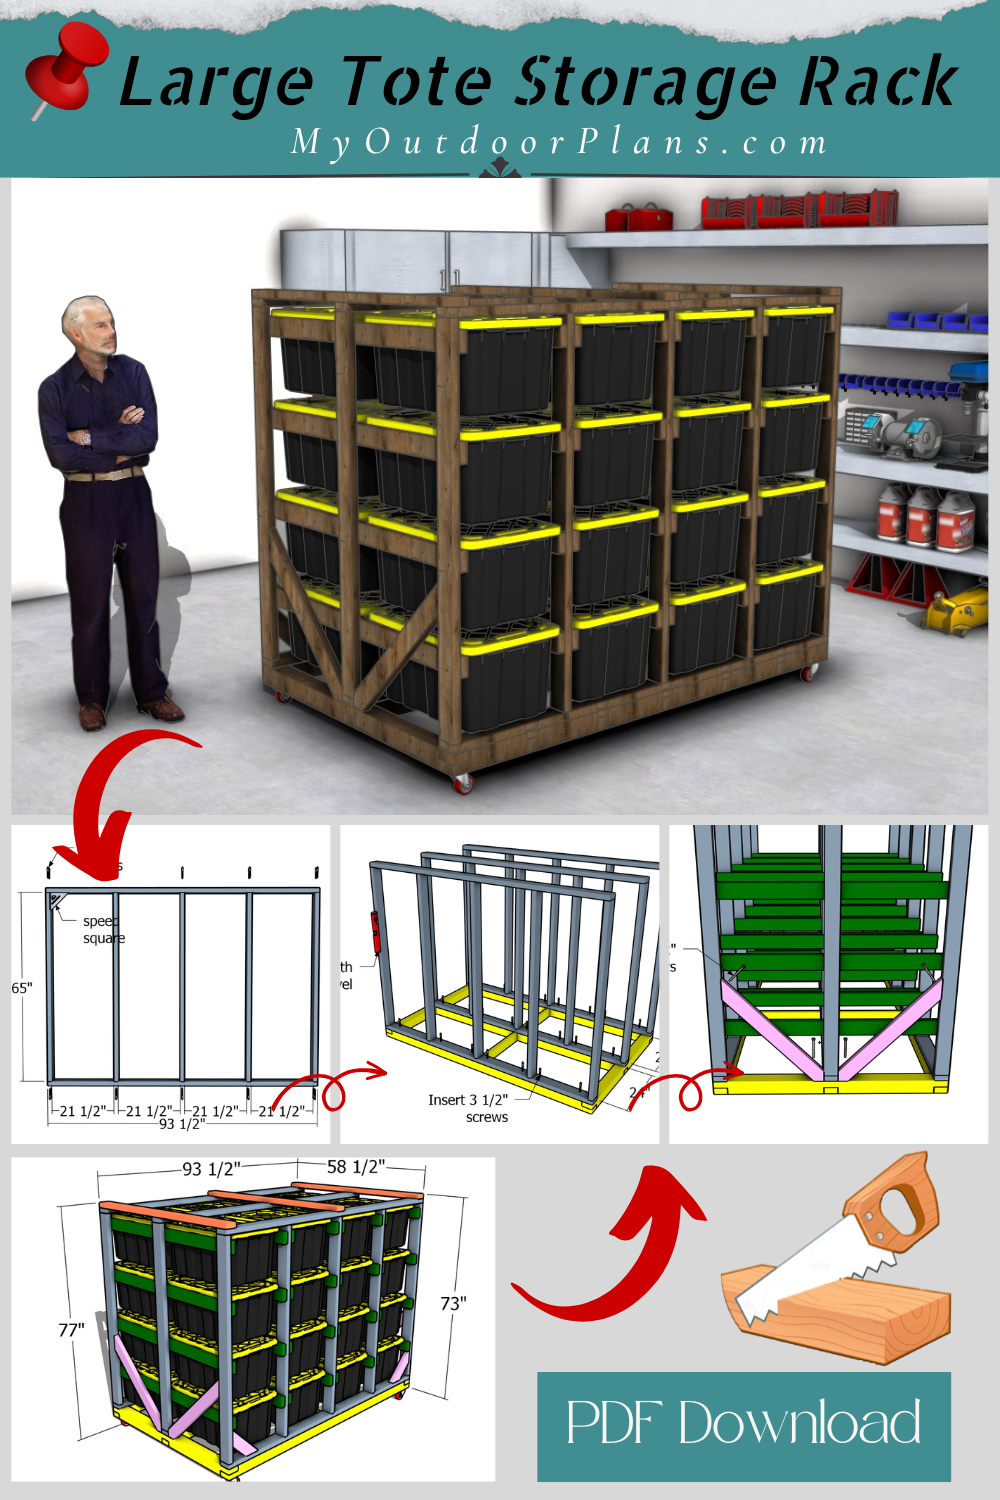
It’s that easy to build a tote storage rack!
Step 1: Building the base
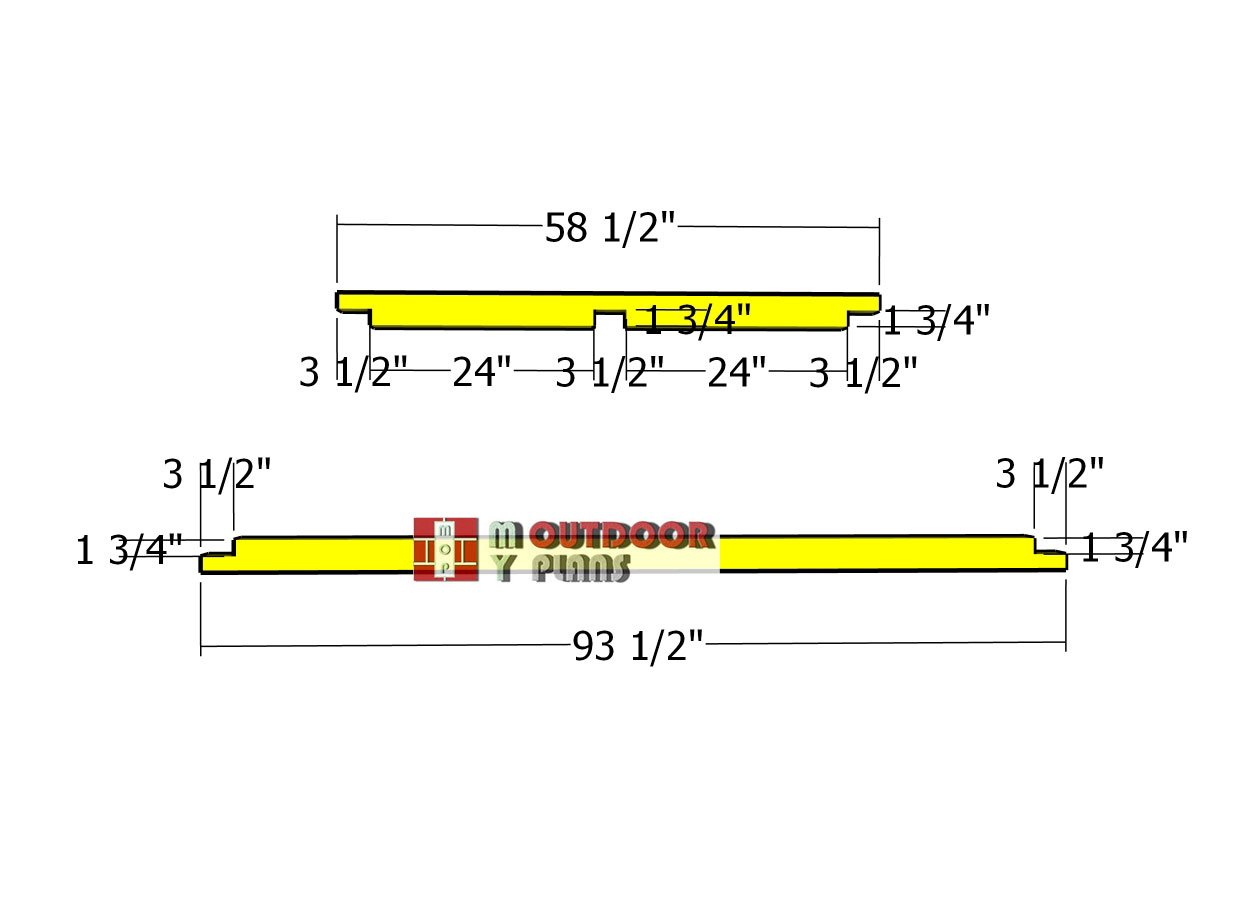
Fitting-the-skids
To start building the base for your storage tote shelving system, begin with the skids. Use sturdy 4×4 lumber and mark the notch cut lines according to the diagram. Grab a circular saw to make parallel cuts within the marked area, then use a chisel and hammer to remove the excess wood cleanly. This will create secure notches that will give your shelving system a solid, stable foundation.
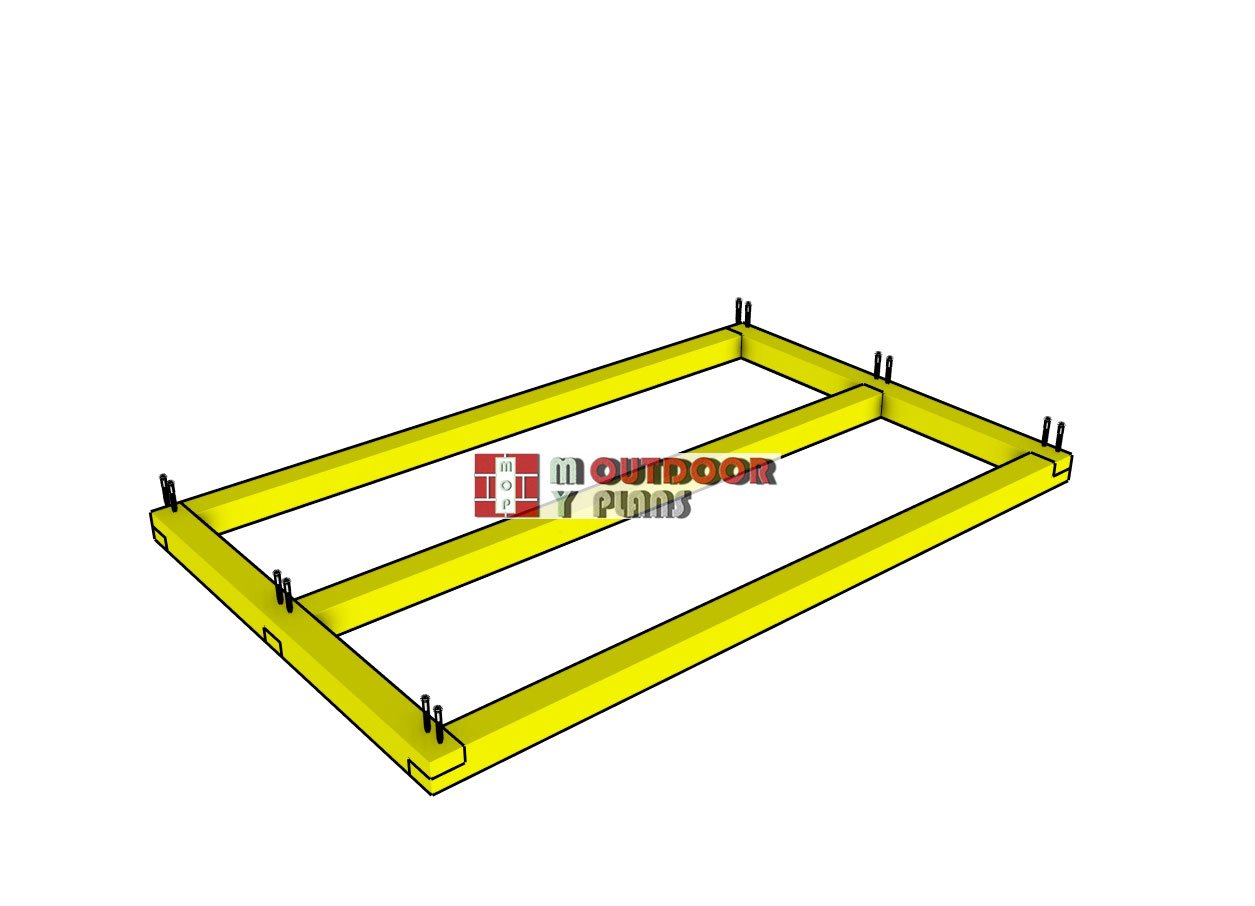
Assembling-the-floor-frame
Place the skids on a level surface and align them as shown in the diagram. Ensure the corners are square and that all edges are flush for a solid base. Drill pilot holes through the side beams, then secure each joint with 3 1/2″ screws—using two screws per joint for maximum stability. This will lock the skids together tightly, providing a strong foundation for your shelving system.
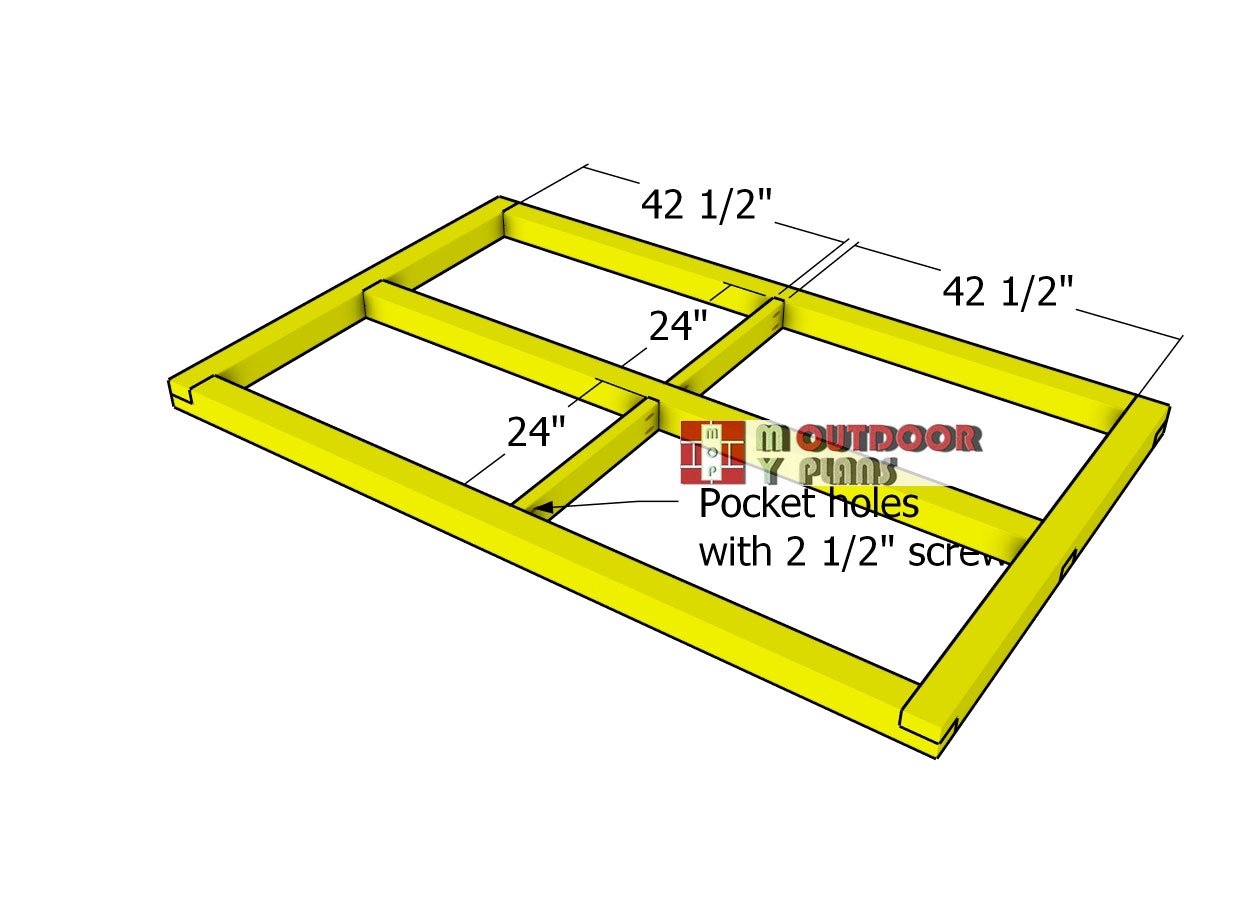
Floor-frame-spacers
Add 2×4 spacers to the floor frame for extra reinforcement. Drill pocket holes at both ends of each spacer and position them in the center of the frame, as shown in the plans. Secure the spacers by inserting 2 1/2″ screws, ensuring everything is locked tightly in place. These supports will add stability and strength to your shelving base, making it ready to hold those storage totes securely!
Step 2: Assembling the structure
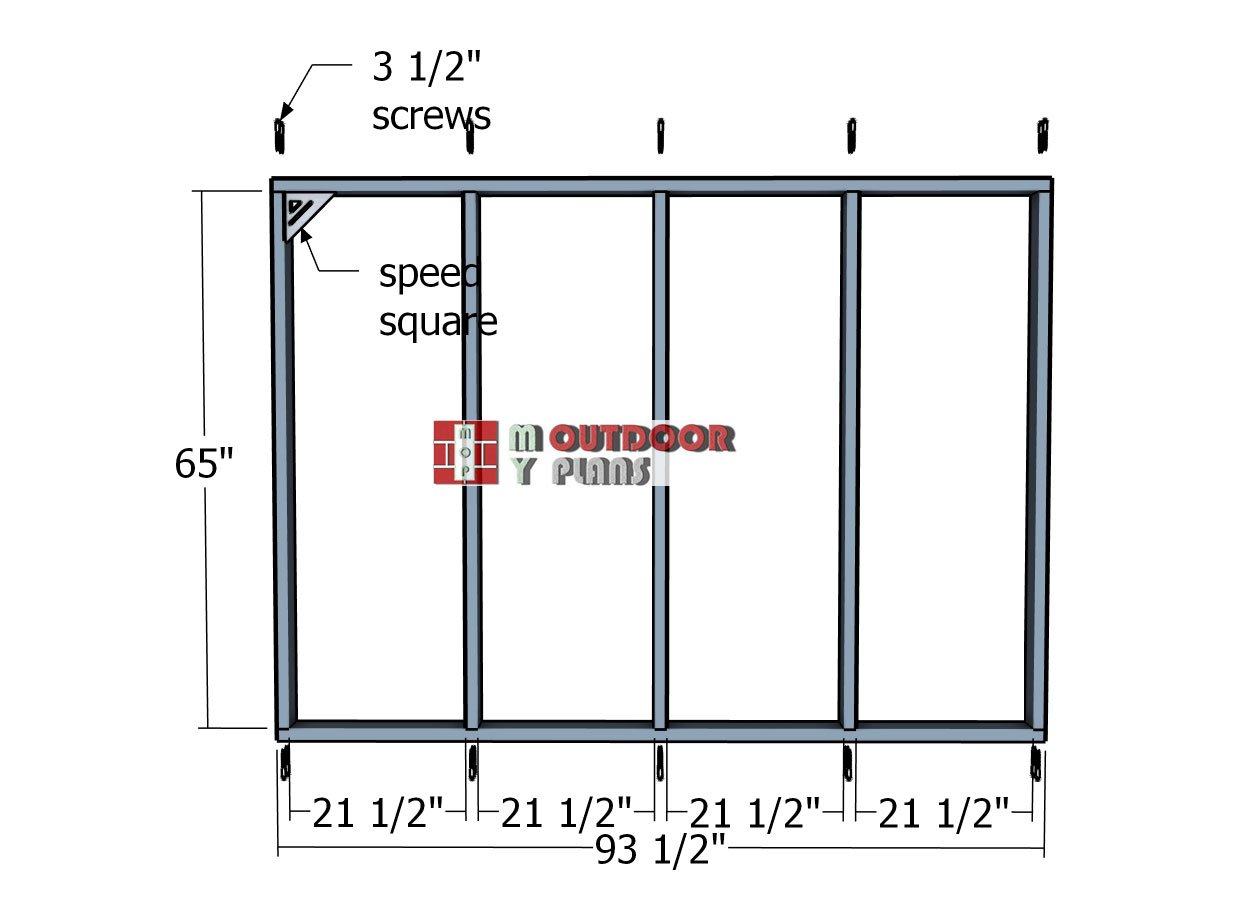
Assembling-the-frames
With the base complete, it’s time to move on to building the three frames that will form the backbone of your shelving system. Cut your 2×4 components to lengths of 65″ and 93 1/2″, then lay them out on a level surface. Align the edges flush and double-check that all corners are square using a speed square. Drill pilot holes through the top and bottom plates, then secure each stud with 3 1/2″ screws—using two screws per joint for solid, stable connections. These frames will provide the core structure needed to support your storage totes.
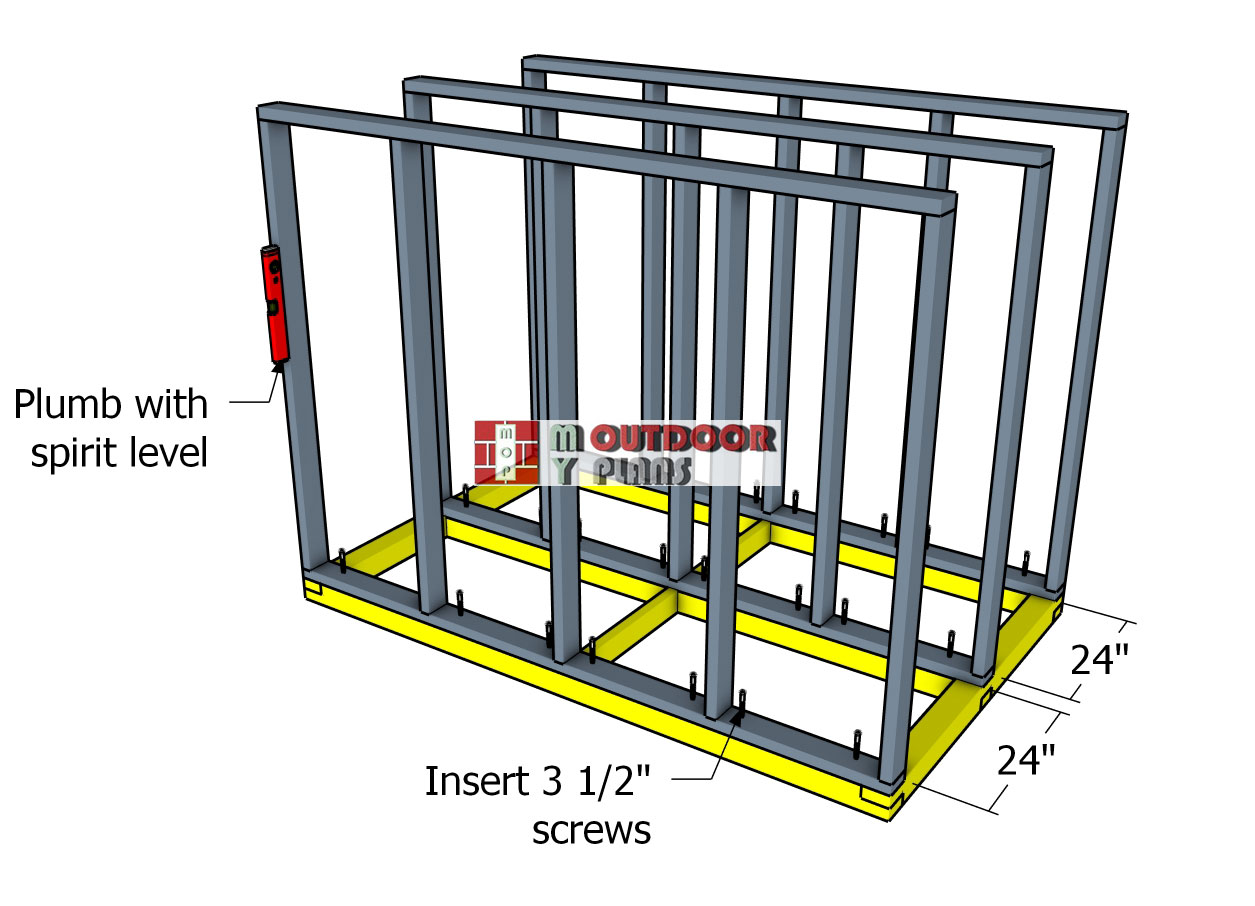
Installing-the-frames
Attach the frames to the base of your mobile shelf unit by aligning them over the three base skids, ensuring the sides are flush. Use a spirit level to plumb the frames so they’re perfectly vertical. Drill pilot holes through the base plate and secure each frame to the skids with 3 1/2″ screws, using a total of 8 screws per frame for a strong, stable hold. This will anchor the frames firmly to the base, creating a solid structure for your shelving unit.
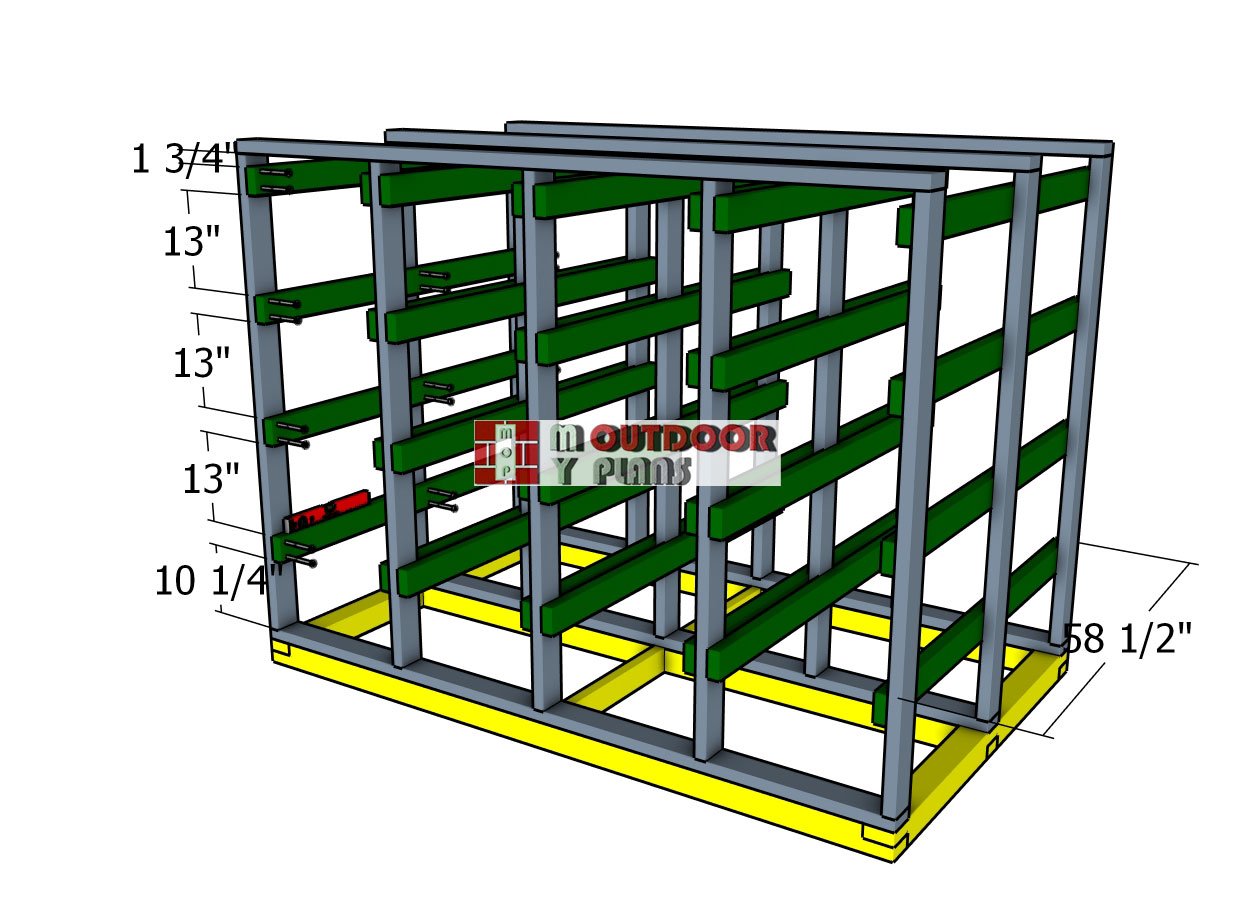
Fitting-the-cleats
Next, attach the 2×4 cleats to your DIY tote shelving system. Secure each cleat with two 2 1/2″ screws per joint, ensuring a strong hold. Use a spirit level to make sure each cleat is perfectly horizontal, which is key to keeping your shelves level. Pay close attention to the spacing between the cleats as outlined in the plans, this precision will give your shelving unit a clean, professional finish that’s ready for storing those totes securely!
Fitting-the-top-slats
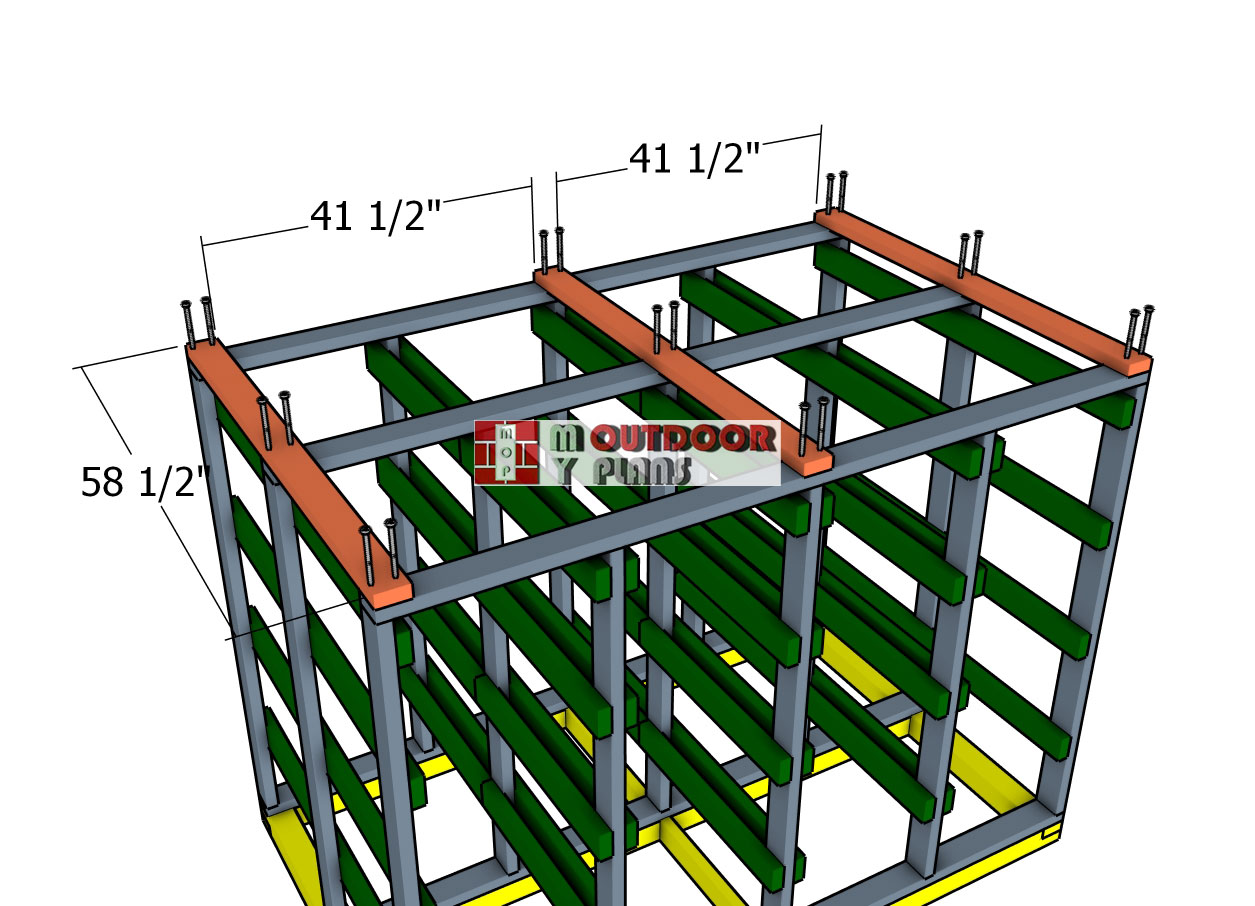
Install the 2×4 braces at the top of the mobile storage unit to add stability. Make sure the edges are flush on all sides for a neat fit. Secure each brace to the three frames with 2 1/2″ screws, using two screws per joint for a strong connection. These braces will help keep the unit solid and steady, completing the frame structure of your shelving system.
Back-braces
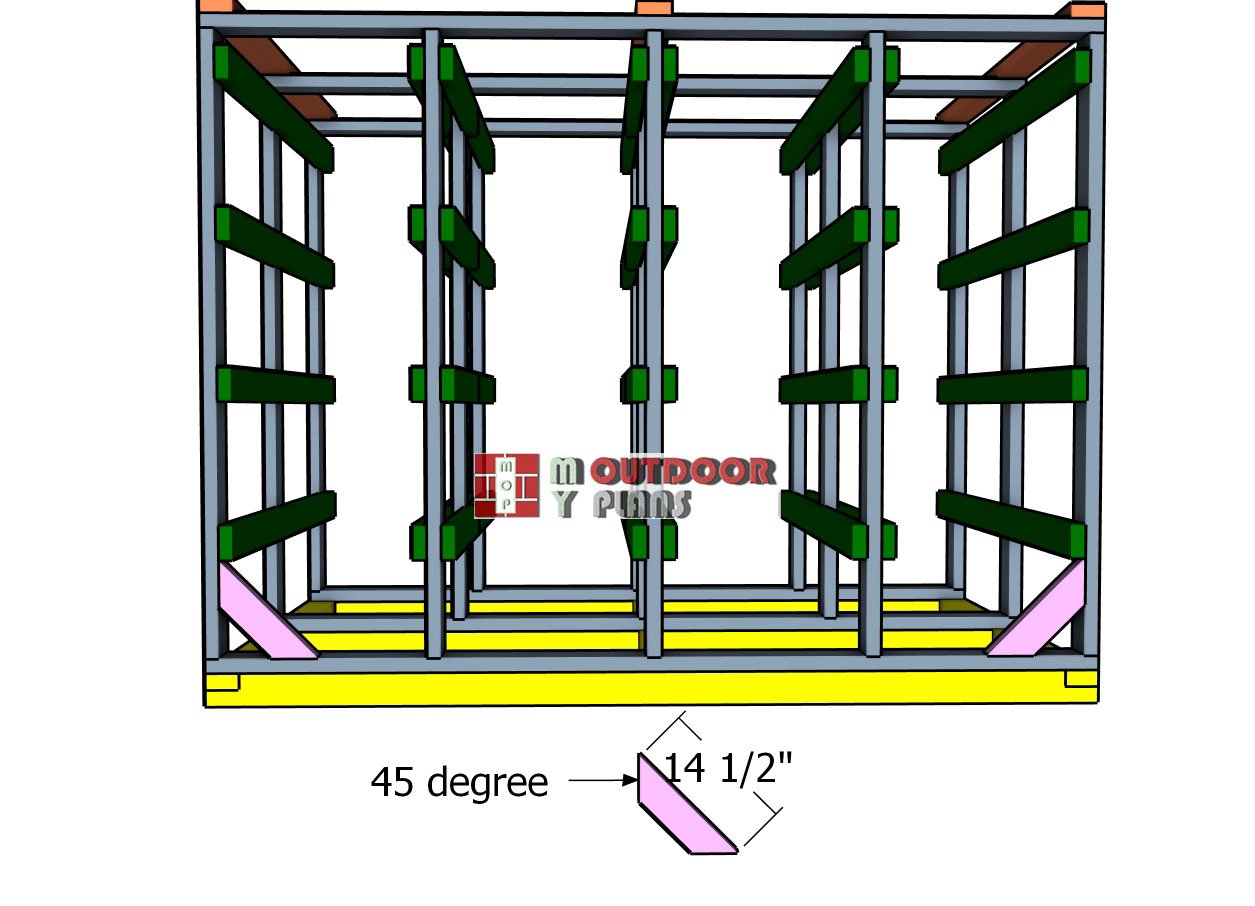
Now, add the diagonal braces to the back of the storage shelves to reinforce the structure. Cut each brace at a 45-degree angle on both ends for a precise fit. Position them as shown in the diagram, aligning them carefully with the frame. Drill pilot holes, then secure the braces with 3 1/2″ screws, using two screws per joint to lock the braces firmly to the back frame. These diagonal supports will greatly enhance the stability of your shelving unit.
Diagonal-braces
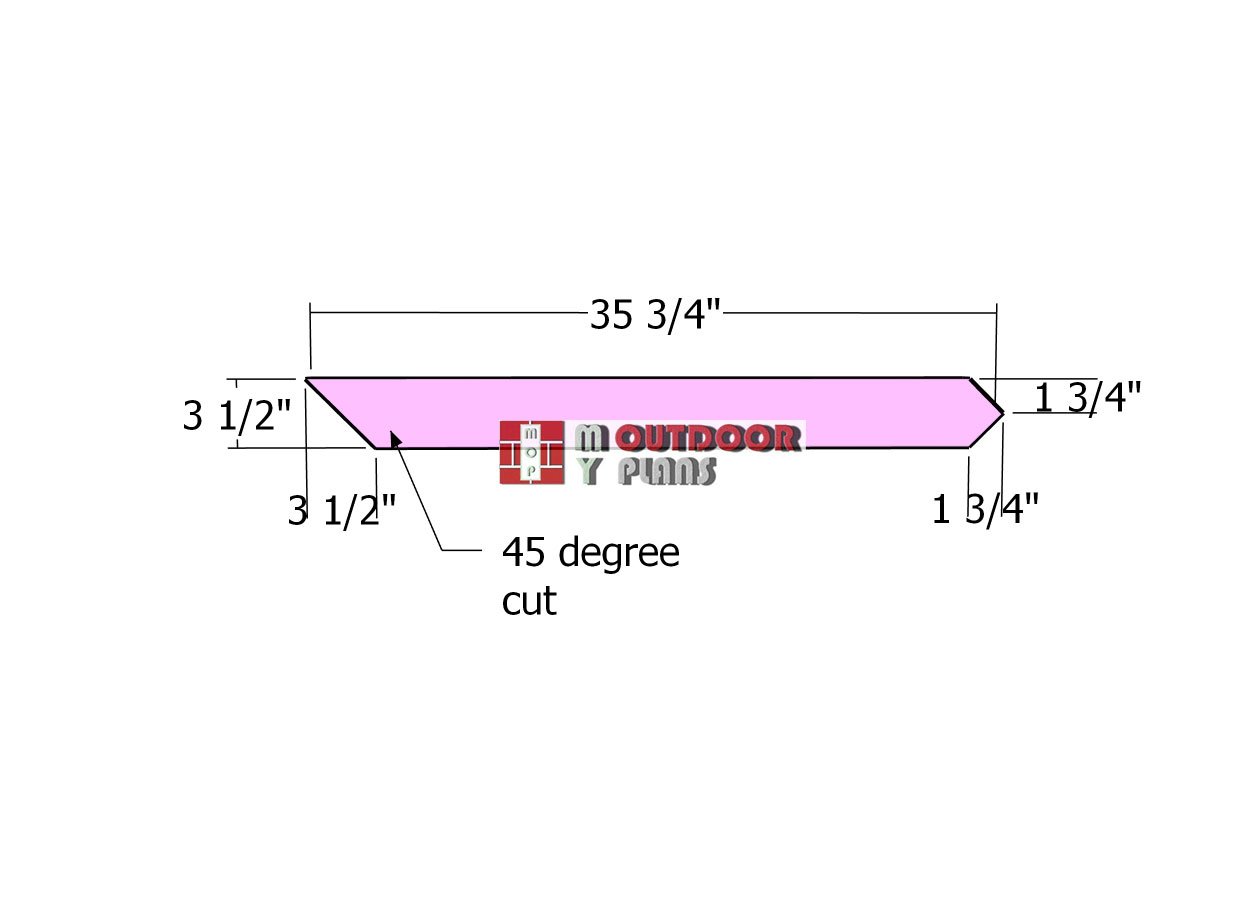
Cut the diagonal braces from 2×4 lumber, making sure to create the angled cuts before fitting them to the storage rack. Start by marking the cut lines carefully, then use either a circular saw or a miter saw to achieve clean, accurate cuts. This prep work ensures the braces will fit perfectly, giving your storage rack the support and stability it needs.
Attaching-the-diagonal-braces
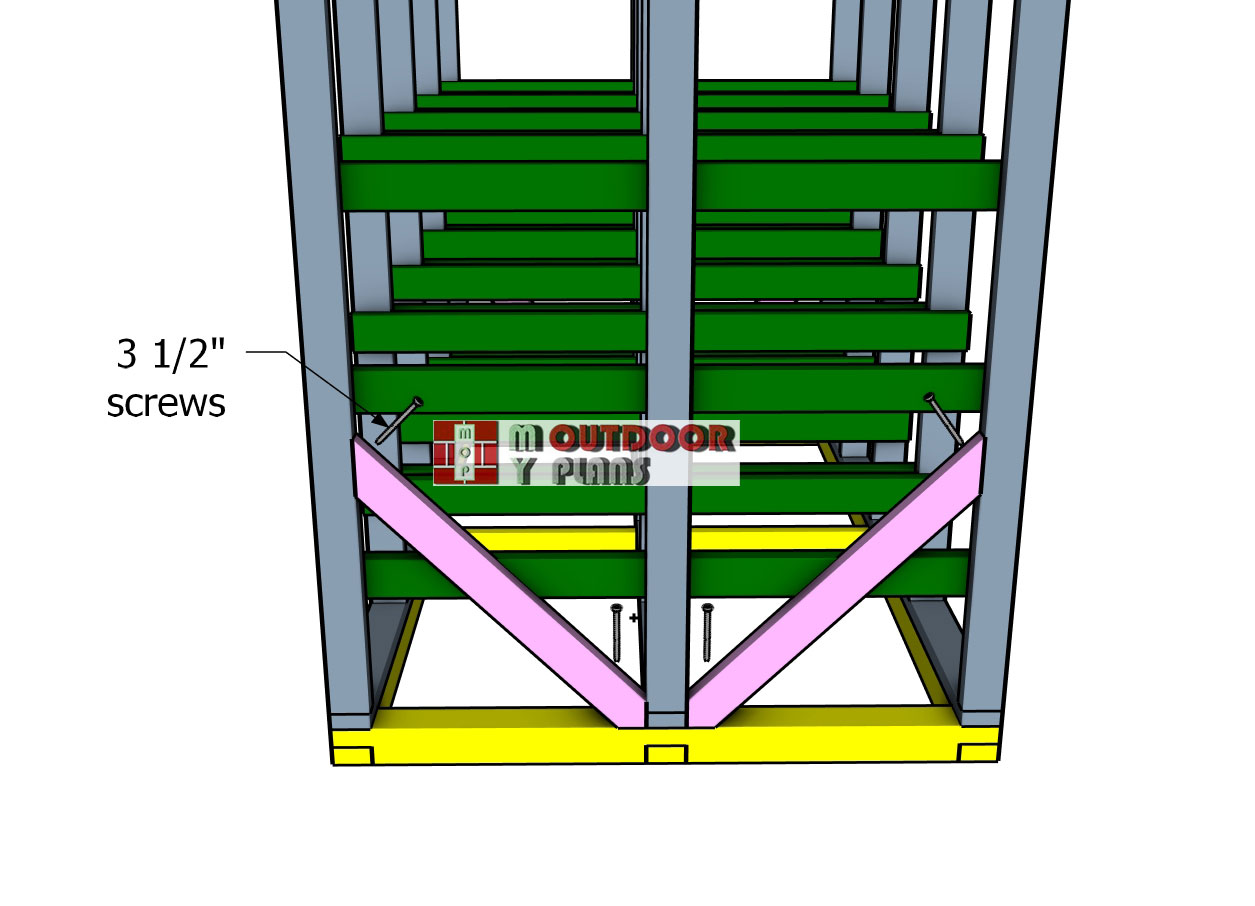
Next, attach the diagonal braces to the sides of the unit rack for added stability. Drill pilot holes, then secure each brace with 3 1/2″ screws to lock them firmly to the storage rack. These side braces will significantly strengthen the entire structure, ensuring it’s sturdy enough to hold the totes securely and reliably.
Step 3: Finishing Touches
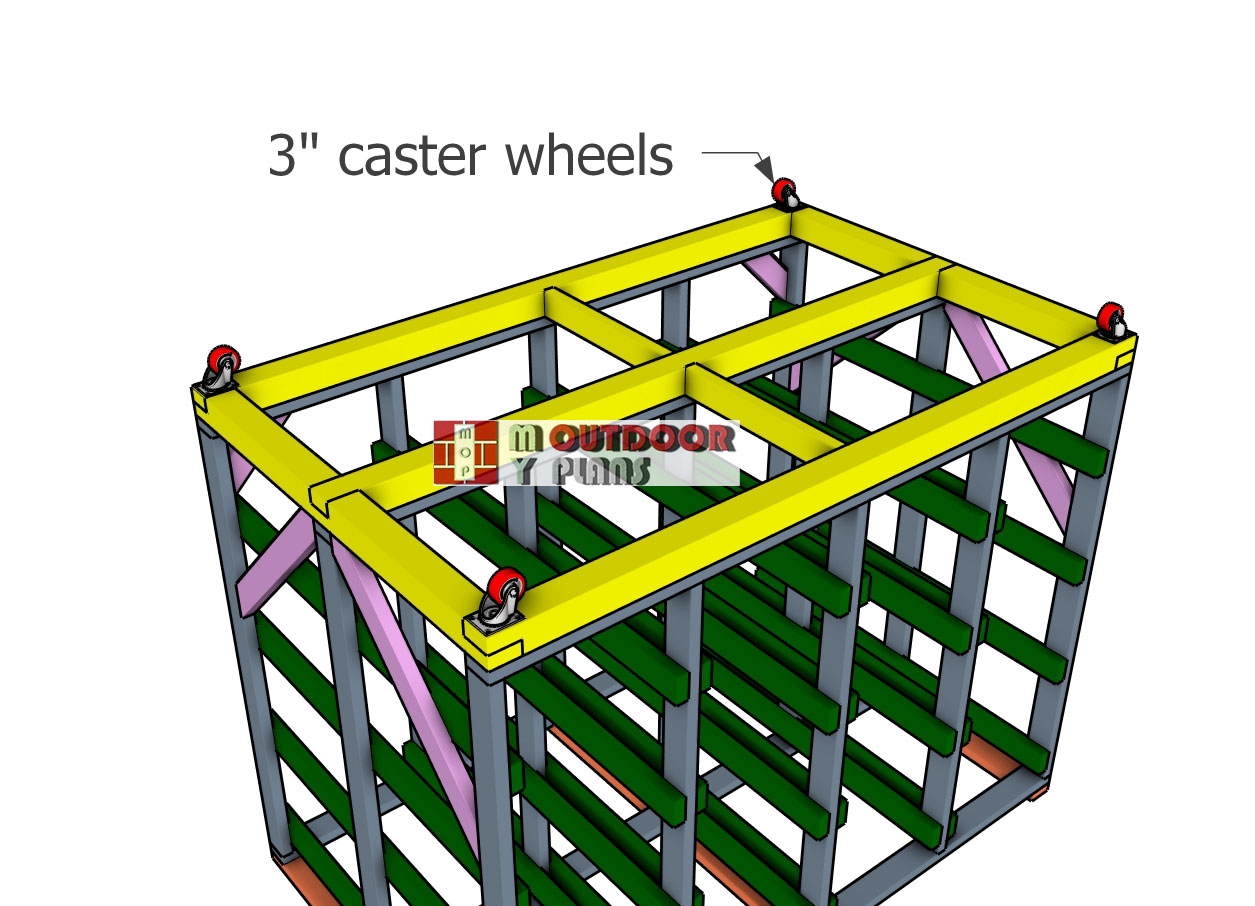
Fitting-the-caster-wheels
To make your storage shelf system mobile, attach 3″ caster wheels to the base. Four casters will work for lighter loads, but if you plan to store heavier items, consider adding two extra casters in the center of the base frame for extra support. This will distribute the weight more evenly and improve stability, making it easier to move your loaded shelf system around as needed.
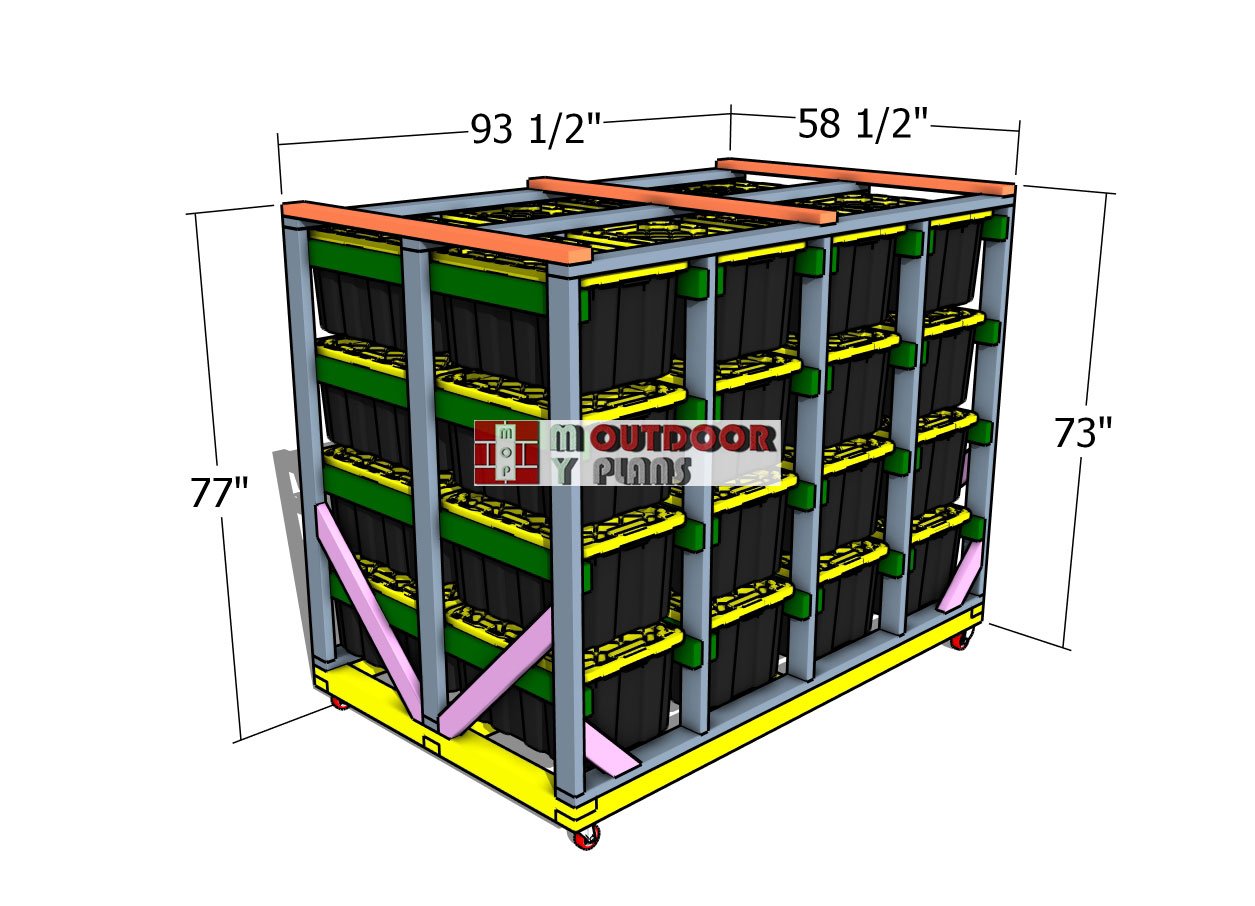
32-tote-storage-unit—dimensions
For the finishing touches, start by filling any visible holes or gaps with wood filler, letting it dry completely before sanding the entire structure for a smooth, polished look. If you’re planning to stain or paint, now’s the time to apply your chosen finish, adding both style and protection to your storage unit.
A clear coat or sealant will provide added durability, especially if the shelving will be exposed to moisture or heavy use. Finally, double-check that all screws are tight, and if you’ve added casters, test the mobility of the unit to ensure it rolls smoothly. These finishing touches will give your storage shelf system a clean, professional look that’s ready for action!
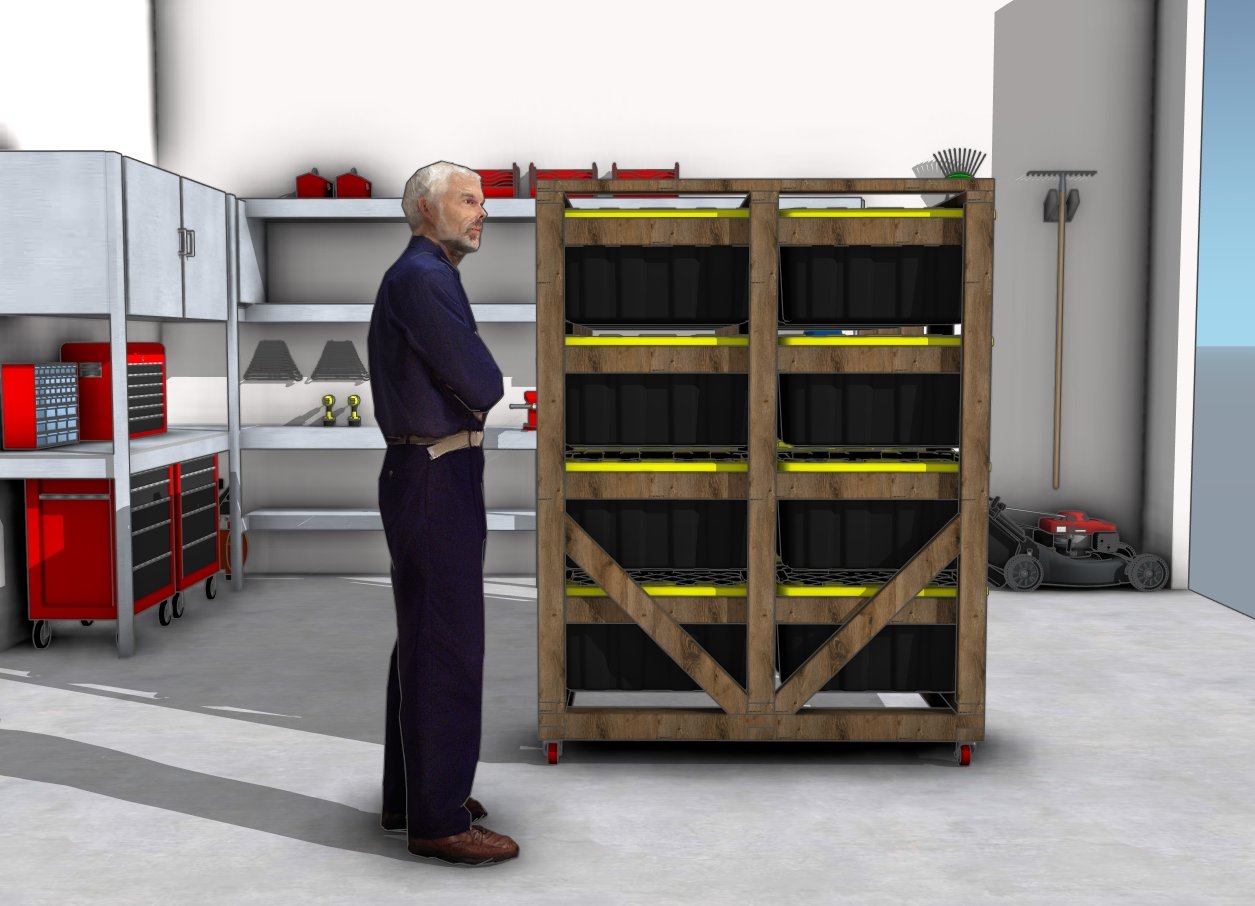
How to build a mobile tote storage rack
With the storage rack complete, it’s time to add the 32 sturdy, 27-gallon totes. These totes slide seamlessly onto each shelf, creating an organized, efficient storage solution that makes it easy to locate and access your items. Each tote can be designated for specific tools, seasonal items, or supplies, helping you maintain a clutter-free space.
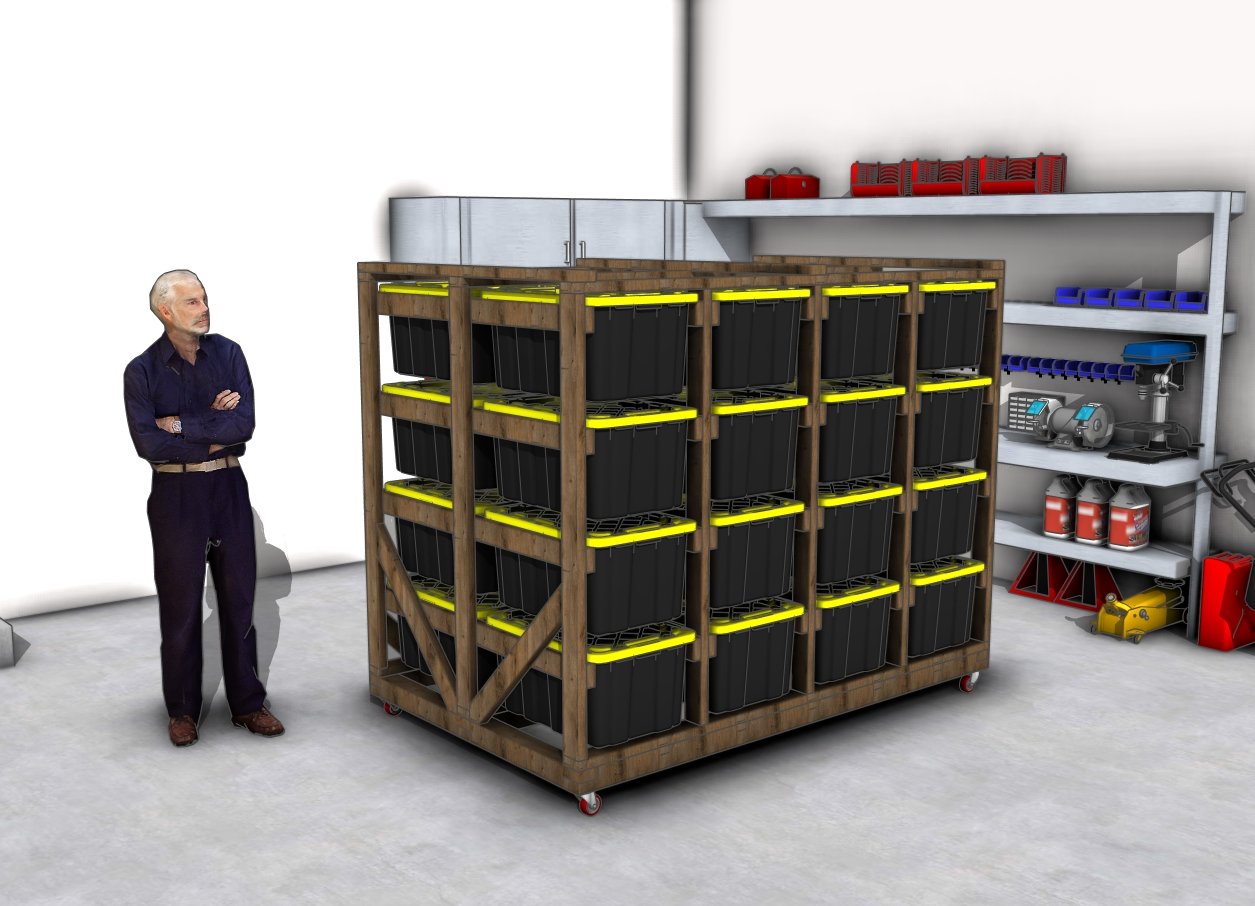
How to build a large tote storage rack
With this setup, everything has its place, and you’ll no longer have to dig through piles or stacks to find what you need. It’s the perfect system for anyone looking to bring order and functionality to their storage area!
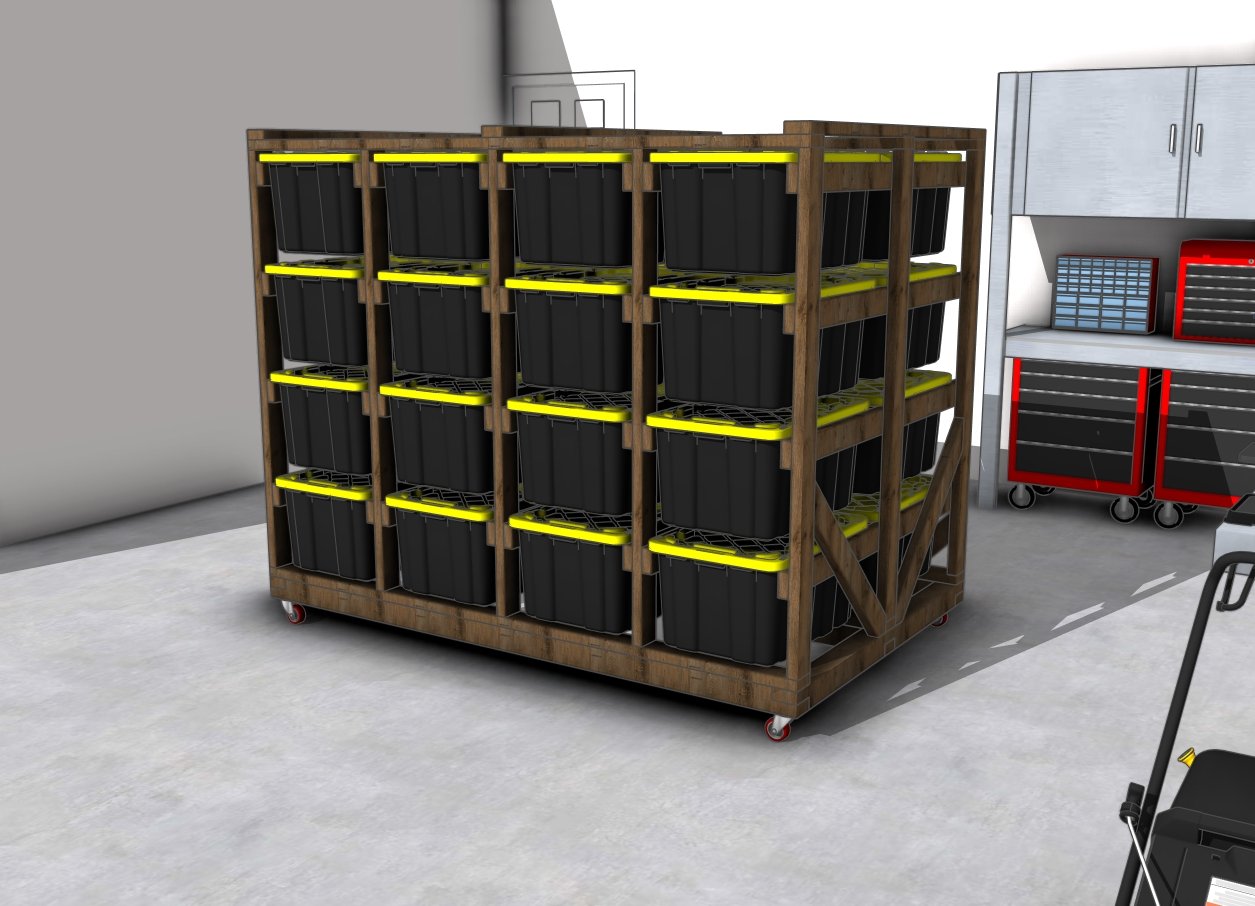
DIY Tote storage shelves plans
If you want to get the Premium plans with all the extras, just press the GET PREMIUM PLANS button bellow. If you want to get the free plans, just read the blog FAQs. Make sure you check out the rest of the DIY plans on my blog, for even more building inspiration.
This woodworking project was about tote storage workbench – free DIY plans. If you want to see more outdoor plans, check out the rest of our step by step projects and follow the instructions to obtain a professional result.

