This step by step woodworking project is about utility shed plans. Building a storage shed has many advantages, but in most of the cases it requires a large investment and a huge amount of work. Nevertheless, in this article we will show you an easier way to get things done, while building a shed with lots of storage space and a beautiful appearance. Follow the instructions and buy quality materials.
In order to get the job done as a profession, using the least amount of materials and time, you need to plan everything from the very beginning. Don’t forget that you should consult the local building codes before starting the actual construction. If the 8×10 storage shed requires a building permit, you have to comply with several legal requirements. Place the shed on a level surface, if you want to get a durable result. See all my Premium Plans HERE.
Projects made from these plans
Cut & Shopping Lists
- A – 2 pieces of 2×6 lumber – 120”, 9 pieces of 2×6 lumber – 93” long JOISTS
- B – 3 pieces of 3/4” tongue and groove plywood – 48×96” long FLOORING
- C – 4 pieces of 2×4 lumber – 89”, 2 pieces – 96”, 4 pieces – 120”, 2 pieces – 113” PLATES
- D – 22 pieces of 2×4 lumber – 84” long STUDS
- E – 8 pieces of 5/8” grooved plywood SIDING
Tools
![]() Hammer, Tape measure, Framing square
Hammer, Tape measure, Framing square
![]() Miter saw, Drill machinery, Screwdriver, Sander
Miter saw, Drill machinery, Screwdriver, Sander
Time
![]() One weekend
One weekend
Related
- Part 1: Utility Shed Plans
- Part 2: Building a Shed Roof
8×10 Shed Plans
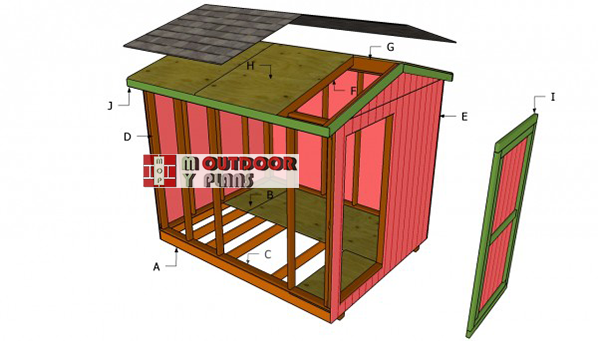
8×10-shed-plans
If you need to add storage space to your backyard, but in the same time you don’t have a large budget, building a 8×10 shed would probably fit your needs perfectly. As you should notice in the image, this project is about a simple wooden structure.
Top Tip: Due to the large amount of information, we won’t be able to cover all the aspects of building an utility shed in just an article, so make sure you check the rest of the project parts.
Utility shed plans

Floor-frame-plans
The first step of the project is to build the frame of the shed. In order to get the job done easily, place the floor frame on top of several 4×4 skids. As you can see in the image, you need to leave about 8 inches from the edges of the frame to the wooden skids.
Drill pilot holes trough the rim joists into the 2×6 joists, before inserting the 3” screws, to prevent the wood from splitting.
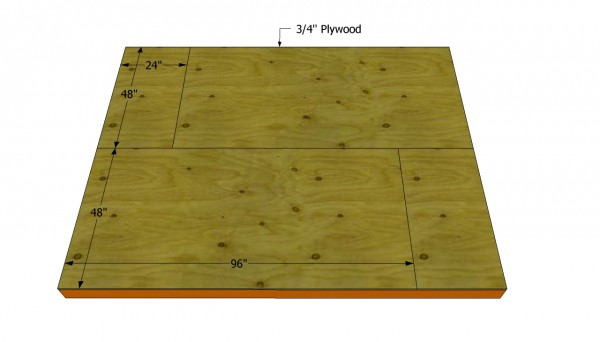
Installing the plywood floor
Make sure the corners of the frame are square and check if the diagonals are equal. Afterwards, you have to attach 3/4” plywood sheets to the frame and secure them to the joists with 2” nails, every 6”.
Top Tip: Use tongue and groove plywood sheets, as they will facilitate the installation of the sheets into place. Cut the sheets to the right size with a circular saw.
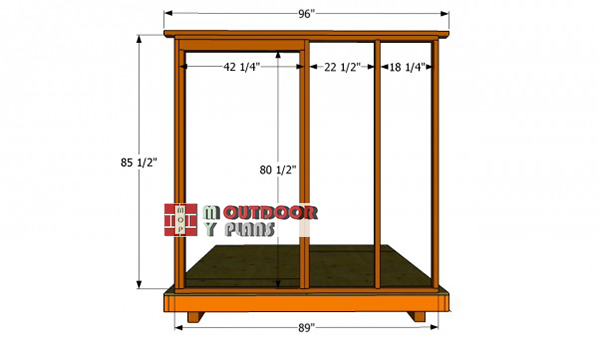
Front-face-plans
The font wall of the shed is the most complex step of the whole project. As you can notice in the image, you should leave enough space for a large door. The top plate should stick out 3 1/2” on both sides of the frame.
Top Tip: Install a double header on top of the door opening. In addition, the trimmer studs will provide extra-support to the frame. Use a carpentry square to ensure the corners are right-angled.
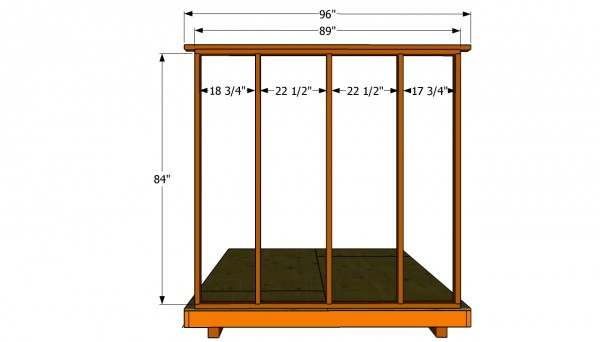
Back wall plans
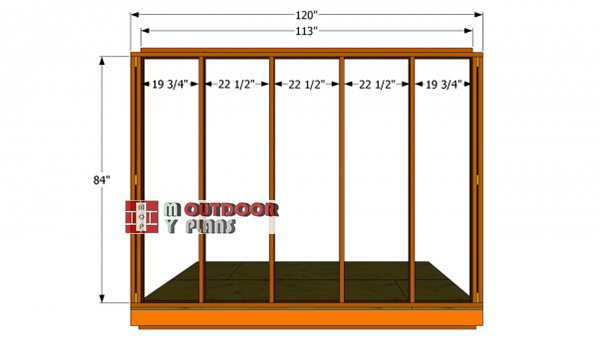
The back wall of the utility shed is easy to build, as you just have to follow our plans and use the basic woodworking techniques. Drill pilot holes trough the plates, before driving in the 3” screws into the studs. In addition, check if the corners are square, after each step.
Top Tip: Build the wall frames on the ground, making sure you choose a level surface. The studs should be equally spaced, every 24” on center.
Side-walls-plans
The side walls don’t require many woodworking skills, as you just need to attach the studs to the 2×4 plates and lock them with galvanized screws. Generally speaking, the studs have to be placed every 24” on center, so make sure you take accurate measurements.
Top Tip: Fill the space between the studs placed at both ends of the wall with 1/2” plywood. Cut the blocking using a circular saw.

Installing the wall frames
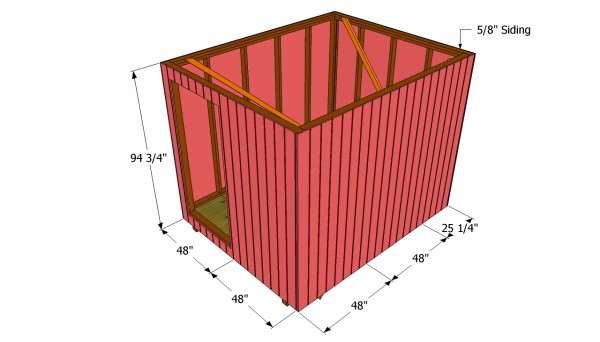
After building the four walls of the 8×10 shed, you should lay them on top of the floor. Make sure you align the exterior edges with the frame of the floor, before drilling pilot holes and inserting 3 1/2” wood screws. Reinforce the joints between the wall with 3” screws.
Top Tip: Install 2×4 temporarily braces to increase the rigidity of the frame, as in the plans, after plumbing the walls with a spirit level.
Attaching the exterior siding
After building the frame of the 8×10 shed, you need to attach the exterior siding. In order to attach the 5/8” grooved plywood to the frame, you need to adjust the size of the sheets. Use a circular saw to make the cuts. Attach the siding to the wall frames and drive in 1 1/4” nails into the studs.
Top Tip: Make sure the sheets are flush with the edges. Check out the next part of the project, to learn how to build the roof of the shed.
This woodworking project was about utility shed plans. If you want to see more outdoor plans, check out the rest of our step by step projects and follow the instructions to obtain a professional result.


6 comments
You make it seem so easy!! Love the plans! I don’t know how to build anything but I want a shed for my tools!
Thank you for the nice words. Building a tools shed is a nice start for more diy projects in the future.
Thanks for the plans. Being a new home owner and young farmer money is tight and sometimes plans are confusing or not free, but yours was so simple. I am building this 8×10 plan from old lumber from a torn down barn thats over 100 yo. Thanks for helping a fellow in Texas out. God bless.
Bradley
Glad I could help! Good luck with the project and let me know how it comes out. I would love to see, once you are done!
Sir,
I am disabled and have carers, however, I really would like to demolish my 18yr pre-build pent shed, which has rotted away, and replace the 8×7 with perhaps a corner shed 8×8, with the door across one of the corners as you have on one of your pictures.
It will probably take me a long time to complete, but I would like to attempt it, as opposed to buying a ready made one again.
If I knew what timber was required, I could have it delivered, and then I could make a start on cutting them to required sizes.
I live in the UK, but have found your site the best.
Regards
Phil Melson.
You should check this as well: https://myoutdoorplans.com/shed/8×8-5-sided-corner-shed-free-diy-plans/