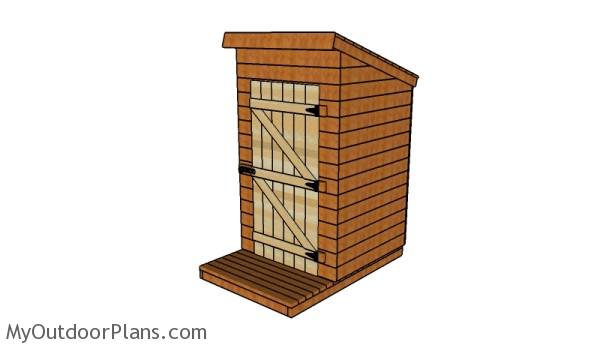
This step by step diy woodworking project is about a outhouse plans. I have designed building plans for this lean to outhouse so that anyone can get the job done with no prior experience in woodworking. This project has three parts, so make sure you check out the following articles to learn more on how to build an outhouse roof. Take a look over the rest of our woodworking plans, if you want to get more building inspiration.
When buying the lumber, you should select the planks with great care, making sure they are straight and without any visible flaws (cracks, knots, twists, decay). Investing in cedar or other weather resistant lumber is a good idea, as it will pay off on the long run. Use a spirit level to plumb and align the components, before inserting the galvanized screws, otherwise the project won’t have a symmetrical look. If you have all the materials and tools required for the project, you could get the job done in about a day. See all my Premium Plans HERE.
Projects made from these plans
It’s that simple to build an outhouse!
Outhouse Plans
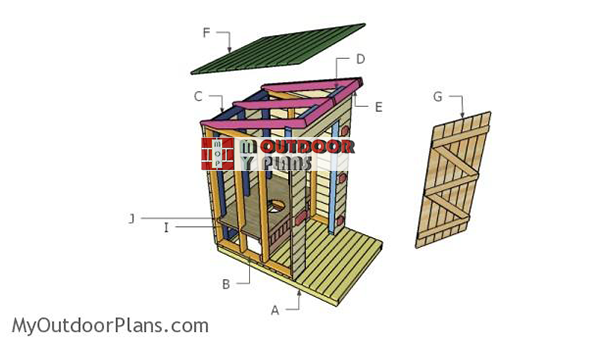
Building-an-outhouse
[tabs tab1=”Materials” tab2=”Tools” tab3=”Time” tab4=”Related Plans”] [tab id=1]
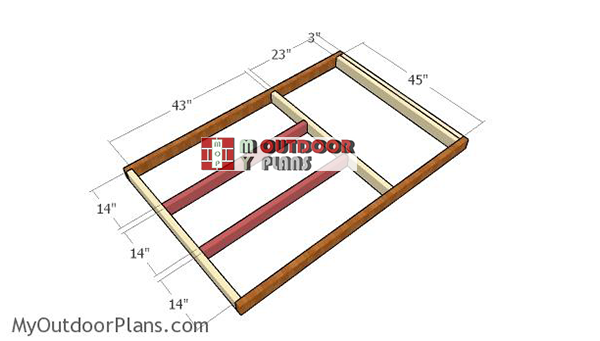
- A – 2 pieces of 2×4 lumber – 72″ long, 4 pieces – 45″ long, 2 pieces – 43″ long, 13 pieces – 48″ long, 2 pieces – 22 1/2″ long FLOOR
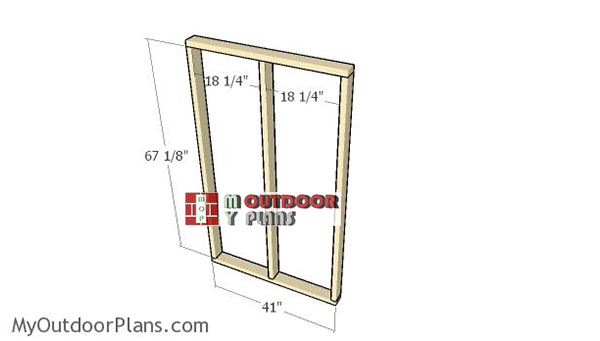
- B – 2 pieces of 2×4 lumber – 48″ long, 4 pieces – 67 1/8″ long 2xSIDE WALL
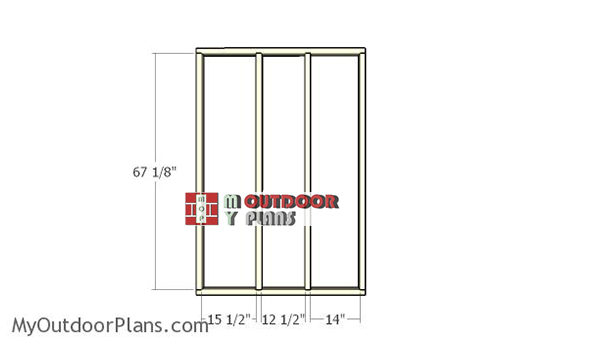
- C – 2 pieces of 2×4 lumber – 41″ long, 3 pieces – 67 1/8″ long BACK WALL
- D – 4 pieces of 2×4 lumber – 11″ long, 4 pieces – 67 1/8″ long, 2 pieces – 48″ long, 5 pieces – 9 3/8″ long FRONT WALL
- I – 2 pieces of 2×4 lumber – 48″ long, 2 pieces – 18 1/4″ long, 2 pieces – 23 3/4″ long, 2 pieces – 11″ long, 2 pieces – 14″ long SEAT
- F – 12 pieces of 1×4 lumber – 16 1/2″ long, 1 piece of 3/4″ plywood- 29 1/2″x48″ long SEAT
- 32 pieces of 2×4 lumber – 8′
- 3 pieces of 1×4 lumber – 8′
- 1 piece of 3/4″ plywood – 4’x4
- 500 pieces of 2 1/2″ screws
- 100 pieces of 1 1/4″ screws
- 100 pieces of 2″ brad nails
- wood glue, stain/paint
[/tab] [tab id=2]
![]() Hammer, Tape measure, Framing square, Level
Hammer, Tape measure, Framing square, Level
![]() Miter saw, Drill machinery, Screwdriver, Sander
Miter saw, Drill machinery, Screwdriver, Sander
[/tab] [tab id=3]
![]() One day
One day
[/tab][tab id=4]
- PART 1: Outhouse Plans
- PART 2: Lean to Outhouse Roof Plans
- PART 3: Outhouse Door Plans
[/tab][/tabs]
Building an outhouse plans
Building-the-floor-for-the-outhouse
The first step of the project is to build the floor frame for the outhouse. As you can notice in the diagram, the front platform is fairly large, but you can adjust it if you want to have the exact same size with the structure. Drill pilot holes and insert 2 1/2″ screws to secure the joists together tightly. Make sure the corners are right-angled and add waterproof glue to the joints.
Attaching the decking
Attach the 2×4 decking boards to the frame. Align the edges and make sure you place the slats equally-spaced, for a professional result. Drill pilot holes and use 2 1/2″ screws to lock the boards to the frame. Countersink the head of the screws, so they are at the same surface with the boards.
Building-the-side-wall-frame
Build the sides walls for the outhouse from 2×4 lumber. Drill pilot holes through the bottom and top plates and insert 2 1/2″ screws into the studs. Align the edges with attention and make sure the corners are square.
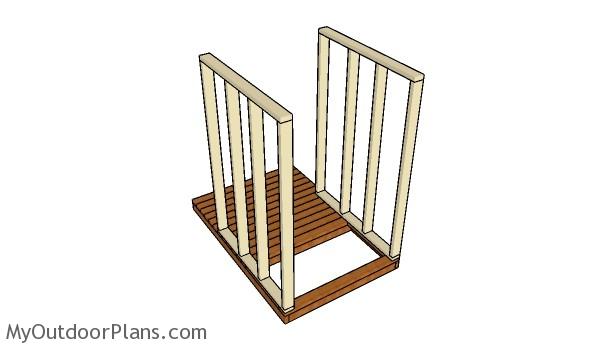
Building the side walls
Fit the side walls to the floor of the outhouse. Use a spirit level to plumb the walls and make sure the edges are flush. Drill pilot holes through the bottom plates and insert 2 1/2″ screws into the frame.
Building-the-back-wall-frame
Build the back wall from 2×4 lumber. Drill pilot through the plates and insert 2 1/2″ screws into the studs.
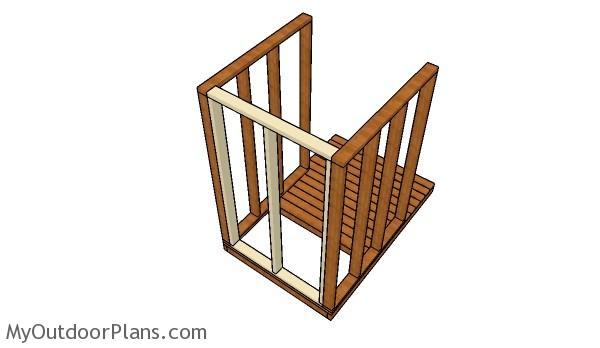
Fitting the back wall
Fit the back wall to the floor of the wooden outhouse. Align the edges with attention and make sure the corners are right-angled. Drill pilot holes and insert 2 1/2″ screws into the floor and into the adjacent walls.

Building-the-front-wall-frames
Build the front walls from 2×4 lumber, as well.
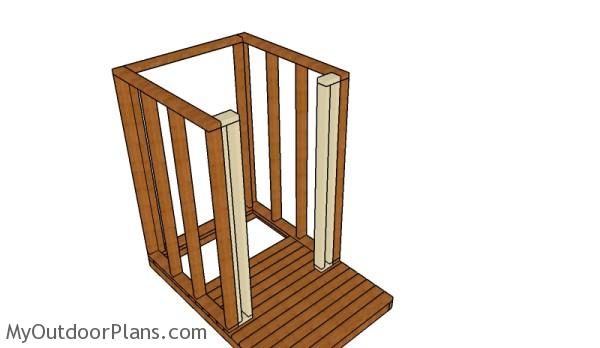
Front walls
Fit the walls to the front of the outhouse, as shown in the diagram. Lock the frames to the floor and to the adjacent walls, making sure the corners are square.
Top wall
Build the top front frame from 2×4 lumber. Drill pilot holes through the top and bottom plates and insert 2 1/2″ screws into the studs. Make sure the corners are square and align the edges with attention.
Front top wall
Fit this frame to the front wall. Align the edges and insert 2 1/2″ screws through the bottom plate, after drilling pilot holes. Make sure the corners are square and leave no gaps between the components.

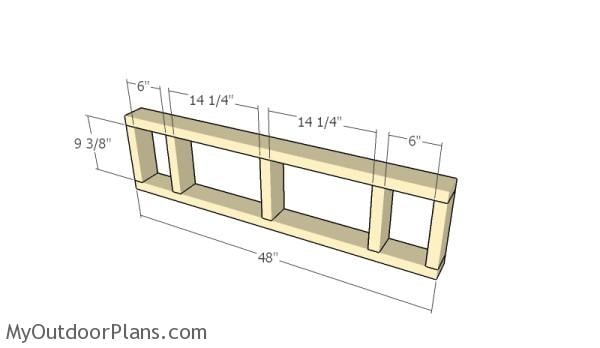
Front seat supports
Next, you need to start assembling the seat for the outhouse. Therefore, fit 2×4 supports to the structure, as shown in the image.
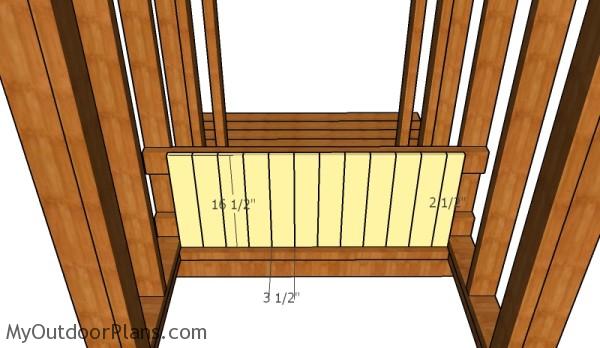
Building the front seat
Fit 1×4 slats to the supports, making sure you leave no gaps between them. Use 1 1/4″ screws to lock the slats to the supports.
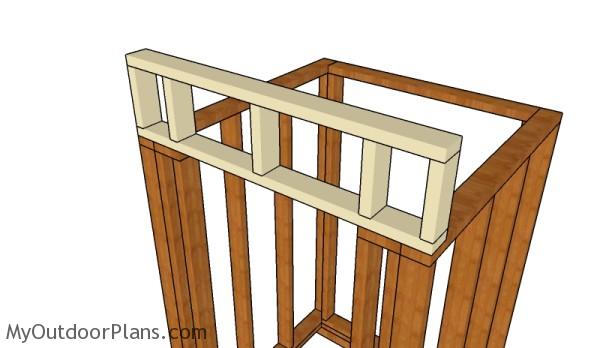
Fitting the top supports
Fit the 2×4 supports to the back of the outhouse. Drill pocket holes at both ends and insert 2 1/2″ screws to assemble everything with attention. Next, attach the supports for the seat top. Drill pocket holes at both ends and insert 2 1/2″ screws to lock them into place tightly.
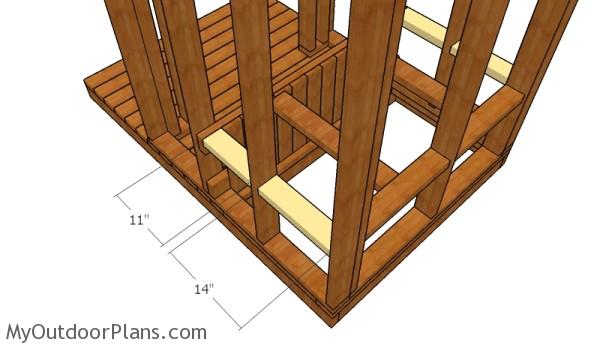
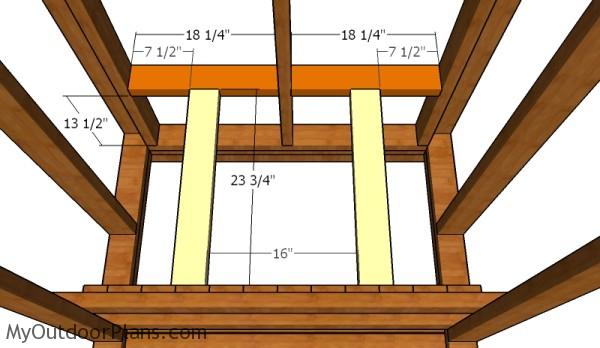
Fitting the side supports
Fit 2×4 supports to the side walls of the outhouse, as well. Drill pocket holes at both ends and secure them to the studs with 2 1/2″ screws. Make sure the corners are square and leave no gaps between the components.
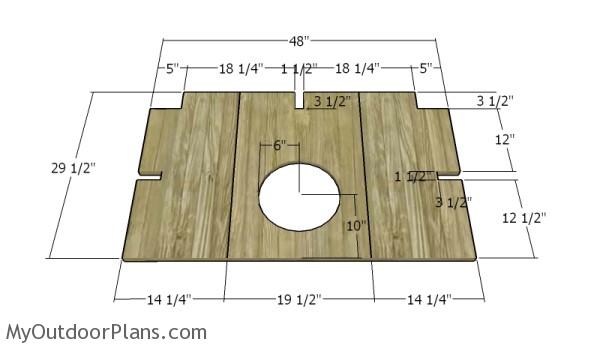
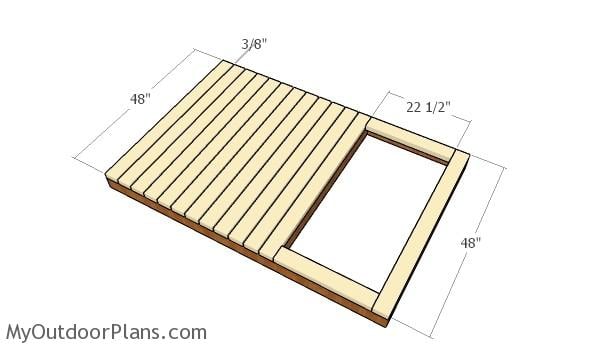
Building the top
Build the top from 3/4″ plywood. As you can see in the image, you need to make a few notches to the plywood sheet, so it can fit around the studs. In addition, cut out the hole using a jigsaw. Last but not least, you need to cut the sheet into three pieces, otherwise you would have a hard time fitting it into place.
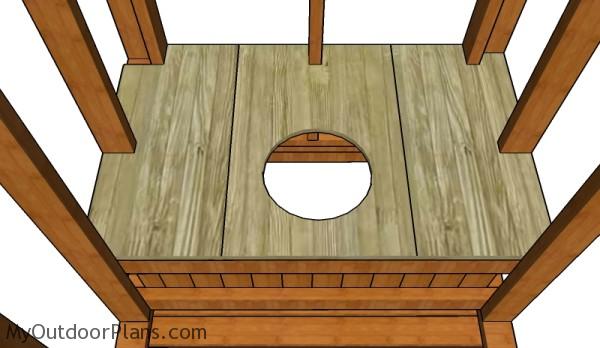
Attaching the plywood top
Fit the 3 panels to the top of the supports, making sure everything is aligned properly. Leave no gaps between the components and lock them into place with 2″ brad nails.
How to build an outhouse
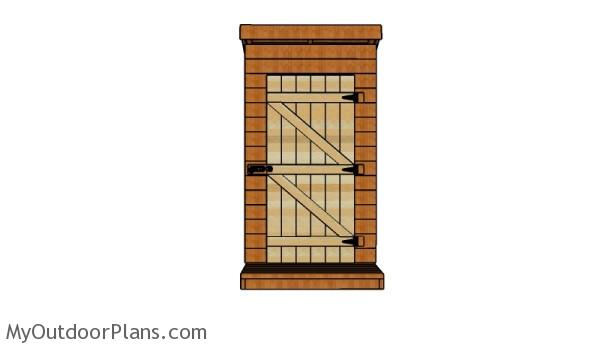
Take a look over PART 2 and PART 3 of the project to learn how to frame the roof and the door for the outhouse.
Outhouse Plans
Fill the holes with wood putty and let them dry out for a few hours. Smooth the surface with 100-220 grit sandpaper and remove the residues with a damp cloth.
Top Tip: Apply a few coats of paint or stain to the base components, to enhance the look of the project. Design is a very subjective area, so you can make modifications to the project so it suit your needs. Check out the rest of the project, to learn how to build a complete outhouse.
This woodworking project was about outhouse plans free. If you want to see more outdoor plans, check out the rest of our step by step projects and follow the instructions to obtain a professional result.

EXPLORE MORE IDEAS FOR:
 |
 |
 |
 |
13 comments
Please email outhouse plans
You can save all the plans as PDF or print them. Please read the FAQs: http://myoutdoorplans.com/faq/
How much would this cost?
You have the cut list. All you need to do is add up all the costs. I can’t give an estimate since the prices differ.
My outhouse cost me around $365. $300 for the framing. $20 for blades to take apart wooden pallets. I used the wooden pallets for the siding. $30 for see-through plastic roofing. $15 for roof spacers.
I forget to mention the $50 to $60 in screws and nails. I used the plan provided but didn’t follow it 100%.
how to light the out house. They are very dark when that door is closed any time of day.
You could fit a small window to the side walls. Or you could install a solar LED lamp (fit the sensor outside and the light inside of the outhouse). If someone has other ideas, feel free to share them in the comments.
Thanks for sharing! I’m wondering – why are the walls 67 1/8 tall? Was that to get an overall height, or to use some lumber of s specific dimension that I’m not familiar with? I’m building an outhouse and wondering how to accommodate the friends who are just over 6′
You can adjust the size of the walls to your needs.
I cannot find any mention or details regarding the exterior wall materials.
Check PART 2 of the project.
Thanks for the outhouse plan. I made an outhouse from your plans but I beefed up the flooring with 2x6s. I used free wooden pallets as the siding. I can’t legally have an outhouse so instead of a hole, I installed a portable toilet.