This step by step woodworking project is about outdoor shed plans. Building a shed in your backyard is a great project, as it is a great opportunity to learn new carpentry techniques, as well as to create a place where you could store garden tools or outdoor furniture. Moreover, if you pay attention to details and use quality materials, the outdoor shed would add character to your garden and increase the value of your property.
There are many plans you could choose from, therefore you should assess your needs from the very beginning. A basic 8×10′ gable shed could be done in just an weekend, if the right woodworking techniques are used. Nevertheless, don’t forget to go to the local building department before beginning the construction, as there are certain legal requirements you have to comply with, according to the area you live in. Hire a professional handyman to get the job done for you, if you don’t want to undertake the risk of such a complex project. See all my Premium Plans HERE.
Projects made from these plans
Cut & Shopping Lists
- A – 2 pieces of 2×4” lumber 96” long, 7 pieces of 2×4 lumber 117” long JOISTS
- B– 80 sq ft of 3/4” tongue and groove plywood FLOORING
- C – 41 pieces of 2×4 lumber 90”, 4 pieces of 2×4 lumber 120”, 2 pieces of 2×4 lumber 113” WALL STUDS
- C – 2 pieces of 2×4 lumber 96”, 4 pieces of 2×4 lumber 89” WALL STUDS
- D – 450 sq ft of 5/8” grooved plywood SIDING
- E – 12 pieces of 2×4 62” – cut at 30º at both ends, 6 pieces of 97” – cut at 60º at both ends TRUSSES
- F – 5/8” grooved plywood 45 x 76 1/2”, 2 1×4 trims 45”, 2 1×4 trims 73 1/2” DOOR
- G – 3×3′ wooden window WINDOW
- H – 60 sq ft of 1×4 trims TRIMS
Tools
![]() Hammer, Tape measure, Framing square
Hammer, Tape measure, Framing square
![]() Miter saw, Drill machinery, Screwdriver, Sander
Miter saw, Drill machinery, Screwdriver, Sander
Time
Backyard Shed Building Plans
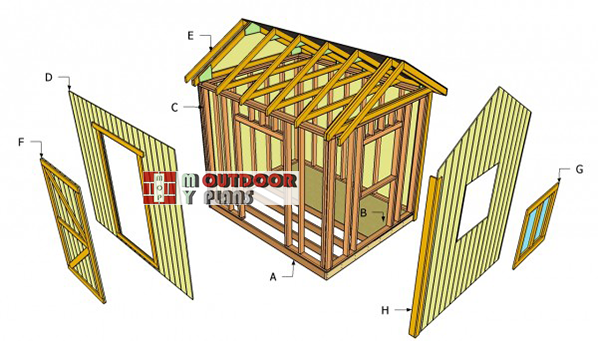
Outdoor-shed-building-plans
Building an outdoor shed is usually seen as a complex project, but in fact the construction process is a lot easier than it might seem at first glance. Therefore, you should choose the plans that fit your needs, taste and budget, as there are many options available. An 8×10′ shed with a gable roof is a great project, as it offers a significant storage space and it requires basic carpentry skills.
Top Tip: Install a large door to have a good access to the shed. In addition, a large 3×3′ window would let plenty of light inside the shed. Reinforce the frame properly, otherwise the shed won’t be as durable as desired.
Outdoor Shed Plans Free
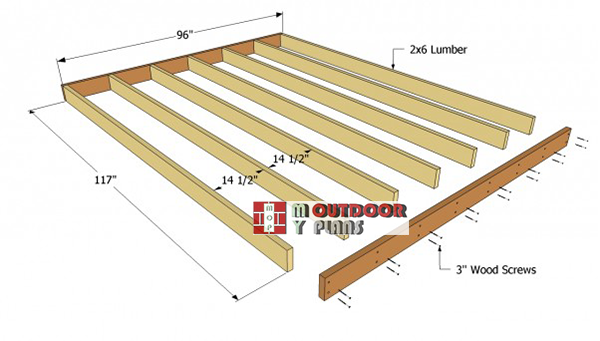
Shed-floor-frame
First of all, you have to build the floor of shed, using 2×6 beams. In order to create a sturdy base, you have several options: on one hand you could install 4×4 skids under the floor frame while on the other hand you could pour concrete footings or even a concrete foundation.
Top Tip: Align the joists, making sure the diagonals of the floor are equal, before driving in the wood screws.
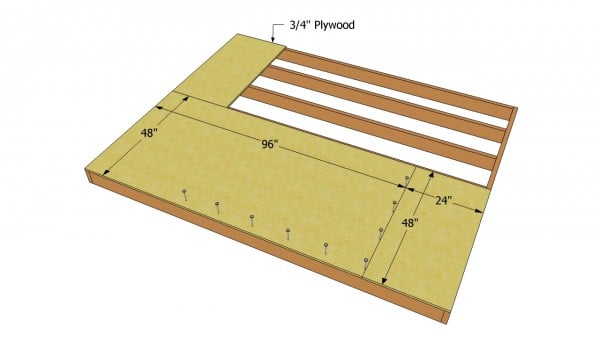
Attaching the plywood floor
Afterwards, you should attach the plywood flooring of outdoor shed, as in the image. Place the 4×8′ plywood sheets (3/4” thick) on the joists and secure them to the joists with 2” nails, every 6”. If the corners of the frame are right-angled, the sheets should overlap perfectly.
Install the tongue and groove sheets as in the image, otherwise the floor won’t provide enough support to store heavy items.
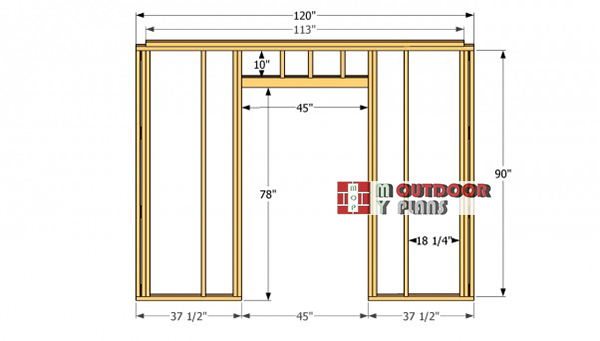
Front-wall-frame—gable-shed
Next, build the front wall of the shed. Therefore, use 2×4 lumber to build both the plates and the studs. Building the front wall of the shed is a simple task, if you pay attention to several aspects. As you can see in the image, you have to leave enough room for the door opening, as well as to reinforce the frame with a double header and with cripple studs.
The double top plate will increase the rigidity of the outdoor shed, if it is built properly.

Back wall plans
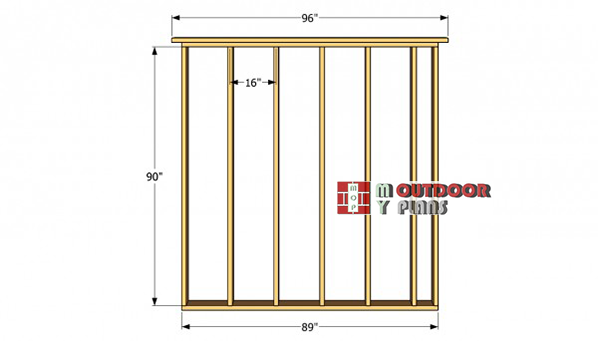
Continue with the back wall, in the same manner described above, except for the door opening. As you should easily notice in the plans, you have to place the studs equally spaced, every 16” O.C. Work with great care and attention, if you want to obtain a professional result.
Top Tip: Drill pilot holes in the wooden plates, before inserting the 3” wood screws in the wall studs. Use a good mire saw to make the cuts, as accurately as possible.
Installing the shed walls
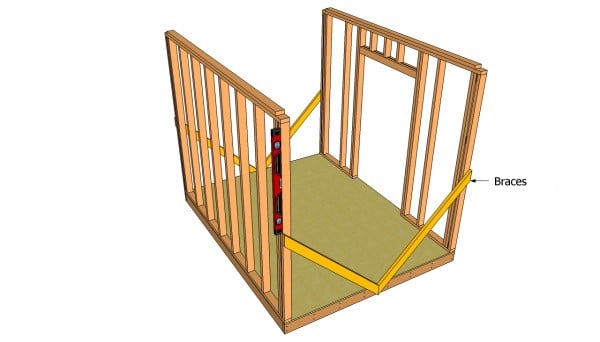
After building the walls on a level surface, you have to install them into position on top of the floor. Ask a friend to assist you, as the frames are quite heavy and hard to manipulate. Plumb the walls with a spirit level and lock them into place with braces at both ends.
Top Tip: Drill 4” wood screws trough the bottom plates in the floor of the backyard shed, every 6”, after drilling several pilot holes.
Side-wall-frame
Next, assemble the side walls of the shed, using the same woodworking techniques described above. Cut the wooden components only after measuring them several times, in order to avoid costly mistakes. As you should notice in the free plans, the top plate should overhang about 3 1/2” at both ends.
Top Tip: Make sure the corners of the frame are right angled, using a good carpentry square.
side-wall-with-window
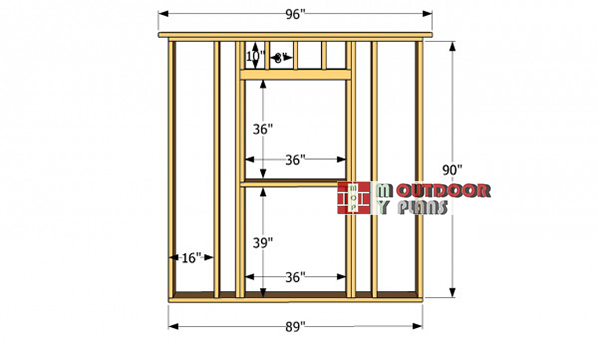
The opposite wall should have a similar structure, but you need to leave enough space to fit a 3×3′ window. In this manner, there will be enough light inside the backyard shed to use it efficiently. Install a double header, as well as cripple studs, to provide support to the top of the window.
Fit the frame and secure it with 3 1/2” screws to the adjacent walls. Drive the screws trough the top plate as well as to the studs placed at extremities.
Assembling the outdoor shed
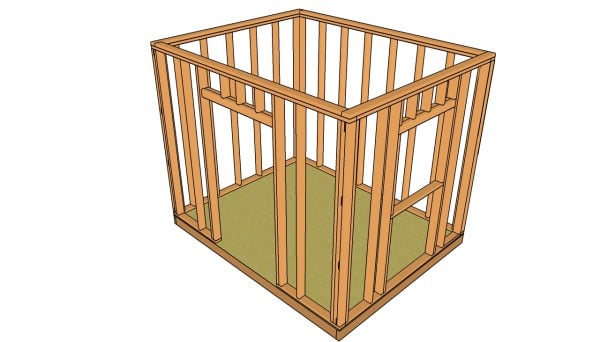
Make sure the frame of the outdoor shed is rigid, as in the free plans. Drive in 4” screws trough the bottom plates in the floor of the shed. In addition, don’t forget to reinforce the corner joints with 3 1/2”, every 8”.
Top Tip: Plumb the walls using a hand level, before locking them into place with screws. Make sure the top plates are perfectly horizontal, otherwise the roof won’t be symmetrical.

Attaching the exterior siding
Attaching the exterior siding should be a straight forward job, as you need to use 4×8′ grooved plywood (5/8” thick) and several nails. Clamp the sheets to the wall studs and secure them with 1 1/4” nails.
Top Tip: Cut the plywood sheets with a circular saw or using a handsaw. Irrespective of your choice, make sure the blade of the saw has fine teeth, to prevent the edges from damaging.
Backyard Shed Roof Plans
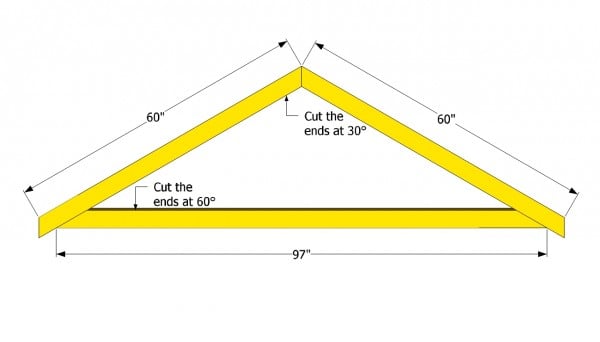
Roof trussess plans
Building the roof of the shed is pretty much a straight-forward job, if you assemble the trusses on the ground. In order to get the job quickly and to drain the water properly, we recommend you to make the pitch of the roof about 30º. Cut the ends of the angled rafters at 30º, while the ends of the bottom rafters should be cut at 60º.
Top Tip: Assemble the trusses on the ground, by installing 1/2” plywood gussets over each joint.
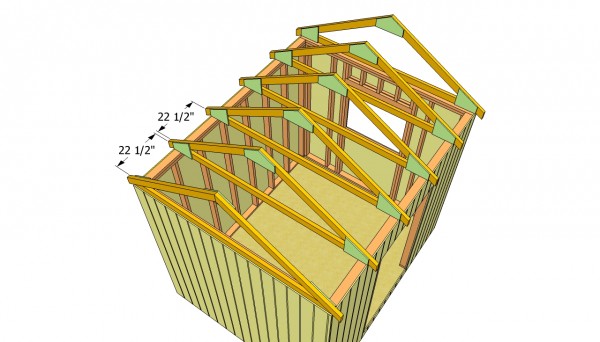
Installing the trusses
Afterwards, lift the trusses and install them into place, by driving 4” screws trough the bottom rafter in the top plates of the outdoor shed. Plumb every truss before installing it into place, otherwise you won’t be able to attach the roofing sheets.
Top Tip: Place the trusses every 24″ O.C. in order to support the weight of the roof properly. Learn more about building a gamble shed roof, by clicking the link.
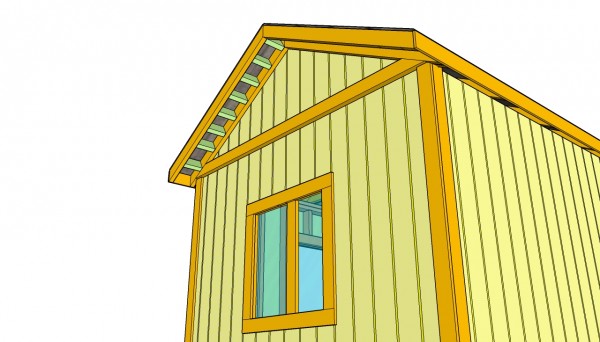
Shed roof overhang
In order to give your shed a nice appearance, as well as to protect the walls from rot, you should install a 10” front and a back overhang. Therefore, secure a truss to the exterior of the shed to the inner rafters, using 3 1/2″ wood screws. Afterwards, fit the end rafters to the roof, using 2×4 blockings and 3” screws. Pre-drill pilot holes in the end rafters, to prevent the wood from splitting.
Top Tip: Install 1×4 trims to the corners of the shed, as well as around the window.
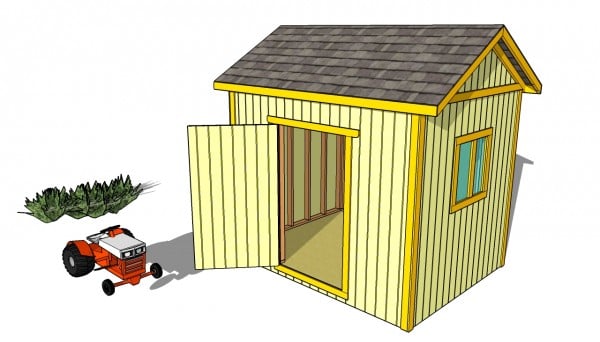
Outdoor shed plans free
Build the door of the shed using 5/8” grooved plywood and 1×4 trims. Attach the rims along the edges of the door, as well as along the edges of the door opening, using 1 1/4” nails. Install several hinges and a simple latch.
Top Tip: Fill the holes with wood putty or using a sealer. Sand the wooden surfaces with 120 grit sandpaper, before applying primer and several coats of paint to the siding and studs.
This woodworking project is about outdoor shed plans free. If you want to see more outdoor plans, we recommend you to check out the rest of our step by step projects.


