This step by step diy woodworking project is about loafing shed plans. The project features instructions for building a 12×24 run in shed. If you want to build a shelter for your cattle, this project is to obvious choice. The roof has a lean to shape, so that you keep the costs at minimum. Check out PART 2 of the article to see how to frame the roof of the shed. Make sure you check out the local building codes before starting the project.
When buying the lumber, you should select the planks with great care, making sure they are straight and without any visible flaws (cracks, knots, twists, decay). Investing in cedar or other weather resistant lumber is a good idea, as it will pay off on the long run. Read the local building codes before starting the project, as you might need a building permit. In addition, level the area and remove the vegetation layer.
Projects made from these plans
It’s that simple to build a loafing shed!
Loafing Shed Plans

Building-a-loafing-shed
Cut & Shopping Lists
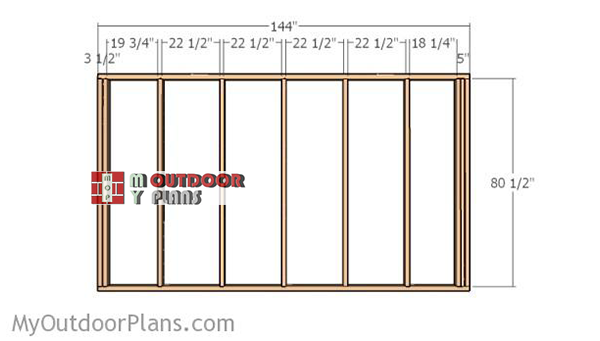
- A – 2 pieces of 2×4 lumber – 144″ long, 10 pieces – 80 1/2″ long 2xSIDE WALL
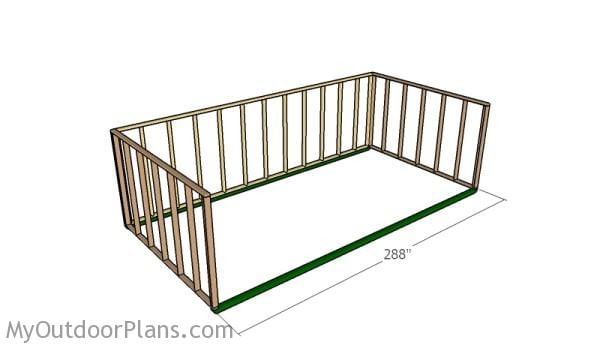
- B – 2 pieces of 4×4 lumber – 288″ long SKIDS
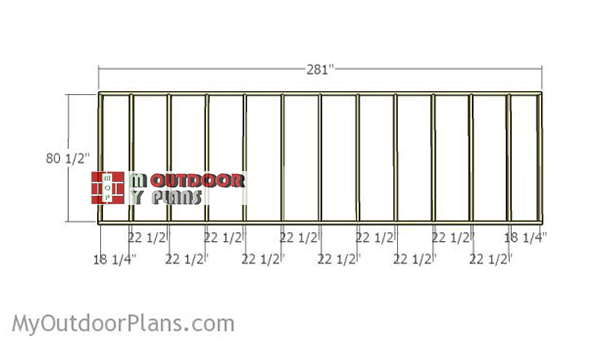
- C – 2 pieces of 2×4 lumber – 281″ long, 13 pieces – 80 1/2″ long BACK WALL
- D – 1 piece – 134 3/4″ long, 1 piece – 139″ long, 1 piece – 2 1/2″ long, 1 piece – 8 1/2″ long, 1 piece – 14 3/4″ long, 1 piece – 21″ long, 1 piece – 27″ long, 1 piece – 33″ long 2xTOP SIDE WALL
- E – 4 pieces of 2×6 lumber – 114″ long, 1 piece of 2×10 lumber – 288″ long BEAMS
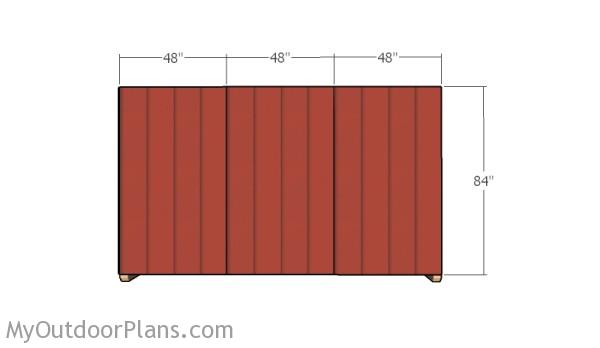
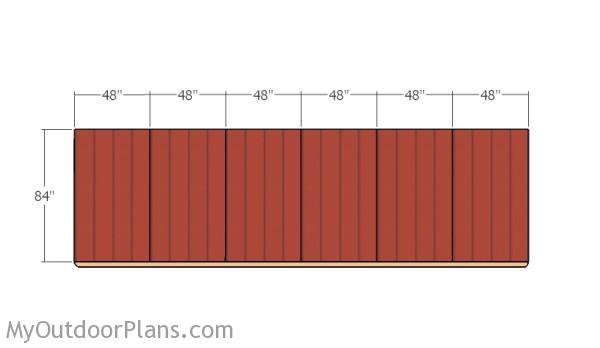
- G – 12 pieces of T1-11 siding – 48″x84″ long SIDING
- 2 pieces of 4×4 lumber – 24′
- 2 pieces of 2×4 lumber – 24′
- 1 piece of 2×10 lumber – 24′
- 8 pieces of 2×6 lumber – 10′
- 4 pieces of 2×4 lumber – 12′
- 37 pieces of 2×4 lumber – 8′
- 12 pieces of T1-11 siding – 4’x8′
- 100 pieces of 3 1/2″ screws
- 500 pieces of 2 1/2″ screws
- 100 pieces of 1 5/8″ screws/brad nails
- 12 pieces of 3″ lag bolts
Tools
![]() Hammer, Tape measure, Framing square, Level
Hammer, Tape measure, Framing square, Level
![]() Miter saw, Drill machinery, Screwdriver, Sander
Miter saw, Drill machinery, Screwdriver, Sander
Time
![]() One day
One day
How to build a 12×24 loafing shed
Building-the-back-wall-frame
First of all you need to frame the walls for the cattle shed. Cut the components from 2×4 lumber at the dimensions indicated in the diagram. Align the edges with attention and make sure the corners are square. Drill pilot holes through the plates and insert 2 1/2″ screws into the studs. Place the studs equally-spaced for a professional result.
Side-wall-frames
Frame the side walls for the loafing shed, using the instructions from the diagram. Place the studs equally-spaced for a professional result.
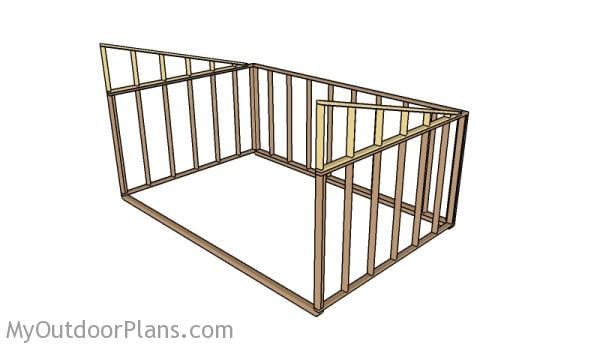
Assembling the frame of the shed
Use 4×4 skids for the shed, placed at the front and back of the construction. In addition, you need to lock the side walls to the back frame, as shown in the diagram. Use 2 1/2″ screws to lock the adjacent walls together and double check if the corners are square before inserting the screws. Use a spirit level to make sure the walls are plumb. Drill pilot holes through the bottom plates and insert 2 1/2″ screws into the skids.
Fitting the side panels
Attach T1-11 siding to the sides of the shed, as shown in the diagram. Leave no gaps between the panels and lock them to the framing, every 8″ with 1 5/8″ nails.
Fitting the panels to the back
Attach the siding to the back wall, in the same manner described above.
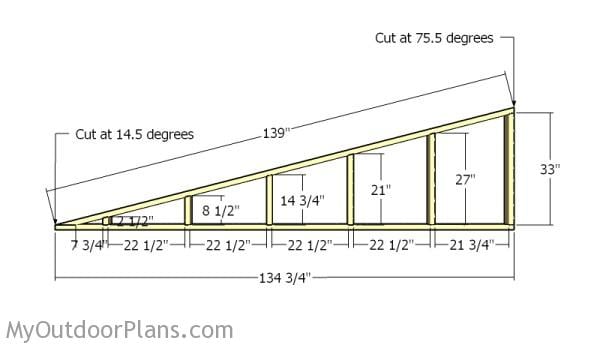
Building the top side walls
Build the top side walls from 2×4 lumber. Cut the components at the right dimensions, following the instructions from the plans. Cut the top of the studs at 75.5 degrees using a miter saw. Drill pilot holes through the plates and insert 2 1/2″ screws into the studs.
Fitting the top side walls
Fit the top frames to the side walls, as shown in the plans. Align the edges with attention, drill pilot holes through the bottom plate of the lean to frames and insert 2 1/2″ screws into the support walls.
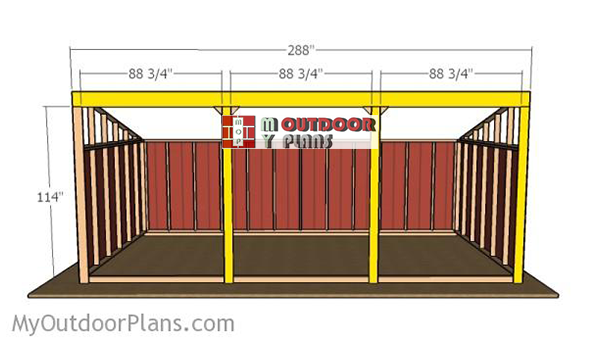
Fitting-the-front-beams
Next, attach the 2×10 beam to the front of the run in shed. Use a spirit level to check if the beam is perfectly horizontal. Use 3″ lag screws to lock the beam to the top frames.
Next, attach 2×6 beams to the front of the shed, as shown in the diagram. Use a spirit level to plumb the beams. In addition, check if the corners are square for a professional result.
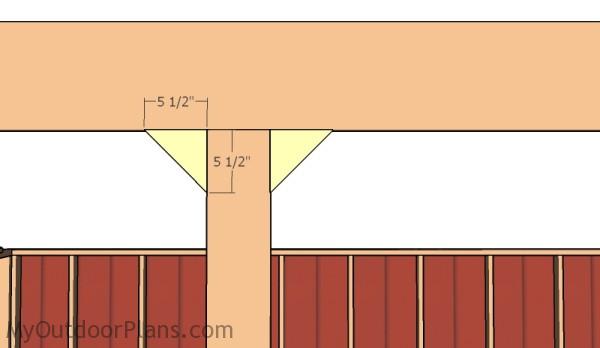
Fitting the front beam braces
Use pieces of 2×6 lumber to lock the middle support into place. Drill pilot holes and insert 3 1/2″ screws to lock the braces into place.
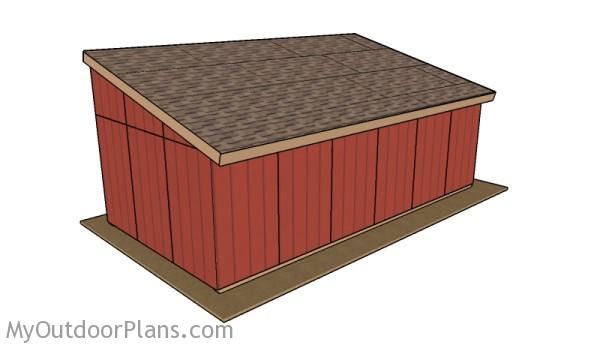
12×24 Run In Shed
Don’t forget to take a look over PART 2 of the project, to learn how to build the roof for the shed.
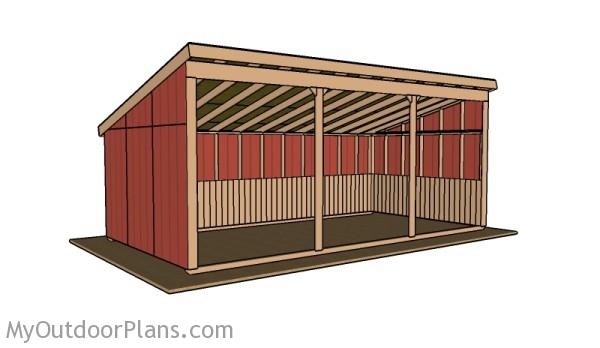
12×24 Cattle Shed Plans
Fill the holes with wood putty and let them dry out for a few hours. Smooth the surface with 100-200 grit sandpaper and remove the residues with a damp cloth.
Top Tip: Check out the rest of the project, to learn how to build the roof for loafing shed.
This woodworking project was about loafing shed plans. If you want to see more outdoor plans, check out the rest of our step by step projects and follow the instructions to obtain a professional result.

EXPLORE MORE IDEAS FOR:
 |
 |
 |
 |
15 comments
I think the video may be missing the framing for the side walls.
Is there a way to connect 2 shorter 4×4 for your sled?
I don’t understand your question.
I am trying to do a 12×24 run in shed for horses. Is there a structural issue if I use this plan but, instead of dividing the 24′ with 2, 2×6 (6′ apart), i change it to a 2×8 centered at 12′. this would create two stalls of 12×12.
secondly, how are you creating 2x10s at that length? the plans chow a single beam, but, I’m not finding any length over 16′ in my stores.
The problem is not with the center supports. The problem is with the horizontal top beam. That hold all the roof weight, so it needs appropriate support. If you want to use one center support, you need to get an engineered beam. You should custom order beams at that sizes. You just need to ask around at the local lumberyards.
Your plan calls for a 2x10x24′. I am not finding any lumber provider in my area that can provide a 2x10x24 without special ordering.
When you say an engineered beam, are you talking about an LVL beam?
Yes. That would work. For every foot of span you need an inch of depth. So you should get one at least 12″.
Any idea what a rough cost estimate would be on this size?
I don’t have a cost estimate, but you have the materials list to add up the costs.
Would this good be good enough for a Midwestern snow load?
Do you host the sketchup plans anywhere?
No
For a 24 foot loafing shed – do you think 4 x 4 are available in 24 ft lengths?
Not finding a way to download the PDF plans for this shed
Please read the FAQs It’s in the top menu