This step by step diy project is about 6×12 firewood shed plans. If you want to store 3 chord of wood in a proper manner, you need to take a look over these plans. This wood shed has lean to roof and a sturdy frame. See the rest of my firewood shed free plans HERE. Take a look over the rest of my woodworking plans, if you want to get more building inspiration. Premium Plans for this project available in the Shop.
When buying the lumber, you should select the planks with great care, making sure they are straight and without any visible flaws (cracks, knots, twists, decay). Investing in cedar or other weather resistant lumber is a good idea, as it will pay off on the long run. Use a spirit level to plumb and align the components, before inserting the galvanized screws, otherwise the project won’t have a symmetrical look. If you have all the materials and tools required for the project, you could get the job done in about a day. See all my Premium Plans HERE.
Projects made from these plans
It’s that simple to build your own 3 cord firewood shed!
3 Cord Firewood Shed Plans
Fitting-a-3-cord-wood-shed
Cut & Shopping Lists
- A – 2 pieces of 2×6 lumber – 144″ long, 7 pieces – 69″ long FLOOR FRAME
- B – 17 pieces of 2×4 lumber – 144″ long DECKING
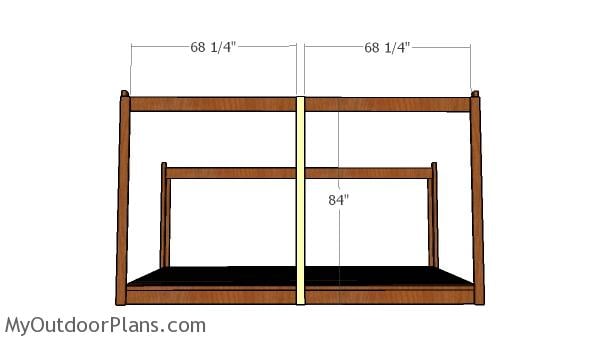
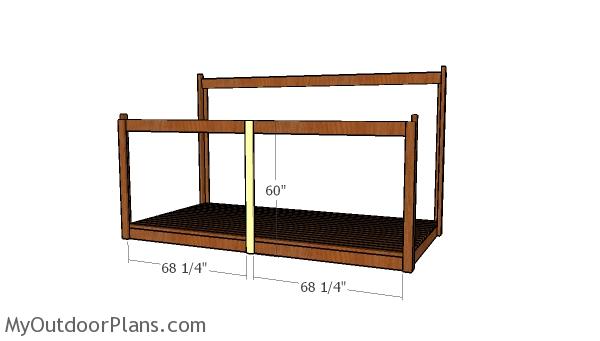
- C – 2 pieces of 2×4 lumber – 84″ long, 2 pieces – 86 3/4″ long, 2 pieces – 60″ long, 2 pieces – 62 3/4″ long, 2 pieces of 2×6 lumber – 144″ long POSTS
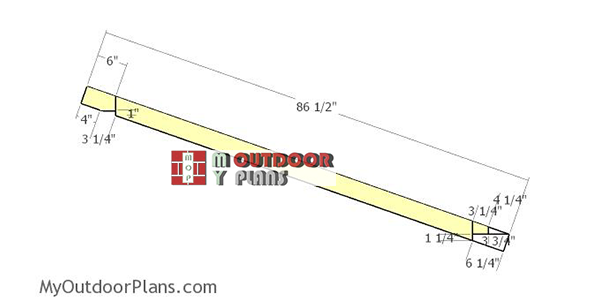
- D – 7 pieces of 2×4 lumber – 86 1/2″ long RAFTERS
- E – 1 piece of 3/4″ plywood – 48″x96″ long, 1 piece – 48″x48″ long, 1 piece – 34 1/4″x48″ long, 1 piece – 34 1/4″x96″ long ROOF
- F – 2 pieces of 1×6 lumber – 82 1/4″ long, 2 pieces – 148 1/2″ long TRIMS
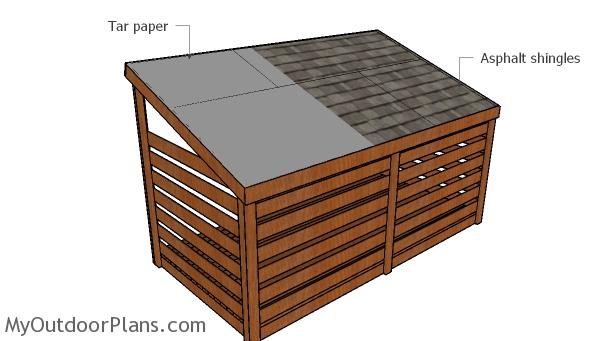
- G – 100 sq ft of tar paper, 100 sq ft of asphalt shingles ROOFING
- H – 7 pieces of 1×6 lumber – 72″ long, 6 pieces – 142 1/2″ long SLATS
- 8 pieces of 2×6 lumber – 12′
- 17 pieces of 2×4 lumber – 12′
- 11 pieces of 2×4 lumber – 8′
- 2 pieces of 2×4 lumber – 12′
- 3 pieces of 3/4″ plywood – 4’x8′
- 2 pieces of 1×6 lumber – 8′
- 2 pieces of 1×6 lumber – 14′
- 13 pieces of 1×6 lumber – 12′
- 100 sq ft of tar paper, 100 sq ft of asphalt shingles
- 2 1/2″ screws, 3 1/2″ screws, 1 5/8″ screws
- 6d nails, 16d nails
- rafter ties
- 1 1/2″ structural screw
- wood filler , wood glue, stain/paint
Tools
![]() Hammer, Tape measure, Framing square, Level
Hammer, Tape measure, Framing square, Level
![]() Miter saw, Drill machinery, Screwdriver, Sander
Miter saw, Drill machinery, Screwdriver, Sander
Time
![]() One day
One day
Related
How to build a 6×12 wood shed
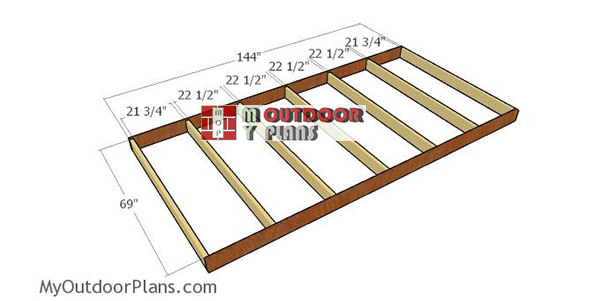
Building-a-floor-frame
First of all, build the floor frame for the storage firewood shed. Therefore, cut the joists for the shed from 2×6 lumber, at the dimensions shown in the diagram. Drill pilot holes through the rim joists and insert 3 1/2″ screws into the perpendicular components. Place the joists every 24″ on center, making sure the corners are square and the edges are flush.
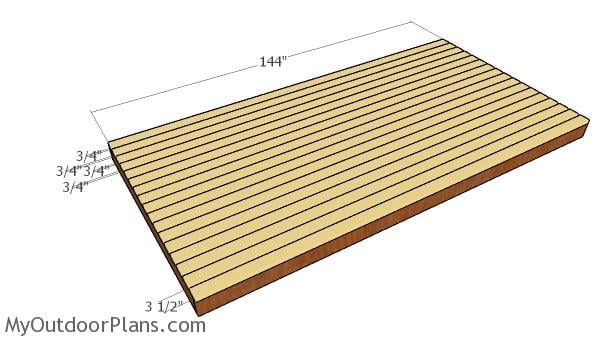
Fitting the floor slats
Choose the location for the wood shed and level it up thoroughly. It can be next to the property line or to one side of your backyard, to save space. Fit cider blocks under the floor frame so you can keep the firewood protected from moisture and to support their weight properly.
Fit the 2×4 decking to the floor of the shed. Make sure you place 3/4″ block of woods between the slats so you create even gaps. Align the edges flush, drill pilot holes and insert 2 1/2″ screws, so you secure the slats into place tightly.
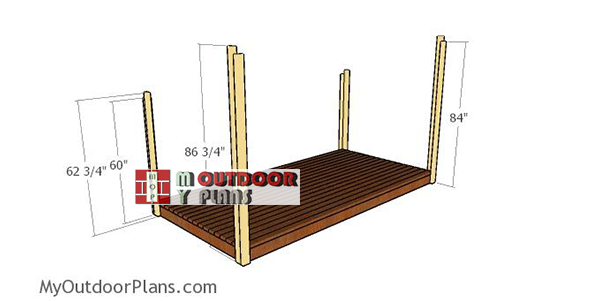
Fitting-the-posts—3-cord-woodshed
Fit the 2×4 posts to the floor frame of the shed. Use 2 1/2″ screws to lock the perpendicular posts one to another. Drill pilot holes before inserting the screws, to prevent the wood from splitting. Plumb the posts with a spirit level before securing them into place.

Roof supports
Fit the 2×6 supports to the top of the front and back posts. Check if the supports are horizontal. Drill pilot holes and insert 2 1/2″ screws to lock them into place tightly.
Front wall middle support
Fit 2×4 middle supports to the front and back of the firewood shed. Center the posts into place and then secure them into place with 2 1/2″ screws, after drilling pilot holes.
Back middle support
Fit the 2×4 support to the middle of the back wall of the firewood shed. Center the posts, drill pilot holes and insert 2 1/2″ screws.
Rafters—3-cord-firewood-shed
Use 2×4 lumber for the rafters. Mark the cut lines on the beams and then get the job done with a circular saw. Smooth the edges with sandpaper.
Fitting-the-rafters
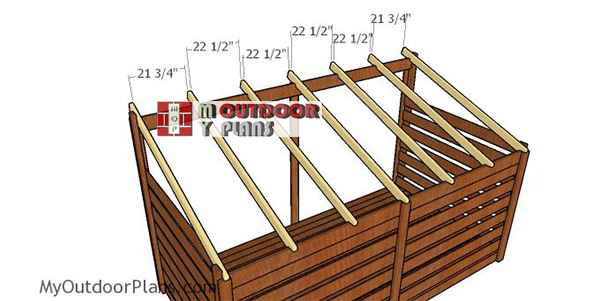
Fit the rafters to the top of the shed structure. Place the rafters every 24″ on center. Use rafter ties to secure the rafters into place tightly.
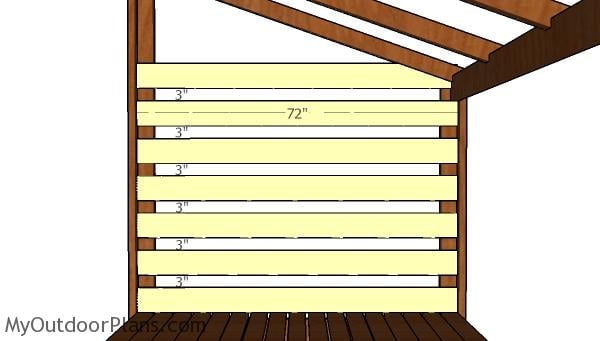
Fitting the side slats
Fit 1×6 slats to the sides of the firewood shed. Place a piece of 3″ between the slats to create even gaps. Drill pilot holes and insert 1 5/8″ screws to secure the slats into place.
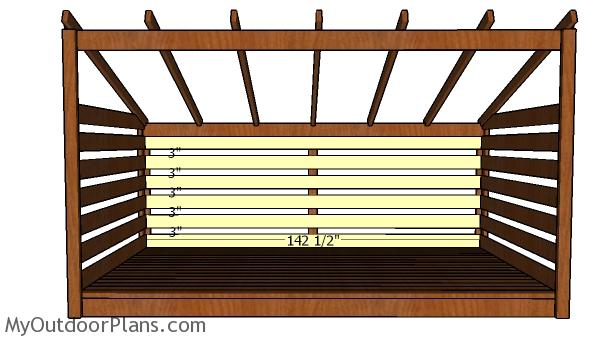
Fitting the back slats
Fit the 1×6 slats to the back of the shed, as shown in the plans.
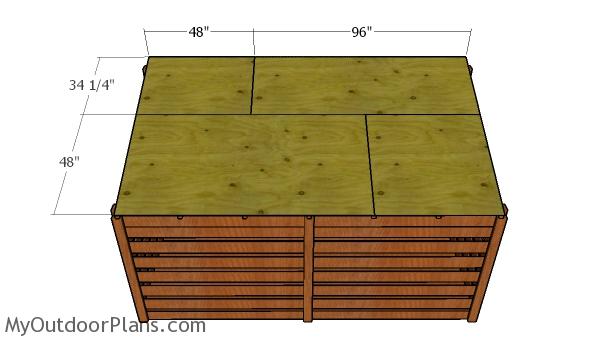
Fitting the roof sheets
Fit the 3/4″ plywood sheets to the top of the roof, as shown in the plans. Leave no gaps between the sheets and align the edges with attention. Drill pilot holes and insert 1 5/8″ screws every 8″ along the rafters.

Side trims
Fit the 1×6 trims to the sides of the roof. Align the edges with attention and secure them with 1 5/8″ screws.
Front and back roof trims
Fit the 1×6 trims to the front and back of the wood shed. Align the edges and insert 1 5/8″ screws to lock them into place.
Fitting the roofing
Cover the roof of the shed with roofing felt, making sure the strips overlap at least 2″. Secure the tar paper to the plywood sheets with roofing staples. In addition, cut a 12″ piece for the top ridge. Fit the side drip edges over the roofing felt, while the bottom drip edges should be fit under.
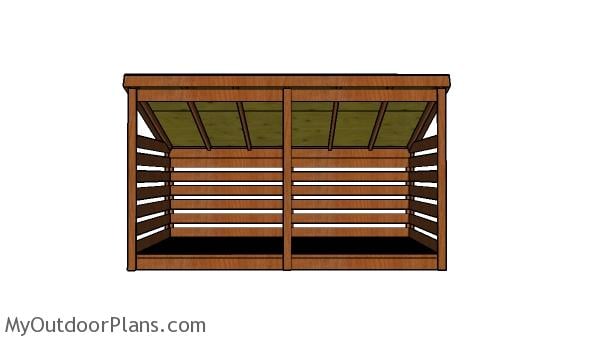
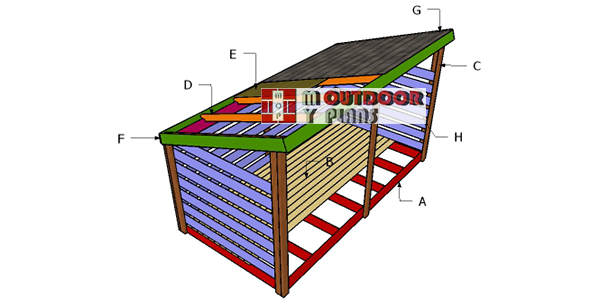
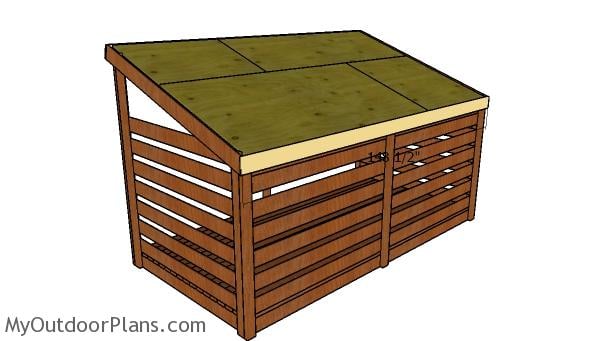
3 cord firewood shed plans – front view
This firewood shed features a large opening for easy access to the wood logs. You can stack a few wood sheds together to increase the storage capacity.
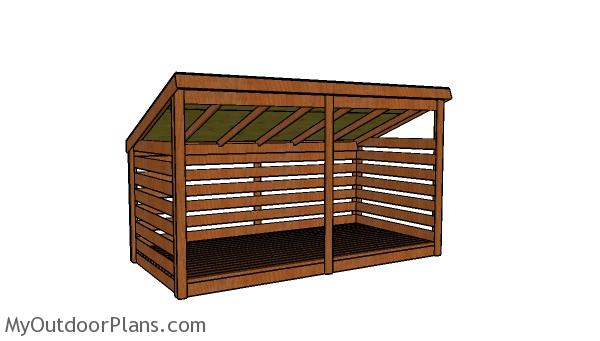
3 cord firewood shed plans
This 6×12 wood shed is ideal for any homeowner, as it will shelter the firewood from the weather, while adding a touch of unique charm to your backyard. You should also check out my 8×8 gable wood shed plans, which can also hold 3 cords of wood. I have many design ideas on this blog, so make sure you take a look over all the alternatives before taking a decision.
If you want to get PREMIUM PLANS for this project (different design with re-engineered structure), in a PDF format, please press GET PDF PLANS button bellow. Thank you for the support.

This woodworking project was about 6×12 wood shed plans. If you want to see more outdoor plans, check out the rest of our step by step projects and follow the instructions to obtain a professional result.
EXPLORE MORE IDEAS FOR:
 |
 |
 |
 |
43 comments
On the materials list for the 3 cord wood shed, you have omitted the 7 2x4s for the rafters in the building supplies list. So, instead of 5 pieces of 2×4 lumber, 8′ long, you should have 12 pieces of 2×4 lumber, 8′ long.
I had ordered all the lumber, according to the materials list and was marking up the lumber for cutting when I noticed that I was short the lumber for the rafters. After checking my order, I realized it was the materials list that didn’t include the lumber for the rafters.
Another trip to the building supply store!
Thank you for your plans. They are easy to follow and the materials list is very helpful (with this one exception). I have modified your 6’x12′ wood shed plans to a 4’x12′ shed since that size fits the space I have.
Ron
Thank you for the help. I’m sorry for the error, I’ve updated the list. Good luck with the project and let me know how it comes out. I would love to feature your shed on the blog!
We have bought the wood to start this 6×12 firewood shed, but it seems like the slats for the sides are missing from the material list? You say 1×6 slats, but there are only 4 1x6s on the material list, and these are for the roof trim.
List updated with the 13 pieces of 1×6 12 ft needed for the sides and back.
I live in the Northeast. Would this structure hold up to snow? I suppose I could sister up the 2×6 on the roof support and use 4×4 post in the middle supports.
That would be great modifications. The slope is steep enough, so I would also suggest laying the rafters every 24″ on center.
I’m planning on building the 3 cord wood shed. I have a spot in mind that will be leveled and graveled. My question is, if I’m placing the shed frame on a graveled surface, can I omit the need for cinderblocks? I’m using pressure treated lumber.
Yes, you can do that. Still better with the blocks, though.
Can you explain what is meant by the “21×5 trims” on the sides of the roof?
It was a typing mistake, all the roof trims are 1x6s.
I have two 4x4x10′ and four 4x4x8′ pressure treated from an old project I dis-assembled. Is there an easy way to modify the plans to include them as the vertical posts to save on lumber costs? I see many have mounted on cinder blocks, I plan on doing the same, but with the 4x4s could I just bury them alongside the cinder blocks up to the height I need? Thanks for your time on this.
Yes, you can do that. I would place them along the inside corners of the shed floor frame.
Thanks for the good idea. Also, did you require Pressure-treated lumber for the floor (B – decking) given the possibility for moisture? It didn’t specify in the materials list.
Yes, pressure treated is required for durability.
What is approximate cost of the project?
Just about $750
You didn’t include rafter ties in the materials list, and you need to update the list to reflect the wood that needs to be pressure treated.
Shouldn’t the floor frame be pressure treated too? If so, I bought the wrong kind of wood.
As long as you don’t lay the frame directly on the ground, you’re fine. Use concrete blocks or skids. In addition, I recommend you to coat the floor frame with outdoor stain / paint or similar.
Thanks. I have it up on cinder blocks, and I’ll paint.
Any structural reason the vertical supports can’t be lengthened by a foot or so each, in order to increase the overall volume of the structure, and, head room in the back?
Thank you.
If you do that you will add more weight on the floor frame, and I’m not sure if it can handle the extra weight. You should consider this plan that hols up to 6 cords: https://myoutdoorplans.com/shed/8×16-firewood-shed-plans/
Thank you for your feedback Ovidiu. Very much appreciated.
I am located where I have access to large pallets of rough cut oak board that did not meet market requirements (2nd’s). Since I can purchase such material for roughly $75 for nearly 3 ton’s of boards (most ranging from 1″ thick, 6″-12″ wide and 10′-16′ long) I have used this material for your planned wood shed. I have already come to the conclusion that I will have to build a second wood shed adjacent to the first; to much firewood on hand, and, pending future wood piled to be split. All oak boards that I am using are minimal 1″ thick, to include flooring. Hence my original question regarding the height of the structure.
Pending your reply, I went ahead and increased the height of the verticals by roughly 1/2 foot knowing my boards were a bit stronger then pine.
Thanks for your time. Be safe and be well.
Ovidiu, what is the slope of the roof on this project? Thank you.
The pitch is 4:12 and the slope is 18.5 degrees.
Looks like drip edges are missing from list. Also, I couldn’t find 12′ 1×6’s anywhere so having to go with 1×4’s instead. Getting started this weekend!
Good luck. It doesn’t make a difference. You will be fine with the 1x4s. Let me know how it comes out!
Why wouldn’t you use joist hangers?
Cost savings.
One issue I have is that when you attach the trim boards to the sides of the roof, they are actually attached to the vertical corner boards and it leaves a 1.5″ gap between the trim board and the plywood roof. It seems that you just laid the tar paper and shingles right over that gap?
Yes, you cover that with tar and shingles. You should have no problem, since you have the trims as supports.
I just built this, I did add joist hangers and put on a METAL roof. It’s much faster and just a few bucks more. We also stained all the untreated wood to help prevent any rot.
What joist hangers did you use?
Used 2×6 joist hangers on the inner joists, 10 hangers
This was just what I was looking for. I built it in 3 days by myself including four trips to transport the lumber (75 minutes each way). I substituted 12′ 1x6s for the roof. A bit more expensive but I can’t fit the plywood in the car and no one is delivering.
Because I was building on uneven ground, I put the 4x4s in concrete feet. I learned the hard way that supports at the corners are insufficient. It needs at least six supports and maybe eight. If I were doing it again, I’d use more floor joists. Three cords weighs 12,000 pounds!
This is not a 3 1/2 cord shed. It is 2 1/4 cords by calculating 12 ft x 6 ft x 4 ft stacking height.
I didn’t do my own calculations prior to building and didn’t listen to that nagging voice at the back of my head.
That’s the reason you should leave calculus to someone who actually knows numbers. This is a 3 cord wood shed. In case you haven’t noticed the front opening is 6 ft, the back if more than 4 ft. This is not a flat roof shed to consider the height 4 ft.
Are the paid plans more detailed and step by step?
Yes, they come with color code and with diagrams showing how to cut the components from the materials, so you get low waste. Also, the premium plans are re-engineered so they might differ from the free plans.
How do your drill the screws that attach the skids to the frame?
At angle. Or use rafter ties and screws
DO you have plans for a 5×12 Gable shed? Or how can I adjust the 6×12 quantity`s?
Thanks
I don’t have. You can adjust the 6×12 if you know what you’re doing.