This step by step diy project is about diy 12×16 lean to shed plans. This is PART 2 of the lean to shed project, where I show you how to build the lean to roof for the 12×16 shed. Moreover, I have designed shed with many sizes so check them out, as well. Take a look over the rest of my woodworking plans, if you want to get more building inspiration.
When buying the lumber, you should select the planks with great care, making sure they are straight and without any visible flaws (cracks, knots, twists, decay). Investing in cedar or other weather resistant lumber is a good idea, as it will pay off on the long run. Use a spirit level to plumb and align the components, before inserting the galvanized screws, otherwise the project won’t have a symmetrical look. If you have all the materials and tools required for the project, you could get the job done in about a day. See all my Premium Plans HERE.
Projects made from these plans
12×16 Lean to Shed Roof Plans
Building-a-12×16-lean-to-shed
Cut & Shopping Lists
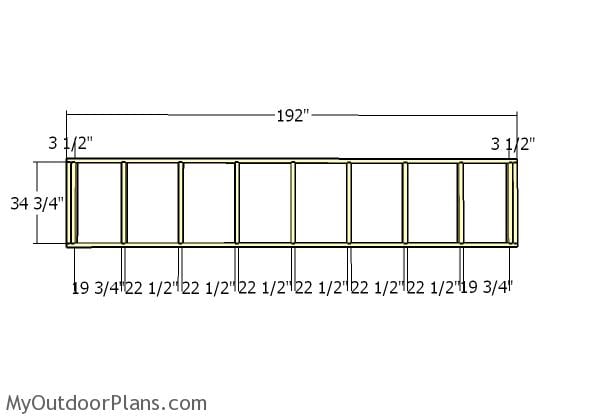
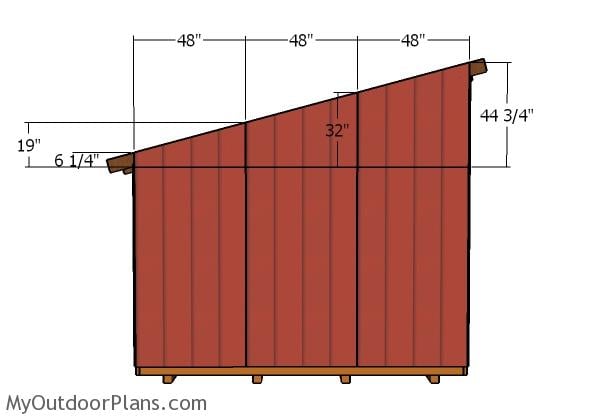
- G – 2 pieces of 2×4 lumber – 192″ long, 11 pieces – 34 3/4″ long WALL
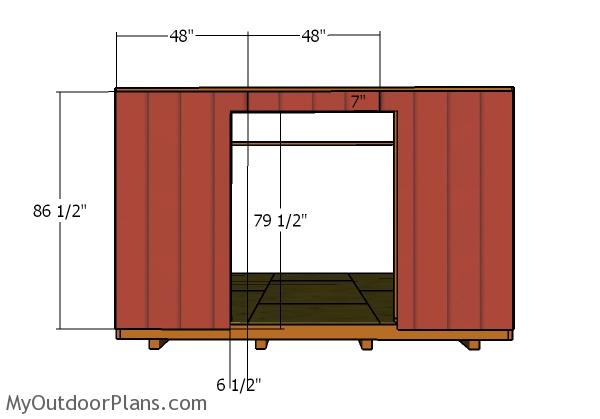
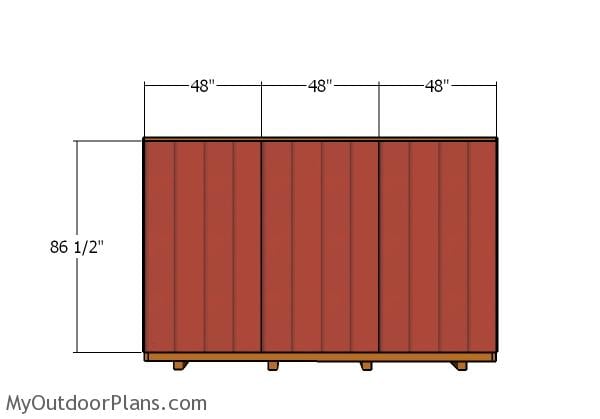
- H – 8 pieces 5/8″ T1-11 siding – 48″x88″ long, 6 pieces – 48″x86 1/2″ long, 4 pieces – 43 1/4″x48″ long SIDING
- I – 9 pieces of 2×4 lumber – 168″long RAFTERS
- J – 2 pieces of 2×4 lumber – 6″ long, 2 pieces – 12 1/2″long, 2 pieces – 18 3/4″ long, 2 pieces – 25 1/4″ long, 2 pieces – 31 3/4″ long SUPPORTS
- K – 5 pieces of 3/4″ plywood – 48″x96″ long, 2 pieces – 48″x48″ long, 2 pieces – 24″x48″ long, 1 piece – 24″x96″ long FRONT WALL
- 2 pieces of 2×4 lumber – 16′
- 9 pieces of 2×4 lumber – 6′
- 9 pieces of 2×4 lumber – 14′
- 16 pieces of 5/8″ siding T1-11 siding – 4’x8′
- 7 pieces of 3/4″ plywood – 48″x96″
- 8d nails, 2 1/2″ screws, 3 1/2″ screws
- wood filler , wood glue, stain/paint
Tools
![]() Hammer, Tape measure, Framing square, Level
Hammer, Tape measure, Framing square, Level
![]() Miter saw, Drill machinery, Screwdriver, Sander
Miter saw, Drill machinery, Screwdriver, Sander
Time
![]() One day
One day
Related
- PART 1: 12×16 Lean to Shed Plans
- PART 2: 12×16 Lean to Shed Roof Plans
- PART 3: 12×16 Lean to Shed Double Doors Plans
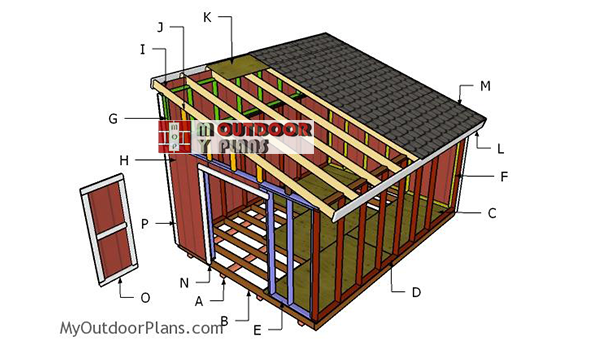
Building a 12×16 lean to roof
Front-wall-siding
Attach the 5/8″ T1-11 siding panels to the front of the shed. Cut the panels at the right size and shape and then attach them to the wall framing with 8d nails. Leave no gaps between the components and align the top of the panels to the bottom of the top plates.
Siding-to-the-narrow-back-wall
Attach the siding panels to the back wall of the lean to shed, using the same techniques as described above.

Siding-panels-side-walls
Attach the 5/8″ siding panels to the side walls, as well. Align the edges of the panels to the top of the plates and secure them into place with 4d nails.
Top-back-wall-plans
Build the top wall for the side of the shed from 2×4 lumber. Cut the components at the right dimensions and smooth the edges with sandpaper. Drill pilot holes through the plates and insert 3 1/2″ screws into the studs. Place the studs every 24″ on center.
Fitting-the-top-back-wall-frame
Attach the wall to one side of the shed and align the edges flush. Drill pilot holes through the bottom plate and insert 2 1/2″ screws, every 8″.

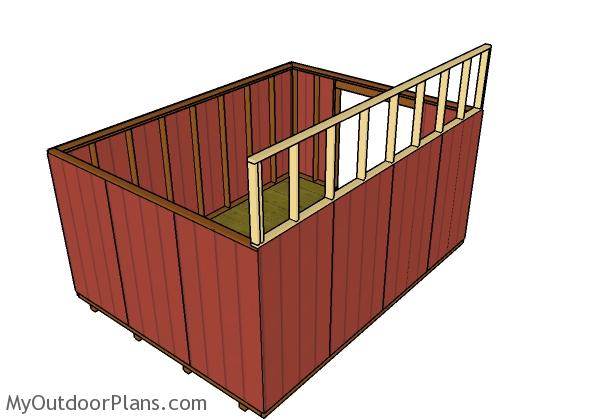
Building-the-rafters
Build the rafters from 2×4 lumber. Mark the cut lines on the slats and get the job done with a circular saw.
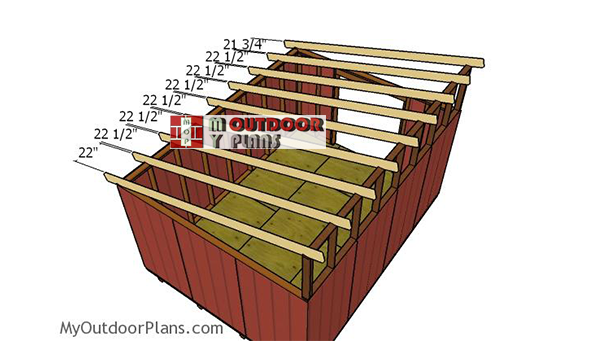
Attaching-the-rafters
Fit the rafters to the top of the lean to shed. Place the rafters every 24″ on center and lock them into place with ties.
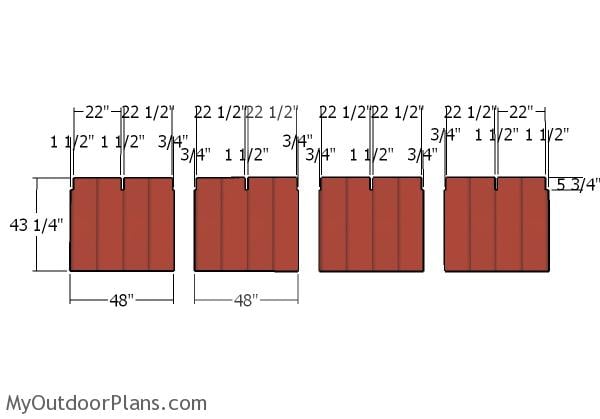
Back-wall-top-siding-panels
Build the panels for the high side of the shed from 5/8″ siding. As you can easily notice in the diagram, you need to make the notches to the top of the walls with a jigsaw. Smooth the edges with sandpaper for a neat result.
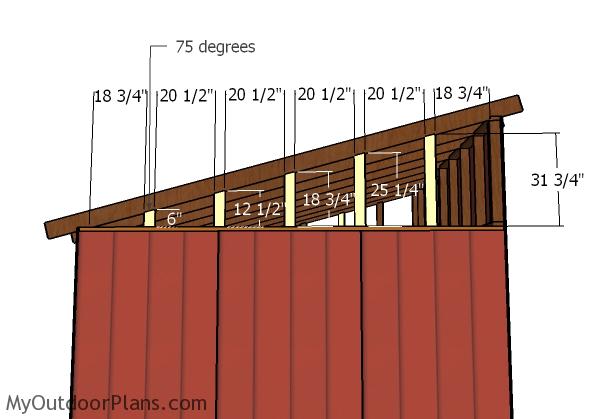
Lean-to-ends-supports
Fit 2×4 supports to the lean to ends of the shed. Drill pilot holes at both ends of the supports and insert 2 1/2″ screws to lock them into place tightly.
Fitting-the-lean-to-ends
Cut the panels for the lean to ends and secure them into place with 4d nails. Leave no gaps between the panels for a neat result.
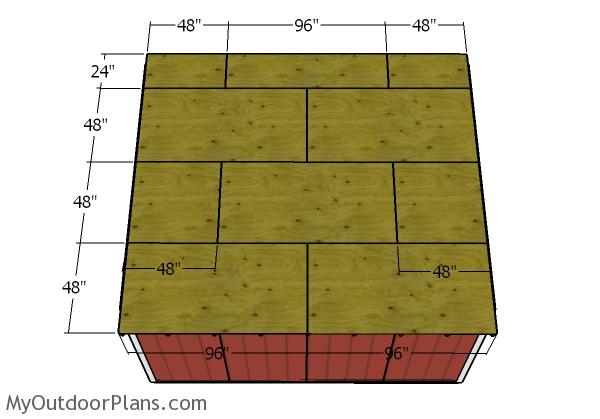
Fitting-the-roof-sheets
Lay the 3/4″ plywood sheets to the top of the shed starting with the bottom of the roof. Use 1 5/8″ screws to secure the sheets into place, every 8″ along the rafters.
Large-lean-to-shed-plans
Fill the holes with wood putty and let them dry out for a few hours. Smooth the surface with 100-220 grit sandpaper and remove the residues with a damp cloth.
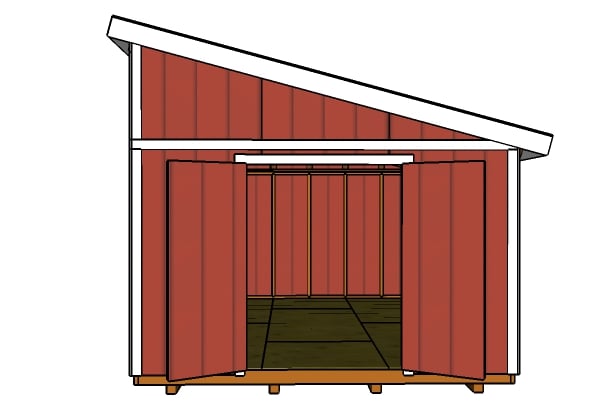
Top Tip: Apply a few coats of paint or stain to the components, to enhance the look of the project. Check PART 1 of the project to learn how to build the frame of the shed and PART 3 to learn how to build the door for the shed.
This woodworking project was about 12×16 lean to shed roof plans free. If you want to see more outdoor plans, check out the rest of our step by step projects and follow the instructions to obtain a professional result.
 |
 |
- EXPLORE MORE IDEAS FOR -
 |
 |
 |
 |
11 comments
I need some clarification on the step building the rafters. Starting on the left side of your diagram – I measured 11.75″ on top and 10.25″ on the bottom and drew a line on the wide side of the 2×4. After that I made a mark 1″ from the bottom on the line I just drew then went another 4.5″ from the bottom past the 10.25″ mark. After drawing the connecting line that will go from the 1″ mark to the extended 4.5″, the line does not form a 90 degree mark. Am I doing something wrong? This plan has been great so far.
You can see in the diagram that is 4 1/4″ and not 4 1/2″. If you want a perfect 90 degree corner you can use an l-square against the line at 1″ mark. Looking forward to seeing your shed!
Sorry, I meant 4.25″. My T1-11 is only 1/4″, not 5/8 so will the span now be 4″. I guess a little slop won’t hurt. What kind of ties do I need for the rafters?
These ties: https://amzn.to/2NmgGP2
Nice plans.
Can you include the angle of the rafters? Without that I’m not so sure I’d be able to make the cuts accurately.
Any chance you could have a revision with a 12×20 and windows lining the top front wall? I’m looking to build exactly that on a concrete slab with a rollup door.
The slope of the roof is 15 degrees. You mark the cut lines on the rafters and then you use a circular saw to make the cut outs. Sorry, but I can’t help you with that. I don’t design custom plans at the moment.
I’ve tried to download your plans, but it isn’t possible. You’ve required me to sign up with Shareaholic.com. I did that, and when I click on the floating icon, it requires me to login. When I try to login, it says “Wrong Password.” When I know it is NOT the wrong password. Whats up with all this?????
You don’t have to sign up for anything. You can download any plan with 2 clicks. Just read and follow the instructions in the FAQs.
Hey what material is used for the outside each of the roof all the way around and how is it installed? Thank you
You mean for the roof soffit?
Hey there, I’ve been looking to purchase this 12×16 lean to plan with the single double door and can find it. Where can I find it cause it won’t let me print this plan. Also I’m trying to find the roof pitch with no luck thank you.