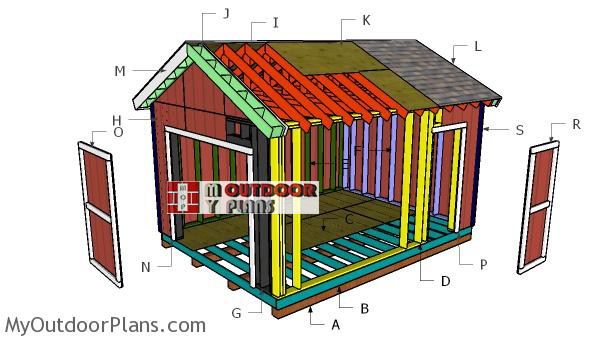
This step by step diy project is about 12×16 gable shed with 2×6 studs plans. I have designed this large storage shed with 2×6 studs so it can be very durable and sturdy enough for any utilization. This garden project has more parts so take a look over the rest of the articles to learn how to build the roof and the door. Moreover, I have designed shed with many sizes so check them out, as well. Take a look over the rest of my woodworking plans, if you want to get more building inspiration.
When buying the lumber, you should select the planks with great care, making sure they are straight and without any visible flaws (cracks, knots, twists, decay). Investing in cedar or other weather resistant lumber is a good idea, as it will pay off on the long run. Use a spirit level to plumb and align the components, before inserting the galvanized screws, otherwise the project won’t have a symmetrical look. If you have all the materials and tools required for the project, you could get the job done in about a day. See all my Premium Plans HERE.
Projects made from these plans
12×16 Gable Shed with 2×6 Studs Plans
Building-a-12×16-gable-shed
Cut & Shopping Lists
- A – 4 pieces of 6×6 lumber – 192″ long SKIDS
- B – 2 pieces of 2×6 lumber – 192″ long, 13 pieces – 141″long JOISTS
- C – 5 pieces of 3/4″ plywood – 48″x96″ long, 2 pieces – 48″x48″ long FLOOR
- D – 2 pieces of 2×6 lumber – 192″ long, 1 pieces – 181″ long, 17 pieces – 81″ long SIDE WALL
- E – 1 piece of 2×6 lumber – 136″ long, 1 piece – 24″ long, 1 piece – 192″ long, 1 piece – 181″ long, 17 pieces – 91 1/2″ long, 2 pieces – 78 1/2″ long, 4 pieces – 7 1/2″ long, 3 pieces of 2×6 lumber – 35″ long SIDE WALL
- F – 1 piece of 2×6 lumber – 144″ long, 2 pieces – 133″ long, 10 pieces – 91 1/2″ long BACK WALL
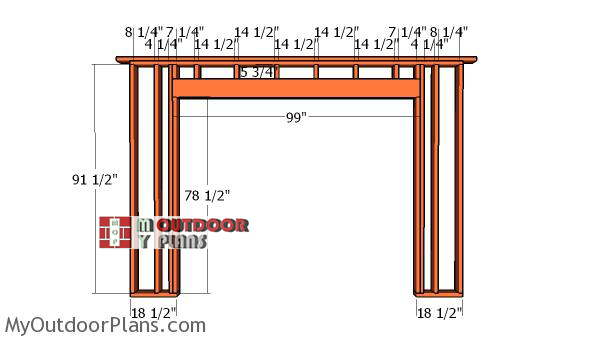
- D – 2 pieces of 2×4 lumber – 18 1/2″ long, 1 piece – 133″ long, 1 piece – 144″ long, 6 pieces – 91 1/2″ long, 8 pieces – 5 3/4″ long, 2 pieces – 78 1/2″ long, 2 pieces – 99″ long FRONT WALL
- E – 13 pieces of 5/8″ T1-11 – 48″x96″ long, 1 piece – 16″x48″ long SIDING
- 2 pieces of 2×6 lumber – 16′
- 13 pieces of 2×6 lumber – 12′
- 4 pieces of 6×6 lumber – 16′
- 48 pieces of 2×6 lumber – 8′
- 6 pieces of 2×6 lumber – 16′
- 5 pieces of 2×6 lumber – 12′
- 2 pieces of 2×8 lumber – 10′
- 6 pieces of 3/4″ plywood – 48″x96″
- 14 pieces of T1-11 – 48″x96″
- 1 piece of 1/2″ plywood – 48″x96″
- 8d nails, 2 1/2″ screws, 3 1/2″ screws
- wood filler , wood glue, stain/paint
Tools
![]() Hammer, Tape measure, Framing square, Level
Hammer, Tape measure, Framing square, Level
![]() Miter saw, Drill machinery, Screwdriver, Sander
Miter saw, Drill machinery, Screwdriver, Sander
Time
![]() One day
One day
Related
- PART 1: 12×16 Shed with 2×6 Studs Plans
- PART 2: 12×16 Shed with 2×6 Studs Roof Plans
- PART 3: 12×16 Shed with 2×6 Studs Door and Trims Plans
How to build a 12×16 shed with 2×6 studs

Building the floor frame
The first step of the project is to build the floor for the 12×16 shed. Cut the joists from 2×6 lumber using a good saw. Align the beams, making sure the corners are square, drill pilot holes and insert 3 1/2″ screws to lock them together tightly.
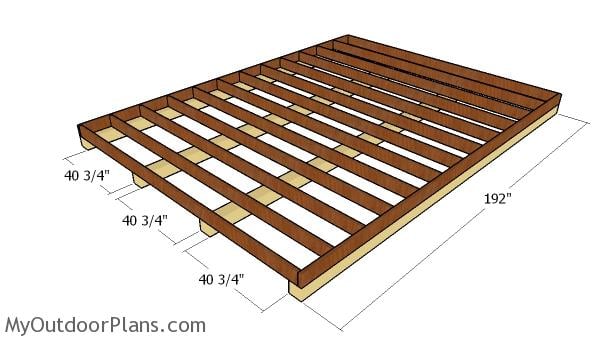
Fitting the skids
After assembling the floor frame, you need to attach the 6×6 skids. Use metal connectors to secure the skids to the joists, after aligning them or toenail them.

Fitting the plywood floor sheets
Continue the project by attaching the 3/4″ plywood sheets to the floor frame. Leave no gaps between the floor sheets and secure them into place with 1 1/4″ screws, every 12″ along the joists.
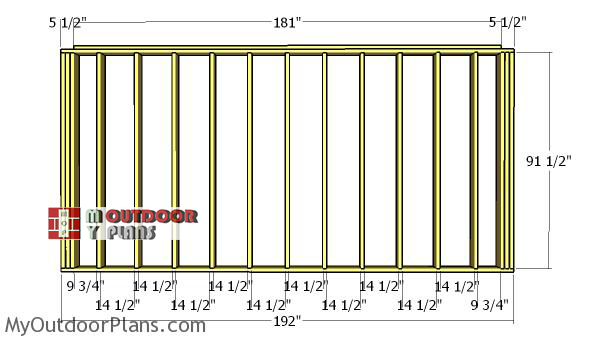
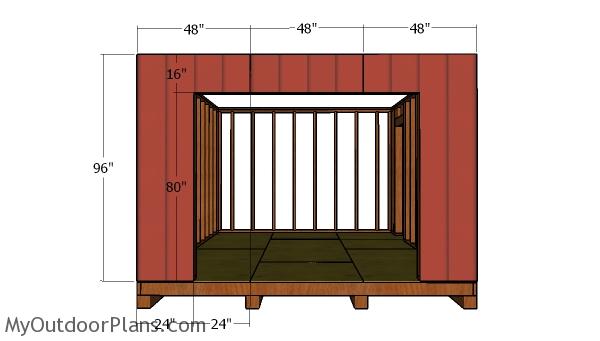
Side-wall-frames
Assemble the side walls from 2×6 lumber. Cut the studs and the plates at the right dimensions. Drill pilot holes through the top plates and insert 3 1/2″ screws or framing nails into the studs, using the information from the diagram. Place the studs, every 16″ on center. Make sure the corners are square for a professional result. As you can see in the plans, you need to fit 1/2″ plywood fillings to the triple end studs.
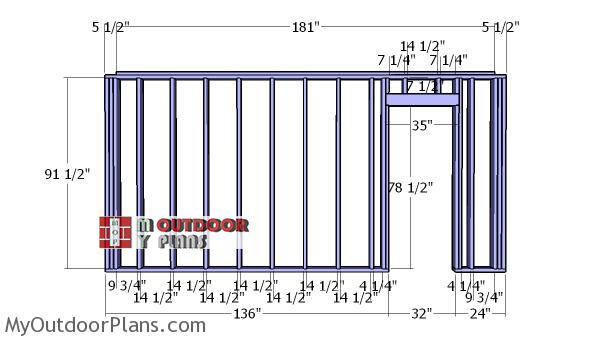
Side-wall-with-door-frame
Build the opposite side wall for the storage shed using the same techniques described above. The only difference is that you could frame a 32″ access door, so you can enter the workshop easily. Build the triple header from 2×6 and 1/2″ plywood. Remember that you can adjust the size of the door to suit your needs.
Building-the-front-wall
Continue the project by assembling the front wall. As you can notice in the diagram, you need to leave enough space for the door opening. You can easily adjust the size of the door to suit your nails. As you can see in the plans, you need to install the jack studs to reinforce the structure of the shed.

Triple header
The triple header for the door is made from 2×8 lumber filled with 1/2″ plywood. Cut the plywood to size and glue it to the headers with construction glue. In addition, drive a few screws or nails to lock everything tightly.
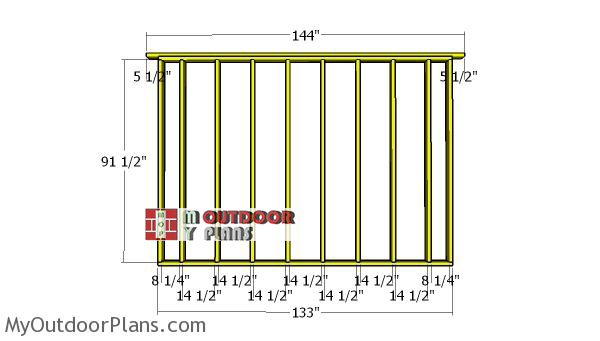
Building-the-back-wall-frame
Build the back wall using the same techniques described above. You should also notice the double plates that will add more rigidity to the walls and to the overall framing.
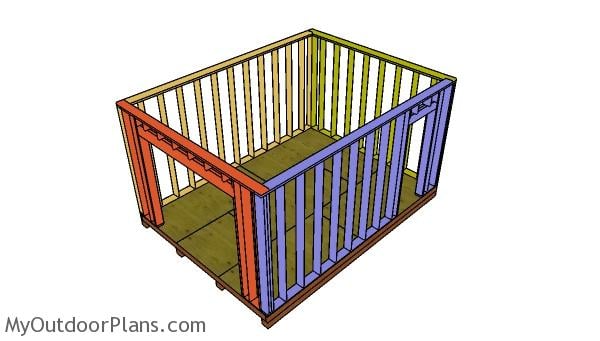
Assembling the shed frame
Lift the side walls and lay them to the floor of the shed. Align the edges with attention and use a spirit level to plumb the walls. Drill pilot holes through the bottom plates and insert 3 1/2″ screws into the floor frame, every 8″. As you can notice in the plans, you need to secure the walls into place temporarily with braces. Fit the front and back walls to the shed floor and lock them to the adjacent walls with 2 1/2″ screws. Make sure the corners are square and insert screws through the bottom plates into the floor, as well.
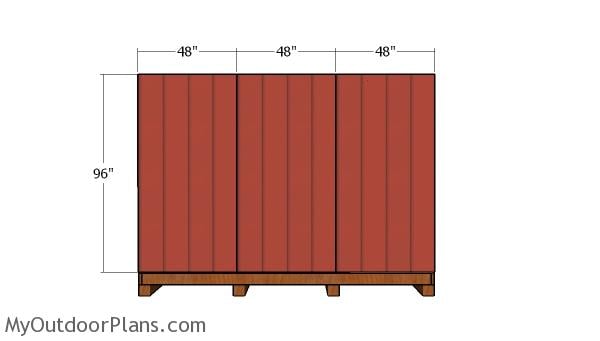
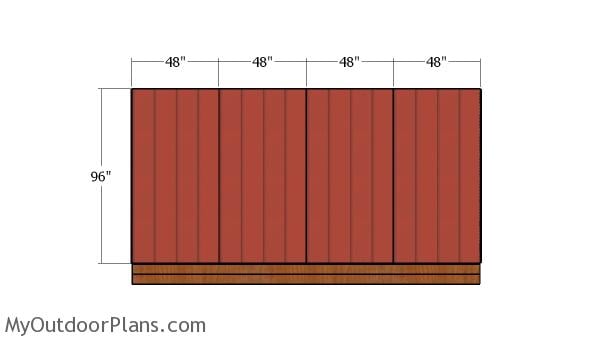
Back wall siding sheets
Build the exterior walls from 5/8″ T1-11 siding. As you can notice in the diagram, you need to make some cuts to the sheets so you cover the whole surface. Use 8d galvanized nails to secure the sheets to the wall frames. Align everything with attention and insert the nails every 8″ along the studs.
Front wall siding sheets
Make the cuts to the sheet that goes around the door opening. Align everything so the edges are flush and secure them into place with 8d nails.
Side wall siding sheets
Fit the sheets to the side wall of the shed. Align the edges with attention and leave no gaps between the sheets.

Side wall with door siding sheets
Attach the rest of the sheets to the opposite side wall of the shed. Align the edges with attention and secure them to the wall studs with 8d nails or screws. Make sure you leave no gaps between the sheets for a professional result.
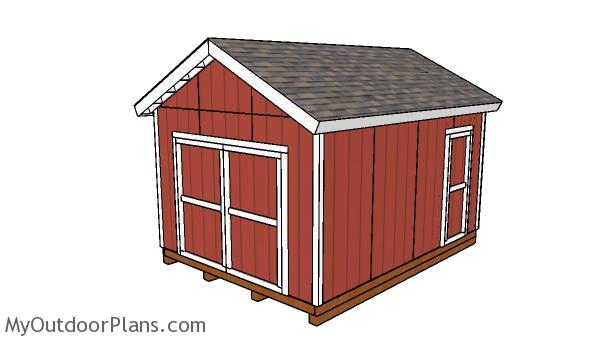
12×16 Shed with 2×6 Studs Plans
This shed is easy to build and extra sturdy. You can easily fit insulation between the studs, if you want to use it as a workshop.
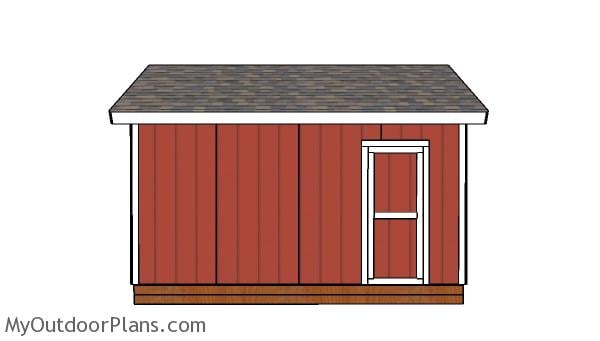
12×16 Shed with 2×6 Studs Plans – Side view
Make sure you check out the rest of the project, so you learn how to frame the roof and how to attach the door and the trims to the shed. See PART 2 and PART 3. In addition, I have lots of other shed projects on the site so I recommend you to browse through all alternatives before starting the building project.
If you want to get this plan as a PDF file with a full Cut list and a full Shopping list, please take a look over the GET PDF PLANS button bellow. Thank you for the support.

This woodworking project was about 12×16 shed with 2×6 studs plans free. If you want to see more outdoor plans, check out the rest of our step by step projects and follow the instructions to obtain a professional result.

EXPLORE MORE IDEAS FOR:
 |
 |
 |
 |
5 comments
Side Walls: Looks like triple stud is 3 2×6’s, but instructions say something about fittimg 1/2″ plywood fillings to the triple studs.
Yes, you need that. Because 3 x 1.5″ you will have 4 1/2″, but the perpendicular wall is 5 1/2″ wide. So you need to fit 1/2″ plywood between the three studs to make them 5 1/2″ wide.
Just use two 2X6s for your corners (just make regular single studded walls) and affix a 2×4 to the back of the end stud of the inside wall (with half the width sticking out so you have something to affix your internal sheathing or drywall to). Then just fill the void in behind with an extra 4″ strip of fiberglass insulation (less thermal bridging).
Although technically not as strong, in a little 12×16 with beefy 2×6 walls those extra two 2×6 studs and strips of expensive plywood are just a waste of money on what is essentially overdesign.
Those extra 8 studs won’t save your building if you are in some kind of earthquake or tornado that will warrant their necessity, especially in something that small, better off putting the money into gang plates if that’s an issue.
8 studs is almost another wall’s worth and those strips of plywood add up to over half a sheet to do all four corner if you count your saw blade kerf (meaning the other half is useless for sheathing on 16″ centers without ripping it down and having an odd piece almost half the remaining width left over).
Four 2x4s instead is the objectively more logical/economic option (and tbh you can get away with 1x4s if you aren’t planning on tossing anvils and maul hammers into the corner from the other side of the shed every day lol).
If my explanation isn’t enough just google “advanced framing techniques 3 stud corners” and look at the images 🙂
The angle for the roof trusses is wrong; there is no way it’s 63.4 degrees. What is the pitch of this roof?
Chill. The pitch is 6:12. The 63.4 is what the rafter angle is, after making the cut. Cheers.