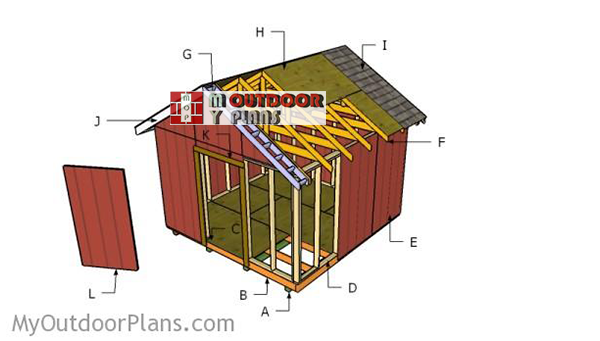
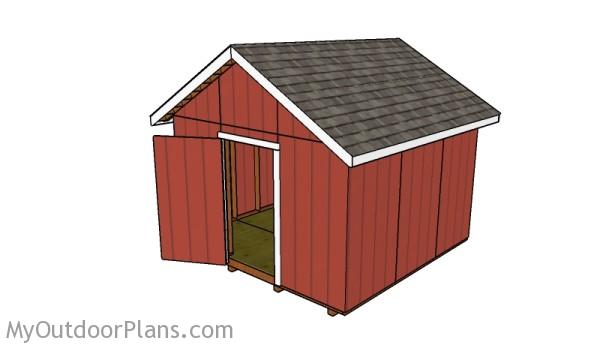
This step by step diy woodworking project is about free 12×12 shed plans. This article features detailed instructions for building a 12×12 shed with a gable roof. This article features instructions about building the frame for a 12×12 shed. This is PART 1 of the project, so make sure you also take a look over the rest of the project, to learn how to frame the roof and the door.
The free woodworking plans come with step by step 3D diagrams, instructions, a full cut and shopping list and it is print friendly. As well, the plans are PDF download, so you can take the printed plans with you in the workshop.
When buying the lumber, you should select the planks with great care, making sure they are straight and without any visible flaws (cracks, knots, twists, decay). Investing in cedar or other weather resistant lumber is a good idea, as it will pay off on the long run. Use a spirit level to plumb and align the components, before inserting the galvanized screws, otherwise the project won’t have a symmetrical look. If you have all the materials and tools required for the project, you could get the job done in about a day.
Projects made from these plans
12×12 Shed Plans – Free DIY Plans
Building-a-12×12-shed
Cut + Shopping Lists
- A – 4 pieces of 4×4 lumber – 144″ long SKIDS
- B – 2 pieces of 2×6 lumber – 144″ long, 4 pieces – 141″ long, 7 pieces – 138″ long JOISTS
- C – 3 pieces of 3/4″ plywood – 48″x96″ long, 3 pieces – 48″x48″ long FLOOR
- D – 2 pieces of 2×4 lumber – 144″ long, 1 piece – 137″ long, 9 pieces – 81″ long 2xSIDE WALL
- D – 1 piece – 144″ long, 1 piece – 137″ long, 2 pieces – 46 3/4″ long, 2 pieces – 75 1/2″ long, 6 pieces – 81″ long, 2 pieces of 2×6 lumber – 46 1/2″ long FRONT WALL
- D – 2 pieces of 2×4 lumber – 137″ long, 1 piece – 144″ long, 7 pieces – 81″ long BACK WALL
- E – 12 pieces of 5/8″ T1-11 siding – 48″x90″ long SIDING
- 34 piece of 2×4 lumber – 8′
- 12 pieces of 2×4 lumber – 12′
- 13 pieces of 2×6 lumber – 12′
- 1 piece of 2×6 lumber – 8′
- 4 pieces of 4×4 lumber – 12”
- 5 pieces of 3/4″ plywood – 4’x8′
- 12 pieces of 5/8″ T1-11 siding – 4’x8′
- 500 pieces of 1 5/8″ screws
- 200 pieces of 3 1/2″ screws
- 500 pieces of 2 1/2″ screws
- 2″ brad nails
- wood glue, stain/paint
- wood filler
Tools
![]() Hammer, Tape measure, Framing square, Level
Hammer, Tape measure, Framing square, Level
![]() Miter saw, Drill machinery, Screwdriver, Sander
Miter saw, Drill machinery, Screwdriver, Sander
Time
![]() One week
One week
Related
- PART 1: 12×12 Shed Plans
- PART 2: 12×12 Shed Roof Plans
- PART 3: 12×12 Shed Door Plans
- 12×12 shed plans – free pdf dowmload
Step 1: Building a 12×12 shed floor frame
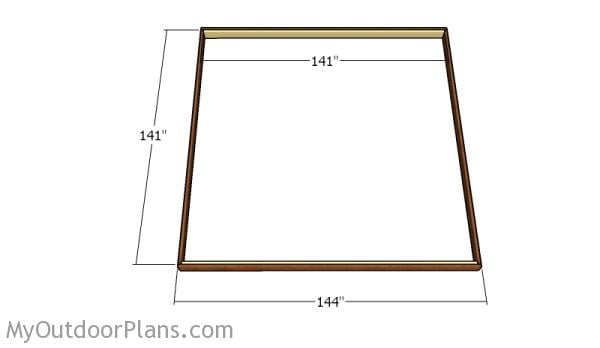
Shed floor frame
The first step of the project is to assemble the floor for the 12×12 shed. Cut the components from 2×6 lumber. Align the components, drill pilot holes and lock them together with 3 1/2″ screws. Make sure the corners are square for a professional result.
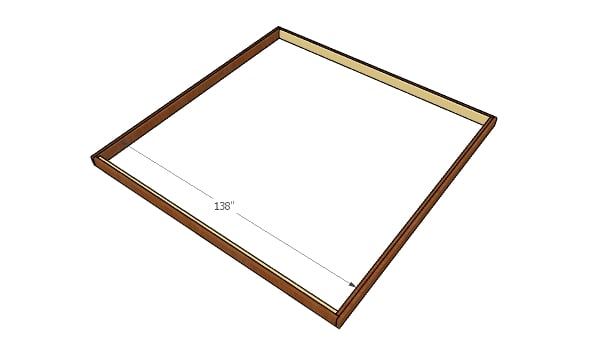
Joists
The next step of the shed project is to fit the interior rim joists. Use 2 1/2″ screws to secure the joists to the frame, leaving no gaps between the components.
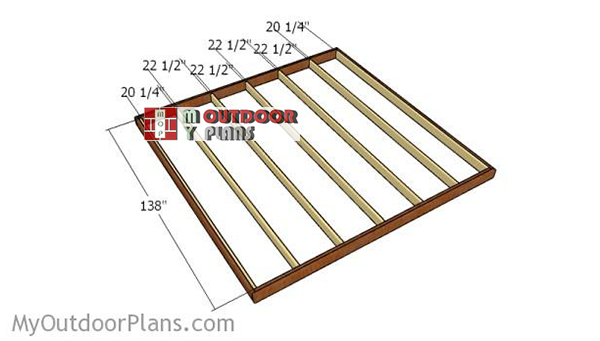
Fitting-the-intermediary-joists
Next, you need to attach the intermediary joists to the floor frame. Use joist hangers to lock the beams to the frame. Make sure you also insert 2 1/2″ screws through the perimeter beams into the joists.
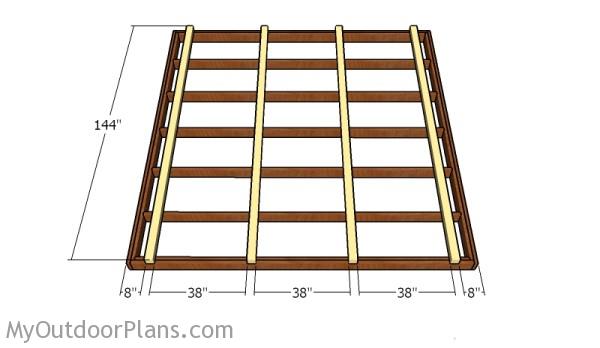
Fitting the skids
In order to protect the floor of the shed from moisture, we recommend you to attach 4×4 skids under the floor. Align the skids to the floor as shown in the diagram, drill pilot holes and insert 3 1/2″ screws into the joists.
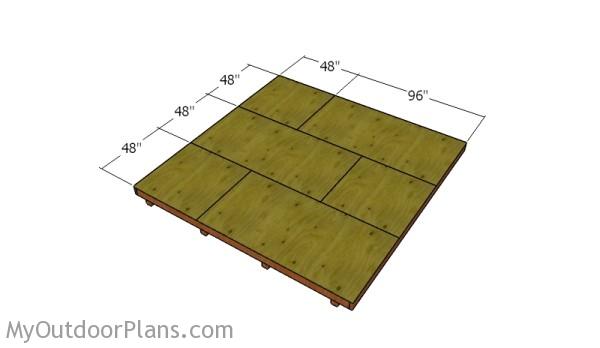
Fitting the floor panels
Attach the 3/4″ plywood sheets to the floor, as shown in the diagram. Use 1 5/8″ screws to lock the panels to the frame, every 8″ along the joists.
Step 2: Building the shed wall frames
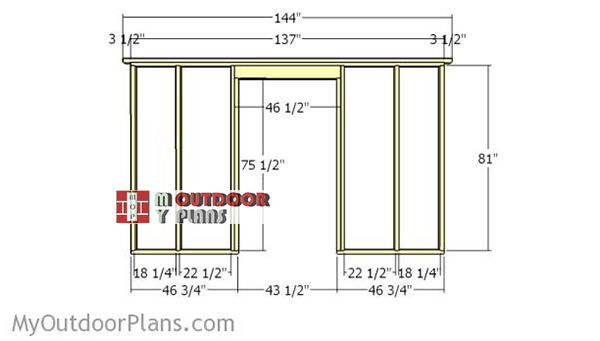
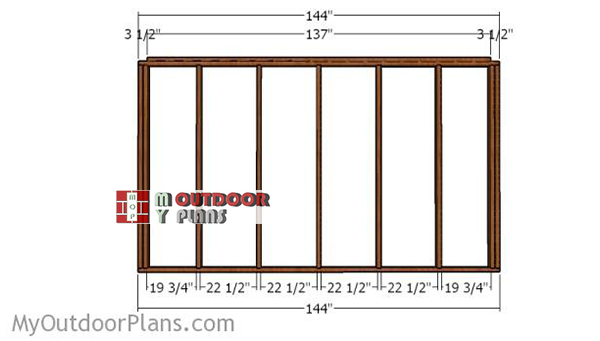
Front-wall-frame
Assemble the front panel of the shed from 2x4s. Cut the components at the right size, using the instructions in the diagram. Drill pilot holes through the plates and insert 2 1/2″ screws into the studs. Align the edges and make sure the corners are square.

Header
Use 2x6s and 1/2″ plywood to make the header. Drill pilot holes and insert 2 1/2″ screws on both sides of the header.
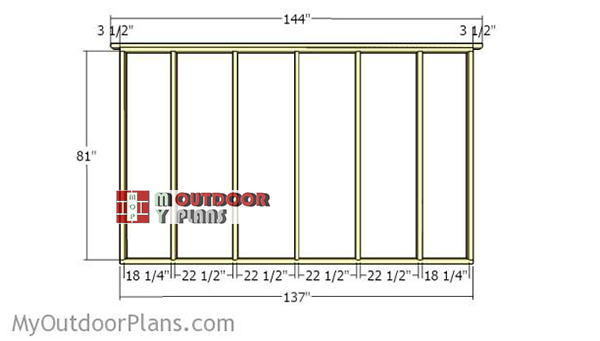
Back-wall-frame
Assemble the back wall frame.
Building-the-side-walls
Assemble the side walls for the shed. Cut the 2x4s at the right dimensions and lock the together with 2 1/2″ screws. Make sure the corners are square and leave no gaps between the components.
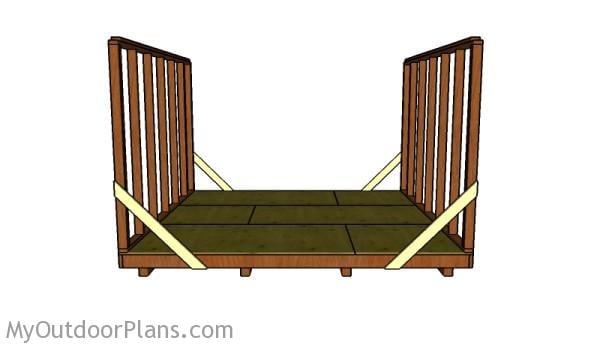
Fitting the side walls
Fit the side walls to the floor of the shed. Plumb the walls with a spirit level and secure them temporarily into place with 2×4 braces. Drill pilot oles through the bottom plates and insert 3 1/2″ screws into the floor.
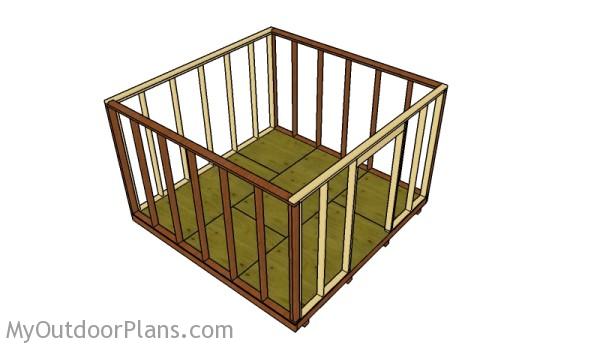
Assembling the shed frame
Next, fit the front and the back walls to the floor of the shed. Drill pilot holes through the plates and insert 3 1/2″ screws into the floor. In addition, you need to lock together the adjacent wall frames and the corresponding top plates.
Step 3: Fitting the outside sheets
Attaching the side panels
Attach the 5/8″ T1-11 siding to the sides of the shed. Leave no gaps between the panels and lock them to the frame with 1 5/8″ nails/screws.
Attaching the back panels
Furthermore, attach the panels to the back of the shed, as well.
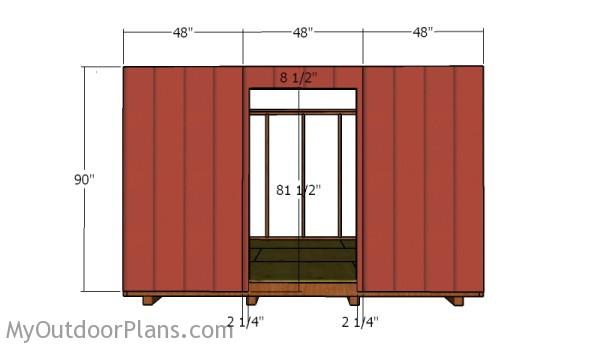
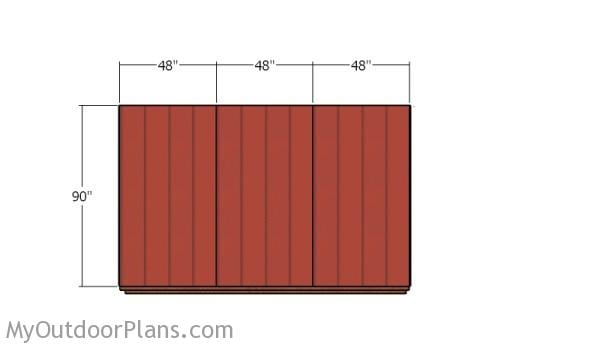
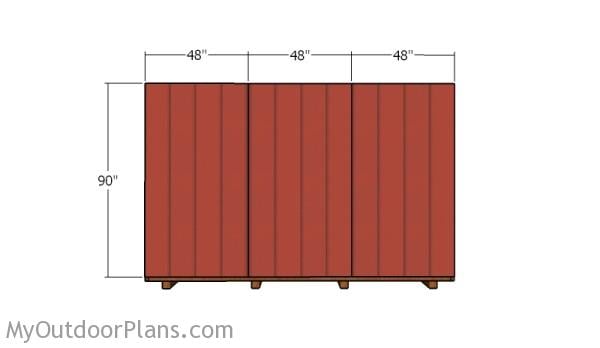
Front panels
Also, attach the siding panels to the front of the shed, as well. As you can easily notice in the diagram, you need to cut out the opening for the door. Mark the cut lines and use a saw to get the job done.
12×12 shed plans
Last but not least, fill the holes with wood putty and let them dry out for a few hours. Smooth the surface with 100-220 grit sandpaper and remove the residues with a damp cloth.
Top Tip: Apply a few coats of paint or stain to the components, to enhance the look of the project. Take a look over the PART 2 of the project to learn how to build the roof for the shed. If you want to get PREMIUM PLANS for this project (different design with a re-engineered structure), in a PDF format, please press GET PDF PLANS button bellow. Thank you for the support.

This woodworking project was about 12×12 shed plans free. If you want to see more outdoor plans, check out the rest of our step by step projects and follow the instructions to obtain a professional result.

EXPLORE MORE IDEAS FOR:
 |
 |
 |
 |
42 comments
Hello,
Having a hard time figuring out the floor plan.
Why are there 3 different lengths for the joists?
Because I have doubled the rim joists for the shed, to add more structural rigidity. I have added an extra diagram to make it more easy to follow. If you want, you can make a regular frame, therefore cutting the joists at just two dimensions.
Thank you Julian, this plan is great. Just finished the floor up last night
Good luck with the rest of the project and let me know how it comes out!
Is there a reason you are using screws and not 3″ galvanized framing nails?
Most of my readers don’t have a proper nail gun, so that’s why I try to be conservative and state the methods that keep the costs down. If you have the nail gun, you can use the framing nails.
Got it. Thanks for the quick response, these plans are excellent!
About to start this project this weekend. What about anchoring the shed into the ground. I dont want to use any concrete footings. so I was considering a screw auger, we live in tornado country. Any recommendations?
I don’t master this topic. If someone who’s reading has a recommendation, please leave a comment.
I Julian, I’d really like to adapt these to use as a chicken coop. But, I really want a regular lean to style roof with corrugated metal. Any suggstions?
Take a look over these plans: http://myoutdoorplans.com/shed/12×12-lean-to-shed-plans/
Thanks Jack, I can work with those!
I know I am missing something here, but on the side walls, I am only coming up 143″ 9 x 1.5″= 13.5
2 x 19.75″ = 39.5
4 x 22.5″ = 90″
Also on the height of the walls, the diagram for putting on the siding shows 90″ but the frame appears to only be 85.5″ tall (1.5 x 3″ + 81″)
The double studs placed at both ends have a 1/2″ gap between them. You can see in the diagram the double studs should be 3 1/2″ wide (2×1 1/2″ + 1/2″)
No indication of a 1/2″ gap. We were breaking our heads missing the extra inch. Good thing I read through the comments!
The indication is in the diagram and it’s very clear.
Okay, I figured the siding runs down past floor but my question on the length of the sidewall remains. Thanks.
Would it be safe to put a 6 foot door or two 3 foot doors and would the front wall need any more supports other than changing the header,
Yes, you can add even a 8′ wide door. Just use a double 2×6 header.
Thank you.
Also on the joist hangers what size screw or nail should I use to secure them to the in side of the frame?
Never mind I under stand the print now thank you .
Front wall Header mistake in plans… 81″ minus 75 1/2 ” = 5 1/2″. Your plans call for a header built by 2×4’s. Shouldn’t it be built by a 2×6’s to make math come out right???
Thank you. I’ve updated the list.
I just finished my floor per these plans but due to the snow load in my area I was wondering if i could do 16″ o.c walls on top of the 2′ o.c floor joists? So I don’t have to restart the whole project would the floor support this or because the joist don’t line up with the walls it would create a problem?
You can do that, as the floor has double perimeter joists.
What is the total height of the shed?
Just about 12 ft
I really like these plans, however can someone provide me a coat on building this shed? I want to compare from the DIY kit sheds you can buy.
How long is a day typically? The plans mention a day to build, but I have a guy on day three. Any suggestions?
Maybe you chose the wrong guy 😉 The plans call for one day for each of the 3 Parts and it never mentions 1 person. You don’t build a 12×12 with one person.
Good morning. I need help! This is the 3rd time I have contacted you and sadly each time no one has responded to me. I would LOVE to stop contacting you guys and get on with my project. Please review the previous messages that I have sent and respond accordingly. I need to move on but cannot since I have not been able to update my materials list, plans, as well as clarification on the 12 x 12 Gable Shed. The way that you guys have it is all screwy. No pun intended. I REALLY, can not wait to hear from you because I am at a stand still on the project until you get in touch with me. Thanks and have a nice day?
I already responded to your previous message. What can I assist you with?
I am so sorry but I have been checking every few hours and the message that you sent that said that you had already responded is the first and only response that I have seen. Had I seen another one I would have not written my last message to you. Also, I have tried to look for your response throughout the site and have not come across it. If it’s not to much trouble can you PLEASE, PLEASE, send it to my email. I would so appreciate that. Thank you in advance and have a nice day.
What is the issue? Just in case you don’t realize, I get tens of comments daily, besides designing new projects, so it’s impossible to keep track if you’re not short and explicit with the questions.
Does the material list exclude the 4 4×4 treated skids or are they being made up from the 2x4s?
Thank you for the plans. It’s working out well so far. Can you explain why the side walls have 90″ 2 x 4’s and the front and back walls are only 81″?
They don’t. The studs are 81″ for all walls.
I have a 12×12 shed I”m building. I have concrete pad. (12×12). Could I use that as the floor or would it be best to put a wood floor ? This is my FIRST time building a Shed.
You can do that. Choose what is best for you. The concrete pad will work if it’s raised from the ground so rain doesn’t get inside
Can I make all the studs 87″ for an extra 6″ of headroom?
Sure