This step by step diy project is about 10×14 shed plans. This compact shed features a gable roof, double front doors for easy access and a side window. If you need more storage space or a small workshop, you should take a look over this free guide. Take a look over the rest of my woodworking plans, if you want to get more building inspiration. Remember that you need to select the site for the shed with attention and that you have to comply with a few legal regulations.
When buying the lumber, you should select the planks with great care, making sure they are straight and without any visible flaws (cracks, knots, twists, decay). Investing in cedar or other weather resistant lumber is a good idea, as it will pay off on the long run. Use a spirit level to plumb and align the components, before inserting the galvanized screws, otherwise the project won’t have a symmetrical look. If you have all the materials and tools required for the project, you could get the job done in about a day. See all my Premium Plans HERE.
Projects made from these plans
10×14 Shed Plans

Building-a-10×14-gable-shed
Cut & Shopping Lists
- A – 4 pieces of 4×4 lumber – 168″ long SKIDS
- B – 2 pieces of 2×6 lumber – 168″ long, 12 pieces – 117″long FLOOR FRAME
- C – 3 pieces of 3/4″ plywood – 48″x96″ long, 3 pieces – 24″x48″ long, 1 piece – 24″x24″ long, 1 piece – 24″x96″ long FLOOR
- D – 2 pieces of 2×4 lumber – 120″ long, 2 pieces – 113″ long, 2 pieces – 20 1/2″ long, 2 pieces – 86″ long, 4 pieces – 91 1/2″ long, 2 pieces of 2×6 lumber – 75″ long FRONT WALL
- E – 2 pieces of 2×4 lumber – 168″ long, 1 piece – 161″ long, 10 pieces – 91 1/2″ long SIDE WALL
- F – 2 pieces of 2×4 lumber – 168″ long, 1 piece – 161″ long, 11 pieces – 91 1/2″ long, 2 pieces – 36″ long, 3 pieces – 37″ long, 3 pieces – 7 1/2″ long, 4 pieces of 2×6 lumber – 39″ long SIDE WALL WITH WINDOW
- G – 2 pieces of 2×4 lumber – 113″ long, 1 piece – 120″ long, 6 pieces – 91 1/2″ long BACK WALL
- H – 6 pieces of T1-11 siding – 48″x96″ long, , 2 pieces – 24″x96″ long, 4 pieces – 48″x94 1/2″ long, 1 piece – 24″x94 1/2″ long, 1 piece – 7″x24″ long SIDING
- 4 pieces of 4×4 lumber – 14′
- 12 pieces of 2×6 lumber – 10′
- 2 pieces of 2×6 lumber – 14′
- 5 pieces of 3/4″ plywood – 48″x96″
- 6 pieces of 2×4 lumber – 14′
- 6 pieces of 2×4 lumber – 10′
- 36 pieces of 2×4 lumber – 8′
- 4 pieces of 2×6 lumber – 8′
- 12 pieces of T1-11 5/8″ siding – 4’x8′
- 2 1/2″ screws, 3 1/2″ screws, 1 5/8″ screws
- 4d nails, 16d nails, 6d nails
- wood filler , wood glue, stain/paint
Tools
![]() Hammer, Tape measure, Framing square, Level
Hammer, Tape measure, Framing square, Level
![]() Miter saw, Drill machinery, Screwdriver, Sander
Miter saw, Drill machinery, Screwdriver, Sander
Time
Tools
- PART 1: 10×14 short Shed Plans
- PART 2: 10×14 Short Shed Roof Plans
- PART 3: 10×14 Shed Doors Plans
How to build a 10×14 shed
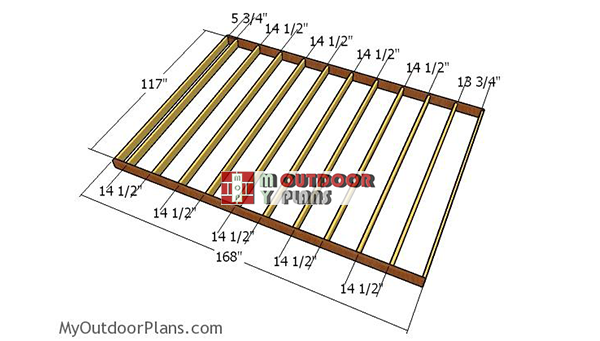
Building-the-floor-frame-shed
First of all, you need to build the floor frame for the shed. Therefore, you have to cut all the joists from 2×6 lumber. Lay all the joists on a level surface and drill pilot holes through the rim beams. Insert 3 1/2″ screws through the rim joists into the perpendicular components. Make sure the corners are square and align the edges flush.
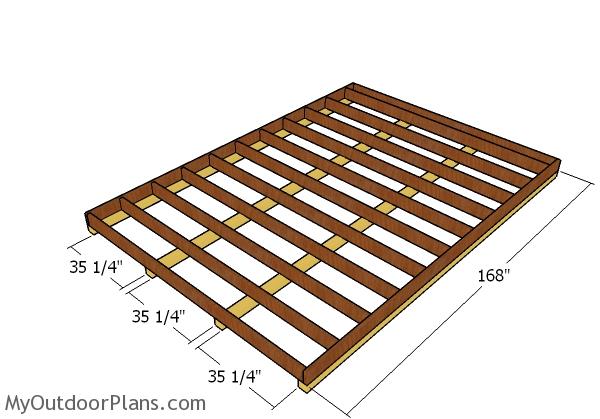
Fitting the skids
Select the location for the shed, making sure you also read and comply with the local building codes. Remove the vegetation layer and then compact a thick layer of gravel. Lay the 4×4 skids to the ground and then fit the floor frame. Align the edges flush and use rafter ties to lock the skids to the floor frame tightly.
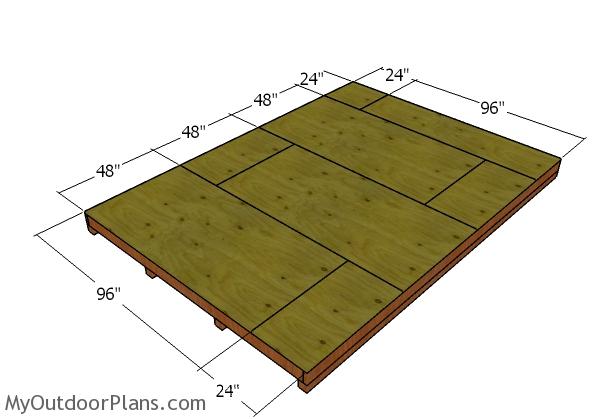
Floor sheets
Attach the 3/4″ plywood sheets to the floor frame, using the pattern show in the plans. Align the edges flush and leave no gaps between the sheets. Insert 1 5/8″ screws every 8″ along the joists, for a professional result.
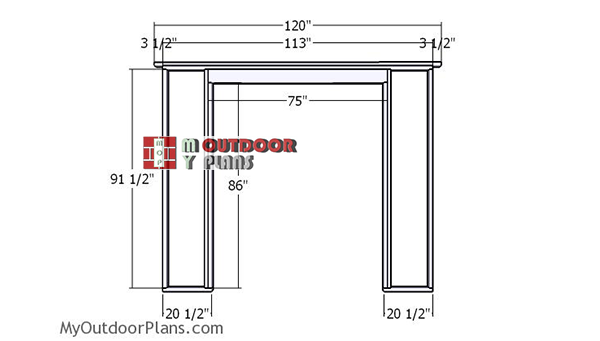
Front-wall-frame
Continue the project by assembling the front wall for the 10×14 shed. Cut the components at the right dimensions and then drill pilot holes through the plates. Insert 3 1/2″ screws through the plates into the studs. Use 2×6 lumber for the door double header. Fit a piece of 1/2″ plywood between the 2×6 headers. Add glue to the joints, drill pilot holes and insert 2 1/2″ screws to lock everything together tightly. You can adjust the size of the door opening to suit your needs.
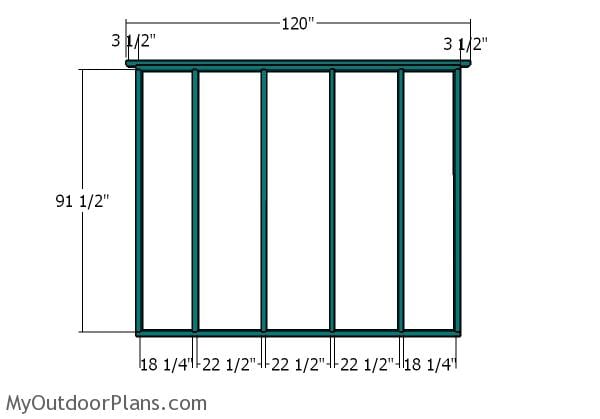
Back wall – Frame
Build the back wall for the shed in the same manner described above. Drill pilot holes through the plates and insert 3 1/2″ screws into the studs. Place the studs every 24″ on center for a professional result.
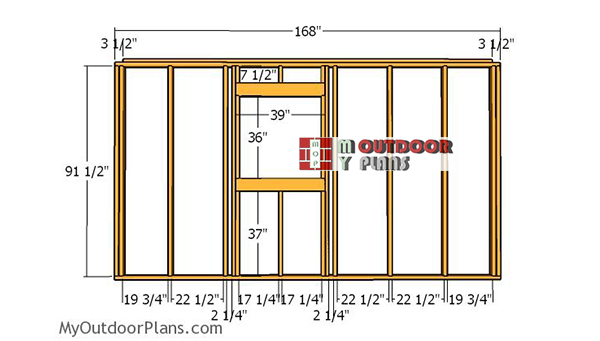
Side-wall-with-window-frame
Frame the side wall with window for the 10×14 storage shed. As you can easily notice in the diagram, you need to use 2×4 lumber for the plates and studs, while the double headers require 2×6 beams and 1/2″ plywood. Drill pilot holes through the plates and insert 3 1/2″ screws into the studs.
Moreover, you could adjust the size of the window openings to suit your needs. Place 1/2″ plywood blockings between the double studs that are placed at both ends of the wall frames.
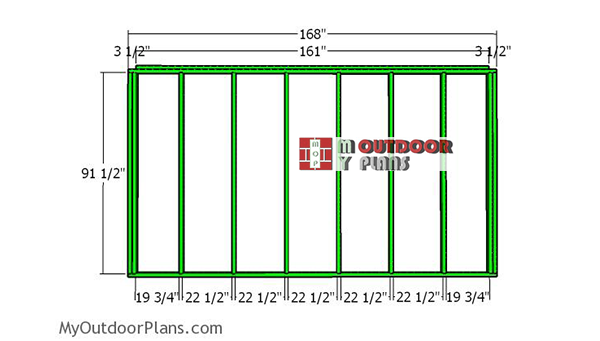
Side-wall-frame
Build the opposite wall from 2×4 lumber. Cut the studs and the plates from 2×4 lumber at the right dimensions, shown in the diagram. Drill pilot holes and insert 3 1/2″ screws into the studs. Place the studs every 24″ on center and make sure the corners are square.
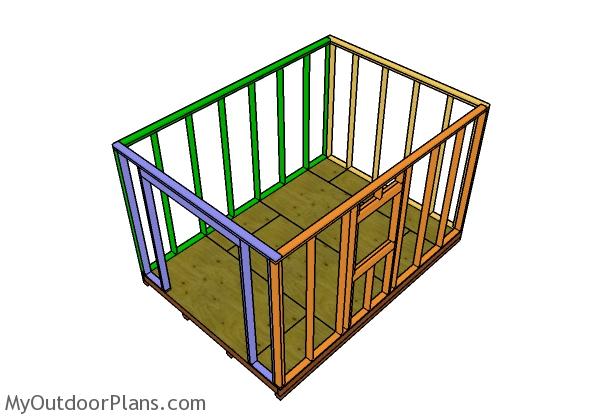
Building a shed frame
Fit the wall frames to the floor of the shed. Align the edges flush and then plumb them with a spirit level. Drill pilot holes through the bottom plates and insert 3 1/2″ screws into the floor. Join the adjacent walls together tightly using 2 1/2″ screws. Make sure the corners are square for a professional result.
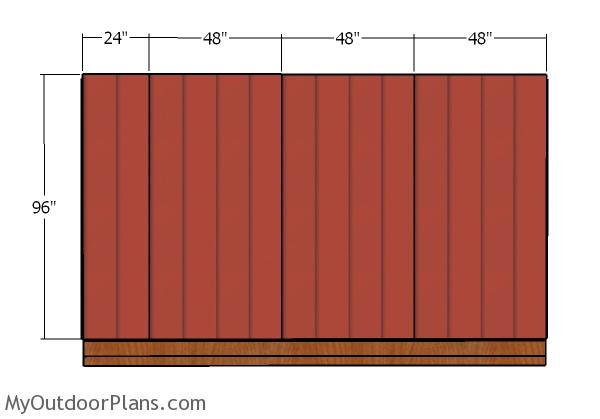
Fitting the side siding sheets
Cut the T1-11 siding sheets to the right dimensions and then secure them to the wall framing. Use 6-8d nails to lock the sheets into place. Insert the nails every 8″ along the framing for a professional result.
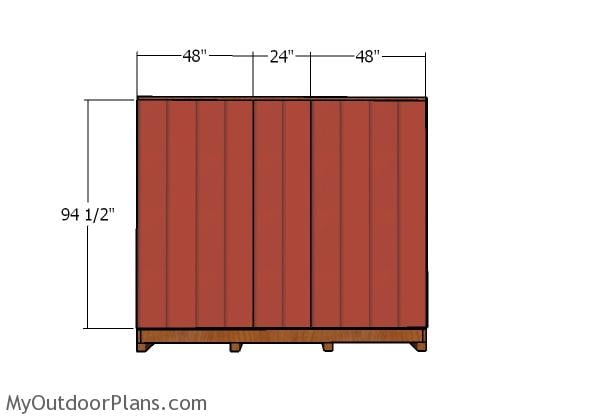
Back wall – Siding
Attach the T1-11 siding panels to the back of the shed. As you can easily notice in the plans, you need to inset the sheets 1 1/2″ from the top plate. Use 6-8d nails to lock the sheets into place. Insert the nails every 8″ along the framing for a professional result.
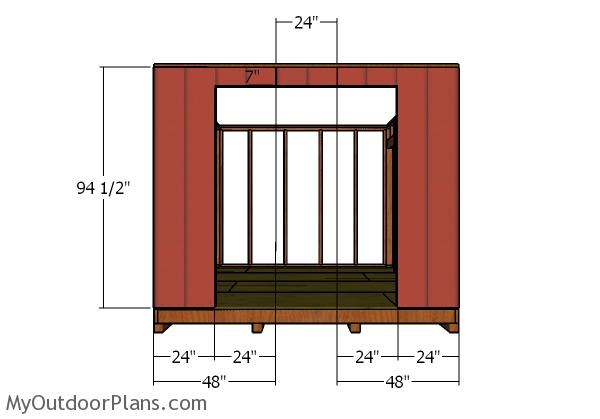
Front wall – Siding
Cut the sheets for the front of the shed. Align the sheets and then lock them into place with 6-8d nails, as shown in the diagram.
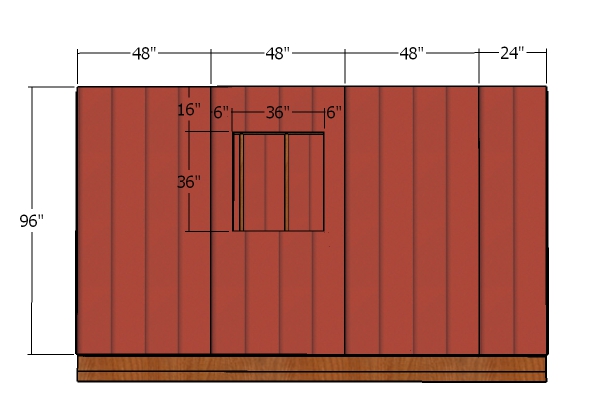
Side wall with window – Siding
Make the cuts so you can fit the T1-11 siding around the window opening. Align the edges flush and insert 6-8d nails, every 8″ along the framing, for a professional result.
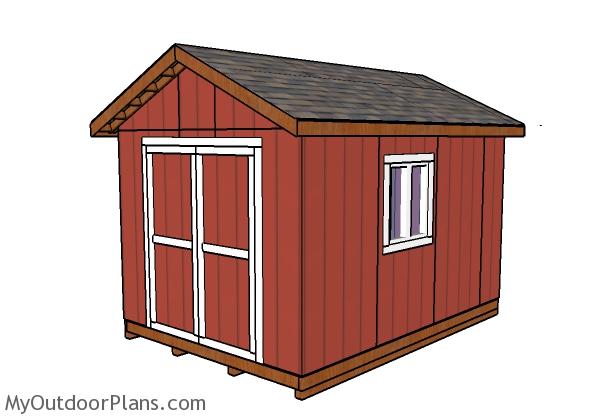
10×14 Shed Plans
This medium-sized storage shed has plenty of highlights so it is definitely worth shortlisting it. If you are in the market for a new shed in your backyard, you can get the job done by yourself and save a ton of money. Take a look over PART 2 of the shed, so you learn how to frame the gable roof.
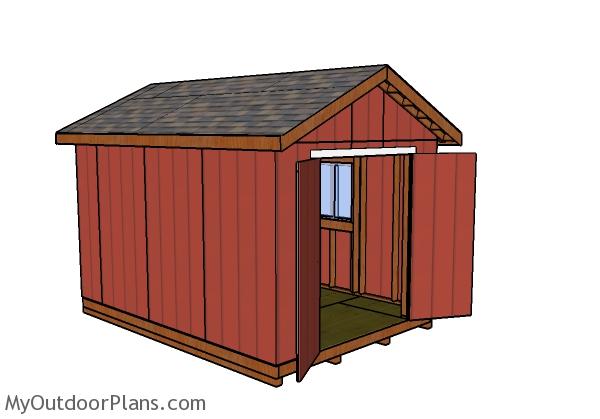
10×14 Shed Plans Free
Don’t forget to take a look over PART 2 to learn how to build the roof for the shed, as well as how to frame the front door. PART 3 is about building the double front doors. You can also check these 10×14 storage shed plans, because they will show you another approach.
If you want to get this plans in one PDF file, with 1 full Cut list and 1 full Shopping list, please take a look over the GET PDF PLANS button bellow.
This woodworking project was about 10×14 shed plans free. If you want to see more outdoor plans, check out the rest of our step by step projects and follow the instructions to obtain a professional result.


9 comments
very well done
Thank you. Looking forward to seeing your projects!
I like this plan very much. Thank you for providing it. My dilemma is-this does not say how tall from the ground to the top of the roof it is when finished. Due to HOA restrictions, the top of my roof cannot be taller than 9 feet from the ground. I’m assuming you are using 7-8 foot walls. Can I build mine with 6 foot walls and use a 3-12 pitch and still have a sufficient angle for the roof and still maintain my 9 foot restriction? Thank You!
Yes. You will be within 9′
How tall will this shed be if I follow exact? I need to be under ten feet
It’s 11 ft
Hi.
Do you offer a material list and instructions on how to add a storage loft to a 10×14 shed. We live in a 800 sqft house and we need to get things out since we just had a baby and he is going to start crawling. Unfortunately moving is not an option.
Thanks for your help and guidance.
Nina
Hi, like the plans and drawings, I know it’s just a shed, what do you think about having 16” centers as opposed to 24’s as you have drawn. I live in a high wind area. Also putting the door in the side. Let me know your thoughts on this. Thank you for your thoughts. God be with you, looking forward to hearing from you.
God bless,
Brian
Having them 16″ oc would help making the structure sturdier. Changing the door location doesn’t impact the structure