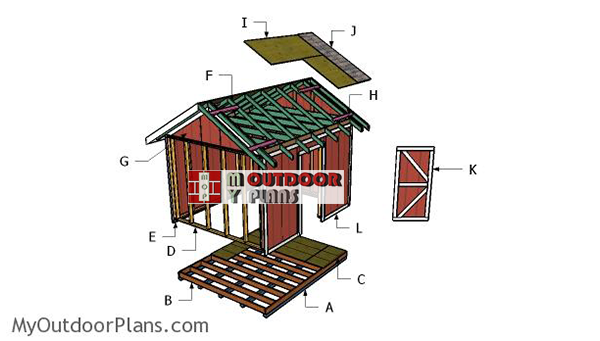
This step by step diy project is about diy 10×12 shed plans. I have designed this shed so you can store your garden tools and outdoor furniture in a stylish and durable manner. This garden project has more parts so take a look over the rest of the sections to learn how to build the roof and the door. Moreover, I have designed shed with many sizes so check them out, as well. Take a look over the rest of my woodworking plans, if you want to get more building inspiration.
When buying the lumber, you should select the planks with great care, making sure they are straight and without any visible flaws (cracks, knots, twists, decay). Investing in cedar or other weather resistant lumber is a good idea, as it will pay off on the long run. Use a spirit level to plumb and align the components, before inserting the galvanized screws, otherwise the project won’t have a symmetrical look. If you have all the materials and tools required for the project, you could get the job done in about a day. See all my Premium Plans HERE.
Projects made from these plans
10×12 Shed Plans
Building-a-10×12-outdoor-shed
Cut & Shopping Lists
- A – 5 pieces of 4×4 lumber – 144″ long SKIDS
- B – 2 pieces of 2×6 lumber – 144″ long, 10 pieces – 117″long FLOOR
- C – 3 pieces of 3/4″ plywood – 48″x96″ long, 3 pieces – 24″x48″ long FLOORING
- D – 2 pieces of 2×4 lumber – 113″ long, 1 piece – 120″ long, 6 pieces – 85″ long 2xSIDE WALL
- D – 1 piece of 2×4 lumber – 144″ long, 1 piece – 137″ long, 2 pieces – 54″ long, 8 pieces – 85″ long, 2 pieces – 39″ long, 2 pieces – 75 1/2″ long FRONT WALL
- D – 2 pieces of 2×4 lumber – 144″ long, 1 piece – 137″ long, 7 pieces – 85″ long BACK WALL
- E – 10 pieces of T1-11 – 48″x96″ long, 2 pieces – 24″x48″ long SIDING
- 2 pieces of 2×6 lumber – 12′
- 10 pieces of 2×6 lumber – 10′
- 5 pieces of 4×4 lumber – 12′
- 4 pieces of 3/4″ plywood – 48″x96″
- 6 pieces of 2×4 lumber – 10′
- 6 pieces of 2×4 lumber – 12′
- 30 pieces of 2×4 lumber – 8′
- 11 pieces of T1-11 – 48″x96″
- 8d nails, 2 1/2″ screws, 3 1/2″ screws
- wood filler , wood glue, stain/paint
Tools
![]() Hammer, Tape measure, Framing square, Level
Hammer, Tape measure, Framing square, Level
![]() Miter saw, Drill machinery, Screwdriver, Sander
Miter saw, Drill machinery, Screwdriver, Sander
Time
![]() One day
One day
Related
- PART 1: 10×12 Shed Plans
- PART 2: 10×12 Shed Roof Plans
- PART 3: 10×12 Shed door and Trims Plans
Building a free 10×12 shed

Building-the-shed-floor-frame
The first step of the project is to frame the floor for the 10×12 shed. Cut the floor joists from 2×6 lumber at the right dimensions using a good saw. Smooth the edges with sandpaper and align the components with attention. Make sure the corners are right-angled and drill pilot holes through the rim joists. Insert 3 1/2″ screws to lock everything together tightly.
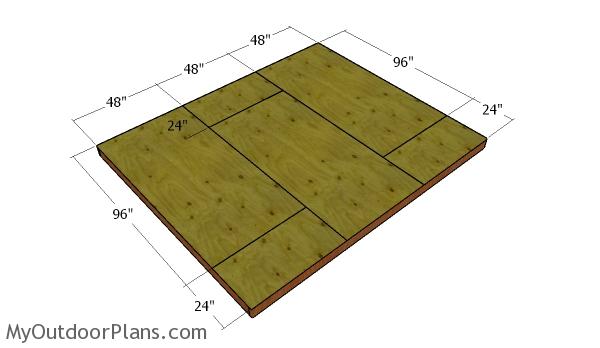
Attaching the flooring
Next, attach the 3/4″ tongue and groove plywood sheets to the joists. Align the sheets with attention and insert 1 1/4″ screws to lock them into place tightly. Leave no gaps between the sheets for a neat result.
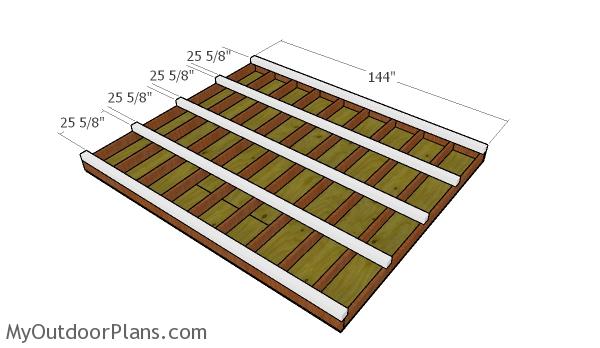
Attaching the skids
Continue the project by attaching the 4×4 skids to the floor frame. Place the skids equally spaced and lock them to the joists with ties.
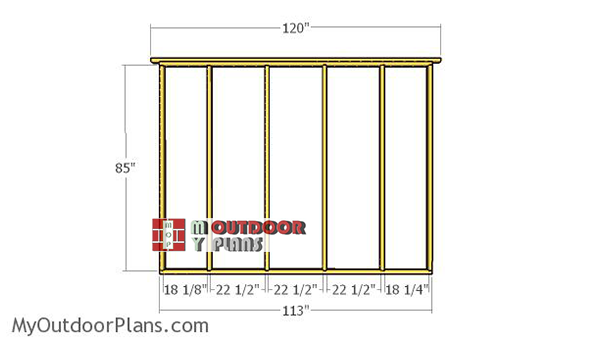
Building-the-side-walls
Assemble the side walls from 2x4s. Make sure you cut the studs and the plates at the right dimensions. Drill pilot holes through the plates and insert 2 1/2″ screws into the studs. Place the studs every 24″ on center, making sure the corners are square and the edges flush.
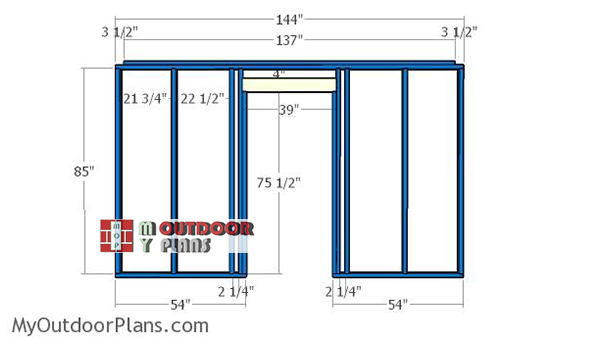
Building-the-front-wall-frame
Continue the project by assembling the font wall for the gable shed. As you can easily notice in the diagram, you need to frame the door opening.
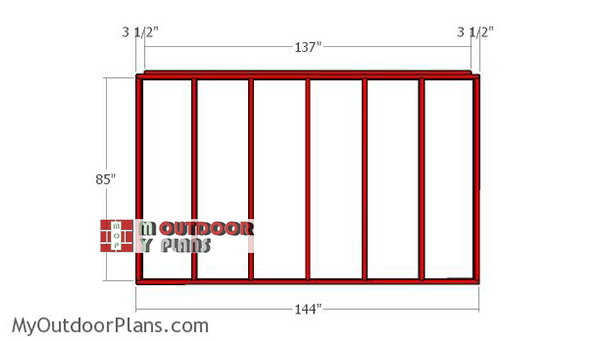
Building-the-back-wall-frame
Next, frame the back wall for the 10×12 shed. Assemble the walls on a plane floor, making sure the corners are square and that all joints are rigid.
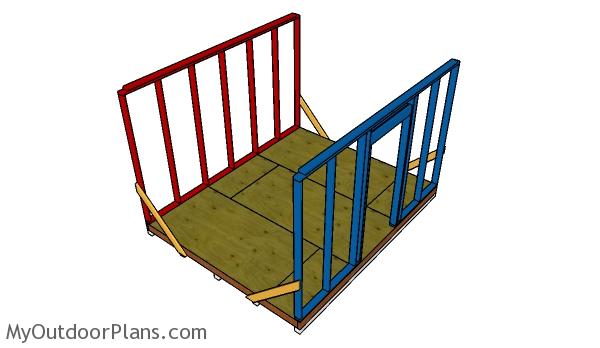
Fitting the front and back walls
After assembling the wall frames you need to install them to the floor of the shed. Align the edges with attention and use a spirit level to plumb them before locking them into place tightly. Use temporarily braces to lock the front and back walls to the floor. Drill pilot holes through the bottom plates and insert 3 1/2″ screws into the floor frame.
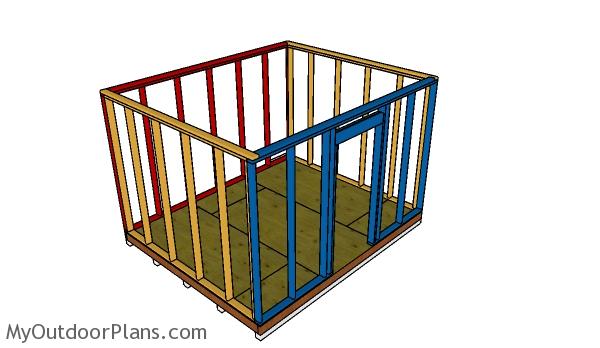
Fit the side walls to the shed, as shown in the diagram. Insert the screws through the bottom plates into the
Fitting the side walls
Build the exterior walls from 5/8″ T1-11 siding. As you can notice in the diagram, you need to make some cuts to the sheets so you cover the whole surface. Use 8d galvanized nails to secure the sheets to the wall frames. Align everything with attention and insert the nails every 8″ along the studs.
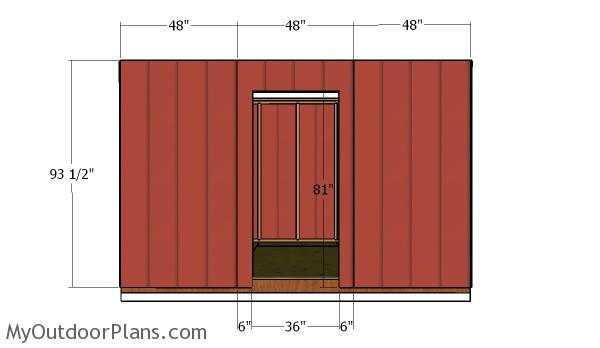
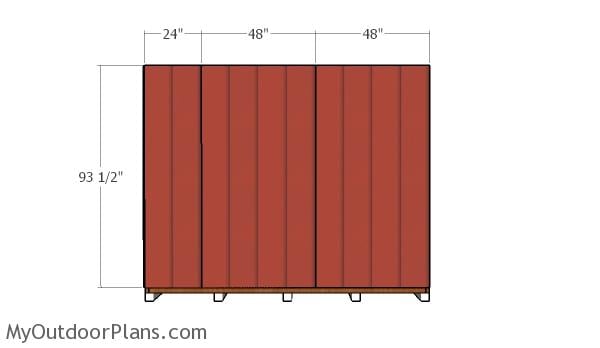
Fitting the front sheets
Make the cuts to the sheet that goes around the door opening. Align everything so the edges are flush and secure them into place with 8d nails.
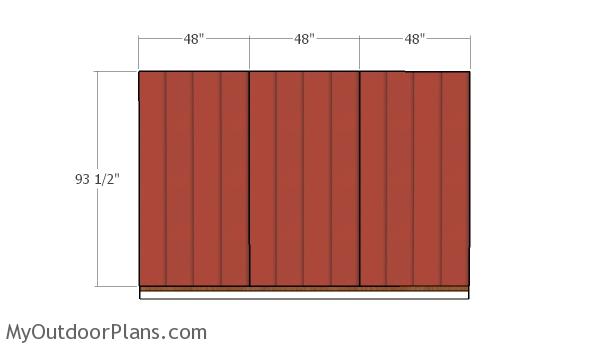
Back Wall
Attach the rest of the sheets to the back wall of the shed. Align the edges with attention and secure them to the wall studs with 8d nails or screws. Make sure you leave no gaps between the sheets for a professional result.
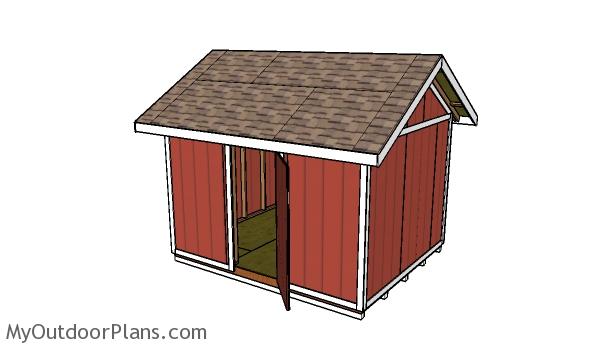
10×12 Shed Plans
Make sure you check out the rest of the project, so you learn how to frame the roof and how to attach the door and the trims to the shed. In addition, I have lots of other shed projects on the site so I recommend you to browse through all alternatives before starting the building project.
If you want to get this project as a PDF file (different design with re-engineered structure), with 1 full cut list and 1 full shopping list, check out the GET PDF PLANS button bellow.

This woodworking project was about 10×12 shed plans free. If you want to see more outdoor plans, check out the rest of our step by step projects and follow the instructions to obtain a professional result.

20 comments
Just about what I’m looking for in a shed. Wondering about going a little higher and using the full length of 8′ studs for the walls. Also, would like to have a barn door on the end and a single door on a back/side corner. Thanks for all the great info!
I recommend you these plans: http://myoutdoorplans.com/shed/12×16-storage-shed-plans/ Sounds like what you are looking for. Double doors and a side door for a 10×12 shed is overkill.
Thanks for sharing these plans! Just curious, do you know an approximate cost to build your 10×12 and/or your 8×10 shed? Trying to figure out if it’s worth it to build vs buy while on a budget but wanting it to last too. Thanks!
Probably around 1500-2000 dollars.
Hi, On “Building the side walls” diagram, on the left lower side you show a measurement of 18 1/8″, is that a type-O-error?
Just curious, Dan.
Yes. Its a typing error. It’s 18 1/4″.
I like this shed, I would need a double door to get my lawn mower inside. I bet I can figure it out.
You should take a look over these plans: http://myoutdoorplans.com/shed/8×12-shed-plans/ It comes with double front doors.
You have what looks like 2 lists of materials.. One is for walls, front and back i understand. the other appears to be what you can buy and then cut down to the required length… is that right? Want to avoid having enough material for 2 sheds when i only need one…
The A B C D is the cut list, and the bottom is the materials list. In addition, each PART of the shed plans comes with their own lists.
Where can I get the plans for the roof? I am not that savvy and need instructions for every step.
Nevermind I found it.
Nice plans. I’m in the beginning stages of building this – just a correction to note: you indicate 10 x 10′ lengths and show 10 in your picture but there should be 11 (14.5 x 7 +13.75 x 2 = 129″, not 144″). There are 15″ unaccounted for.
Ah, think I see the issue. You’re allowing a 1.5″ width for each board to account for those spans, in addition to the same for the end pieces (I think?). Nm my earlier comment.
How do you get the plans emailed to your email address. I selected get you plans by email, but how do you get them send to you?
Read the FAQs: https://myoutdoorplans.com/faq/
You show the wall heights at 85”
Shouldn’t they be 93 1/2”
Please reply
Thank you
The wall height is not 85″, that is the stud height, The wall height is 89 1/2″. Why “should it be 93 1/2”?
I’m new to building stuff but why is there no unit of measurement? and if you know the unit can you tell me??
The unit of measurement is inches and it’s labeled as “