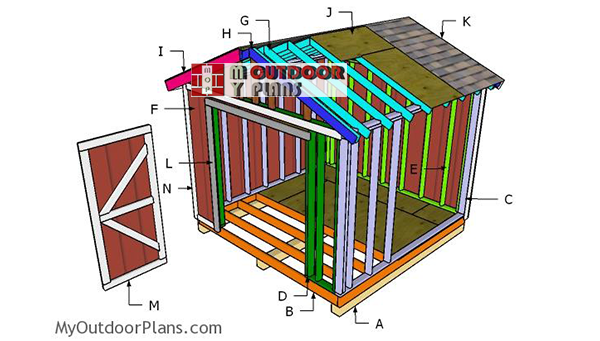
This step by step diy project is about 10×10 shed roof plans. This is PART 2 of the small garden shed plans, where I show you how to build the gable roof. The shed has a 22.5 degree slope, but you can very easily adjust it to suit your needs. Take a look over the rest of my woodworking plans, if you want to get more building inspiration.
When buying the lumber, you should select the planks with great care, making sure they are straight and without any visible flaws (cracks, knots, twists, decay). Investing in cedar or other weather resistant lumber is a good idea, as it will pay off on the long run. Use a spirit level to plumb and align the components, before inserting the galvanized screws, otherwise the project won’t have a symmetrical look. If you have all the materials and tools required for the project, you could get the job done in about a day. See all my Premium Plans HERE.
Projects made from these plans
10×10 Gable Shed Roof Plans
Building-a-10×10-gable-shed
Cut & Shopping Lists
- F – 4 pieces of T1-11 siding – 26 1/4″x48″ long SIDING
- G – 18 pieces of 2×4 lumber – 72″ long, 4 pieces – 19 1/2″ long, 4 pieces – 9 3/4″ long, 2 pieces – 23 3/4″ long RAFTERS
- H – 4 pieces of 2×4 lumber – 72″ long, 12 pieces of 2×4 lumber – 4 1/4″ long 2xOVERHNAG
- I – 4 pieces of 1×6 lumber – 73″ long, 2 pieces – 136″ long TRIMS
- J – 2 pieces of 3/4″ plywood – 48″x96″ long, 2 pieces – 24″x48″ long, 2 pieces – 24″x24″ long, 2 pieces – 24″x96″ long, 4 pieces – 8″x72″ long ROOF SHEETS
- K – 150 sq ft of tar paper, 150 sq ft of asphalt shingles ROOFING
- 26 pieces of 2×4 lumber – 6′
- 4 pieces of 2×4 lumber – 8′
- 4 pieces of 1×6 lumber – 8′
- 2 pieces of 1×6 lumber – 12′
- 1/2″ plywood
- 4 pieces of 3/4″ plywood – 48″x96″
- 2 piece of T1-11 – 48″x96″
- 150 sq ft of tar paper, 150 sq ft of asphalt shingles
- rafter ties
- 8d nails, 2 1/2″ screws, 3 1/2″ screws
- wood filler , wood glue, stain/paint
Tools
![]() Hammer, Tape measure, Framing square, Level
Hammer, Tape measure, Framing square, Level
![]() Miter saw, Drill machinery, Screwdriver, Sander
Miter saw, Drill machinery, Screwdriver, Sander
Time
![]() One day
One day
Related
- PART 1: 10×10 Shed Plans
- PART 2: 10×10 Shed Roof Plans
- PART 3: 10×10 Shed Door Plans
Building a gable roof for a 10×10 shed
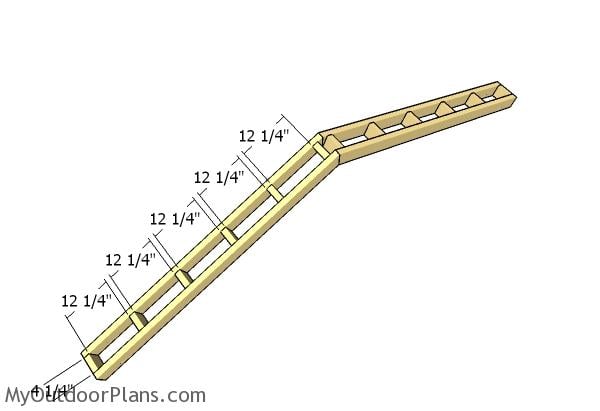
Building-the-rafters
The first step of the roof project is to build the rafters from 2×4 lumber. Make a 22.5 degree cut to one one of the slats and then make the birds-mouth cut to the opposite end.

Fitting the gussets
Use 1/2″ plywood for the gusset. Lay the gussets over the joints, align the edges flush and then insert 1 5/8″ screws to lock them to the rafters tightly.

Fitting-the-trusses
Fit the trusses to the top of the shed, as shown in the diagram (every 16″ on center). Use a spirit level to plumb the trusses vertically and then secure them to the top plates with rafter ties.

Gable end supports
Use 2×4 lumber for the gable end supports. Make the angle cuts to the supports and then drill pocket holes at both ends. Secure the supports into place and then lock them tightly with 2 1/2″ screws.
Gable end panels
Attach T1-11 siding sheets to the front and to the back of the shed. Mark the cut lines on the sheets and then get the job done with a circular saw. Leave no gaps between the sheets for a professional result.
Assembling the overhangs
The next step of the project is to assemble the overhangs. You can adjust the size of the overhangs to suit your needs. Drill pilot holes through the rafters and then insert 2 1/2″ screws into the blockings. Place the blockings equally spaced for a professional result.
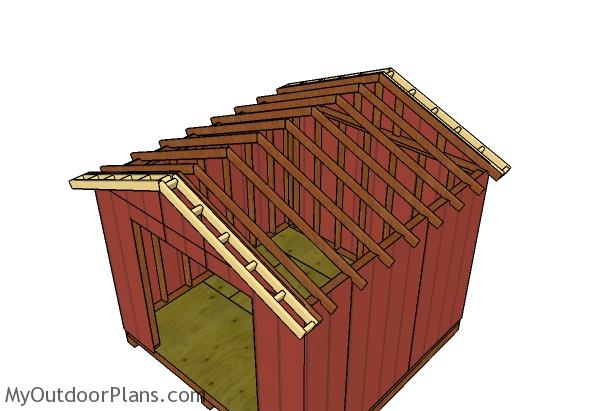
Fitting the overhangs
Fit the overhangs to the front and to the back of the shed. Align the edges flush and insert 2 1/2″ screws to lock them into place tightly.
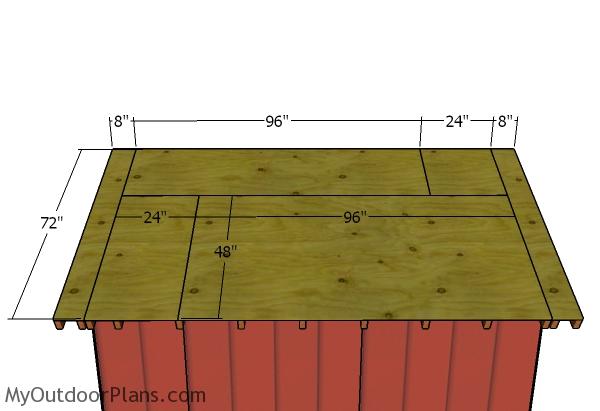
Roof sheets
Fit the 3/4″ plywood sheets to the roof of the shed. Align the edges flush and insert 1 5/8″ screws along the rafters, every 8″. Leave no gaps between the sheets for a professional result.

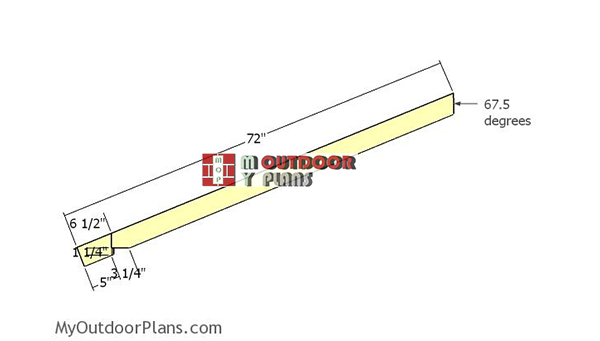
Front and back roof trims
Use 1×6 lumber for the shed roof trims. Make on cut to the trims, as shown in the diagram. Align the edges flush and then insert 2″ nails to secure the trims into place tightly.

Side roof trims
Fit 1×6 trims to the sides of the roof. Align the edges flush and then insert 2″ nails to lock the trims into place tightly.
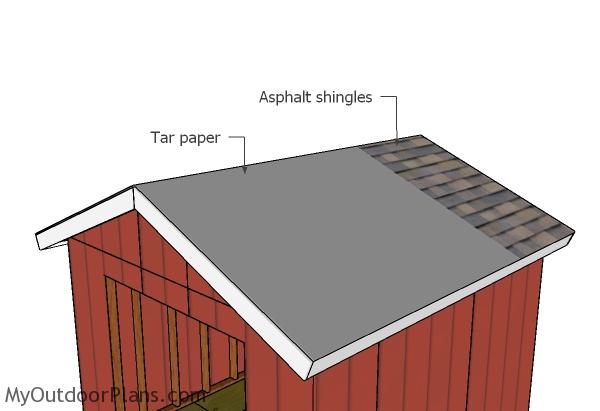
Fitting the roofing
Cover the roof of the shed with roofing felt, making sure the strips overlap at least 2″. Secure the tar paper to the plywood sheets with roofing staples. In addition, cut a large piece for the top ridge. Fit the side drip edges over the roofing felt, while the bottom drip edges should be fit under. Read the instructions labeled on the asphalt shingle packs before installing them into place tightly. Start with the bottom left side of the roof and install them all the way to the top.
Back wall trims
Adding the decorative trims to the shed is a nice touch, as it will add a lot of value to the project. This shed can be built in less than one week, as it requires simple techniques and basic tools.
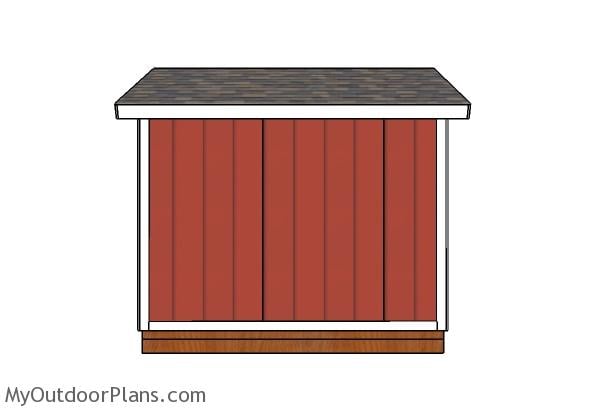
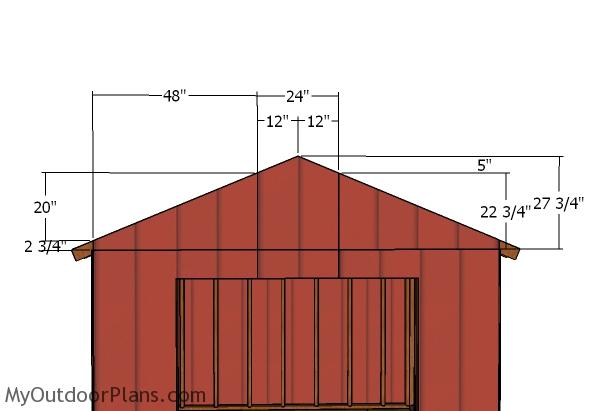
10×10 Gable Shed Plans – side view
You can add a small window to the side of the shed, if you want more light inside of the frame.
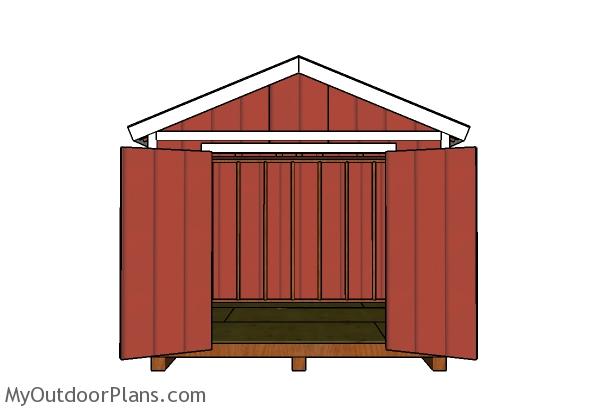
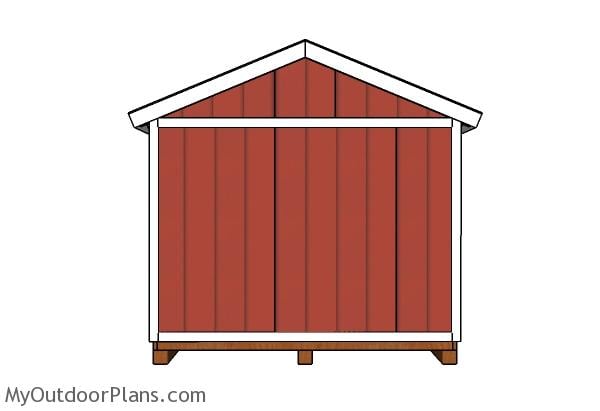
10×10 Gable Shed Plans – Front view
You should also check PART 3 of the shed project, where I show you how to build the door and the trims. In addition, in PART 1 of the project I show you step by step plans for building the floor and the frame of the shed.
This woodworking project was about 10×10 gable shed roof plans free. If you want to see more outdoor plans, check out the rest of our step by step projects and follow the instructions to obtain a professional result.
 |
 |
EXPLORE MORE IDEAS FOR:
 |
 |
 |
 |
12 comments
HI:
Thank you very much for posting so many amazing plans. I am following one of your gable shed 10×10 plan. And it is working out very nicely so far. Only problem is one my neighbors complained about the height of the shed. Which I later found out should be less than or equal to 8 1/2 feet.
I have already constructed the walls. And the trusses are already positioned on the roof. In your professional opinion what would be the best way to adjust it so that the shed is less than or equal to 8 1/2 feet. I’ll be taking the trusses down this weekend.
Your opinion will be much appreciated.
Vijay
It is a weird situation, because the total height of the shed is just over 9′. In order to reduce the total height of the shed you have two options: either you change the slope of the gable roof (I don’t recommend as it will keep the snow on the roof) or you take all the wall frames down and cut the studs shorter. If I were you, I would just try solve the issue with the neighbors and avoid all these modifications that alter the design and the storage space.
Thank you so much for the response. I ended up cutting 3 sides to 72 inches and made this a lean to roof. Now following your 10×10 lean to roof plan. Thank again for that.
I don’t know which neighbor compliant I would have just loved to resolve it with the neighbors. But now that the battery is with the code compliance Dept. They have to make sure the shed meets the restriction.
Glad to hear you found a solution to your problem. Let me know how the roof goes and don’t forget to take a few pics, so I can feature your shed once you are done.
I will absolutely post pictures.
Mostly cosmetically I have diverted from the plans. I put Vynil siding instead. But the door I am building with T1-11. But I do have a question, again.
I installed siding in the front, but did not leave any room for the door jambs. Well I did not understand the functionality then. :(.
Will there be a problem if I mount the door on the frame directly?
Or will I have to undo what I did with the siding and j-channel. Reduce the size by 3.5 inches on both sides and install the jambs.
Your expert opinion is much appreciated.
Vijay
I would cut the siding and install the jambs. That is the best way to hang the doors.
65.5 degrees?
It is 67.5 degrees and that it is what it’s left after you make the cut. If you use a miter saw, you need to set it at 22.5 degrees.
what size rafter ties would you use
Thanks for a good working plan. Being in England I have to go and get an Imperial (inches);tape measure, apart from that it’s easy to understand. For the base I was going to use concreted in posts , is compacted gravel better?
Also I am not sure you can buy ready made sides here, might have to use feather board.
Nick
Both are good. Usually posts are used if the land is sloped
What the heck does “make on cut to the trims” mean?