This step by step diy woodworking project is about seesaw plans. Building a wooden seesaw is a great project for your kids, if you want to entertain and keep them busy. In addition, the greatest advantage of this project is that you don’t have to spend a significant amount of money, as you can even get the job done by using scrap materials. Moreover, you can make the seesaw unique by adding a few finishing touches (paint, handles, shape).
Nevertheless, there are a few things that you should take into account before starting the actual project, if you want to get a nice appearance. First of all, you need to use quality and weather-resistant lumber, such as pine, cedar and redwood. Use a thick water pipe to build the pivot, as well as heavy-duty saddle clips. Lock all the components together with great attention, making sure the parts are aligned. See all my Premium Plans HERE.
Projects made from these plans
Cut & Shopping Lists
- A – 1 used tire TIRE
- B – sand, gravel, cement and 1×4 lumber CONCRETE
- C – 4 pieces of 2×3 lumber – 20″ long SUPPORT
- D – 1 pieces of 2×3 lumber – 14″ long BRACE
- E – 1 piece of 2×8 lumber – 96″ long PLANK
- F – 1 piece of 1″ water pipe – 14″ long, 3 saddle clips PIVOT
- G – 4 pieces of 2×2 lumber – 9″ long, 2 pieces – 15″ long HANDLES
- 8″ carriage bolts
- pipe strap clamp
- pipe
- 2 1/2″ screws
- 1 5/8″ screws
- wood filler
- wood glue
- wood stain
Tools
![]() Hammer, Tape measure, Framing square
Hammer, Tape measure, Framing square
![]() Miter saw, Drill machinery, Screwdriver, Sander
Miter saw, Drill machinery, Screwdriver, Sander
Time
Related
Building a seesaw
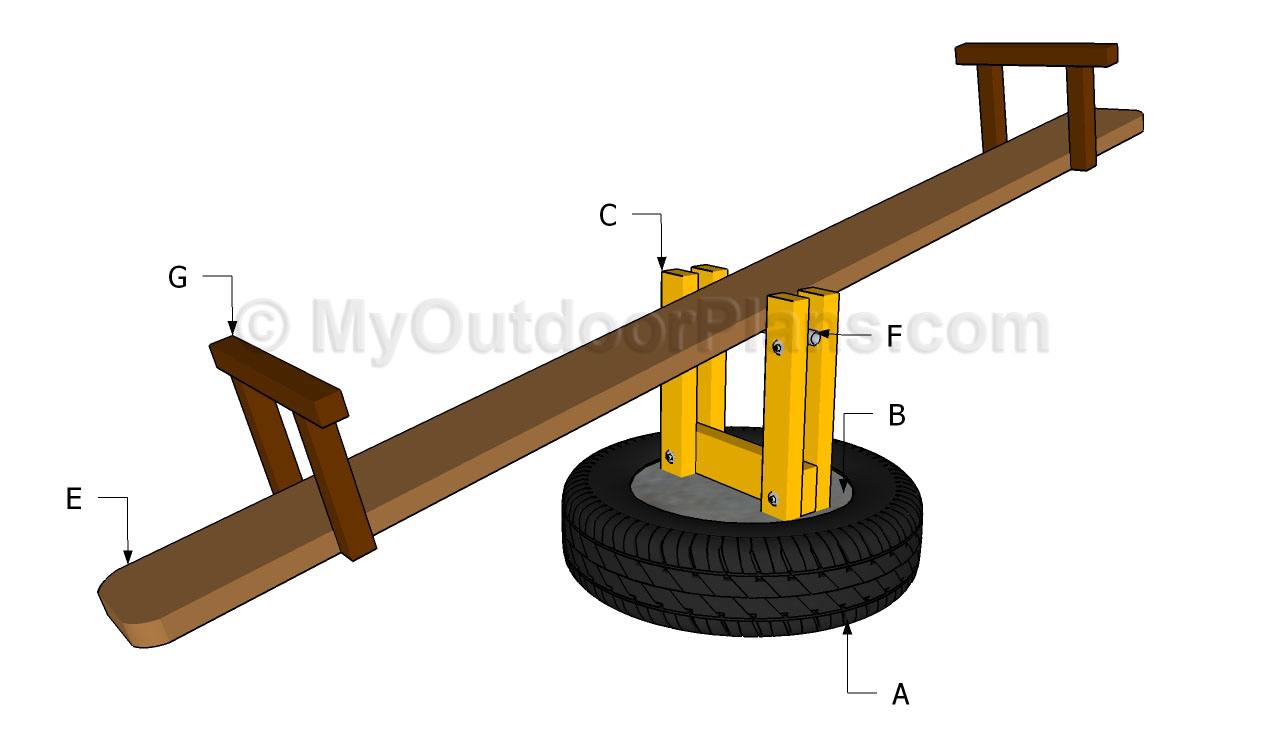
Building a seesaw
Top Tip: A wooden seesaw is entertaining and a great way to spend the weekends, especially for your kids. If you want to put a big smile on the faces of your kids, while investing a small amount of money, we recommend you to pay attention to our plans and instructions.
Seesaw Plans
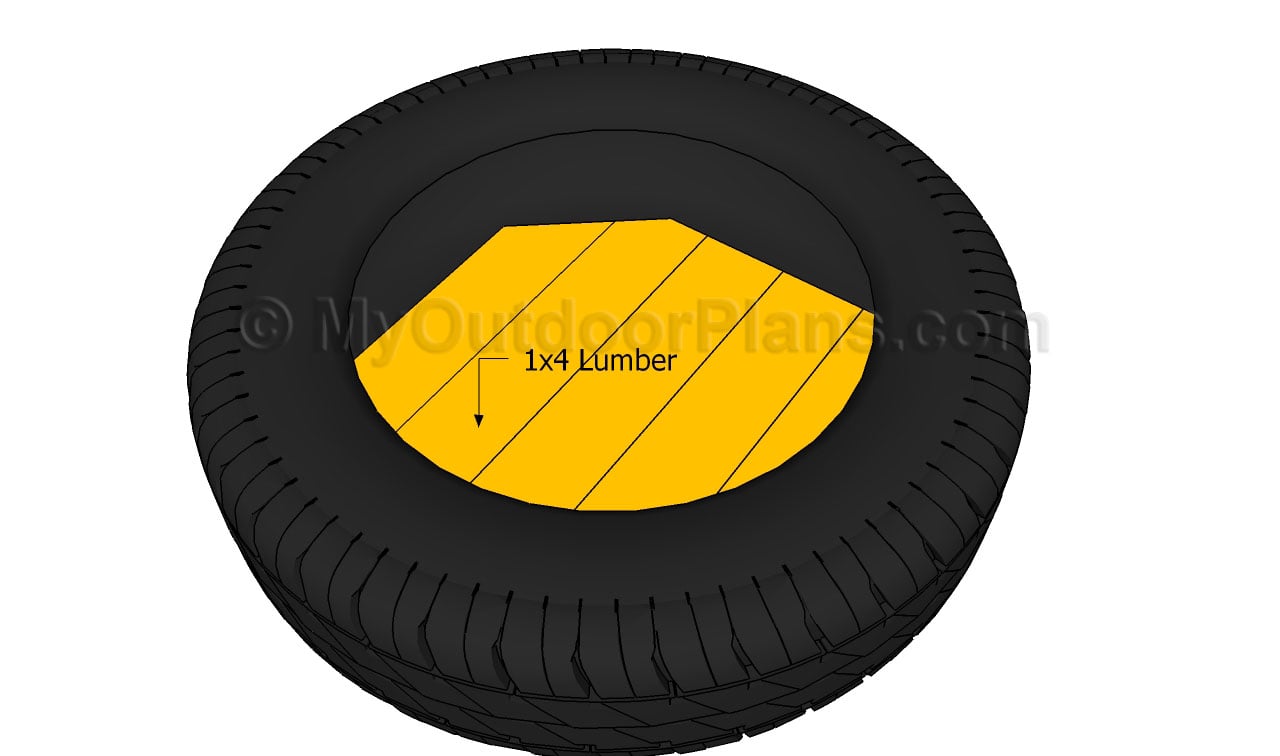
Fitting slats inside the tire
The easiest way to secure the support of the seesaw is to use an old tire. As you can see in the image, you need to fit several slats inside the tire, before locking the supports into concrete. Make sure the tire has a nice appearance and you don’t leave any gaps between the slats.
Make sure you use pressure-treated lumber, as the slats will be in direct contact with the soil. The wooden components should be weather-resistant.
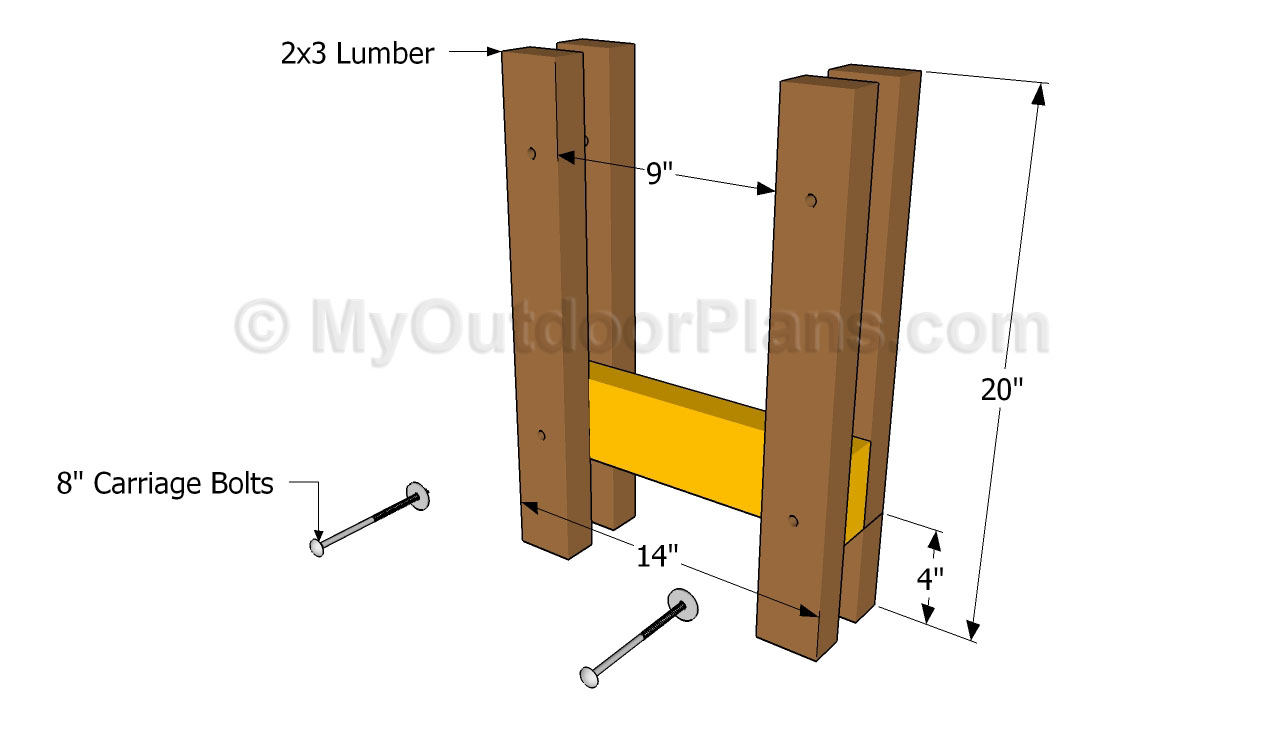
Building supports
Building the wooden supports for the kids seesaw is a straight-forward process, if the right plans and techniques are used. As you can notice in the image, you need to use 2×3 lumber and 8″ long carriage bolts.
Top Tip: Cut the slats at the right size and align them at both ends, before drilling pilot holes and inserting the carriage bolts. Use a carpentry square to check if the corners are right-angled.
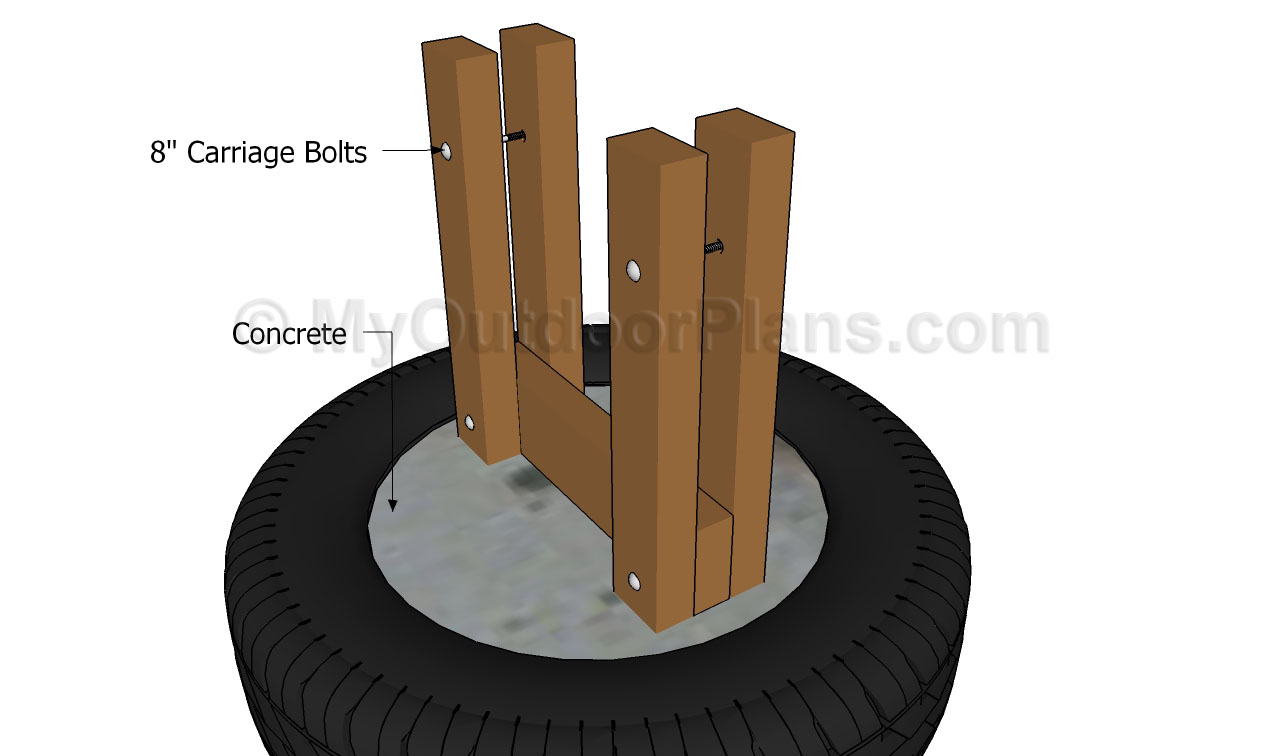
Building the support
Fit the support inside the tire and secure it temporary with braces, before filling the tire with concrete. Use a spirit level to check if the support is plumb. Leave the concrete to dry out for several days, before installing the main component.
It is essential to lock the support into concrete, otherwise you might injure while using the seesaw. The 2×4 braces will keep the support plumb, util the concrete has dried out.

Installing the pipe
The next step of the woodworking project is to fit the pivot pipe to the seesaw plank. As you can notice in the plans, you need to fit the pipe along the middle of the plank and lock it into place with saddle clips.
Top Tip: Make sure you use heavy-duty saddle clips and screws when securing the bar to the plank, otherwise the seesaw might not work properly.

Installing the handles
Build simple handles at both ends of the seesaw plank, as in the image. Cut the 2×2 lumber at the right size and lock them together with screws, after drilling pilot holes. It is essential to drill pilot holes and to countersink the head of the screws, in order to prevent the wood from splitting.
Round the exposed edges of the handles, by using a router and a 3/4″ bit. Secure the handles to the plank with several screws.
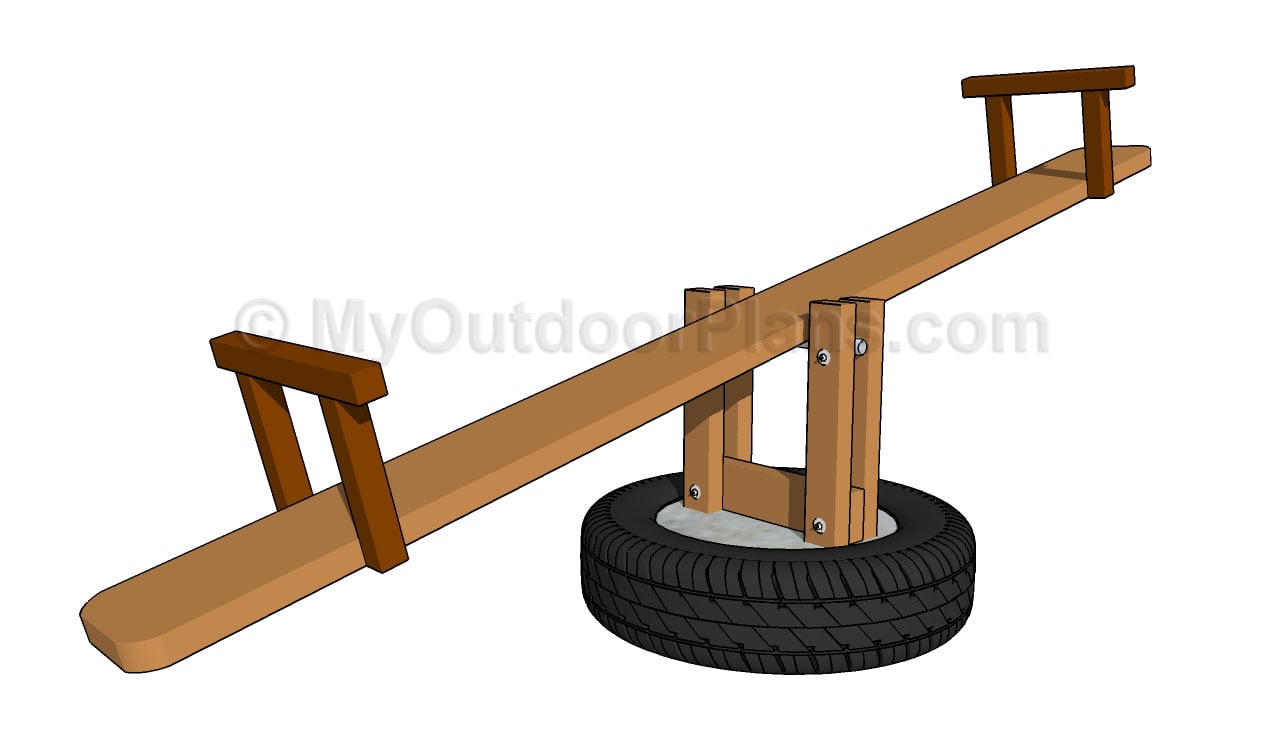
Seesaw plans
Last but not least, you should take care of the finishing touches. Therefore, fill the holes with wood putty and let the compound to dry out for several hours. Smooth the surface with medium-grit sandpaper along the wood grain.
Top Tip: Apply several coats of stain or paint to enhance the look of the seesaw and to protect the components from decay. Check out the rest of the projects, if you want to build other projects for your garden.
This project was about seesaw plans. If you want to see more outdoor plans, we recommend you to check out the rest of the projects. Don’t forget to share our projects with your friends, by using the social media widgets.


8 comments
Approximately how much does this project cost to make?
Probably around 50 $. You can print the cut list and check the total cost at your local DIY store.
Does the seesaw just set on the tire or do you put the braces into the concrete, it’s not clear how to lock it into the concrete???
You fill the tire with concrete with the braces inside.
after you attach to rod to the seesaw plank, how do you attach/secure that to the wooden supports?
You do not. The rod floats on the screws. You should also check out my other design: http://myoutdoorplans.com/playhouse/how-to-build-a-seesaw/
The Carriage Bolts first says 5” then says 8”, I’m confused. I’m confused. Please clarify which size bolts. Thank you.
Both work, since the support is 4 1/2″. However, it’s easier with 8″ bolts but you have to trim the excess.