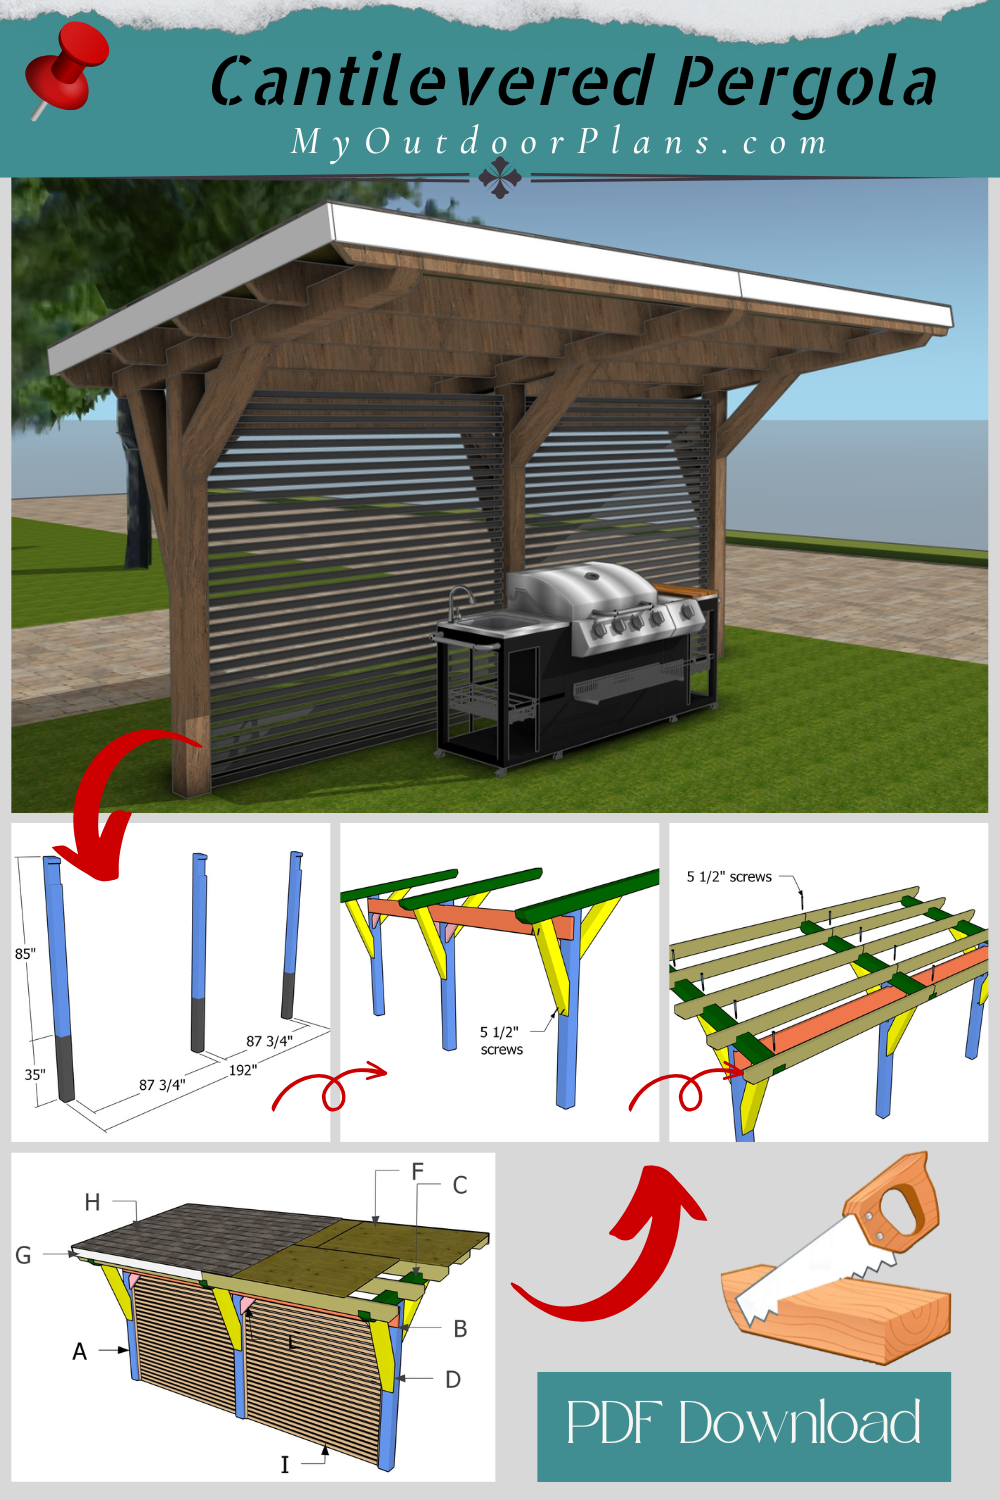
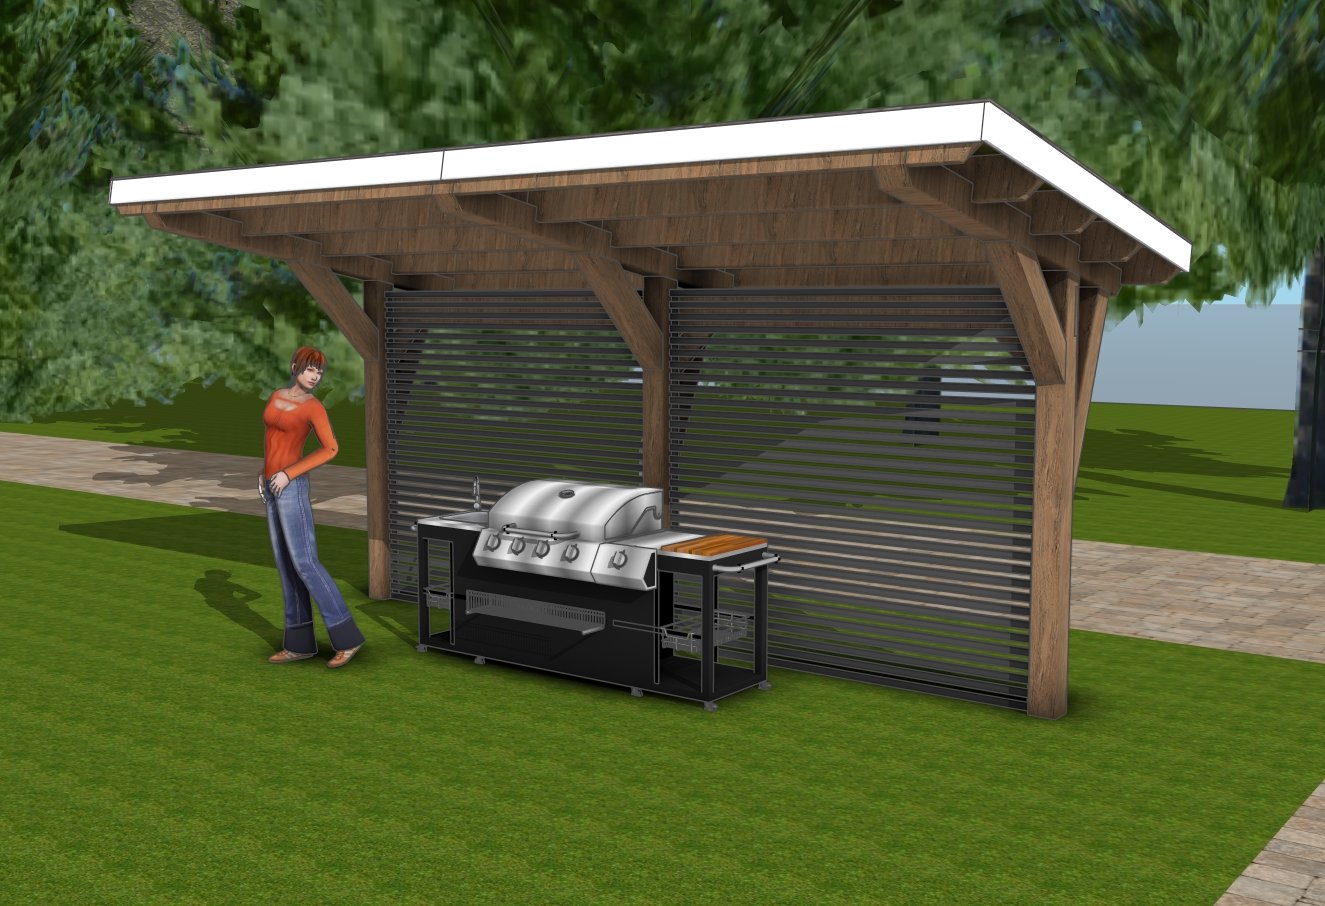
There’s just something about building a structure that looks like it’s defying gravity—and that’s exactly what this 16 ft cantilevered pergola does. It’s bold, it’s clean, and it makes a statement without screaming for attention. I wanted a design that would open up the space underneath, give solid shade coverage, and still have that modern edge that makes people stop and ask, “Wait… how is that even standing?” So I sketched it up, ran through the math, and got to work turning it into a DIY project that you can absolutely build yourself.
In this post, I’ll walk you through every step of the process—cutting the beams, setting the posts, locking in that cantilever, and getting the whole thing square and solid. Whether you’re a seasoned builder or just fired up your miter saw for the first time, this is a build that’ll stretch your skills in the best way. Grab your tools, double-check those measurements, and let’s get to work turning lumber into something awesome.
When buying the lumber, you should select the planks with great care, making sure they are straight and without any visible flaws (cracks, knots, twists, decay). Investing in cedar or other weather resistant lumber is a good idea, as it will pay off on the long run. Use a spirit level to plumb and align the components, before inserting the galvanized screws, otherwise the project won’t have a symmetrical look. If you have all the materials and tools required for the project, you could get the job done in about a day. See all my Premium Plans HERE.
Projects made from these plans
Pin it for Later!
3 Post Pergola with Cantilevered Roof Plans
Building-a-wide-cantilevered-pergola
Cut & Shopping Lists
Tools
![]() Hammer, Tape measure, Framing square, Level
Hammer, Tape measure, Framing square, Level
![]() Miter saw, Drill machinery, Screwdriver, Sander
Miter saw, Drill machinery, Screwdriver, Sander
![]() Safety Gloves, Safety Glasses
Safety Gloves, Safety Glasses
Time
![]() One week
One week
Related
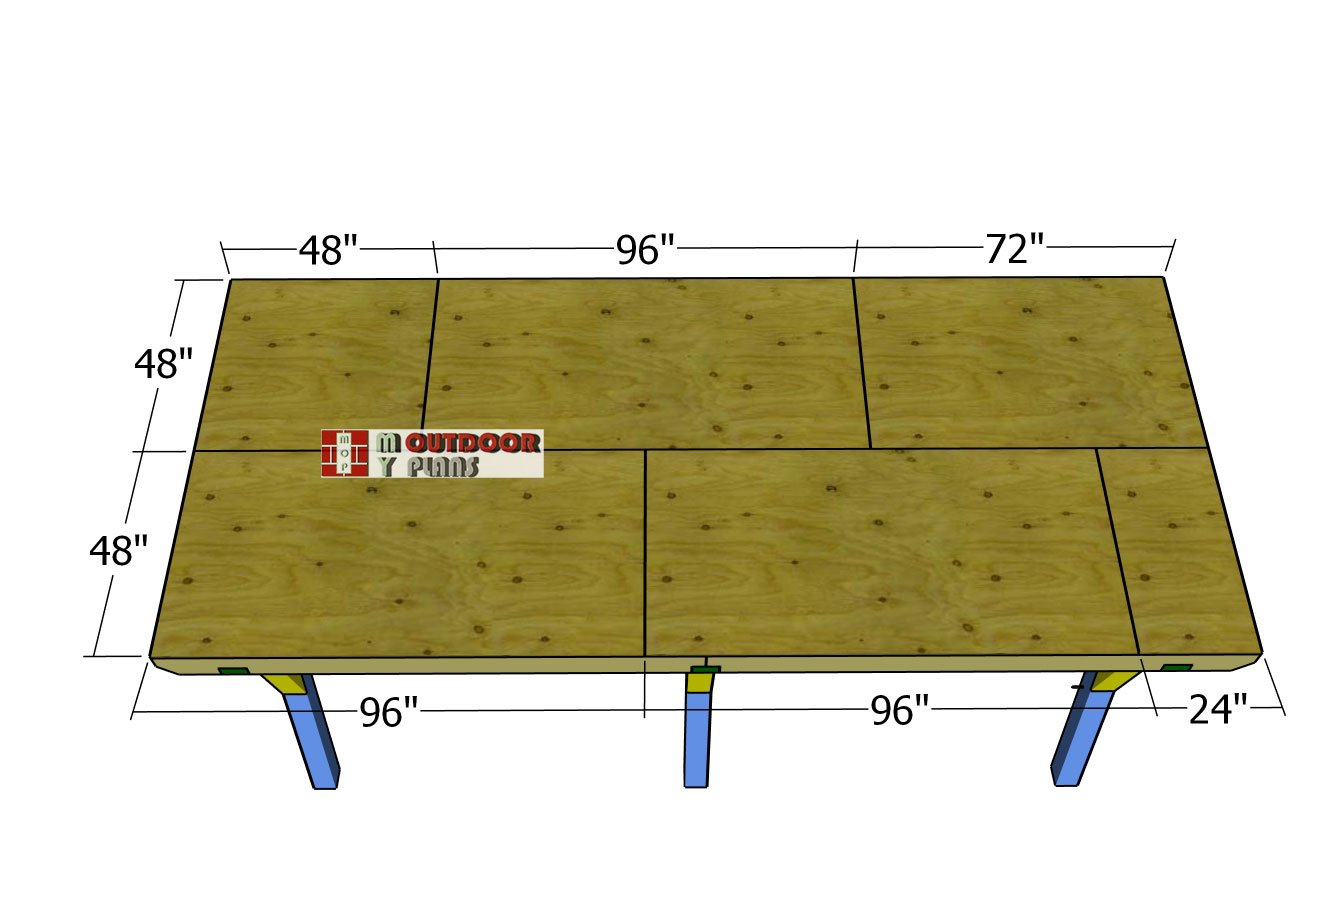
STEP 1: Setting the posts

Layout-1
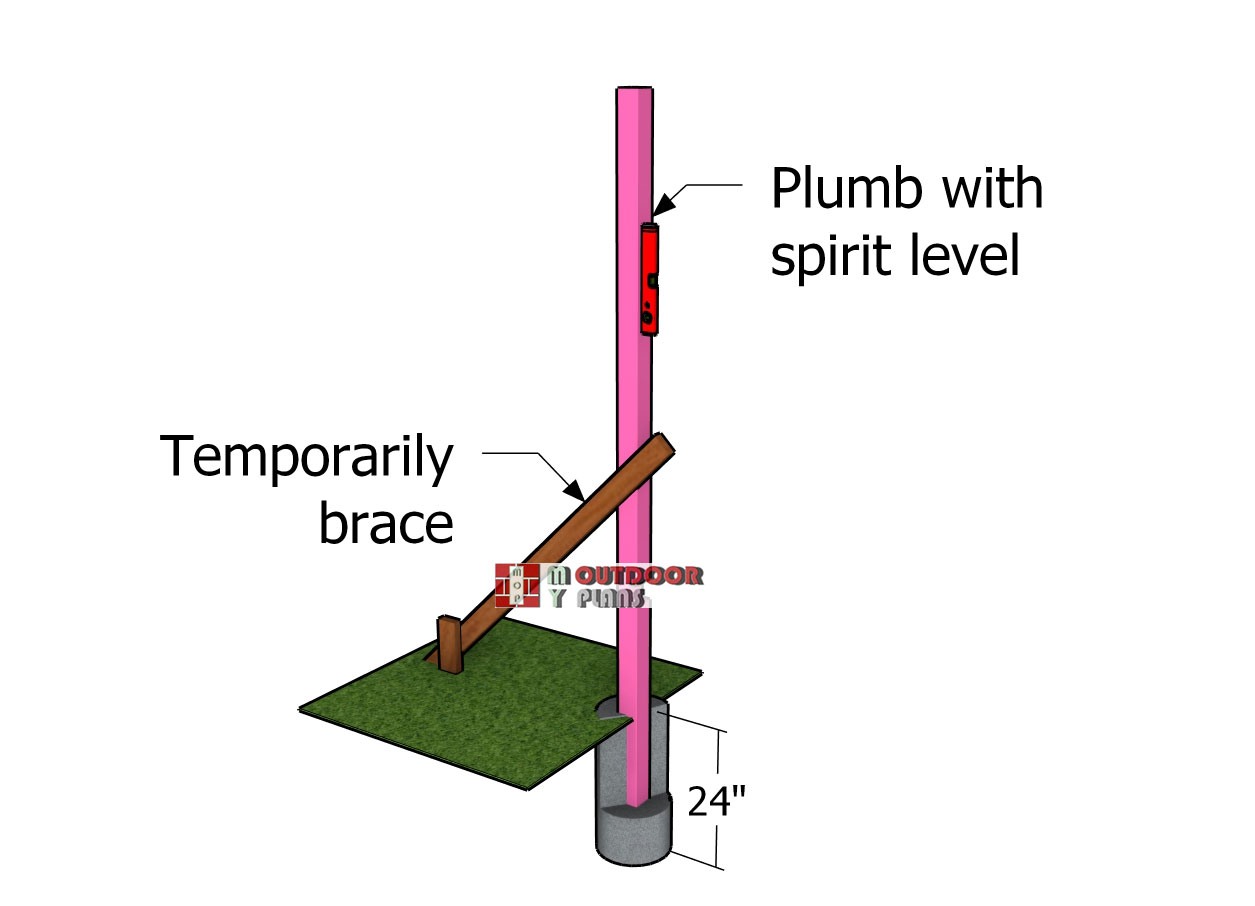
First things first—let’s get those posts laid out. Mark the exact spots where they’ll go, then take a few minutes to level the ground and strip away the topsoil so you’re working on solid footing. It’s not the flashiest part of the build, but trust me, it sets the tone for everything else.
Now, I always set my posts in concrete. Yeah, it takes a bit more time and elbow grease, but it’s 100% worth it. That solid footing means your pergola’s not going anywhere—wind, rain, or whatever else Mother Nature throws at it. Strong foundations make strong builds.
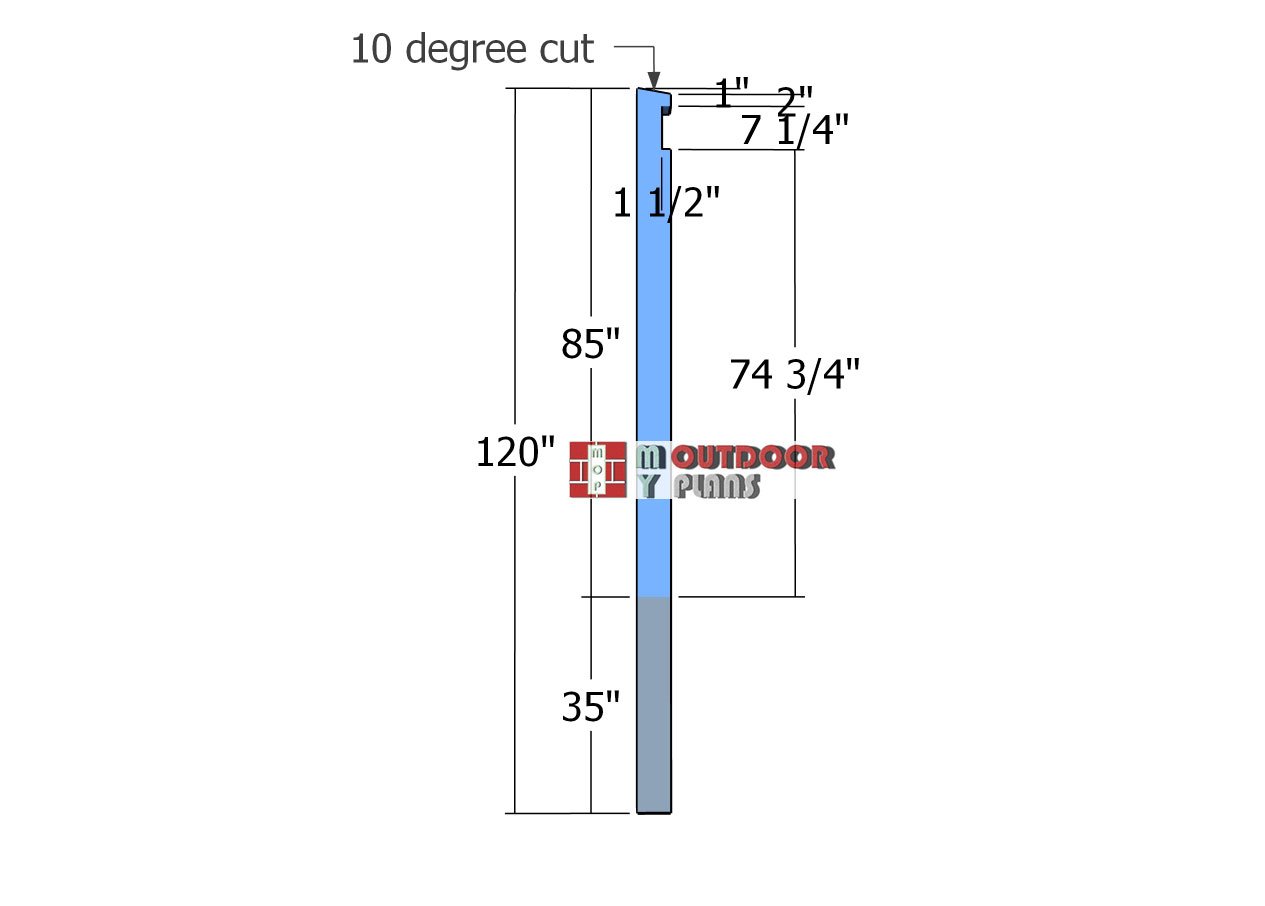
Post
Start by dialing in a 10-degree angle cut at the top of each 6×6 post—this small touch gives the whole structure a cleaner, more polished look right out of the gate. After the cut, hit the edges with some sandpaper to knock down any splinters and leave a smooth, pro-level finish that’s easy on the hands.
Next up, it’s time to notch the tops for the crossbeam. Mark your layout, then use a circular saw to make a series of 1 1/2″ deep cuts inside the notch area. Once that’s done, grab a chisel and pop out the waste—take your time here, the cleaner the notch, the tighter the fit. Finish it off with a little sanding so that beam slides in like it was meant to be there.
Setting-the-post
Dig 14-inch diameter holes, 3 feet deep, to set a solid foundation for your posts—this is what’s going to keep your pergola standing tall for the long haul. Drop in some tube forms to shape the footings, then set your posts in place. Use temporary braces to keep them steady and plumb—take your time here, because a straight post now means fewer headaches later.
Once everything’s dialed in and squared up, go ahead and fill those forms with concrete. Pack it down tight so there’s zero wiggle room. Let the concrete cure for at least 24 hours before touching anything else. Keep those braces in place until the structure gets tied together—better safe than sorry when you’re building something meant to last.
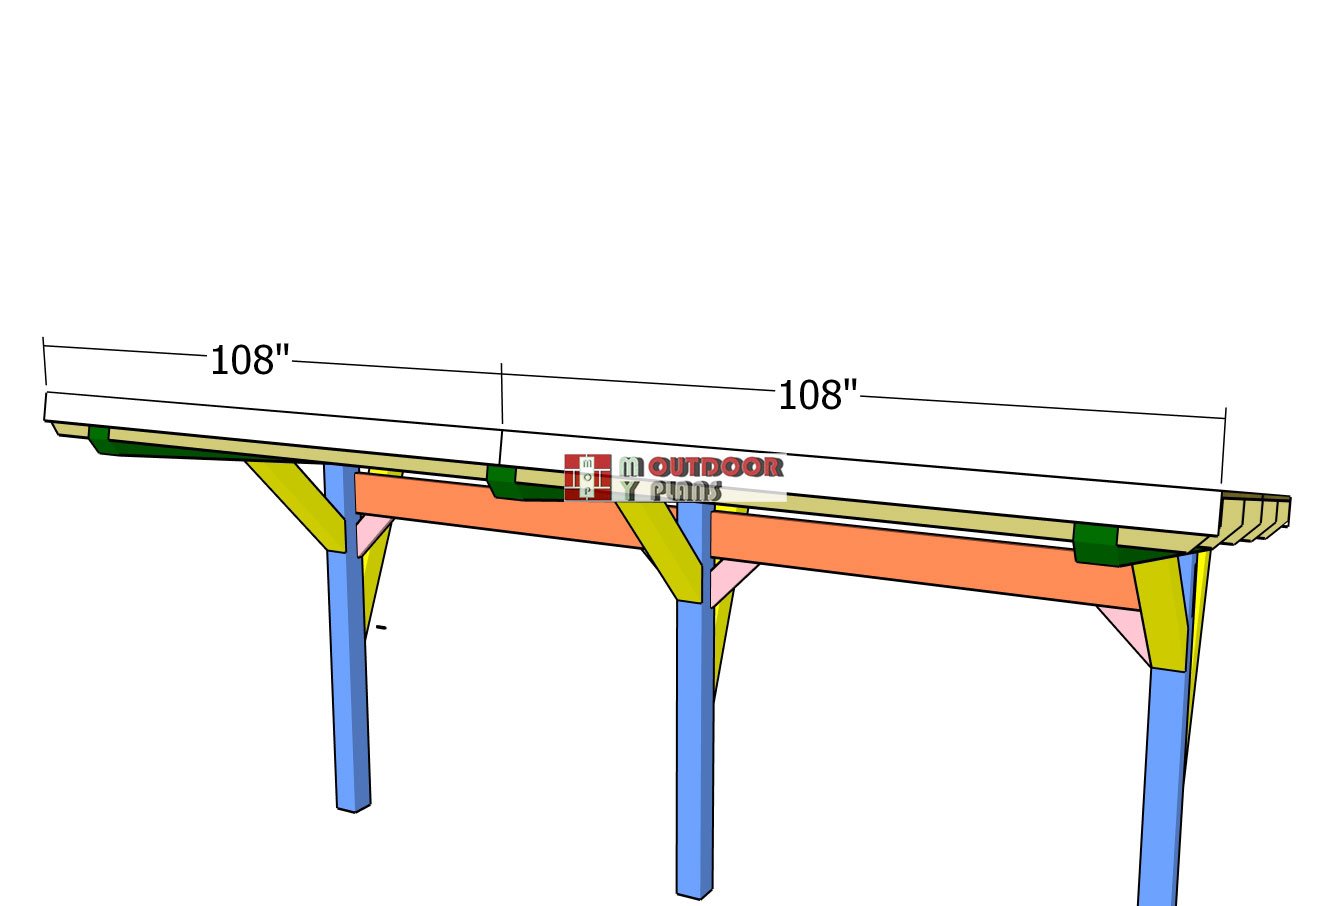
STEP 2: Building the frame of the pergola
Attaching-the-top-back-support-beam
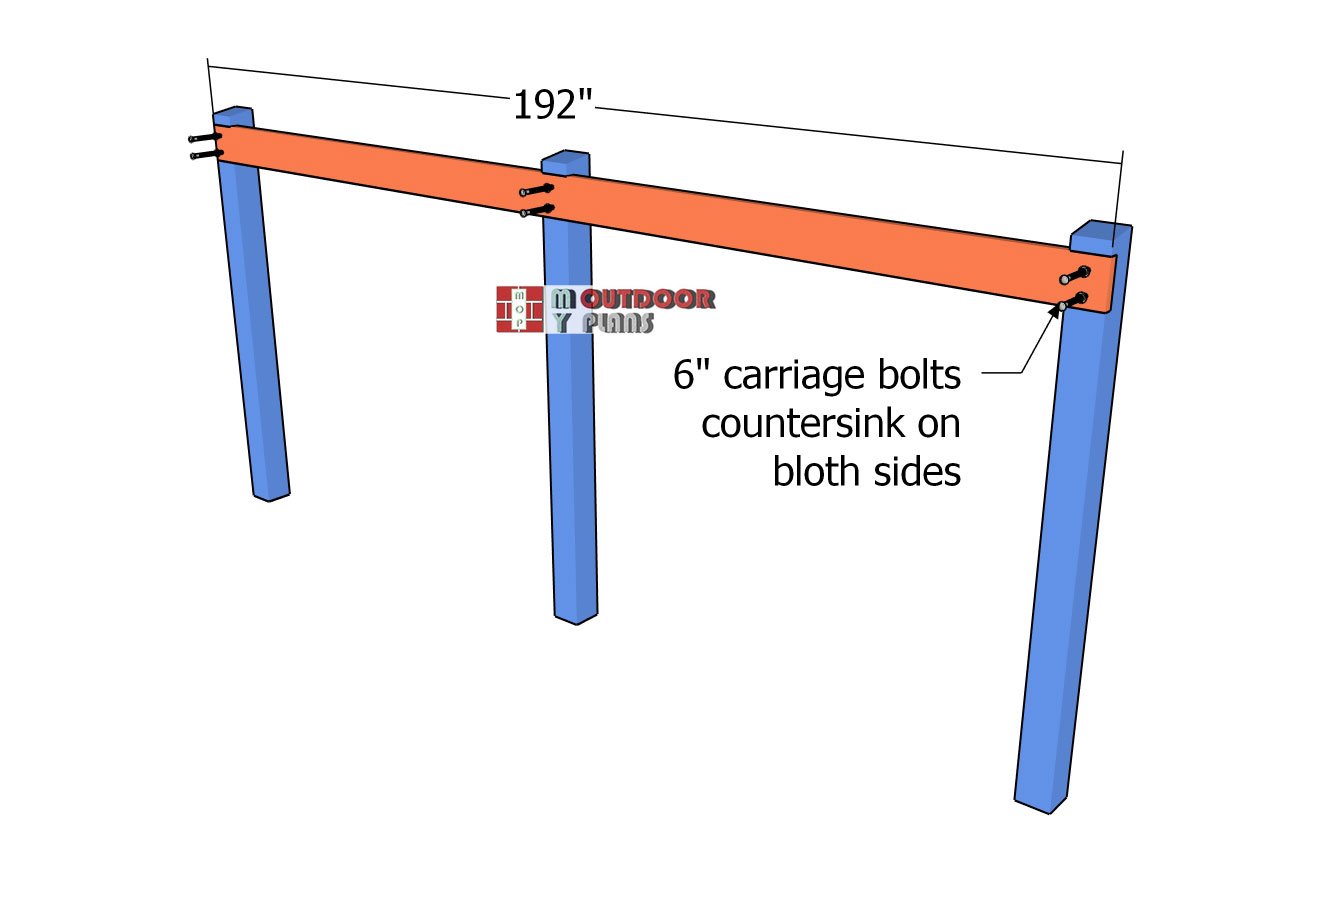
Slide the 2×8 beam into those notches you cut earlier, making sure the edges line up clean on both sides—it should feel like a glove-fit. Before locking anything down, double-check that your posts are still plumb. If things are looking good, clamp the beam in place nice and tight so it doesn’t shift while you drill.
Now grab your drill and run two holes through both the beam and post at each connection point. Countersink the heads and nuts of your carriage bolts so they sit flush—this keeps the look clean and avoids any hardware snagging later on. Drive in two bolts per joint for rock-solid strength. This connection is the backbone of your pergola, so take your time and do it right. This is the kind of detail that’ll keep it standing strong for years to come.
Frame-braces
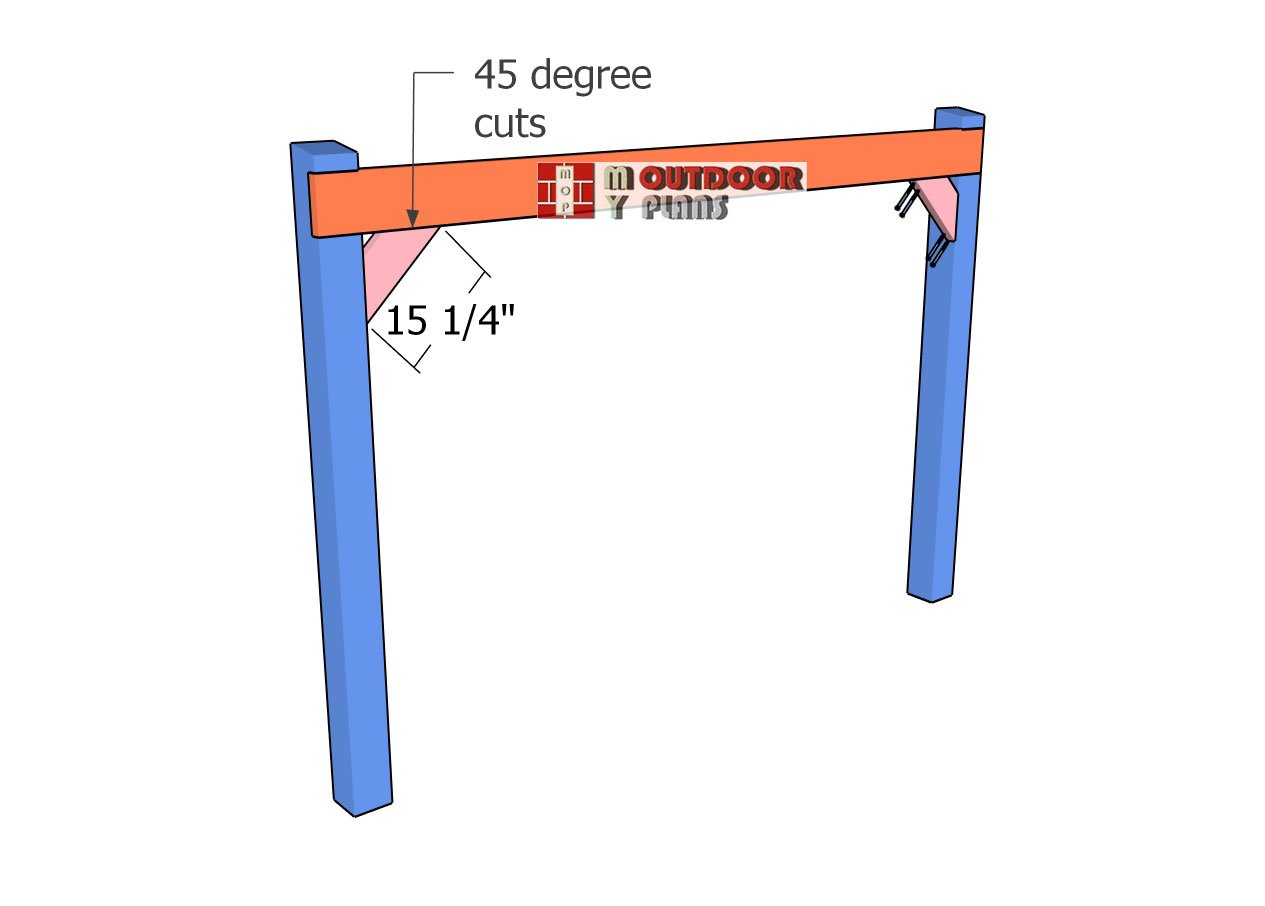
Cut your 2×6 boards to length for the corner braces, adding 45-degree angles to both ends for a crisp, tight fit. These angled cuts not only look sharp, but they also help the braces sit flush between the posts and beams, which is key for keeping everything rock solid.
Once you’ve got them positioned just right, drill pilot holes to avoid splitting the wood—especially near those angled ends. Then drive in 5 1/2-inch screws to lock the braces in place. These aren’t just for looks—these braces are what keep your pergola from racking or swaying when the wind picks up. A few extra minutes here goes a long way in keeping your build rock-steady for the long haul.
Rafter-support-beams
Next up, let’s give those 6×6 beams a bit of character before they go up top. Grab your miter saw and cut both ends at a clean 45-degree angle, following the pattern from your plans. This step doesn’t just dial in the looks—it helps everything fit together like a puzzle once you start framing out the roof.
These angled ends add that custom-built feel that really sets your pergola apart. It’s a small detail that makes a big visual impact and shows you put in the extra effort. Plus, they help the roof supports land snug and square, which means smoother assembly all the way through.
Fitting-the-top-support-beams
Set the roof supports on top of the posts, making sure the edges line up flush for a clean, balanced look. These are the pieces that do the heavy lifting, so take your time and get the alignment just right. Use a level if you need to double-check—it’s easier to tweak now than fix later.
Drill pilot holes to keep the wood from splitting, then drive in 8-inch screws—at least two per joint—to lock everything down tight. These connections are critical since they’re going to carry the load of your roof. Make sure everything’s snug and square before moving on. A little extra care here means a stronger, straighter pergola that’s built to last.
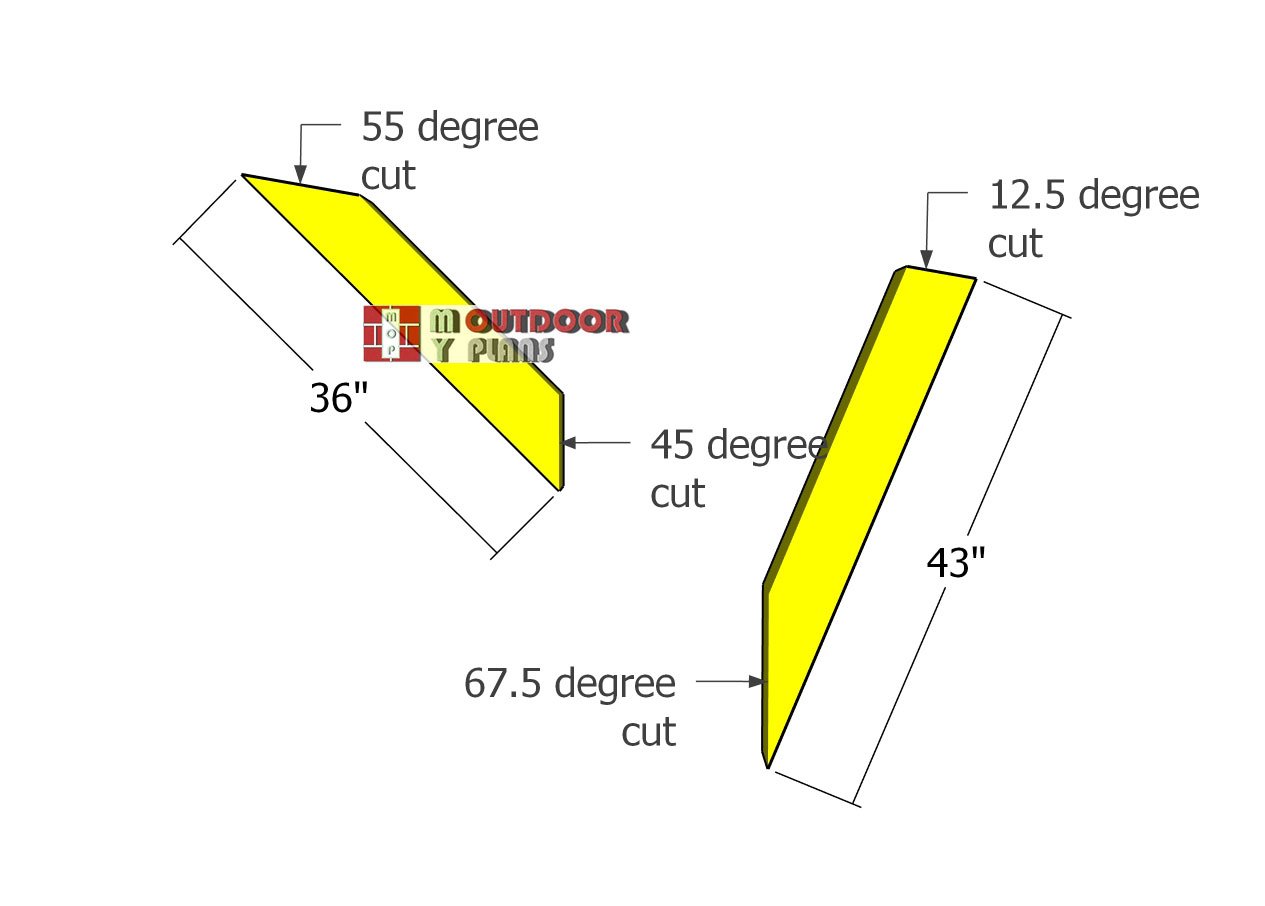
Cutting-the-braces
For the front and back braces of your cantilevered 3-post pavilion, go with solid 6×6 lumber—this is where you want strength and stability. These braces play a key role in supporting that long overhang, so don’t cut corners here. Use a miter saw or circular saw to trim both ends at the specific angles shown in your plans.
Since the roof has a 10-degree lean, your angle cuts won’t be standard—they need to match the slope so everything locks in tight and looks seamless. Take your time measuring and cutting these pieces. A precise fit not only makes the structure stronger but also gives the whole pavilion that clean, professional finish.
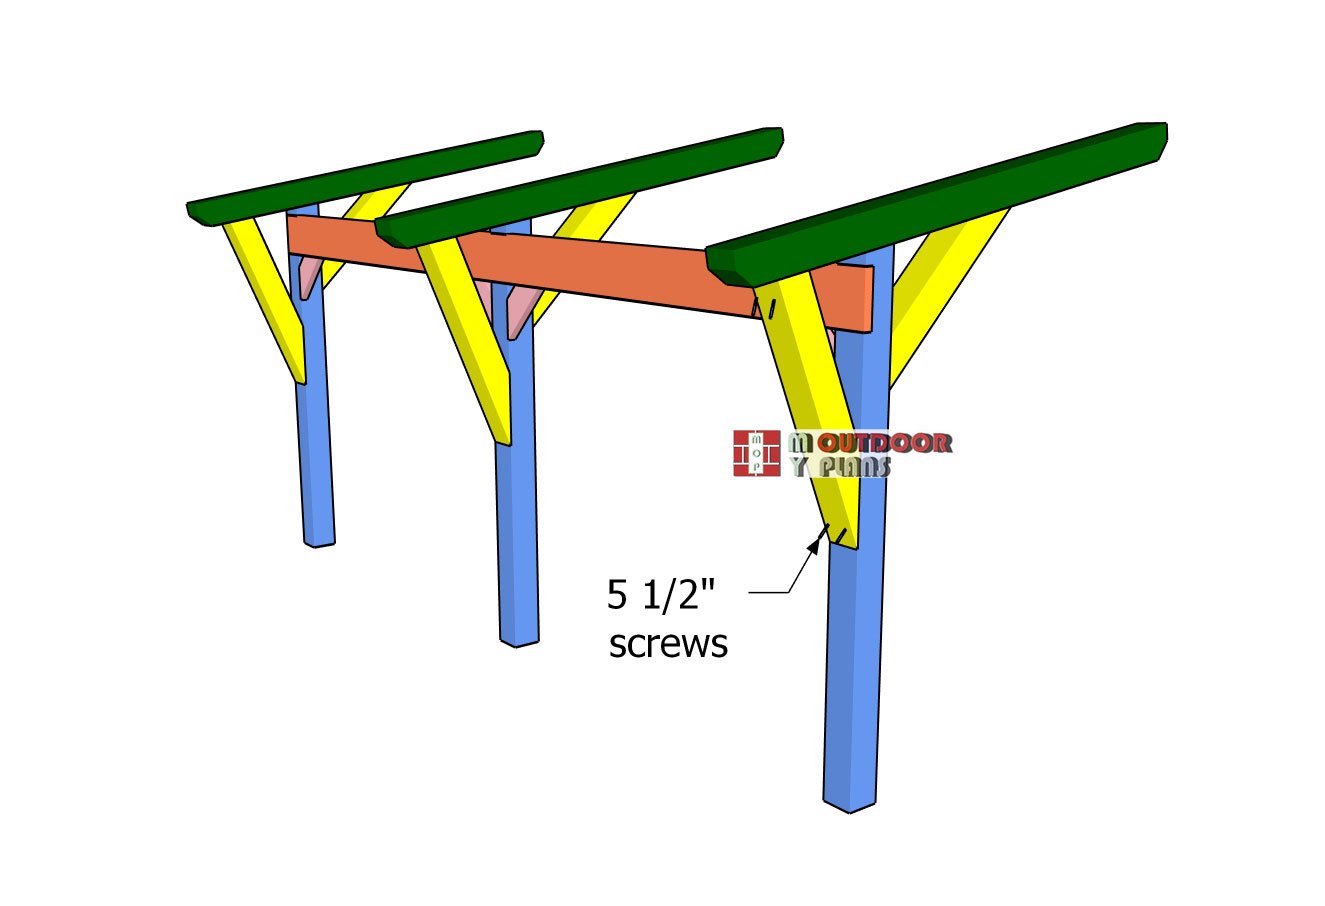
Fitting-the-braces
Set the braces into position so they sit snug against both the vertical posts and the top support beams. You want a tight, gap-free fit here—it not only looks cleaner but adds serious strength to the whole frame. Use your pilot holes to guide the screws and keep the lumber from splitting, especially around those angled cuts.
Drive in 5 1/2-inch screws to lock each brace in place, fastening them securely to both the uprights and beams. These braces are doing some heavy lifting in a cantilevered setup, so don’t rush this step. Once everything’s tight and solid, you’ll feel the difference in how sturdy the structure becomes—it’s the kind of reinforcement that makes your build go from good to rock-solid.
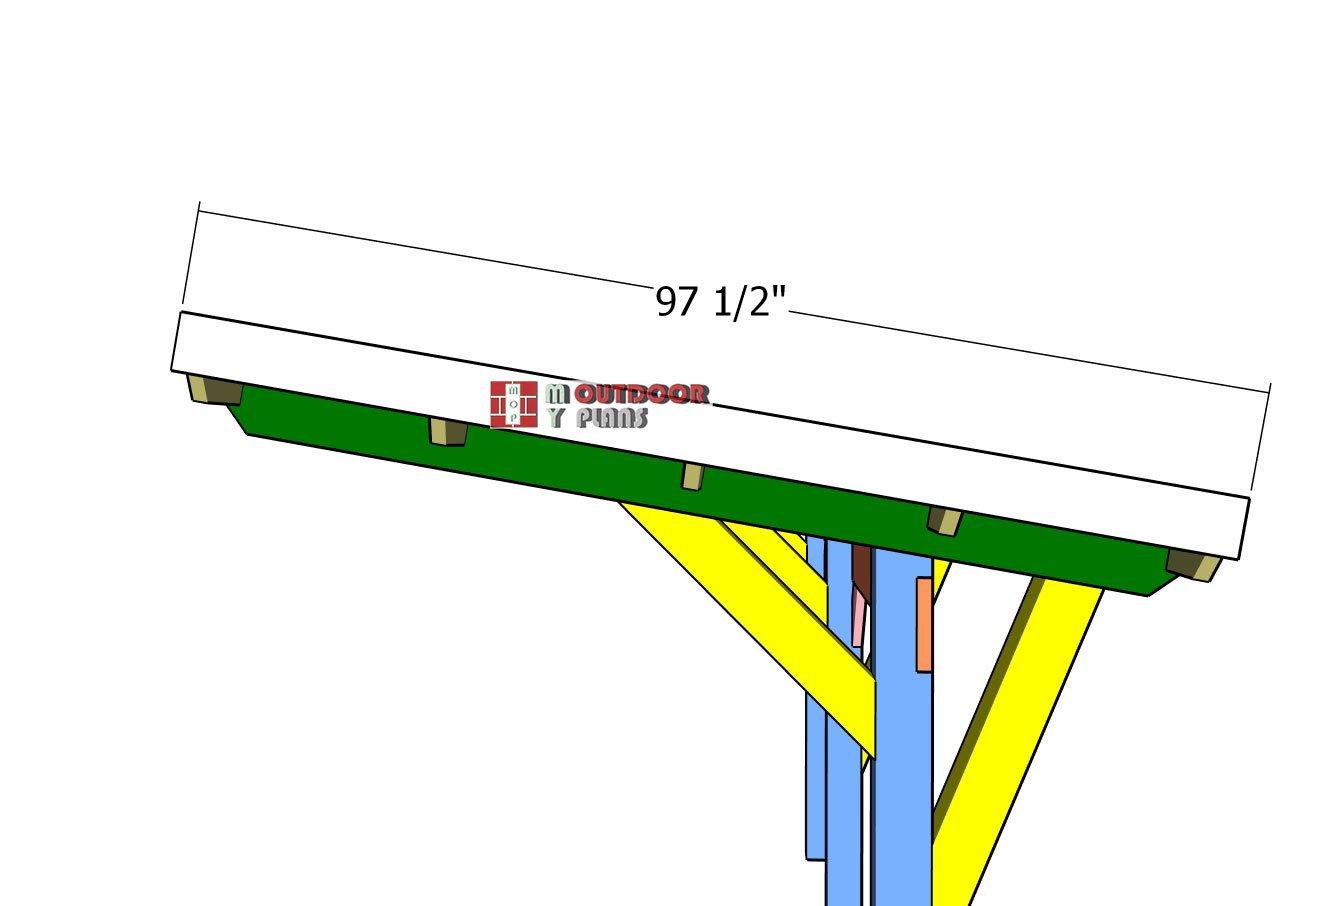
STEP 3: Building the roof
Rafters
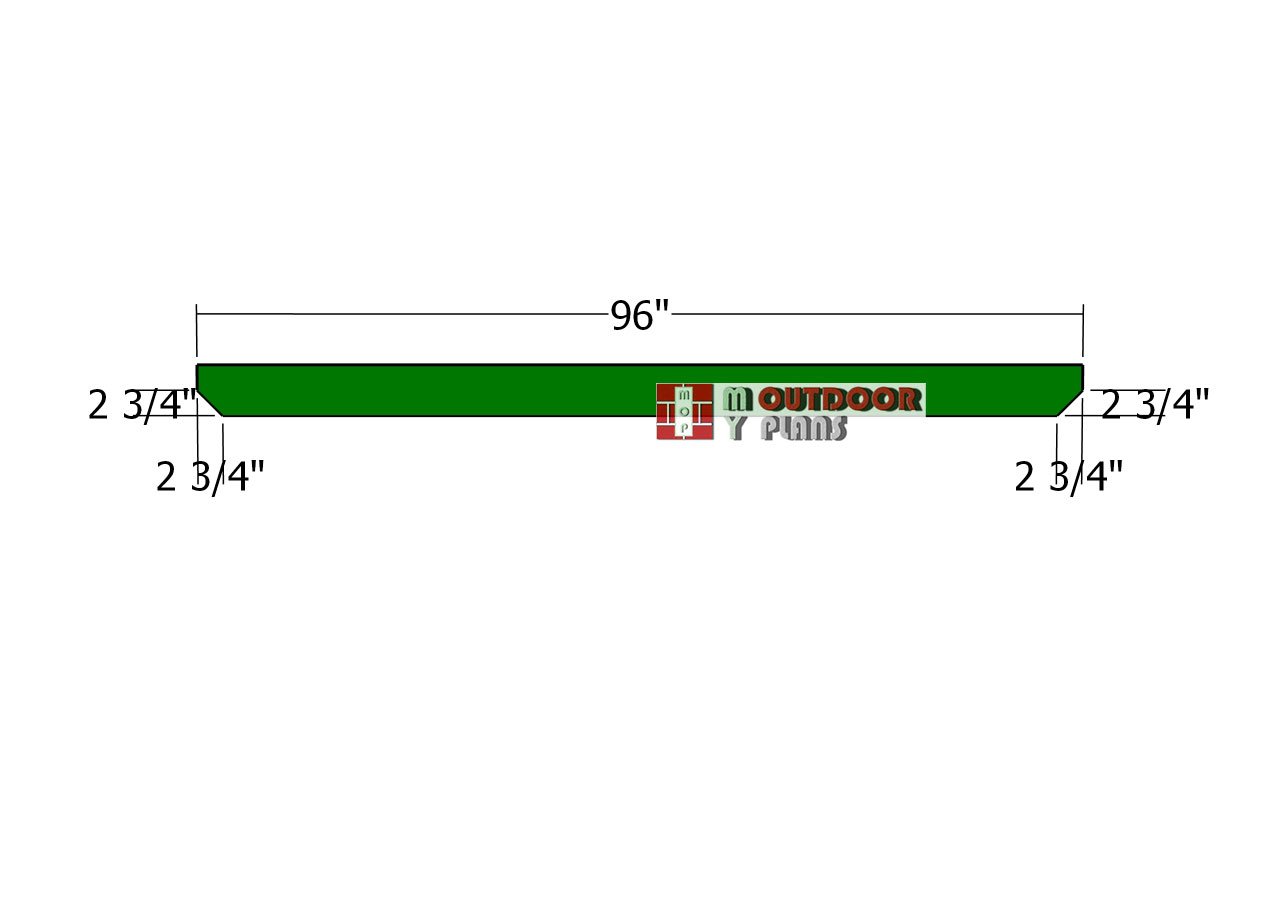
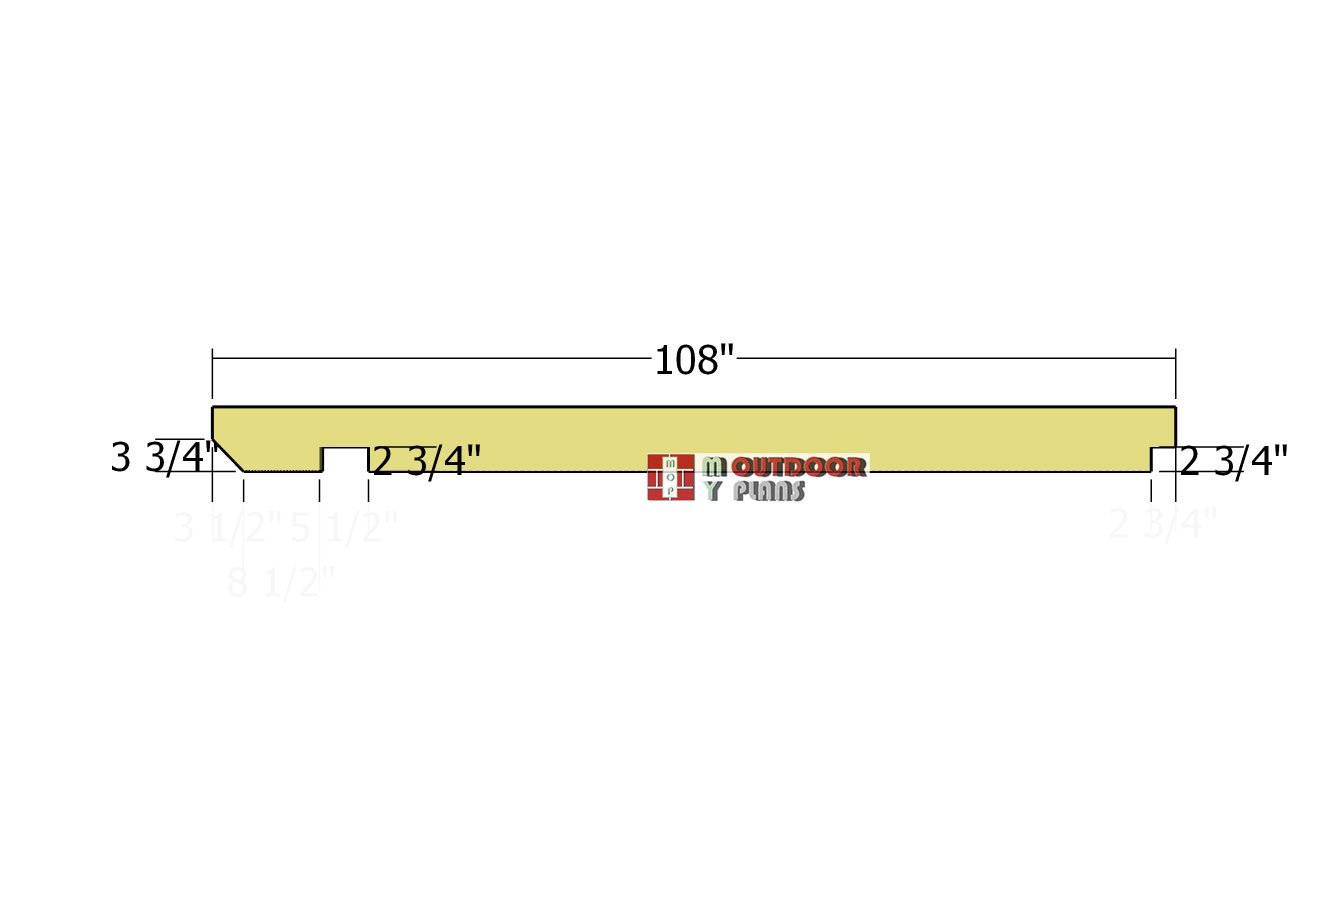
Use 2×8 lumber for the rafters to ensure they provide the strength needed for the wide opening and prevent sagging over time. Start by making 45-degree decorative cuts on both ends of each beam using a miter saw or circular saw, giving the rafters a polished and professional look. Next, mark the lines for the notches, which will allow the rafters to sit snugly on the support beams.
Set your saw depth to 2 3/4 inches and make parallel cuts within the marked area. Once the cuts are complete, use a chisel to remove the excess wood and sand the notches smooth for a perfect fit. Taking your time with these details ensures the rafters are not only functional but also visually appealing.
Fitting-the-rafters
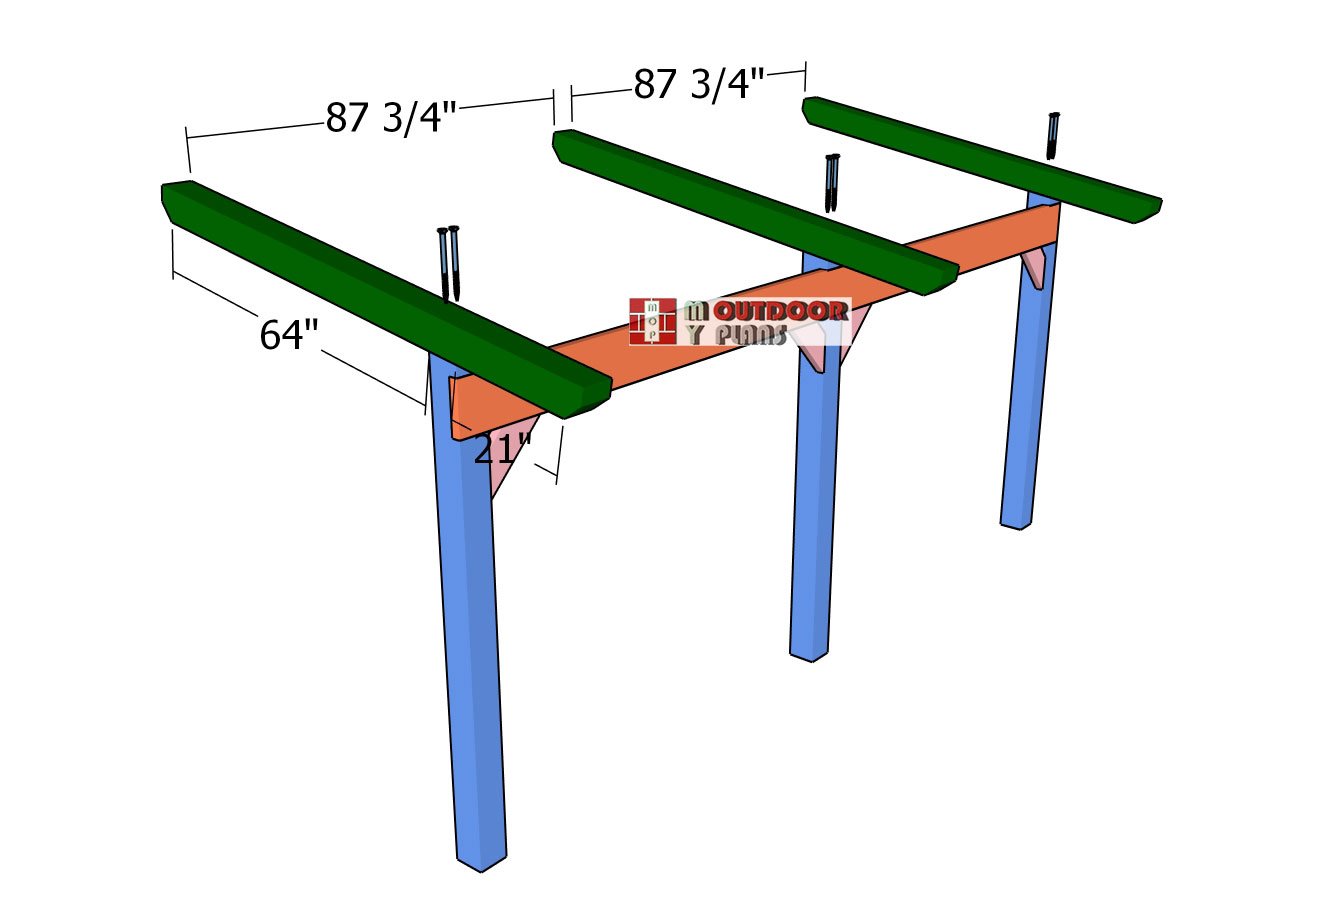
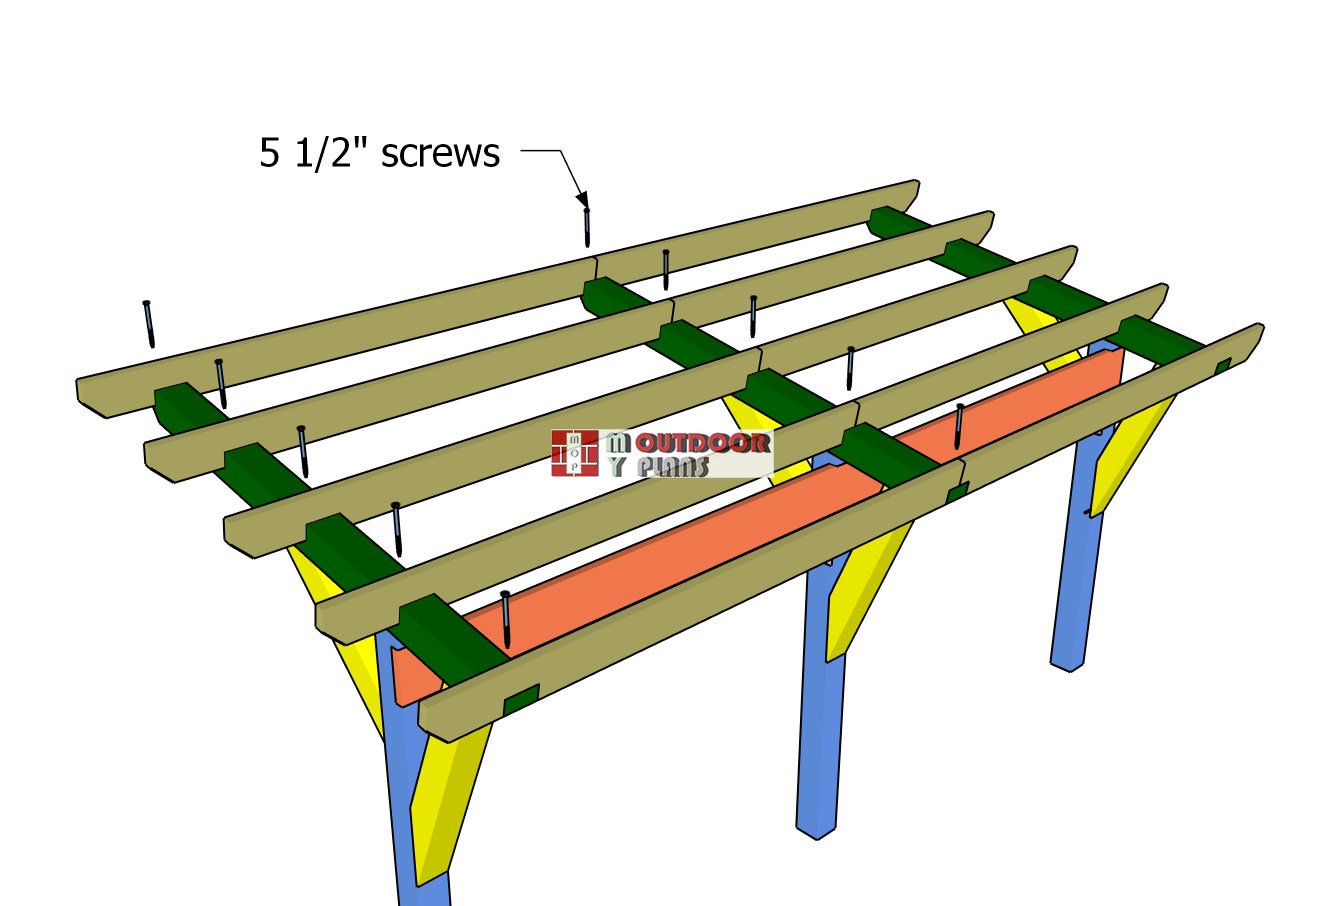
Fit the rafters to the support beams, spacing them 24 inches on center (OC) for a balanced and sturdy structure. Carefully slide each rafter into place, ensuring they are perfectly perpendicular to the beams for proper alignment and support. Once positioned, drill pilot holes through the rafters and into the beams to prevent splitting and make screwing easier. Secure each rafter with 5 1/2-inch screws, tightening them firmly to lock everything in place. This precise spacing and secure attachment will create a strong, visually appealing framework for your pergola roof.
Roof-sheets
Lay the 3/4″ plywood sheets to the roof of the cantilevered pergola. Align the edges flush to the sides and leave no gaps between them. Drill pilot holes and insert 1 5/8″ screws every 8″ along the framing to lock them to the roof structure.
Front-and-back-roof-trims
Attach the 1×6 trims to the front and back edges of the pergola roof for a polished and finished look. Align the trims so their edges are flush with the top of the roof, ensuring a seamless fit. Once positioned, secure the trims by inserting 2-inch finish nails every 8 inches along their length. This not only locks them in place tightly but also adds a decorative touch while protecting the roof edges from the elements. Take care to keep the trims level and properly aligned for a clean and professional result.
Side-roof-trims
Fit the trims to the sides of the roof to complete the look and tie the design together. Align the trims carefully with the edges of the roof, ensuring a smooth and seamless fit. These side trims not only add to the structural appeal but also enhance the modern aesthetic of your pergola. Secure them in place using 2-inch finish nails spaced every 8 inches, just like the front and back trims. This finishing touch elevates the overall design while providing a cohesive and polished appearance to your project.
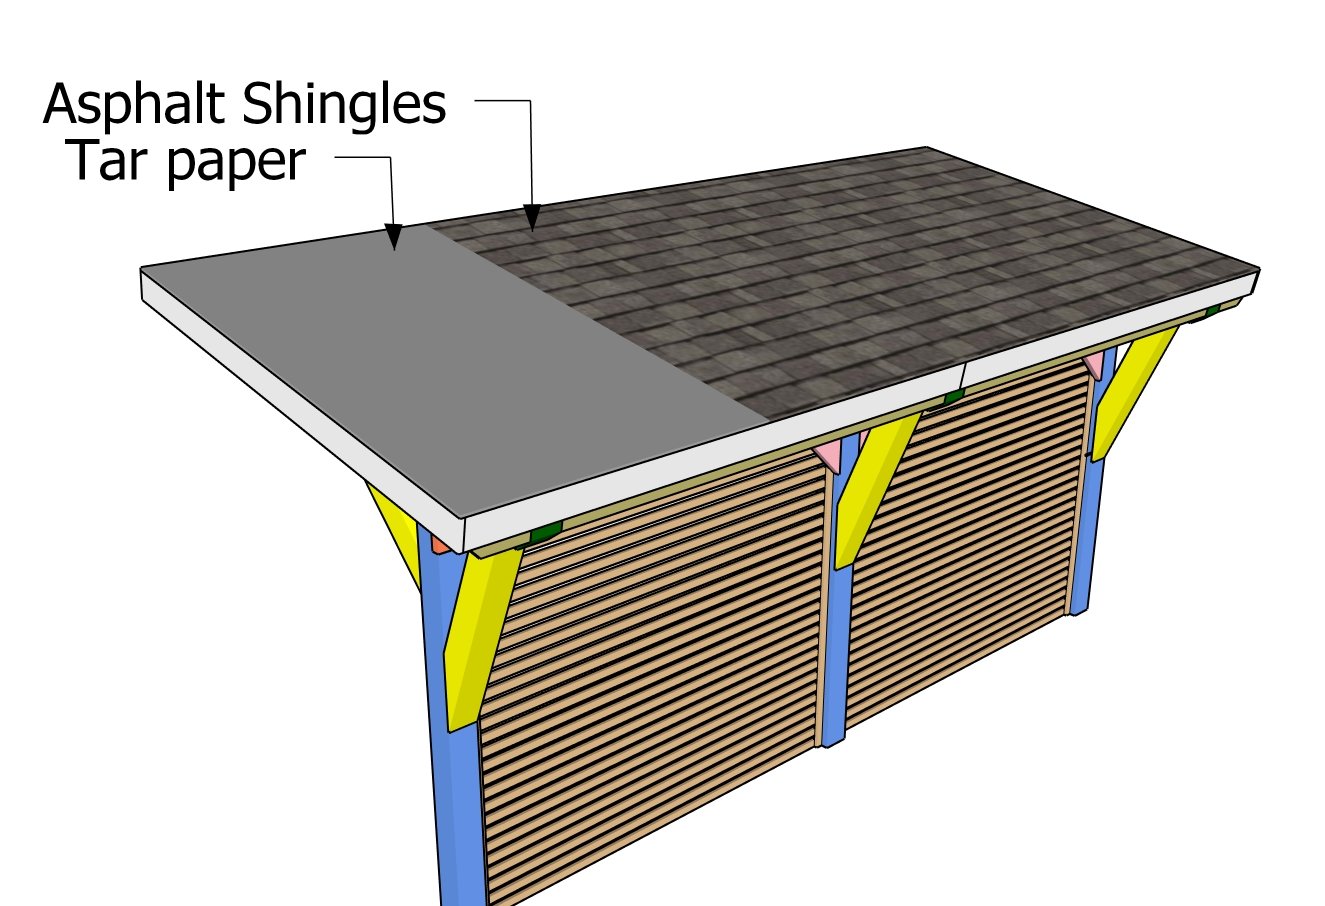
Fitting the roofing
Installing asphalt shingles on your pergola roof is a straightforward process that ensures long-lasting protection from the elements. Begin by attaching drip edges along the edges of the roof, both at the eaves and the rakes, to direct water away from the structure and prevent moisture damage. Lay down a layer of roofing underlayment, such as felt paper or synthetic underlayment, to create an additional waterproof barrier.
Starting at the bottom edge of the roof, install the shingles in overlapping rows, securing them with roofing nails placed just above the adhesive strip. Work your way up, ensuring proper alignment and overlap for a watertight seal. Finish by adding a ridge cap along the top to cover the peak and give the roof a polished look. This step not only adds durability but also enhances the overall appearance of your pergola.
STEP 4: Finishing Touches
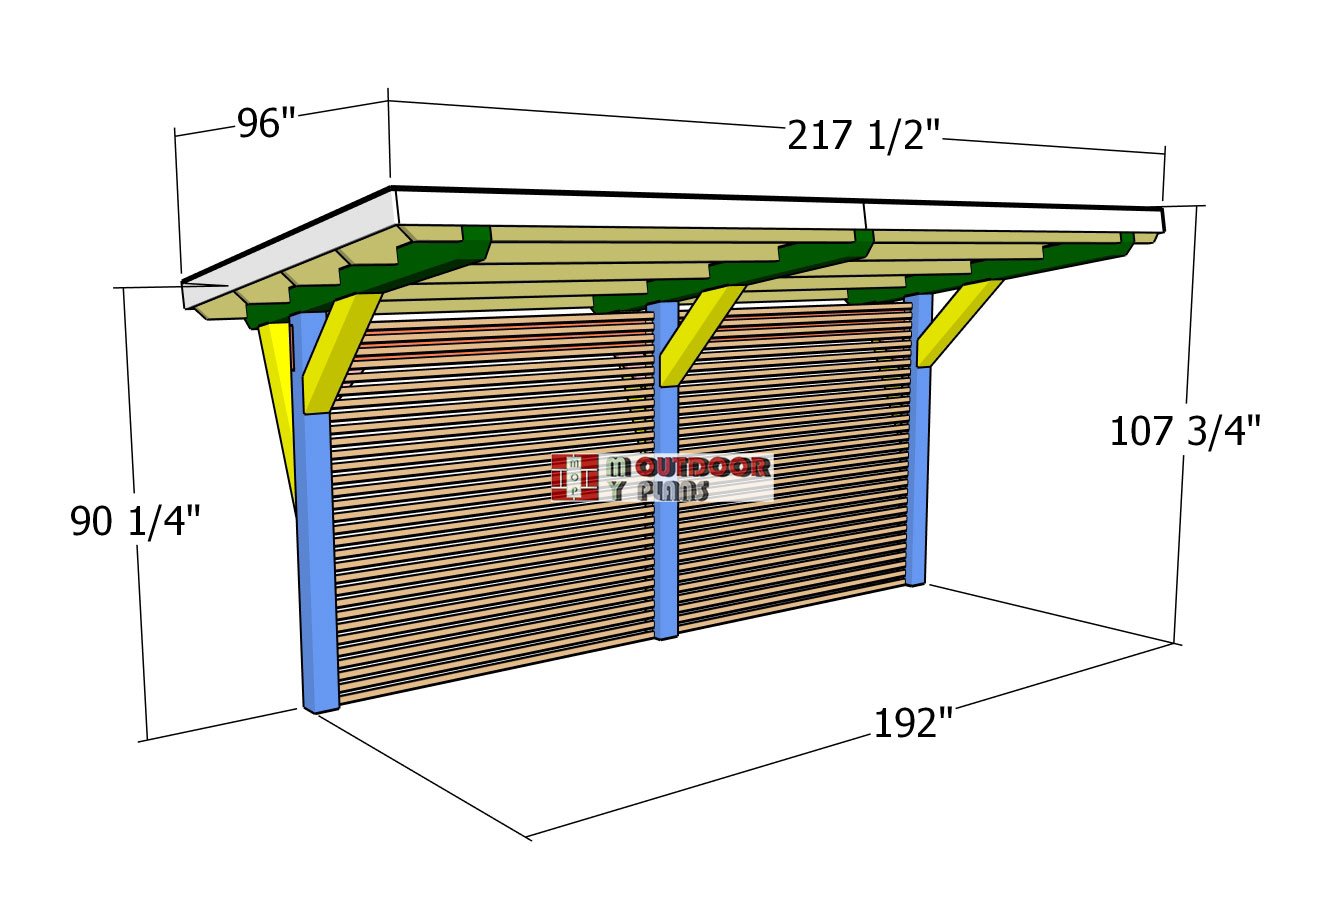
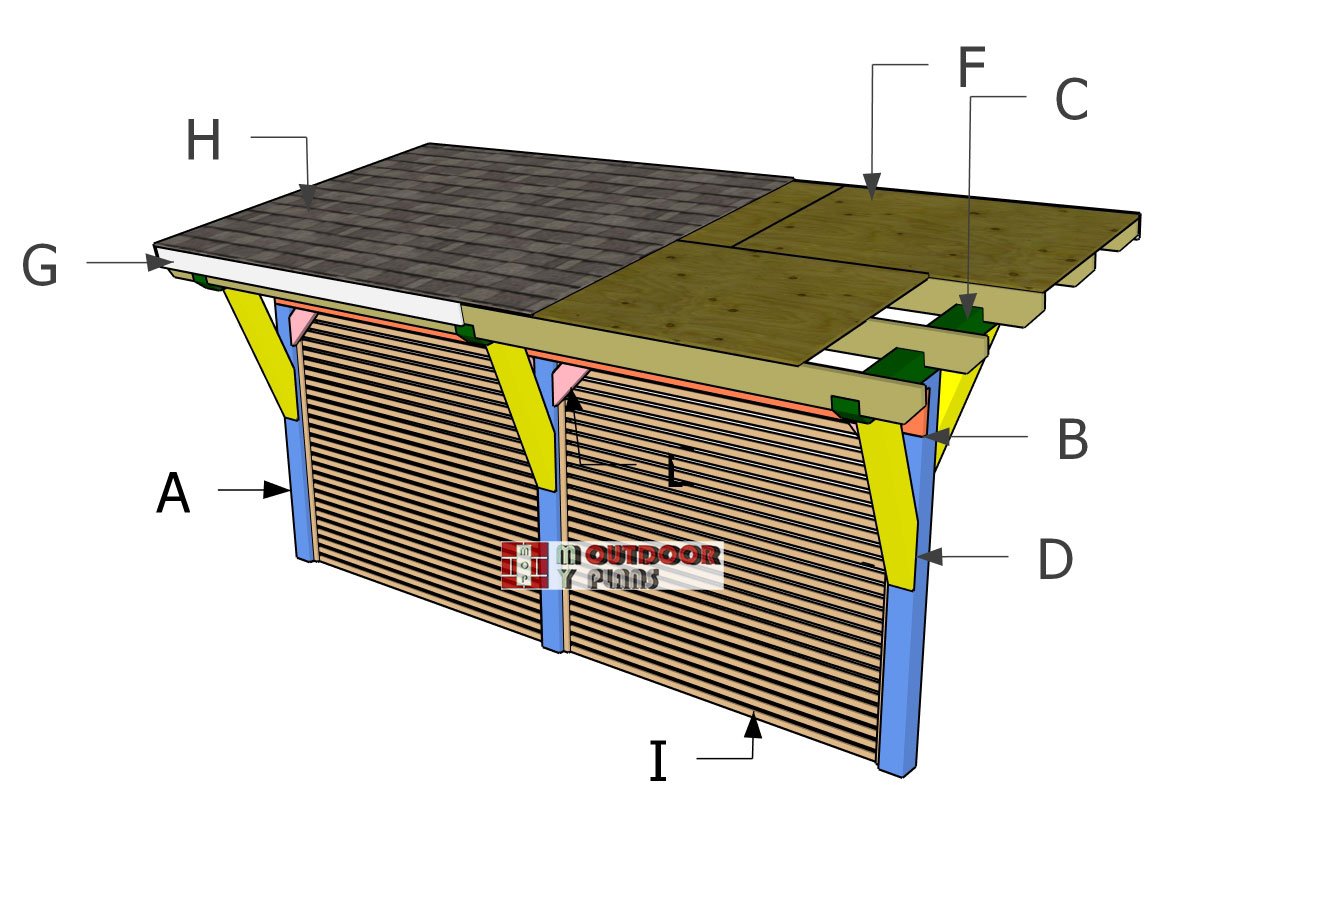
3-post-cantilevered-pergola—full-dimensions
The finishing touches are where your project really comes to life—it’s the moment your build shifts from “DIY” to “dang, that looks sharp.” Start by sanding down all those rough edges and corners so everything feels smooth and splinter-free. This isn’t just about looks—it’s about making the structure safe and touchable for everyone who walks under it. A good sanding session goes a long way toward giving your pavilion that clean, pro-built feel.
16 ft Cantilevered pergola plans
Once that’s done, it’s time to seal the deal—literally. Grab your favorite outdoor-grade stain, paint, or clear sealant and give the wood the protection it deserves. Stain’s great for showing off that natural grain, while paint lets you match the structure to your home or garden. Whatever you go with, make sure it’s rated for exterior use so it holds up to sun, rain, and everything in between.
Now for the fun part—customizing it to make it yours. Add privacy screens, lattice panels, or even train some climbing vines to grow up the sides for a lush, green touch. Want to take it up a notch? Built-in planters or corner shelving can add both style and function. These little details are what turn a solid build into your own backyard showpiece—something that fits your space, your needs, and your personality.
If you want to get this project as a PDF file, with 1 full cut list and 1 full shopping list, check out the GET PDF PLANS button bellow.

This woodworking project was about DIY three legged cantilevered pergola plans. If you want to see more outdoor plans, check out the rest of our step by step projects and follow the instructions to obtain a professional result.
