This step by step diy project is about grape arbor plans free. Building a simple grape arbor is easy, if the right plans, materials and tools are used. Nevertheless, the real challenge of the woodworking project is to choose the right plans for you needs, as there are so many designs and styles you could choose from. Work with attention and with great care, if you want to get a professional result.
In mos of the cases, building a grape arbor doesn’t require a building permit, but we still recommend you to check the local building codes before starting the project on your own. Moreover, you should use quality materials (weather-resistant lumber: pine, cedar, redwood). Always pre-drill the components before inserting the screws, in order to prevent the wood from splitting. Align the components at both ends and level them with a spirit level. See all my Premium Plans HERE.
Projects made from these plans
Cut & Shopping Lists
- A – 4 pieces of 4×4 lumber 96” long WOODEN POSTS
- B – 4 pieces of 2×6 lumber 120” long SUPPORT BEAMS
- C – 11 pieces of 2×6 lumber – 83″ long SHADE ELEMENTS
- 7″ carriage bolt
- 5″ screws
- 4×4 post anchor
- 2 1/2″ screws
- 1 5/8″ screws
- wood filler
- wood glue
- wood stain
Tools
![]() Hammer, Tape measure, Framing square
Hammer, Tape measure, Framing square
![]() Power mixer, Miter saw, Drill machinery, Screwdriver, Sander
Power mixer, Miter saw, Drill machinery, Screwdriver, Sander
Time
Building a grape arbor
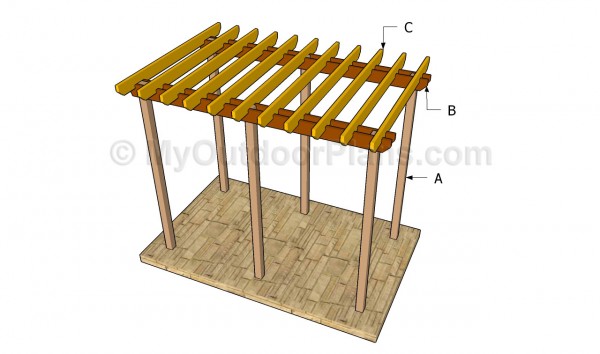
Building a grape arbor
If you want to build a simple grape arbor in your garden, you should know there are many plans you could choose from. We strongly recommend you to check out the rest of our pergola plans and select the option that satisfy your needs.
Grape Arbor Plans Free
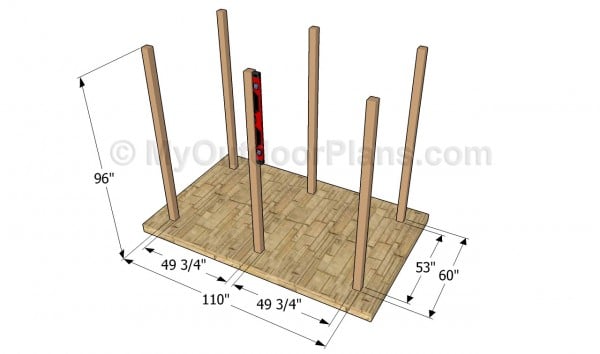
Attaching the posts
The first step of the woodworking project is to lay out the outline of the grape arbor. As you can notice in the image, you need to make sure the diagonals of the arbor are equal and the posts are equally-spaced.
We recommend you to use batter boards and string, if you want to get a professional result. In addition, make sure the corners are right-angled, by applying the 3-4-5 rule to each corner.
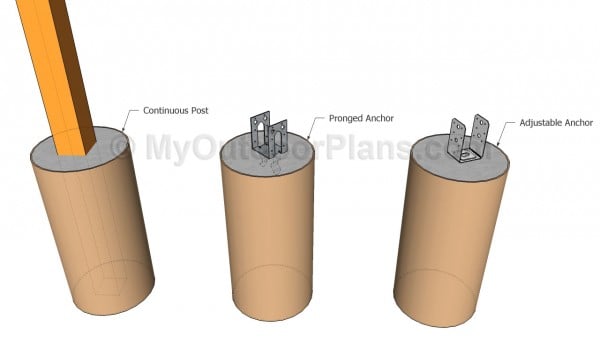
Anchoring the posts of the anchor
Decide the anchoring system of the posts. There are many options, starting with fitting the posts directly into concrete, up to pouring concrete footings and placing a post anchors, or securing metal braces to a concrete slab.
Setting the posts into concrete (2-3 deep footings) is the best choice, if you want to provide support to your construction. Work with attention and with great care, as to prevent costly mistakes.
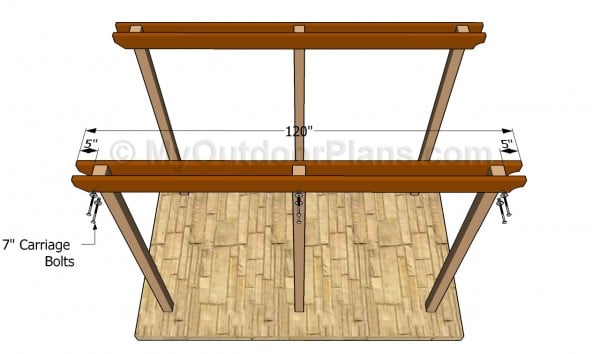
Attaching the support beams
Attach the support beams to the top of the wooden posts, as in the image. In order to get a professional result, we recommend you to build the beams out of 2×6 lumber and to cut the ends in a decorative manner. Secure the beams to the posts with C-claps, after making sure they are perfectly level.
Drill pilot holes trough the components and insert 7″ carriage bolts. Make sure you don’t over-tighten the nuts, to prevent the wood from splitting.
Building the crossbeams
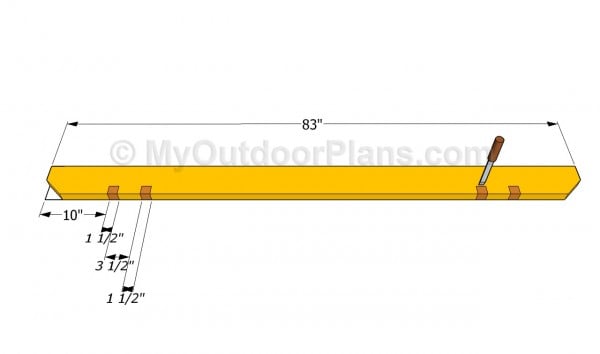
The next step of the woodworking project is to install the crossbeams. The fist step of the process is to cut the ends of the shade elements in an unique manner, as well as to cut out the small notches.
Top Tip: Mark the notches and make several parallel cuts inside the marked area with a circular saw. Next, clean the recess by using a chisel and a piece of sandpaper.
Attaching the shade elements
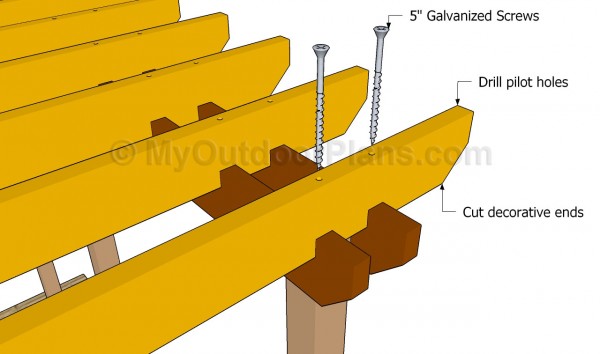
Fit the rafters into place, making sure they are aligned at both ends. Next, drill pilot holes trough the shade elements and lock them to the supports beams with 5″ galvanized screws.
Top Tip: Work with attention and with great care, in order to prevent costly mistakes. Use a spirit level to make sure the rafters are plumb and perfectly horizontal. In addition, countersink the head of the screws.

Installing the shade elements
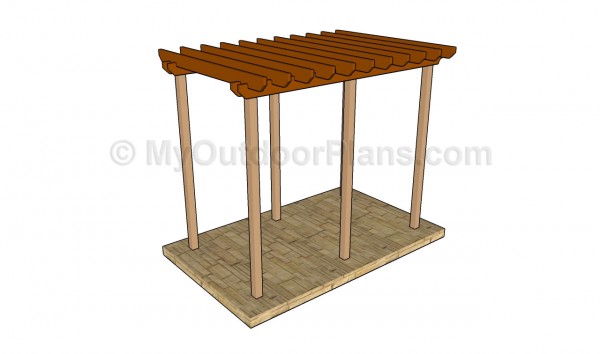
It is essential to place the rafters equally spaced, if you want to get a symmetrical appearance for your grape arbor. In addition, you should adjust the size of the shade elements to your needs.
Top Tip: In our plans the rafters overhang 10″ on both sides of the arbor, but you can adjust its size according to your needs. Work with attention and use the best quality lumber you afford, as to get the job done as a professional.
Grape arbor plans free
Afterwards, you have to fill the gaps and the holes with a good wood putty. Let the compound to dry out properly, before sanding the whole wooden components, along the wood grain, with 120-grit sandpaper.
Top Tip: Apply several coats of wood stain, in order to enhance the look of the diy pergola plans and to protect the lumber from water damage. Build a small patio using traditional materials and set a table with several chairs.
This woodworking project is about patio pergola plans. If you want to see more outdoor plans, we recommend you to check out the rest of our step by step projects.

1 comment
Im looking to build a multiuse grape arbor